background image

Manual PIDM01 

 
MA 1311-A001 EN


18


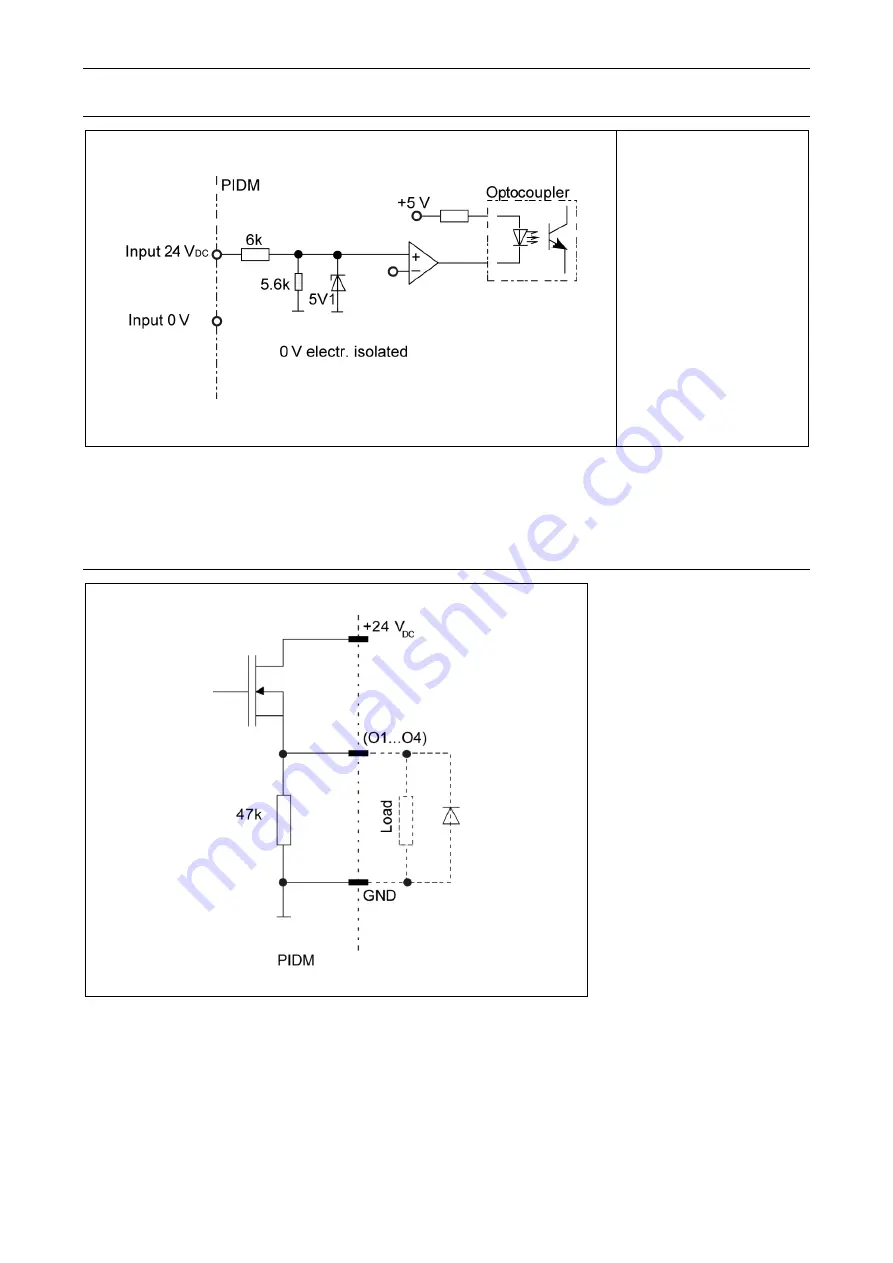
5.2.3  Input Wiring 


Switching threshold 

2.4 V 

Fig. 3:  Input wiring  


5.2.4  Output Wiring 


Fig. 4:  Output wiring  

i


CAUTION 

– Possible damage! 

Damage of the module because of incorrect connection. 

-  Do not swap the 4-pin connector for the four inputs with the 4-pin 

connector for the outputs. 

Summary of Contents for phyMOTION PIDM01.1

Page 1: ...phytron 8 2019 Manual MA 1311 A001 EN phyMOTIONTM PID Controller Module PIDM01 1 Firmware Version V1 0 1 Loader V1 0 5 System TRANSLATION OF THE ORIGINAL GERMAN MANUAL...

Page 2: ...are the descriptions of the features and specifications for the phyMOTIONTM stepper motor controller Every possible care has been taken to ensure the accuracy of this technical manual All information...

Page 3: ...Indicates a high risk of serious injury or death from electric shock WARNING Serious injury possible Indicates a possible risk of serious injury or death WARNING Serious injury from electric shock In...

Page 4: ...tallation and operation of systems may only be performed by qualified and trained personnel These persons should be able to recognize and handle risks emerging from electrical mechanical or electronic...

Page 5: ...risk of dangerous voltages may be on the device Touching these components carrying high voltages can cause serious injury or death from electric shock Always observe the safety concept SELV PELV to e...

Page 6: ...ctors Overview 16 5 2 2 Pin Assignment 17 5 2 3 Input Wiring 18 5 2 4 Output Wiring 18 5 2 5 Measuring Inputs for Temperature Sensors 19 6 PID Control 21 6 1 Terms for PID Control 22 6 2 Temperature C...

Page 7: ...nt PID controller with PWM output Fig 1 PIDM01 front view of the panel Inputs and outputs 4 analogue measuring inputs for Pt100 sensor or thermocouple type K 4 digital inputs 24 VDC 4 digital outputs...

Page 8: ...Manual PIDM01 MA 1311 A001 EN 8 4 Technical Data 4 1 Declaration of Conformity...

Page 9: ...phytron 9 MA 1311 A001 EN...

Page 10: ...001 EN 10 4 2 Mechanical Data Dimension 100 x 100 mm without front panel Weight 56 g without and 79 g with front panel Mounting Plug in module into the modular stepper motor controller phyMOTIONTM Mou...

Page 11: ...mplete PIDM01 module if it is supplied directly to the PIDM01 module 5 VDC internal 30 mA per temperature module 10 mA 24 VDC I O Cable length digital inputs 30 m if longer 100 m max use shielded cabl...

Page 12: ...erload protection Switching frequency max 1 kHz 24 VDC supply 24 VDC internal and 2 A max at the central supply via the delivering modules POWM 30 VDC external and 4 A max when delivered directly to t...

Page 13: ...hermocouple type K digital inputs 24 VDC digital outputs 24 VDC max 1 A internal 24 VDC supply to the inputs and outputs when centrally delivered from the supply modules POWM external 24 VDC supply of...

Page 14: ...expansion module or after repair or service unpack the module in ESD protected area only CAUTION Possible damage The modules of the phyMOTIONTM consist of sensitive electronic components that can be d...

Page 15: ...after power off to allow the capacitors to discharge and ensure that there are no residual charges on cables connectors and boards Make sure not to leave free slots in between modules so the module ad...

Page 16: ...he last step is to plug in the power supply to the mains 5 2 1 Connectors Overview Connector Number of pins Connector on the module Phoenix Mating connector Phoenix Mating connector ID number I O 2x4...

Page 17: ...phytron 17 MA 1311 A001 EN 5 2 2 Pin Assignment Here is the pin assignment of the PIDM01 Fig 2 Pin assignment For wiring use the above defined mating connectors please...

Page 18: ...itching threshold 2 4 V Fig 3 Input wiring 5 2 4 Output Wiring Fig 4 Output wiring i CAUTION Possible damage Damage of the module because of incorrect connection Do not swap the 4 pin connector for th...

Page 19: ...ure sensors mounted outside the motor housing The temperature is measured all the time even if only one motor phase is powered at any one time Thermocouple type K With the Type K NiCr Ni in vacuum and...

Page 20: ...tion and thus a damage of the motor or other system components by overheating Pt100 Resistor Sensor Pt100 resistor sensors are used with in vacuum and cryo stepper motors in the temperature range 200...

Page 21: ...al and a differential controller work together The p component Kp ensures a fast response the i component Ki can completely compensate for the control deviation and the d component Kd enables fast rea...

Page 22: ...variable that is not influenced by the control and is supplied from the outside Controlled variable actual value x Controlled variable is the output variable of the controlled system that is recorded...

Page 23: ...phytron 23 MA 1311 A001 EN 6 2 Temperature Control Example Fig 10 Temperature control via Pt100 temperature sensor...

Page 24: ...5535 Controller component i Ki i component in 1 100 of the PWM measuring module ADMm nI 0 to 65535 Controller component d Kd d component in 1 100 of the PWM measuring module ADMm nD 0 to 65535 PWM fre...

Page 25: ...y Manipulated variable PWM 0 to 100 Ta Sampling time 100 ms Kp Gain factor proportional Ki Gain factor integral Kd Gain factor derivative A scaling factor of 100 is stored for the i component and d co...

Page 26: ...pporting manual phyLOGICTM ToolBox Communication Software for the phyMOTIONTM Stepper Motor Controller For programming the sequential program please read Further manual Detailed information on this su...

Page 27: ...y colours and blinking Fig 11 Status LEDs LEDs Status I O top left top right off No power supply connected I Os not active green Isolated supply ok ok Output O1 to O4 active red Flashing slowly 2 Hz m...

Page 28: ...motor For a general overview of the parameters Further manual Detailed information on this subject is in a supporting manual phyLOGICTM Command Reference for the phyMOTIONTM Controller Information ab...

Page 29: ...oval of a module Switch off the phyMOTION s supply voltage Disconnect the supply voltage Loosen the screw on top and the screw on the bottom of the module s front plate Pull the card carefully by the...

Page 30: ...hich show a failure due to defects in material or caused by the production process This warranty does not include damage caused by the customer for example not intended use unauthorized modifications...

Page 31: ...t wiring 18 Installation 16 Intended use 5 L LED 27 M Mating connector 16 MCM 7 14 O Output wiring 18 P PID control 21 Pin assignment 17 Progamming environment 12 Programming 24 26 Pt sensor 20 S Safe...

Reviews: