background image

Receiver Setup

Neck loop and T/MT function on HA

In order to use HearIt All with hearing aids in T-position (telecoil), the hearing 
aid must be equipped with a telecoil fitted by the hearing care professionel.

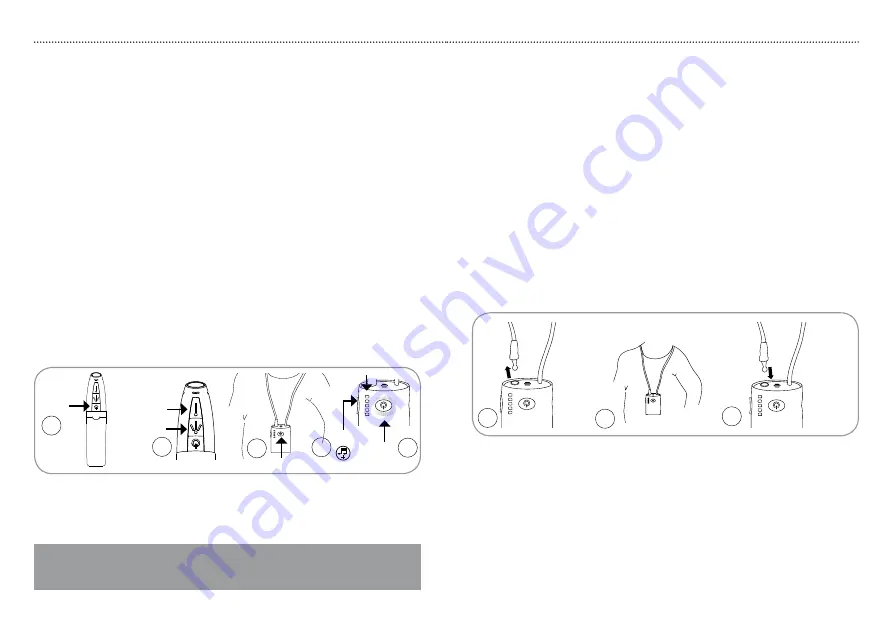
Installing neck loop

1.  Detach neck loop 

R10

 from receiver jack 

R9 

by pulling the loop wire.

2.  Place receiver on the chest and place loop wire around the neck.
3.  Reattach neck loop 

R10

 to receiver jack 

R9

.

4.  Switch hearing aid to T (telecoil only) or MT (microphone and telecoil 

simultaneously) position.

Wireless setup for communication

Establishing wireless connection between the HearIt All  
transmitter and receiver

1.  Turn on the transmitter by a single short push to transmitter button 

T1

.

2.  Hold the transmitter in your hand and place the receiver around the neck.
3.  Choose between omni or directional microphone setting by a single short 

push to either transmitter button 

T2

 or 

T3

.

4.  Turn on the receiver by pressing the receiver button 

R1

 for up to five 

seconds.

5.  If sound is not immediately available, press the receiver button 

R2+


(volume up) for 5 seconds.

6.  Once a connection has been established receiver indicator 

R1

 turns 

white.

 If the connection is lost due to battery out, out of range or power off repeat 
steps 5 and 6. The indicator 

R7

 blinks white if the transmitter is off or out of 

range. 

Setup

Setup

R9

R9

2

3

1

15

14

Important!

Charge receiver and transmitter before use. (See page 17)

T3

T2

T1

R1

1

4

3

6

5

R2+

R1

R7

During TV listening and communication the receiver indicator

 R1

 will 

illuminate white to show that the wireless connection is active.

Please note:

Connecting headphones to the headphones jack 

• 

R8

 disconnects the 

signal to the neck loop.

Summary of Contents for hearlt all

Page 1: ...Manufactured by 2008 Phonic Ear A S To find your local supplier visit www phonicear com UK US user guide Kongebakken 9 2765 Sm rum Denmark Phone 45 3917 7101 Fax 45 3927 7900 E mail mail phonicear com...

Page 2: ...ss setup for mobile telephones 12 Wireless setup for televisions 13 Wireless setup for communication 14 Receiver setup 15 Operation 16 Indicators 16 Charging 17 Listening to the television 19 Communic...

Page 3: ...phono 6 mm jack to 3 5 mm mini jack Connector set Zip case Bag with carrying strap Headphones Extra power supply for e g travel ling Wrist strap and neck strap Screwdriver The HearIt All system consi...

Page 4: ...g button WDA and Bluetooth indicator R2 Volume button up down R3 Bluetooth and volume level 1 indicator R4 Volume level 2 indicator R5 Battery and volume level 3 indicator R6 Volume level 4 indicator...

Page 5: ...eless connection between the charger and the receiver has been established C8 C9 Please note Most televisions disconnect speakers when attaching a jack to the headphone output Some flat screen televis...

Page 6: ...ops PC s printers headsets etc WDA Wireless Digital Audio Is a way of connecting and exchanging information between WDA enabled devices such as the HearIt All charger and receiver Please note Once the...

Page 7: ...urn on the television 4 Turn on the receiver by pressing receiver button R1 for up to five seconds 5 If sound is not immediately available press the receiver button R2 volume up for 5 seconds 6 Once t...

Page 8: ...nd place the receiver around the neck 3 Choose between omni or directional microphone setting by a single short push to either transmitter button T2 or T3 4 Turn on the receiver by pressing the receiv...

Page 9: ...T1 or receiver indicator R5 flash red during operation or units do not turn on when desired it is time to charge the transmitter and or receiver You can charge each unit separately or charge both at...

Page 10: ...eceiver button R1 for up to five seconds 3 Place the transmitter firmly in the charger 4 Turn on the transmitter by a single short push to transmitter button T1 5 Transmitter indicators T2 and T3 will...

Page 11: ...nd receiver off make a single push to transmitter button T1 and hold down receiver button R1 Please note If no sound is audible press button R2 volume up for 5 seconds to activate the wireless connect...

Page 12: ...ter the desired telephone number 5 To end the call press receiver button R1 Please note Only make a single short push to accept or end a call It may take a couple of seconds before the call is complet...

Page 13: ...king blue 2 Press receiver button R2 volume down for 5 seconds to reject the call R1 R2 2 1 Please note It is not possible to reject calls from the landline telephone using this procedure Advanced ope...

Page 14: ...R6 Green light Volume level 4 R7 White blink WDA connection lost Green light Volume level 5 Quick list of functions Button diode jack Function R8 Jack for headphones R9 Jack for neck loop R10 Neck lo...

Page 15: ...he exclusive remedy under this warranty is strictly limited to repair or replacement as herein provided 6 Products damaged in transit unless investigated by the shipper and returned to the warrantor w...

Page 16: ...household Please contact your local authority for further information How to remove batteries Transmitter 1 Remove screw in the black clip on the rear side 2 Pull top part and bottom part apart by pul...

Page 17: ...ult a doctor if you experience any side effects Use on Aircrafts The HearIt All should not be used on board on aircrafts unless specifically permitted by the flight personnel Implantable devices HearI...

Page 18: ...ce received including interference that may cause undesired operation Changes or modifications not expressly approved by Phonic Ear could void the user s authority to operate the equipment NOTE This e...

Page 19: ...34 36 37...

Page 20: ...38...

Reviews: