Description of Functions
The charge controller protects the battery from being overcharged by the solar array. The
charging characteristics include several stages which comprise automatic adaptation to
the battery temperature.
The charge controller adjusts itself automatically to 12 V or 24 V system voltage.
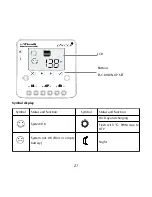
The controller provides a user friendly LCD, programmable parameters and various safety
functions.
Connecting and Grounding
The controller is intended for indoor use only. Protect it from direct sunlight and place it in a dry
environment. Never install it in humid rooms (like bathrooms). The controller warms up during
operation, and should therefore be installed on a non flammable surface only.
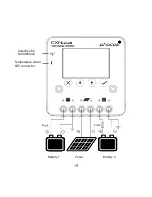
Connect the controller by following the steps described below to avoid installation faults.
Observe the following connection sequence when installing the system:
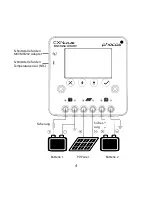
1. Connect the battery 1 to the charge controller – plus and minus.
2. Connect the battery 2 to the charge controller – plus and minus.
3. Connect the photovoltaic modules to the charge controller – plus and minus.
Follow the reverse procedure when uninstalling!
To avoid any voltage on the wires, first connect the wire to the controller, then to the
battery and to the photovoltaic modules.
Recommended minimum wire size: 6 mm²
Make sure the wire length between battery and controller is as short as possible.
Be aware that all negative connections of the CXNup 2B controller are common and
therefore have the same electrical potential. If any grounding is required, always do this on
the negative wire.
REMARK:
Mind the recommendations of your battery manufacturer. We strongly recommend
connecting a fuse directly to the battery to protect any short circuit at the battery wiring. The
fuse must correspond to the nominal current of the charge controller: 30A for CXNup 2B.
18
Summary of Contents for CXNup 2B
Page 12: ...10...
Page 21: ...Battery 1 Panel Battery 2 19 Interface for MXI MXI232 Temperature sensor NTC connector...
Page 27: ...25...
Page 42: ...40...
Page 57: ...55...
Page 72: ...70...
Page 78: ...CXNup 2B LCD PWM MXI MXI232 CXNup 2B GEL AGM LiFePO4 12 24 V 1 5 LiFePO4 BMS 76...
Page 79: ...CE CE 12 V 24 V 77...
Page 80: ...1 1 2 2 3 6 mm CXNup 2B 1 5 30 A 78...
Page 81: ...1 2 79 NTC MXI MXI232...
Page 82: ...12 V 24 V 18 V 24 V LCD 80...
Page 83: ...C PWM 81 LCD ESC DOWN UP SET...
Page 84: ...SET DOWN UP 1 1 1 2 2 2 2 90 70 90 30 70 10 30 0 10 0 82...
Page 85: ...83 1 2 1...
Page 87: ...85...
Page 89: ...NTC CXNup 2B C Err NTC 87...
Page 90: ...15 5 31 0 V 88...

