background image

Philips continuously strives to improve its products. Due to software upgrading, some contents in this user guide
may be different from your product. Philips reserves the rights to revise this user guide or withdraw it at any
time without prior notice.  Please take your product as standard.

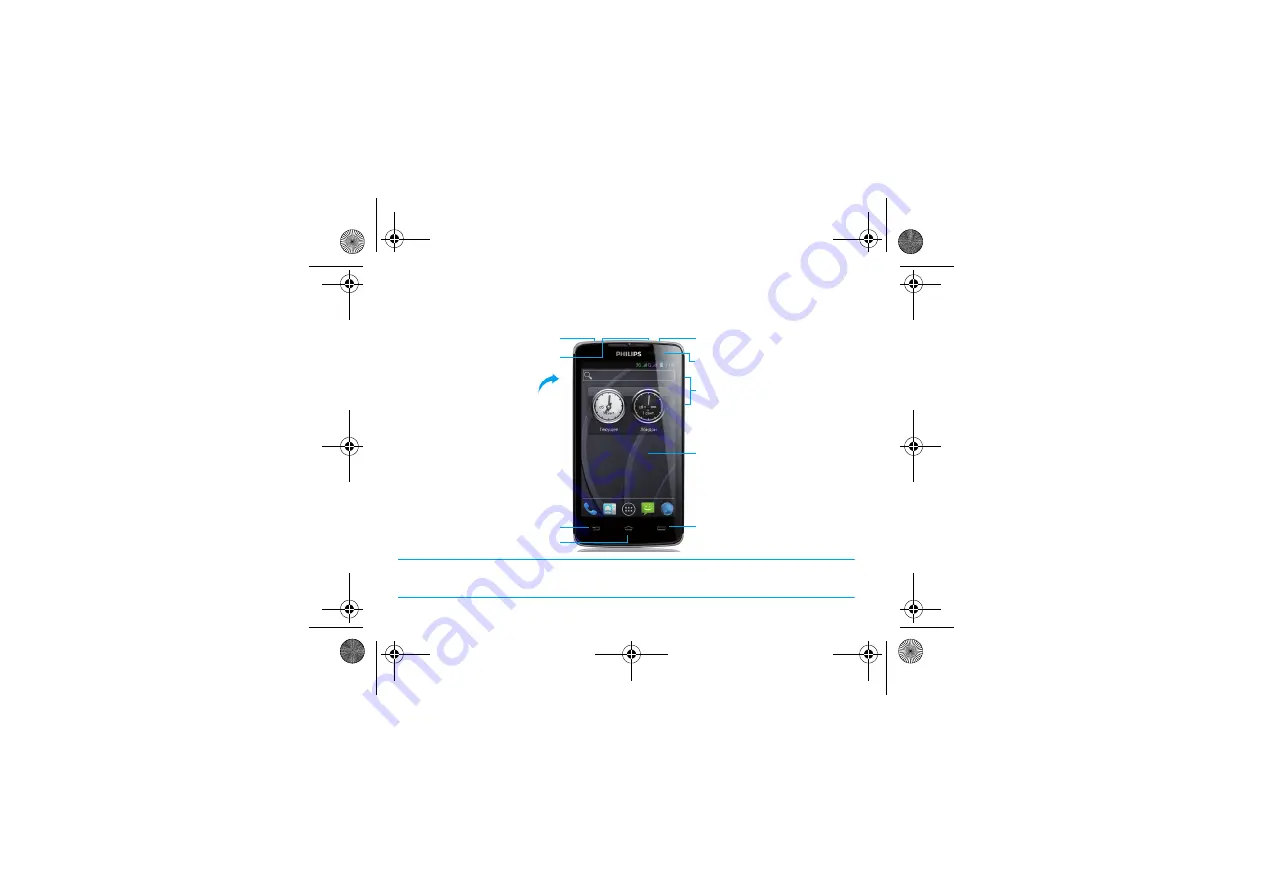
Touch screen

Option key

Side volume key

Back key

Headphone jack

Home key

Power key /Lock key

Front  camera lens

Charger/Micro USBport connector

Back of phone:

5.0MP  Auto focus

camera lens

Your phone

W732_ENG_Book.book  Page 0  Thursday, August 16, 2012  5:40 PM

Summary of Contents for W732

Page 1: ...ights to revise this user guide or withdraw it at any time without prior notice Please take your product as standard Touch screen Option key Side volume key Back key Headphone jack Home key Power key Lock key Front camera lens Charger Micro USBport connector Back of phone 5 0MP Auto focus camera lens Your phone W732_ENG_Book book Page 0 Thursday August 16 2012 5 40 PM ...

Page 2: ...nction P Power Press and hold to power on off Press to turn on off the screen display Hold to access the Phone options choose Silent or Airplane mode M Home key Press to return to the home screen Hold to open the list of recent applications O Option key Open a list of options available on the current screen On the home screen open the Wallpaper Manage applications and System settings B Back key Re...

Page 3: ...nch them together In some apps like web browser youcan pinch the screen using twofingers for example thumb and indexfinger to zoom in or zoom out whenviewing a picture or a web pages Function Operation Add items Tap to enter into menu screen or widgets tap and hold an item and then drag it to home screen Move items Tap and hold an item and then drag it to a new location Remove items Tap and hold a...

Page 4: ... slide your finger horizontally to the left and right to check each one Tap M to return to the center home screen You can add your favorite applications shortcuts and widgets so they re always just a tap away Your phone s home screen consists of the following areas Status Bar Shortcut icons Search input window Widgets and applications Menu key Tap to enter into applicaions W732_ENG_Book book Page ...

Page 5: ...ess and hold the status bar then slide your finger downward If you have several notifications you can scroll down the screen to see them all To hide the panel drag the bottom of the panel upwards Using Quick Settings tab The Quick Settings tab lets you easily turn on Wi Fi Bluetooth GPS and more and also provides a quick shortcut to change the mode and set the brightness timeout auto rotation if s...

Page 6: ... the reception is Your phone is connected to network Downloading data Uploading data Call in progress You have a missed call New SMS or MMS The bars indicate the battery level WLAN activated Connected to PC Bluetooth is activated The headset is plugged into the phone The alarm clock is activated Indicates the memory card is in use Error occurred or caution required FM radio turned on in the backgr...

Page 7: ...endar 26 Alarm 26 File management 27 Calculator 27 Connections 28 Bluetooth 28 Wi Fi 28 VPN 29 Mobile network sharing 29 Internet 30 PC connections 31 Sync 31 Settings 32 Wireless Networks 32 Device 33 Personal 33 System 34 Safety Precaution 35 Precaution 35 Tips 36 Troubleshooting 36 Trademark Declaration 38 Specific Absorption Rate Information 38 Declaration of Conformity 39 Советы и рекомендаци...

Page 8: ...www philips com support Note Please read the safety instructions in the Safety Precaution section before use Assembling and Charge Learn about installing USIM or SIMcard and charging the battery for the first use Insert SIM card Follow the steps below to insert your USIM or SIM card Remember to turn off your mobile phone before removing the back cover 1 Remove the back cover 2 Take out the battery...

Page 9: ...on the default settings of your phone it will connect 3G network by SIM1 directly Also you can enter into Settings Wireless and networks Mobile networks 3G service to get your personal settings 4 Install the battery 5 Replace the back cover W732_ENG_Book book Page 8 Thursday August 16 2012 5 40 PM ...

Page 10: ... use your phone for several days we recommend that you remove the battery If a fully charged battery left unused it will lost its charge over time If a battery is being used for the first time or the battery has not been used for a prolonged period it may take longer time to recharge Insert a Micro SD card Memory card Insert a memory card You can expand the memory of your phone and store more addi...

Page 11: ...nt corrupting or damaging the files in the memory card Format the memory card Formatting your memory card on a PC may cause incompatibilities with your device Format the memory card only on the device In Idle screen select O Settings Storage Erase SD card Note Before formatting the memory card remember to make backup copies of all important data stored on your device The manufacturer s warranty do...

Page 12: ...elect O Settings Personal Security Screen lock None Disable the screen lock Slide Choose slide to unlock the screen Pattern Draw a pattern to unlock the screen PIN Unlock the screen by enter the PIN code Password Creat your private password to unlock the screen Lock your SIM or USIM card You can lock your phone with the PIN that is supplied with your SIM or USIM card 1 In the application list sele...

Page 13: ...tically switch to landscape view To set the interface to keep the orientation when you rotate the device select Settings Display Auto rotate screen Download applications from Android Market Based on the Android platform your device s functionality can be extended by installing additional applications Android Market provides you an easy and quick way to shop for games and mobile applications 1 Inst...

Page 14: ...eted your device stays connected to the web If any change is made on the web the updated information will appear on your device and will automatically begin synchronisation and vice versa Tips This feature may be unavailable depending on your region or service provider 2 Set up a server account In Idle mode open the application list and select Settings Accounts sync Select Add account an account t...

Page 15: ...ally In Idle mode open the application list and select Settings Accounts sync Select an account Select Sync now Your device will start synchronising the data you set for synchronisation W732_ENG_Book book Page 14 Thursday August 16 2012 5 40 PM ...

Page 16: ...e person s name you want to call Smart dial automatically searches and filters your stored contacts and the phone numbers from the call history Note For international calls long press 0 to enter the sign for the international prefix It is illegal in many areas to record a call without permission Always ask the other party for permission before recording a call Answer Reject a call 1 During an inco...

Page 17: ...If you ve enabled but forgot your lock password or lock pattern you can still make emergency calls by tapping Emergency call on the screen Messages You can use your phone to send text message and multimedia messages Send a message 1 In the application list tap 2 Tap New message 3 Enter the number or tap to select the number from phonebook 4 Select the text field and enter your message text 5 Press...

Page 18: ...dd an attachement Tap to send the mail or save it as a draft or press B to discard the message Email Learn to send or view email messages via your personal or company email account Set up an email account 1 On the home screen tap 2 Enter your email address and password 3 Select Manual setup and choose POP3 IMAP Exchange and then tap Next 4 If the account type you want to set up is not in the phone...

Page 19: ...select To move the message to another folder press O Move To delete the message select To reply to the message select To forward the message to others select Forward To search one mail select To update the message list select Manage your phonebook Learn about basic phonebook function Add a new contact 1 Tap to enter the Contacts 2 Tap and select a memory location 3 Add phone number and details as ...

Page 20: ... 4 Tap Done You can send your namecard to others or share it by pressing O and selecting Share Create a group of contacts By creating groups of contacts you can manage multiplecontacts and send a message to an entire group 1 In the application list tap 2 Tap and select a memory location 3 Enter a name and customise the settings for the group 4 Add members to the group 5 Tap Done Import Export your...

Page 21: ...elete Delete the music from playlist Sound effects Select a sound effect Library Return to music category Note When listening to music adjust the volume to a moderate level Continuous exposure to high volume may impair your hearing Function Definition Paly and resume playback Pause the playback Select previous track Select next track Select the play mode Repeat once play current file repeatedly Re...

Page 22: ... camera lens and take the first photo 4 Slowly move the device in any direction and align the green frame with the viewfinder When you have aligned the green frame and viewfinder the camera will automatically take the next photo 5 Repeat step 4 to complete the panoramic photo Capture a photo of action You can capture shots of a moving subject and then combine them into a single photo that shows th...

Page 23: ... access the following options Slide show To start a slide show Edit To edit the photo with the image editor Print To print the photo via Wi Fi or USB Rotate right To rotate the photo clockwise Rotate left To rotate the photo anti clockwise Copy to clipboard To add the photo to the clipboard Set picture as To set the photo as your wallpaper or a contact image Record a video 1 Tap to turn on the cam...

Page 24: ...lect the proper mode for your shooting conditions and subjects Face beauty Hide facial imperfections Smile shot Set the device to recognise people s faces and help you take photos of them when they smile Best shot Select the best mode for your shooting EV bracket shot Adjust the exposure value for your shooting 4 shots Continuous shooting function 8 shots Continuous shooting function 16 shots Cont...

Page 25: ...n or blur the borders between objects Hue Adjust the Hue level Saturation Make colors more or less pronounced Brightness Adjust the brightness level Contrast Adjust the contrast Picture size Select the size of picture ISO Set the ISO level manually AE meter Select Spot Center weighted or Average mode Anti flicker Reduce blur caused by the device s vibration or movement Restore defaults Restore to ...

Page 26: ...FM radio To listen to the FM radio you must connect a headset which serves as the radio antenna Listen to the FM radio 1 Plug a headset into your phone 2 Tap to enter into FM radio 3 Tap Search The FM radio scans and saves available stations automatically 4 Tap to previous next available FM station 5 Tap to tune the radio frequency by 0 1 MHz 6 Tap to turn on the Speaker 7 Tap Exit to turn off the...

Page 27: ...or a specific period Create an event 1 In the application list tap 2 Tap O New event 3 Enter the details of the event and select Done Alarm Learn about how to set and use an alarm You can set up to five alarms Set an alarm 1 In application list tap 2 Select Add alarm and set the details of the alarm 3 Tap OK to finish setting the alarm Turn on an alarm 1 Go to Alarm 2 Select the alarm you want to ...

Page 28: ...u can copy move or delete a file in a folder Open a file tap to create a new folder Tap select the file or folder Tap copy the file Tap paste cut rename the file Tap delete files Search 1 In the application list tap 2 Enter a keyword and select 3 Select a search result Calculator Learn to perform calculations with your phone Use the keys on the screen to perform basic calculations Scroll the scree...

Page 29: ... 4 On the receiving device accept the file Note Some devices especially headsets or hands free car kits may have a fixed Bluetooth PIN such as 0000 If the other device has a PIN you must enter it Received data is saved to the bluetooth folder If you receive a contact it is automatically saved to the phonebook Send data via Bluetooth 1 Select a file or item such as a contact calendar event memo or ...

Page 30: ...PN server and select a VPN type 3 Change the options as required 4 When you are finished select Save Tips The options available may vary depending on the VPN type Your device should already be configured with Internet access If you have trouble accessing the Internet you must edit the connections If you are not sure what information to enter ask your VPN administrator To use this feature you must ...

Page 31: ... a USB cable connect the multifunction jack on your device to a PC 2 In the application list select Settings Wireless and network Tethering portable hotspot 3 Select USB tethering to activate the USB tethering feature Your device shares the mobile network connection on your PC 4 To stop sharing the network connection tap to turn off USB tethering Tips The sharing method for the network connection ...

Page 32: ...f the memory card by using the device as a memory card reader 4 Copy files from the PC to the memory card 5 When you are finished select Turn off USB storage Sync Tap Accounts sync to finish setting online account before sync Synchronizing with a Google Account 1 Tap Accounts sync Add account 2 Follow the onscreen instructions to sign in to an account or create a new account 3 If select Background...

Page 33: ...e Flight mode to disable all wireless functions on your device You can use only non network features VPN Set up and manage virtual private networks VPNs Tethering portable hotspot Set to use your device as a wireless modem by making a USB connection with a computer Set to use your device as a wireless access point for other devices Activate the Bluetooth tethering feature to share your mobile netw...

Page 34: ...ions to or from the storage card and install or uninstall programs Function Definition Account sync Change the settings for the auto sync feature or manage accounts for synchronisation Log in or out of your social network accounts Google Account and Exchange ActiveSync account Location services Select the sources to use when determining your location Security Set a screen lock or manage the creden...

Page 35: ... when you ve downloaded and installed anaccessibility tool such as a screen reader that provides voicefeedback You can turn accessibility functions or services on or off Developer options Change the settings for application development About phone View different information about the phone such as the battery legal information model number software version baseband version and build number W732_EN...

Page 36: ...ensibly For the optimal and satisfactory operation of the phone you are recommended to use the phone in the normal operating position Do not expose your phone to extreme temperatures Do not immerse the phone in any liquid if your phone is damp switch it off remove the battery and let them dry for 24hrs before using them again To clean the phone wipe it with a soft cloth In hot weather or after pro...

Page 37: ...he pacemaker to minimize the potential interference Switch off your phone if you suspect that interference is taking place Hearing aids If you are a user of a hearing aid consult your physician and hearing aid manufacturer to learn whether your particular device is susceptible to cellular phone interference How to prolong the battery life of your phone To have your mobile phone function properly s...

Page 38: ... if it is too large if its name is too long or if it doesn t have the correct file format You feel that you have missed some calls Check your call divert options When charging the battery icon shows no bar and the outline is flashing Only charge the battery in an environment where the temperature does not go below 0 C 32 F or above 50 C 113 F In other cases please contact your phone supplier The d...

Page 39: ... SAR have been conducted using recommended operating positions with the mobile phone transmitting at its highest certified power level in all tested frequency bands Although the SAR is determined at the highest certified power level the actual SAR levels of the mobile phone while operating are generally below the maximum SAR value This is because the phone is designed to operate at multiple power ...

Page 40: ...1 489 17 v2 1 1 ETSI EN 301 489 24 v1 5 1 Radio ETSI EN 301 511 v9 0 2 ETSI EN 301 908 1 v4 2 1 ETSI EN 301 908 2 v4 2 1 ETSI EN 300 328 v1 7 1 We hereby declare that all essential radio test suites have been carried out and that the above named product is in conformity to all the essential requirements of Directive 1999 5 EC The Conformity assessment procedure referred to in Article 10 and de tai...

Reviews: