background image

Preparing the remote control for
operation

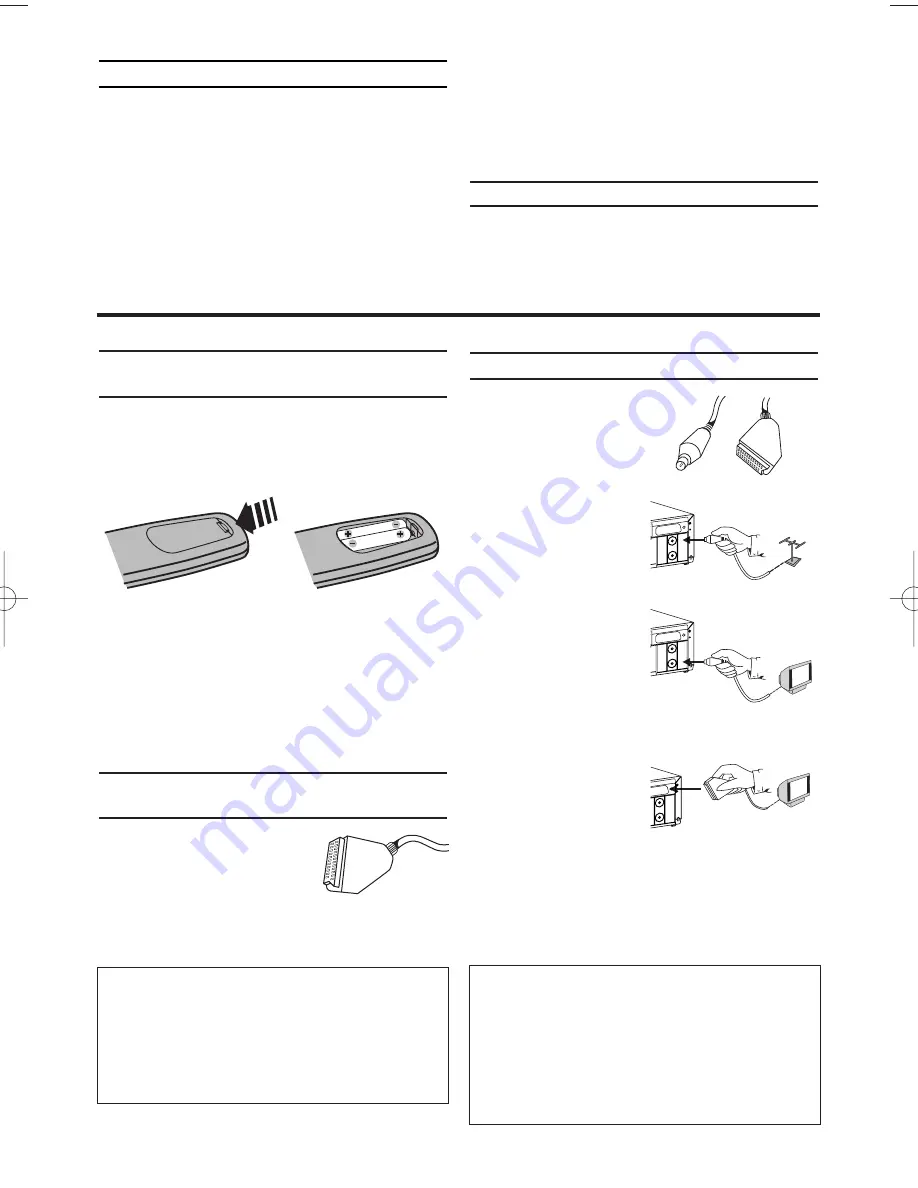
The remote control and its batteries are packed
separately in the original video recorder packag-
ing. You must install the batteries in the remote
control before use.

1.

1.

Take the remote control and the enclosed
batteries (2 batteries).

2.

2.

Open the remote control's battery compart-
ment and place the batteries in it as shown in
the picture and close the battery compart-
ment.

The remote control is now ready to use. Its
range is approximately 5 metres.

Connecting your video recorder to
the TV  set

The necessary cable connec-
tions must be made before
you can record or playback
TV programmes using your
video recorder.
We recommend that you use a scart cable to con-
nect your TV and video recorder.

Connecting with a scart cable 

Have the following
cables ready:
an aerial cable (1, sup-
plied), a scart cable (2,
not supplied).

1.

1.

Remove the aerial
cable plug from your
TV set. Insert it into
the AERIAL at the
back of the video
recorder.

2.

2.

Insert one end of the
supplied aerial cable
into the RF OUT at
the back of the video
recorder and the
other end into the
aerial input socket at
the back of the TV set.

3.

3.

Plug one end of a
scart cable into the
scart socket AV1(TV)
at the back of the
video recorder and the other end into the
suitable scart socket on your TV reserved for
the video recorder operation (see your TV's
operating instructions).

4.

4.

Switch on the TV.

5.

5.

Insert AC cable into the wall socket.

EN

Specifications

Voltage:

220-240V/50Hz

Power consumption :

20W

Power consumption (Standby):

less than 

3W (PWR. in the display switched off)

Rewind time:

approx. 70 seconds (cassette E-

180)

Dimensions in cm (WxDxH):

36.0x22.6x9.2

Number of video heads :

4

Number of video heads (HIFI):

2

Recording/playback time:

3 hours (SP) (cassette E-180)
6 hours (LP) (cassette E-180)

Supplied accessories

Operating instructions

Remote control and batteries

Aerial Cable

1. Connecting the video recorder

What is a scart cable?

The scart or Euro AV cable serves as the universal
connector for picture, sound and control signals.
With this type of connection, there is practically no
loss of quality during the picture or sound transfer.
*You can have the Hi-fi sound on the TV only
with a scart cable.

AERIAL

R F   O

U T

AV1  (TV)

A E R I A

L

RF OUT

R F   O

U T

AV1  (TV

)

A E R I A

L

AV1(TV)

R F   O

U T

AV1  (TV)

A E R I A

L

1

2

My TV has several scart sockets. Which one
should I use?

Select that scart socket which is suited for the
video output as well as for the video input.

My TV has a configuration menu for the
scart socket.

Please configure this scart socket as Input-
Output.

2

HE474ED(EN).QX3  03.2.22  5:47 PM  Page 2

Summary of Contents for VR540/58

Page 1: ...y there are some compo nents that are in constant operation To switch off the video recorder completely you must disconnect it from the power supply Make sure that air can circulate freely through the ventilation slots on the video recorder Do not place the device on an unsteady base Make sure that no objects or liquids enter the video recorder Do not place vases or the like on the video recorder ...

Page 2: ...the scart socket AV1 TV at the back of the video recorder and the other end into the suitable scart socket on your TV reserved for the video recorder operation see your TV s operating instructions 4 4 Switch on the TV 5 5 Insert AC cable into the wall socket EN Specifications Voltage 220 240V 50Hz Power consumption 20W Power consumption Standby less than 3W PWR in the display switched off Rewind t...

Page 3: ... next screen appears 7 7 Save this programme number setting on your TV for video recorder operation You can find more details in chapter Preparation for use Connecting additional devices You can connect additional devices such as decoders satellite receivers camcorders etc to the socket AV2 DECODER My screen is empty Many TVs are switched to the programme num ber for the scart socket by way of a c...

Page 4: ...STOP C L PLAY B K FWD 1 B STOP C L PLAY B K FWD 1 B STOP C L PLAY B K MENU 0 9 STOP C L PLAY B K STATUS EXIT 0 9 PROG P MENU STOP C L PLAY B K EN Aim correctly In the following sections you require the remote control for the first time When using always aim the front of the remote control at the video recorder and not at the TV Connecting additional devices After you have connected additional devi...

Page 5: ...rder and the TV are connected by a scart cable 1 1 Switch on the TV If required select the pro gramme number for the video recorder 2 2 Press The main menu will appear 3 3 Select TUNER SET UP with and confirm with 4 4 Select FOLLOW TV with or and confirm with 5 5 P 01 will appear in the video recorder display 6 6 Select programme number 1 on the TV FWD 1 B STOP C L PLAY B K FWD 1 B STOP C L PLAY B...

Page 6: ...h you may not agree with the sequence in which the individual TV channels have been allo cated to the programme positions programme numbers of the video recorder You can use this function to individually sort the TV channels already saved or to delete unwanted TV chan nels or those with poor reception 1 1 Switch on the TV set If required select the programme number for the video recorder 2 2 Press...

Page 7: ...el fre quency on the video recorder 1 1 Switch on the TV If required select the pro gramme number for the video recorder 2 2 Press The main menu will appear 3 3 Select INITIAL SET UP with or and confirm with 4 4 Select RF OUT with or and confirm with 5 5 Press 6 6 Press or to select a free not allocated channel between channel 22 and 69 in your area 7 7 Press 8 8 Select TV system with or 9 9 Choos...

Page 8: ...nd is switched off This is not a fault in your video recorder PLAY B K SLOW STILL 2 PLAY B K FWD 1 B REW0 s STOP EJECT STOP EJECT STOP C L PLAY B K REW FWD STOP PLAY EN 3 Playback DIGITAL STUDIO PICTURE CONTROL Philips has developed a system which produces the best possible playback quality For old and often used video cassettes this system reduces interference For new or high quality cassettes it...

Page 9: ...t Lining up recordings assemble cut When you add a further recording to a cassette which already has a recording on it a short blank flicker can appear between the old and the new recording or the picture itself can flicker To help reduce these from occurring proceed as follows 1 1 Find the tape position of the old recording where you want to insert the new recording 2 2 Look at the last minute of...

Page 10: ...rd With Direct Record you can record the right TV channel in seconds even if your video recorder is switched off If the recording is started manually the video recorder uses the current TV channel set on the TV You will find more information on how to switch Direct Record on or off in the next section Make sure that your video recorder socket AV1 TV and the TV are connected by a scart cable 1 1 On...

Page 11: ...stored in a TIMER block 8 8 Insert a cassette with an intact security tab unprotected 9 9 Switch off with The programmed recording will only function when the video recorder is switched off with STANDBY ON y y STANDBY ON y y STATUS EXIT 0 9 0 9 FWD 1 B STOP C L PLAY B K FWD 1 B STOP C L PLAY B K MENU EN 5 Programming a recording TIMER SELECT K L CHOOSE B ONCE DAILY WEEKLY TIMER LIST END EXIT Selec...

Page 12: ...elpful Hints STANDBY ON y y STATUS EXIT 0 9 STOP C L PLAY B K CLEAR 0 9 FWD 1 B STOP C L PLAY B K FWD 1 B STOP C L PLAY B K MENU STANDBY ON y y STATUS EXIT CLEAR FWD 1 B FWD 1 B STOP C L PLAY B K FWD 1 B STOP C L PLAY B K MENU ONCE TIMER 1 2 3 4 5 6 7 8 SELECT TIMER NUMBER END EXIT Error message will flash in the video recorder display No cassette was inserted Insert a cassette and switch off the ...

Page 13: ...TV screen to be solid blue when a weak signal is received set BLUE BACK GROUND to ON The screen will be blue and the sound will be muted Or if you want to receive the weak signal set BLUE BACK GROUND to OFF 1 1 Switch on the TV If required select the pro gramme number for the video recorder 2 2 Press The main menu will appear 3 3 Select VCR SET UP using and confrim with 4 4 Select BLUE BACKGROUND ...

Page 14: ...ving TV channels via the video recorder This allows you to select a desired language for multi language transmis sions 1 1 Press This will show the current sound setting 2 2 Press until the desired setting appears in the display AUDIO AUDIO STATUS EXIT FWD 1 B STOP C L PLAY B K FWD 1 B STOP C L PLAY B K MENU STATUS EXIT FWD 1 B STOP C L PLAY B K FWD 1 B STOP C L PLAY B K MENU SELECT K L CHOOSE B S...

Page 15: ...e found on the back of this instruction manual Have the model number MODEL NO and the production num ber PROD NO of your video recorder ready 7 Before you call an engineer If contrary to expectation you have any prob lems using this video recorder it may be caused by the following reasons Your video recorder does not respond to any button being pressed There is no power supply check the power supp...

Page 16: ...agh DUBLIN 14 Phone 01 7640292 PHILIPS CONSUMER ELECTRONICS Servizio Consumatori Via Casati 23 20052 Monza Milano ITALY Phone 800 820026 PHILIPS MAGYARORSZÁG KFT Fehérvári út 84 a Budapest 1119 HUNGARY Phone 01 382 1700 PHILIPS PORTUGUESA S A Consumer Information Centre Rua Dr António Loureiro Borge nr 5 Arquiparque Miraflores P 2795 L A VEHLA PORTUGAL Phone 021 4163063 PHILIPS CE The Philips Cent...

Reviews: