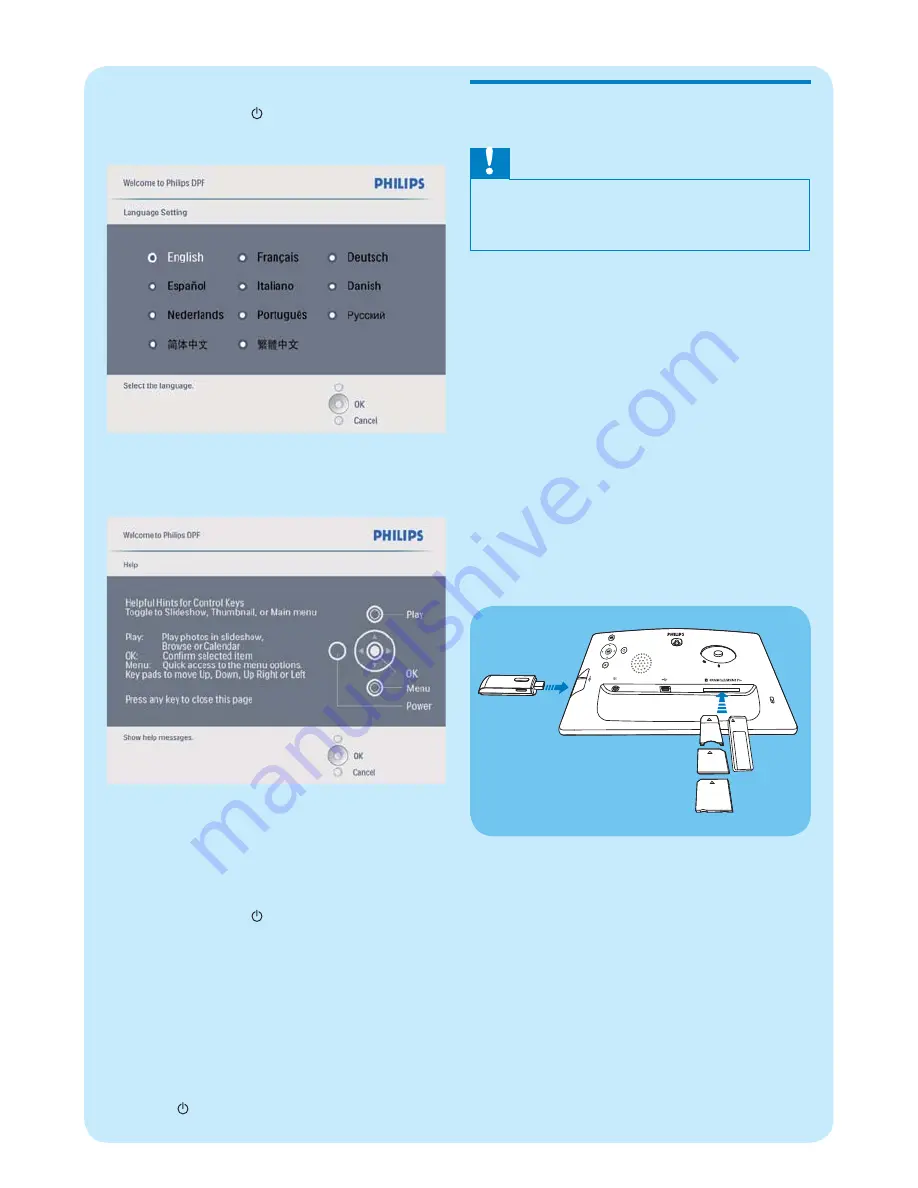
background image

For the 

fi

 rst time use

 :

    1

  Press and hold     for more than 1 second.

    The language setting menu is displayed.


»


      2

  Select a language, and press  

OK

  to con

fi

 rm.

    Help message for control keys is displayed.


»


      3

  Press any button to exit the help message.

    Photos are displayed in slideshow 


»

mode.


For other times

 :

    1

  Press and hold     for more than 1 second.

    Help message for control keys is 


»

displayed.

      2

  Press any button to exit the help 

message.

    Photos are displayed in slideshow 


»

mode.

        To turn off the PhotoFrame, press and 

• 

hold    .

       Connect a storage device

 Caution

 Do not remove a storage device from the 


PhotoFrame when 

fi

 les are transferring from or 

to the storage device.

  You can play photos, music or video in one of 
the following storage device which is connected 
to the PhotoFrame:

    Secure Digital (SD)

• 

    Secure Digital (SDHC)

• 

    Multimedia Card

• 

    Mul Card

• 

    xD card

• 

    Memory Stick

• 

    Memory Stick Pro (with adaptor)

• 

    USB memory drive

• 

  However, we do not guarantee the 
operations for all types of memory card 
media.

      1

  Insert a storage device 

fi

 rmly.


    Photos in the storage device are 


»

displayed in slideshow mode.

        To remove a storage device, pull it out 

• 

from the PhotoFrame.

Summary of Contents for SPF4008

Page 1: ...PhotoFrame 1 Get started Play Setup 2 3 SPF4008 SPF4208 EN Quick start guide ...

Page 2: ...al PhotoFrame AC power socket AC DC power adaptor AC Memory card USB Stand Computer CD ROM including Digital User Manual Philips PhotoFrame Manager Software and User Manual Quick Start Guide 1 2 3 Quick start guide Get started Play Setup Eng PhotoFrame ...

Page 3: ...tand to the back of the PhotoFrame 1 Insert the stand into the PhotoFrame 2 Position the indication on the stand to the position 3 Turn the stand anti clockwise 45 degrees to the position and lock it to the PhotoFrame firmly Connect power Note When you position the PhotoFrame ensure that the power plug and outlet are easily accessible 1 Connect the power cord to the DC socket of the PhotoFrame 2 C...

Page 4: ...urn off the PhotoFrame press and hold Connect a storage device Caution Do not remove a storage device from the PhotoFrame when files are transferring from or to the storage device You can play photos music or video in one of the following storage device which is connected to the PhotoFrame Secure Digital SD Secure Digital SDHC Multimedia Card Multimedia Card xD card Memory Stick Memory Stick Pro w...

Page 5: ...iles to your PhotoFrame and play 1 In the main menu select Video and then press OK to confirm 2 Select a source and then press OK to confirm 3 Select an album folder and then press OK to confirm To select files in a sub folder repeat step 3 4 Select a file to play To select all files press and hold OK 5 Press to start play During play To stop press and hold To pause press OK To resume press OK aga...

Page 6: ... OK again To stop press To select the next previous file press To adjust volume press To mute play press and hold until the icon is displayed To change repeat mode press repeatedly Play background music 1 In the main menu select Music and then press OK to confirm 2 Select a source and then press OK to confirm 3 Select an album folder and then press OK to confirm To select files in a sub folder rep...

Page 7: ...ollage base on the optimal layout of photos and displays the collages in slideshow mode 3 Setup Select on screen language 1 In the main menu select Setup and then press OK to confirm 2 Select Language and then press OK to confirm 3 Select Language Setting and then press OK to confirm 4 Select a language and then press OK to confirm Select photo background You can select a background border color f...

Page 8: ...thout black bars or aspect ratio distortion Set time and date 1 In the main menu select Setup and then press OK to confirm 2 Select Time and Date and then press OK to confirm 3 Select Set time Set date and then press OK to confirm 4 Press and OK to enter the current time date and then press OK to confirm Set an event reminder You can create a reminder for a special event and you can also select a ...

Page 9: ...and date of the PhotoFrame before you set time and date for an event reminder 1 In the main menu select Setup and then press OK to confirm 2 Select Event Reminder and then press OK to confirm 3 Select a reminder and then press OK to confirm 4 Select Set time Set date and then press OK to confirm 5 Press and OK to set the time date and then press OK to confirm Tip When the reminder alerts you can p...

Page 10: ...irm Set display auto on off by time You can configure the time for the PhotoFrame to turn on or off the display automatically Note Ensure that you set the current time and date of the PhotoFrame before you set the auto on off function 1 In the main menu select Setup and then press OK to confirm 2 Select Smart power and then press OK to confirm 3 Select Set time and then press OK to confirm 4 Selec...

Page 11: ...o Layer III music files are not damaged Why does my PhotoFrame not show some of my video files The PhotoFrame only supports M JPEG video files in avi format Ensure that these M JPEG motion JPEG video files are not damaged Why does the PhotoFrame not go into auto off status after I set it Ensure that you set the current time auto off time and auto on time correctly The PhotoFrame automatically turn...

Page 12: ...s Electronics N V 2009 All rights reserved Specifications are subject to change without notice Trademarks are the property of Koninklijke Philips Electronics N V or their respective owners QSG_V1 0 Printed in China ...

Reviews: