Philips Screeneo HDP1550 User Manual Download Page 24

24

Philips · HDP15x0 & HDP15x0TV

Video playback

Supported file formats

Supported file formats are *.avi, *.mov, *.mp4, *.mkv, 
*.flv, *.ts, *.m2ts, *.3gp.

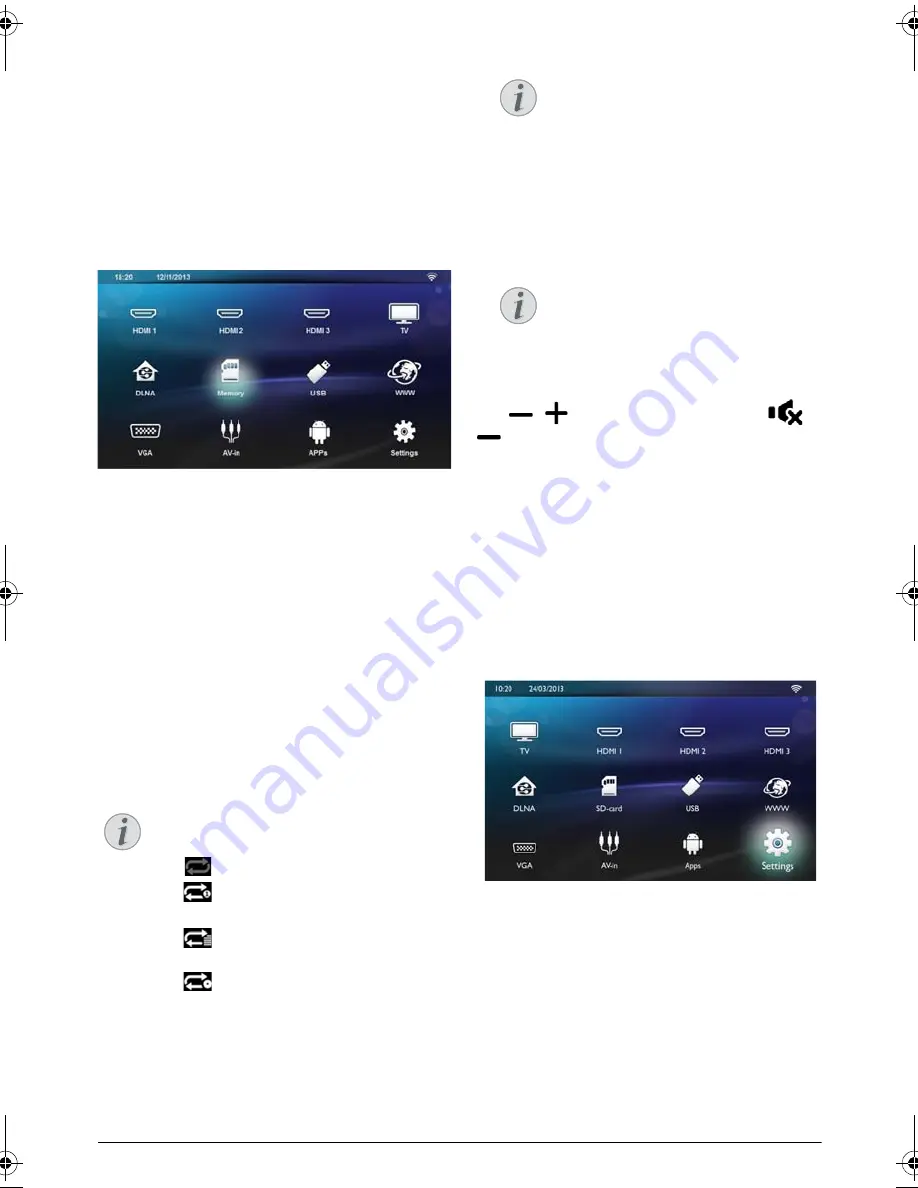
Video Playback (USB/SD Card/
Internal Memory/DLNA)

1

Switch the device on using the on/off key.

2

The main menu appears.

3

Use the navigation keys to select the desired media 
(USB, SD-card or DLNA):

Memory

Internal memory or SD card can be selected.

USB

- If only one USB key is connected the explorer 
shows only the content of the USB.

- If more than one USB memory is connected, select 
the desired USB memory first.

DLNA

The explorer searches for servers and shows them 
in a list. Select the desired DLNA server.

4

Confirm with 

OK

.

The content of selected media is displayed.

5

To only display the movies content, select 

Movie

using the keys 

¡/¢

on the left of the screen.

6

Confirm with 

OK

.

7

Use 

¡/¢

 to select the video file that you wish to 

play. 

8

Press 

OK

 or 

Á 

to start playback.

9

Press 

¿

 to end the slide show and return to the 

overview.

10

When you press 

¿

 again, you will return to the 

main menu.

During playback you can adjust the volume using the 

keys 

/

 on the remote control. Press 

 or 

 repeatedly to shut off the volume completely.

Photo Playback

Supported file formats

Supported file formats are JPEG, BMP, PNG and GIF.

Photo Playback (USB/SD Card/
Internal Memory/DLNA)

1

Switch the device on using the on/off key.

2

The main menu appears.

3

Use the navigation keys to select the desired media 
(USB, SD-card or DLNA):

SD-card

Internal memory or SD card can be selected!

USB

- If only one USB key is connected the explorer 
shows only the content of the USB.

- If more than one USB memory is connected, select 
the desired USB memory first.

DLNA

The explorer searches for servers and shows them 
in a list. Select the desired DLNA server.

4

Confirm with 

OK

.

The content of selected media is displayed.

Notice

The use of color keys

The 

Red

 key allows to set the repeat mode:

: Play mode deactivate (greyed).

: Play only the selected movie in 

loop.

: Play all movies in the selected 

directory in loop.

: Play all movies in the media in loop.

The 

Blue

 key alows to delete the selected 

file.

Notice

Displaying Video Files

Only those videos that are compatible 
with the projector will be displayed.

Notice

Navigation During Playback

Review / forward: Press 

:/;

 on the 

remote control.

Press 

T

 to stop or continue playback.

LU UST.book  Page 24  Jeudi, 26. décembre 2013  9:48 09

Summary of Contents for Screeneo HDP1550

Page 1: ...EN Screeneo User Manual Register your product and get support at www philips com welcome HDP1550 HDP1550TV HDP1590 HDP1590TV ...

Page 2: ...nnecting to a Hi Fi unit 14 Connecting the headphones 15 WiFiDisplay Miracast 15 5 Memory 16 Inserting a Memory Card 16 Connecting USB Storage Medium 16 6 Network 17 LAN Network 17 Wireless Network WLAN 18 Switching Wireless Networking WLAN on off 18 Setting up a Wireless Network WLAN 18 Setting up a Wireless Network WLAN using the Wizard 19 Wifi Hotspot 19 Digital Living Network Alliance DLNA 20 ...

Page 3: ...ide a warning label and a protection bag depending on model 6 Quick Start Guide 7 Warranty Guide 8 Bag Product Highlights Connecting to devices with HDMI output With the HDMI cable you can connect the projector to a computer or laptop see Connect to the Playback Device page 13 WiFiDisplay Miracast With the Miracast solution you can display video between Wi Fi devices without cables or a network co...

Page 4: ...to be investigated by a technical service centre To prevent the spread of fire open flames should be kept away from the device Under the following conditions a layer of moisture can appear inside the device which can lead to malfunctions if the device is moved from a cold to a warm area after a cold room is heated when this device is placed in a damp room Proceed as follows to avoid any moisture b...

Page 5: ...n Also consult a doctor or the manufacturer of the medical device to establish whether these are suffi ciently shielded from external high frequency radiation 3D glasses use The use of 3D glasses in home for watching TV shows is contraindicated for children less than 6 years old for subjects from 6 years old to adulthood should be limited to the vision for a maximum time equal to the duration of a...

Page 6: ... 4 SD Memory card slot 5 ý USB port for a USB storage medium or to con nect accessories mouse or keyboard 6 Focus wheel for image sharpness Rear View 1 Power supply outlet 2 ý 2 USB ports for a USB storage medium 3 SPDIF OPTICAL Digital audio connector 4 HDMI HDMI 1 and 2 ports for a playback device 5 Kensington Security System Connector 6 VGA Personal Computer input 7 LAN LAN network connector 8 ...

Page 7: ...the previous channel page or the next channel page 9 Color keys On screen options Number keys and text keypad Short press for numbers and long press to switch letters SUB SHIFT To display subtitles in DVB T mode or shift key in input mode TTX To display Teletext pages when availa ble in DVB T mode or backspace key in input mode To adjust the volume level to decrease increase and to mute the sound ...

Page 8: ...marks etc 1 Select the input field using the À and Á keys then press the OK key to display the keyboard or click in the input field using the air mouse 2 The software keyboard appears 3 Enter the text on the software keyboard Overview of the Menu Functions 1 After switching on the device the main menu appears 2 Select the desired menu using the navigation keys À Á 3 Confirm with OK 4 By pressing t...

Page 9: ...Overview 9 Symbols in the Statusbar 1 Time 2 Date 3 LAN status display 4 Bluetooth status display 5 WiFi status display a b d c e ...

Page 10: ...e projection distance a as described in the following table Connect Power Supply 1 Connect the power cord into the socket on the rear side of your device 1 2 Plug the power cord to outlet on the wall 2 Installing or Changing the Batteries of the Remote Control 1 To access the battery press to unlock the locking mechanism 1 and slide out the battery compart ment 2 2 Insert the new batteries into th...

Page 11: ... leakage and possible damage to the remote control The used batteries should be disposed of according to the recycling regulations of your country CAUTION The improper use of batteries can lead to overheating explosion risk of fire and injury Leaking batteries can possibly damage the remote control Never expose the remote control to direct sunlight Avoid deforming dismantling or charg ing the batt...

Page 12: ... Home or Shop and confirm with OK Home for normal use Shop when you choose this option the projector starts in demonstration mode In this mode the pro jector automatically displays the pictures or videos stored in the internal memory in loop 12 A message is displayed to give the address web site where the user manual can be downloaded Press OK to continue Turning off the projector Press the B butt...

Page 13: ...cable to the projector s VGA socket 3 Connect the VGA plug to the VGA socket of the computer 4 Adjust the computer s resolution to the correct set ting and switch the VGA signal to an external moni tor The following resolutions are supported 5 From the main menu select VGA Notice Use the HDMI socket 1 or 2 to connect the projector to a DVD player when a 3D signal is broadcasted PHILIPS PHILIPS VGA...

Page 14: ...inal cables from the device manufacturer may func tion Connecting to a home cinema amplifier Use a S PDIF optical cable cable not provided to con nect the DIGITAL AUDIO output on the projector to the input of your home cinema amplifier For example to show digital channels in DTS or DOLBY DIGITAL quality sound Connecting to a Hi Fi unit It is possible to use an analog audio connection just connect ...

Page 15: ...lect on the WifiDisplay application of the external device the name of the projector connection in the example Screeneo_5f31 9 Connect the external device smartphone or tablet to the projector it will show up connecting 10 In the WifiDisplay application of the projector it will show up the message Invitation to connect Decline or Accept select Accept DANGER Danger of Hearing Damage Do not use the ...

Page 16: ...m 1 Connect the USB storage medium to one USB port of the device DANGER Inserting a Memory Card Never pull out the memory card while the device is accessing it This could cause data to be damaged or lost Switch the device off in order to make sure that the device does not access the mem ory card PHILIPS DANGER Inserting a Memory Card Never pull out the memory card while the device is accessing it ...

Page 17: ...th OK 13 Using select Network address 14 Confirm with OK 15 Check that Automatic is selected Manual configuration To configure your projector manually you should obtain the usual information used to set a peripheral device IP address sub network mask network and gateway address To configure the local network setting manually 1 Switch the device on using the on off key 2 After the initial screen th...

Page 18: ...control and press OK 12 Enter the password with the virtual keyboard using the navigation keys of the remote control or with an external keyboard 13 Click on Connect The key takes you one step back in the menu Setting up a Wireless Network WLAN using the Wizard You can integrate your device very quickly and easily into an existing wireless network using Wi Fi Protected Setup WPS or using a wireles...

Page 19: ... Wi Fi hotspot to share the device s network connection with computers or other devices through the Wi Fi network Activating WiFi hotspot 1 Switch the device on using the on off key 2 After the initial screen the main menu appears 3 Use the navigation keys to select Settings 4 Confirm with OK 5 Using select Wireless and Networks 6 Confirm with OK 7 Using select WiFi Hotspot 8 Confirm with OK 9 Usi...

Page 20: ...e initial screen the main menu appears 3 Use the navigation keys to select Settings 4 Confirm with OK 5 Using select Wireless and Networks 6 Confirm with OK 7 Using select DLNA Sharing 8 Confirm with OK 9 Modify the settings with 10 Confirm with OK The key takes you one step back in the menu Play Media Using DLNA If DLNA enabled devices are located in the connected network then you can access them...

Page 21: ... Confirm with OK 11 Modify the desired settings Bluetooth speaker The projector can be used as Bluetooth speaker In this mode you can play music from smartphones or tablets The projector can only connect to and play audio from one device at a time Activating Bluetooth speaker 1 Switch the device on using the on off key 2 After the initial screen the main menu appears 3 Depending on model use the n...

Page 22: ...owing actions are available Red key To stop the connection Green key To make a pause Yellow key To play the previous music Blue key To play the next music Changing the name of the Bluetooth speaker connection This is the name used to identify your projector when it is detected by another Bluetooth device 1 Switch the device on using the on off key 2 After the initial screen the main menu appears 3...

Page 23: ... folders or files in the displayed list Á or OK For directories goes one level down For files starts the selected media file À or Goes one level up in the direc tory structure u Exits to main screen Red key of the re mote control Allows to set the repeat mode for movie and music files Play mode deacti vate greyed Play only the selected movie in loop Play all movies in the selected directory in loo...

Page 24: ...volume using the keys on the remote control Press or repeatedly to shut off the volume completely Photo Playback Supported file formats Supported file formats are JPEG BMP PNG and GIF Photo Playback USB SD Card Internal Memory DLNA 1 Switch the device on using the on off key 2 The main menu appears 3 Use the navigation keys to select the desired media USB SD card or DLNA SD card Internal memory or...

Page 25: ...oom and rotate functions During the slide show press OK key to display the con textual menu To perform a zoom use the navigation keys to select the symbol then press OK To rotate a picture use the navigation keys to select the symbol then press OK to rotate the picture 90 clockwise Press return to the slide show Notice The use of color keys The Green key allows to set the slide show parameters The...

Page 26: ... screen and confirm with OK 6 Use to select the file that you wish to play 7 Press OK to start playback 8 Press T to stop or continue playback During playback you can adjust the volume using the keys on the remote control Press or repeatedly to shut off the volume completely Notice Switch off the Image Playback You can switch off the screen while playing music in order to save power by a long pres...

Page 27: ... the on off key 2 The main menu appears 3 Use the navigation keys to select the desired media USB Memory or DLNA 4 Confirm with OK 5 Use to select the file that you want to delete 6 Press the Blue key on the remote control to delete the file 7 Confirm with OK Notice Error If errors occur during the deletion pro cess make sure that the storage medium is not write protected ...

Page 28: ... or parental control Enter the code with 4 digits 0000 is not accepted and enter again the same code to confirm 7 Press OK to confirm the settings and continue the installation The channel search starts automatically 8 At the end of the search press OK Your TV is now set You can start watching and enjoy ing all your channels Television Notice Aerial Size and Orientation In some regions it is neces...

Page 29: ...ys or À Á on the remote control Press or repeatedly to shut off the volume completely Modifying the DVB T settings To modify DVB T settings press the Menu key on the remote control Main menus are Edit channels To display and modify the channel and radio lists Installation To launch an automatic or a manual search for channels System Setup To modify the parental lock settings the display settings a...

Page 30: ... a mem ory card or USB stick 2 Insert the memory card into the device see Insert ing a Memory Card page 16 3 Switch the device on using the on off key 4 After the initial screen the main menu appears 5 Use the navigation keys to select APPs 6 Confirm with OK 7 Use the navigation keys to select ApkInstaller 8 Confirm with OK 9 Use the navigation keys to select Install 10 Confirm with OK 11 Navigate...

Page 31: ...hind the pro jection surface hanging from the ceiling in an upside down position the image is rotated by 180 degrees and reflected horizontally Wall color correction colour correction of the pro jected image to adjust to coloured projection surfaces Smart Settings select predefined settings for bright ness contrast colour saturation If you modify these settings the setting is switched to Manual Br...

Page 32: ...ll go into off mode HDMI name select this item to change the HDMI names Name that appears on the main screen Language Language Menu language use to select the desired lan guage and press OK to confirm Soundtrack use to select the desired lan guage and press OK to confirm Sub Title use to select the desired language and press OK to confirm Maintenance Reset settings Reset settings to factory defaul...

Page 33: ...Language Selection screen appears The firmware update is now completed DANGER Instructions for Cleaning Use a soft lint free cloth Never use liquid or easily flammable cleansers sprays abrasives polishes alcohol etc Do not allow any moisture to reach the interior of the device Do not spray the device with any cleaning flu ids Wipe over the surfaces gently Be careful that you do not scratch the sur...

Page 34: ...e manufac turer may function No sound from DVB T program or external HDMI out put device Set the audio setting to Multichannel Raw data Stereo PCM No sound when you connect your computer via HDMI cable Check that the sound is activated on the computer Video display problem when the source is a 3D signal from a DVD player Check that the 3D mode is activated on the projec tor If the DVD player is co...

Page 35: ...ightness to minimum level of brightness in order to protect the high power LED Use the device with lower environment tempera tures The device cannot connect with an Android device for example a mobile phone smartphone with the Android operating system when connected via USB Deactivate the function USB debugging in the set tings menu of your Android device before connect ing the Projector via USB y...

Page 36: ...isplay technology WVGA 0 45 DLP Light source RGB LED Native resolution 854 x 480 Pixel 16 9 Supported Resolutions VGA SVGA WVGA XGA WXGA FULL HD Brightness Bright Mode up to 500 lumen Contrast ratio 2000 1 Projected image size inch 50 up to 100 Screen distance mm 108 up to 441 Display refresh rate 60Hz 50Hz 120Hz Power supply Input 100V 240V 4 0 A 50 60HZ Power consumption 150W Off mode power cons...

Page 37: ... plastic wrapping recycled or dispose of it in the non recyclable waste depending on the requirements in your country Trademarks The mentioned references in this man ual are trademarks of the respective companies The lack of the trademarks É and Ë does not justify the assumption that these dedicated terminologies are free trademarks Other product names used herein are for identification purposes o...

Page 38: ...nts SAS under license from Koninklijke Philips N V È 2013 Sagemcom Documents SAS All rights reserved Sagemcom Documents SAS Documents Business Unit Headquarters 250 route de l Empereur 92848 Rueil Malmaison Cedex FRANCE Tel 33 0 1 57 61 10 00 Fax 33 0 1 57 61 10 01 www sagemcom com Simplified Joint Stock Company Capital 8 479 978 509 448 841 RCS Nanterre ...

Reviews: