


You can add a ‘voice tag’ to a name and number in your Phonebook.
This enables you to call up to 10 numbers by pressing one key and ‘speaking’ into your phone.
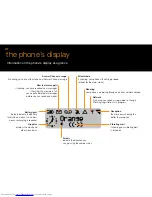
voice activated dialling
2.9
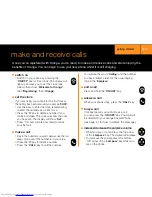
store a name and number with a voice tag
1
Press ‘MENU’.
2
Press ‘OK’ to move from <Names> to
<View>
.
3
P ress
‘ > ’
on the compass key to move right to
< A d d >
.
4
P ress ‘OK’, you will see
‘Name:’
and a flashing cursor.
5
Enter the name of the person whose number you
want to store. See page 3.4 ‘send a text or picture
message’ for details on entering text.
6
Press ‘OK’. You will see
‘Number:’
and a flashing
cursor.
7
Enter the number of the person, including the area code.
8
Press ‘OK’.
9
You will be asked if you want to use Voice dial.
10
Press ‘OK’ for yes.
11
The display prompt will ask you to
‘ P ress OK and
s p e a k ’
.
12
Say the name of the person clearly, into the phone.
13
You will be prompted to repeat the name again.
14
Say the name again.
15
Listen to your phone to hear your re c o rding play back.
16
You will see the word
‘ S t o red’
on the display.
The ‘voice tag’ is stored. When you call up
the name in your Phonebook you will see this
icon. You can have as many as 10 ‘voice
tags’. If you are not happy with your ‘voice
tag’, use
‘>’
to scroll to
‘change’
, press ‘OK’
and you will return to
11
above. The ‘voice dial’
option disappears after 10 tags.
add a voice tag to an existing entry
1
Press ‘OK’ to access your Phonebook.
2
Select the entry you want to assign a ‘voice tag’ to.
Press ‘OK’ twice to go to
<Send msg.>
3
Press
‘>’
twice, to move right to
<voice dial>
, then
press ‘OK’ twice. You will then be at stage
11
above.