background image

English

20

OPERATION

V

Personal preferences

In this mode you can set your personal preferences for a
number of player features. Some settings however must
be made.This depends on the type of audio equipment
connected. For this see ‘Connecting to audio
equipment’.

General operation

Press 

MENU SYSTEM

on

the remote control.

Select 

V

in the menu bar and

press 

w

(down cursor).

The Personal Preferences

menu appears.

Use the 

t u v w

(left/right/up/down) keys to

toggle through the menus, sub menus and submenu
options.

When a menu item is selected, the cursor keys

(on the remote control) to operate the item are
displayed next to the item.

Press 

OK

to confirm and return to the main menu.

The following items can be adapted:

p

Picture 

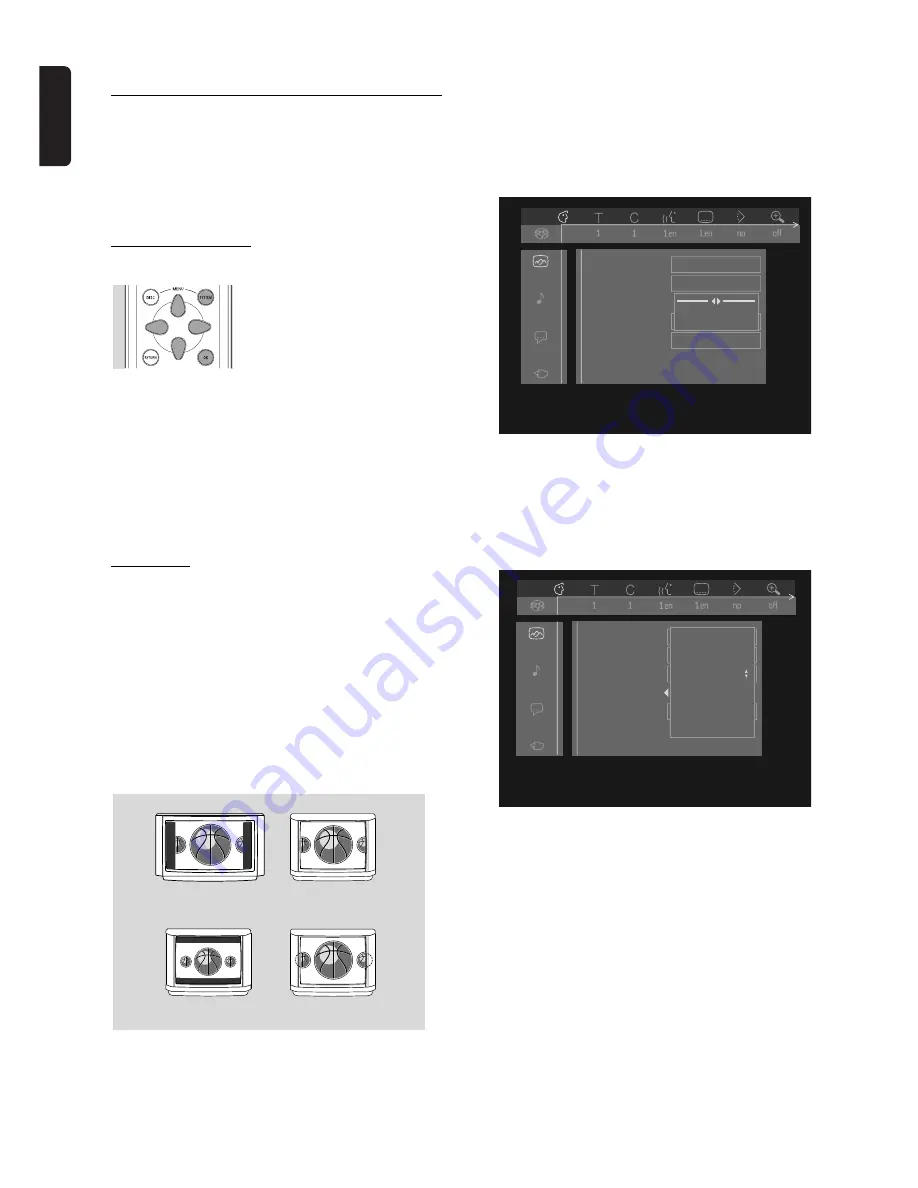
TV Shape

If you have a wide screen (16:9) TV, select 16:9.
If you have a regular (4:3) TV, select 4:3.
In this case you can also select between:
Letterbox for a ‘wide-screen’ picture with black bars top
and bottom, or Pan Scan, for a full-height picture with
the sides trimmed. Provided this is avaiIable on the disc
in play. If a disc has Pan Scan, the picture then moves
(scans) horizontally to keep the main action on the
screen.

Black level shift (NTSC only)

Adapts the colour dynamics to obtain richer contrasts.
Select 

ON

or 

OFF

.

Video shift

Factory setting is such that the video will be centered on
your screen. Use this setting to personalize the position
of the picture on your TV by scrolling it to the left or
right.

Colour settings 
(only when connected via Euroconnector)

You can select one of four predefined sets of colour
settings and one set (Personal) which you can define
yourself.

Personal colour 
(only when connected via Euroconnector)

Allows you to fine-tune the selected colour settings
saturation, brightness and contrast.

TV shape

Black Level shift

Video shift

Colour settings

Personal colour

1 Personal 

2 Rich

4 Soft

5 Animation

3 Natural                   

TV shape

Black Level shift

Video shift

Colour settings

Personal colour

OK to exit

LETTERBOX

PAN SCAN

VIEWING ON 16:9

VIEWING ON 4:3

Summary of Contents for SACD 1000

Page 1: ... _________________________________________________70 Deutsch _______________________________________________104 Nederlands ____________________________________________140 Italiano ________________________________________________174 Português______________________________________________208 Français Español Deutsch Nederlands Italiano Português ...

Page 2: ... Dolby Laboratories Inc All rights reserved This product incorporates copyright protection technology that is protected by method claims of certain U S patents and other intellectual property rights owned by Macrovision Corporation and other rights owners Use of this copyright protection technology must be authorized by Macrovision Corporation and is intended for home and other limited viewing use...

Page 3: ...______________________17 Infra red remote control ____________________________________18 Remote control device code _________________________________18 Operation General explication_________________________________________19 Switching on ______________________________________________19 Personal preferences _______________________________________20 Loading a SACD or Audio disc _____________________...

Page 4: ... layers are read from the same side of the disc The HD layer is read by a DVD laser The bottom reflective layer with conventional CD sound is read by the CD laser through the second semi transmissive HD layer SACD 1000 reality in sound and vision The SACD 1000 will not only surprise you with its superior reproduction of almost all existing audio formats Connected to your TV your SACD 1000 presents...

Page 5: ... double that of VHS superior to Laser Disc and entirely comparable with digital masters made in recording studios DVD Video discs conform to either the PAL or NTSC video standard This dual standard player can play both types and presents them in the best possible way on your multistandard TV screen As the universal video system of the future DVD Video offers optimal pictures on any TV screen DVD V...

Page 6: ...unlight In a cabinet allow about 2 inch 5 cm of free space all around the player for adequate ventilation If the SACD player cannot read SACDs CDs DVDs correctly use a commonly available cleaning CD DVD to clean the lens before taking the SACD player to be repaired Other cleaning methods may destroy the lens Always keep the tray closed to avoid dust on the lens When replacing from a cold to a warm...

Page 7: ...cator lights up red when the player is in Standby mode SOUND MODE selects required sound mode for SACD CD Stereo or Multi channel if available for DVD VCD Stereo Dolby Surround 3D Sound or Multi channel Display displays the current status of the player PAUSE interrupts audio video play or steps to the next picture frame REPEAT S PREV selects previous track title chapter index or beginning of curre...

Page 8: ...he various components of your system in case of disturbance problems Also see System grounding of chapter Operation Enhanced use Filter switch See chapter Operation Enhanced use MULTI CHANNEL AUDIO OUT For connection to a multi channel receiver SUBW oofer subwoofer connection CENTER center speaker connection RIGHT LEFT SURR ound surround speaker connections RIGHT LEFT front speaker connections VID...

Page 9: ...RA M TITLE VIDEO S O MCH CD STEREO CD SVCD SACD SACD playback temporarily interrupted not active when setting Personal Preferences first 10 seconds of each track chapter are played A passage A B is being repeated tracks chapters are played in random order repeat Title Chapter Track All active FTS Favourite track selection program available for CD DVD VCD inserted remote control active flashing DTS...

Page 10: ...es the sound in TV mode CH program up down in TV mode FTS switches FTS function ON OFF displays FTS menu FTS Favourite Track Selection SHUFFLE playback in random order Z Z SUBTITLE subtitle ON OFF selects subtitles DVD VCD only Y Y AUDIO language selection SACD POWER B B switches the player to power standby MENU DISC selects DVD defined menu MENU SYSTEM On screen Display ON OFF v w t u up down lef...

Page 11: ...he menu bar if activated in the Features menu see Personal Preferences General Disc type Tray status Default screen The default screen is displayed when the player is in STOP mode It may contain a status window see Status Window and a Temporary Feedback Field Giving information concerning prohibited actions playback modes available angles etc Temporary Feedback Field icons Scan Repeat All Repeat T...

Page 12: ...l You only need to select Multi channel using the Sound Mode key 1 Connect the audio Left and Right outputs for Front speaker connection 1 to the corresponding input sockets on your receiver For this use the audio cable supplied 2 Connect the audio Left and Right outputs for Surround speaker connection 2 to the corresponding inputs on your receiver For this use an optional audio cable 3 Connect th...

Page 13: ...i channel sound not for SACD For this you need a multi channel A V receiver that supports one or more of the DVD audio formats supported by your SACD player MPEG 2 Dolby Digital and DTS For this you can check the receiver manual and the logos on the front of the receiver 1 Connect the player s digital audio output optical 4 or coaxial 5 to the corresponding input on the receiver For this use the d...

Page 14: ...e front speakers can reproduce low frequency signals below 120Hz S Small When the front speakers cannot produce low frequency signals below 120Hz Center Speaker L Large When the center speaker can reproduce low frequency signals below 120Hz S Small When the center speaker cannot produce low frequency signals below 120Hz Off When the center speaker is not connected Surround speakers L Large When th...

Page 15: ...y times for Dolby Pro Logic mode will automatically be calculated and set Connecting the power supply 1 Check if the mains voltage as shown on the type plate on the back of the player corresponds to your local mains voltage If not adjust the voltage selector 1 to match with your local mains supply 2 Plug the female end of the power cable supplied into the Power connector MAINS 2 on the rear of the...

Page 16: ...ated the system code is set to Code 1 again Selecting the remote control code Simultaneously press DISPLAY and 1 or 2 on the remote control to select code 1 or 2 The remote control will now be set to the remote control code of your choice This action can be repeated whenever necessary Programming the remote control Your remote control can also be used for operating your television 1 Select the bra...

Page 17: ...TS The following functions can be operated via the menu bar Personal Preferences Track title selection Chapter selection Audio language selection Subtitle language selection Angle selection Zoom Colour selection Video FTS selection Sound mode Picture by picture Slow motion Fast motion Time search The various items can be selected with the t u left right cursor keys or by pressing the relevant keys...

Page 18: ...th black bars top and bottom or Pan Scan for a full height picture with the sides trimmed Provided this is avaiIable on the disc in play If a disc has Pan Scan the picture then moves scans horizontally to keep the main action on the screen Black level shift NTSC only Adapts the colour dynamics to obtain richer contrasts Select ON or OFF Video shift Factory setting is such that the video will be ce...

Page 19: ...utput settings for DVD VCD Select Stereo Dolby Surround 3D Sound or Multi channel Factory setting is Multi channel Multi channel Select this setting when using a multi channel audio video receiver with six inputs In this mode the player will perform Dolby Digital 5 1 channel decoding when applicable and Dolby Pro Logic decoding on DVD Video and Video CD discs with 2 channel soundtracks No Dolby Pr...

Page 20: ...in order to play discs Parental control Allows the conditional presentation of DVD discs containing Parental Control information Status Window Displays the current status of the player and is displayed together with the menu bar In STOP mode it is displayed together with the Temporary Feedback Field in the default screen See On Screen Display information Factory setting is ON Select OFF to suppres...

Page 21: ...lected in the Personal Preferences menu and this Sound mode is not availabale on the disc inserted playback will start in the first available Sound mode on the disc Playback will stop at the end of the disc To stop play at any other time press 9 STOP The number of tracks and the total playing time will be shown on the player display and on the screen Sound mode SACD playblack Press SOUND MODE on t...

Page 22: ...he selections can be called up and played at any time For storing an FTS program On Screen Display operation is required Storing an FTS program 1 Load a disc and go to Stop mode 2 Use w down cursor to go to the list of available tracks 3 Use t and u left right cursor to select tracks from the list To go directly to any track enter the track number using the numerical keys 0 9 4 Store each track by...

Page 23: ...e for Play Once or Play Always If you select Play Once the disc can be played as long as it is in the player and the player is in the ON position If you select Play Always the disc will become child safe authorized and can always be played even if the Disc lock is set to ON Notes The player memory maintains a list of up to 80 authorized Child safe disc titles A disc will be placed in the list when...

Page 24: ...ating or lower will be played Higher rated scenes will not be played unless an alternative is available on the disc The alternative must have the same rating or a lower one If no suitable alternative is found play will stop and the 4 digit code has to be entered 6 Press OK or t left cursor to confirm and press t left cursor again to exit the menu Country 1 In Stop mode select Access Control in the...

Page 25: ...ion Play may stop at the end of the Title this can result in return to menu To stop play at any time press 9 STOP The default screen will then appear giving information about the current status of the player You can resume play from the point at which you stopped by pressing e RESUME The resume feature applies not only to the disc in the player but also to the last four discs you have played Simpl...

Page 26: ...ar Use the w down key to enter the Slow Motion menu The player will now go into Pause mode Use the t u left right keys to select the required speed 1 1 2 1 4 or 1 8 backward 1 8 1 4 1 2 or 1 forward Select 1 to play at normal speed again If PAUSE is pressed the speed will be set to 0 To exit slow motion mode press 2 PLAY and then v up cursor You can also select Slow motion speeds by using the H bu...

Page 27: ... cursor The player will now go into Pause mode A time edit box appears on the screen showing the elapsed playing time of the current disc Use the digit keys 0 9 to enter the required start time Enter hours minutes and seconds from left to right in the box Each time an item has been entered the next item will be highlighted Press OK to confirm the start time The time edit box will disappear and pla...

Page 28: ...ighlight moves to the first available chapter number for this title Use t u left right cursors to select the required chapter number Press OK to confirm the selection The title chapter selection will be added to the list of selections Press OK or MENU SYSTEM to exit the Video FTS menu Erasing a title track FTS Video Program In Stop mode select Video FTS c in the menu bar Use w down cursor to selec...

Page 29: ... then change the camera angle if you wish Use the w v down up keys to select the required angle in the angle icon To go to any angle directly enter the angle number using the numerical keys 0 9 After a small delay play changes to the selected angle The angle icon remains displayed until multiple angles are no longer available Changing the audio language Select Y Audio in the menu bar Press Y or w ...

Page 30: ...on all speakers is set to 50 kHz Warning When you are not sure your system is able to handle audio input signals up to 50 KHz do not change the output signal You may damage your speakers or amplifier receiver System grounding When your system consists of a lot of components occasional disturbance problems like howling noises may occur These problems can be solved by grounding the system 1 Unscrew ...

Page 31: ... picture with player menu The NTSC PAL switch may be in the wrong status Press the 9 STOP and T NEXT buttons simultaneously and keep them pressed while you turn the player ON No colour in picture with player menu The NTSC PAL switch may be in the wrong status Press the 9 STOP and T NEXT buttons simultaneously and keep them pressed while you turn the player ON No return to start up screen when disc...

Page 32: ...ultaneously and keep them pressed while you turn the player ON On the display the message BUSY appears together with a counter that counts down as the test is running reaching zero by the end of the test After a few minutes the message on the local display changes from BUSY to FAIL or to PASS If the message FAIL appears on the display there is apparently a failure in your player and your player sh...

Page 33: ...English NOTES 35 Notes ...

Reviews: