background image

24

EN

English

4

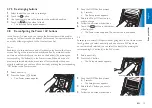
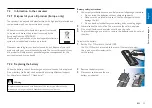
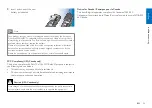
   Insert and connect the new 


battery as indicated.


Note

Your product contains a built-in rechargable battery covered by the European 

Directive 2006/66/EC. To safeguard the functionality and safety of your product, 

always bring your product to an official collection point or service centre where a 

professional can remove / replace the battery.

Please inform yourself about the local rules on separate collection of batteries 

because the correct disposal will help prevent negative consequences for the 

environmental and human health. 

Please do not dispose of your batteries with your normal household waste.

FCC Compliancy (USA, Canada only)

This device complies with Part 15 of the FCC Rules. Operation is subject to 

the following two conditions:

•  This device may not cause harmful interference.

•  

This device must accept any interference received, including interference 

that may cause undesired operation.

Caution (USA, Canada only)

User changes or modifications not expressly approved by the party responsible 

for compliance could void the user’s authority to operate the equipment.

Notice for Canada / Remarque pour le Canada

This class B digital apparatus complies with Canadian ICES-003.

Cet appareil numérique de la Classe B est conforme à la norme NMB-003 

du Canada.

Ser

vice and suppor

t

Summary of Contents for Prestigo SRT9320

Page 1: ...Prestigo SRT9320 EN User Manual Register your product and get support at www philips com welcome ...

Page 2: ...uttons 15 18 4 8 Reconfiguring the Power AV buttons 18 19 4 9 Adjusting system settings 19 4 10 Installing Philips PrestigoSync software 19 20 5 Frequently asked questions 20 22 6 Technical specifications 22 7 Service and support 22 24 7 1 Need help 22 7 2 Information to the consumer 23 24 Equipment list 25 Table of contents IR transmitter Display touchscreen Power button Home Setup button AV butt...

Page 3: ...ions for registration How to use this manual When you click with the cursor on a sentence in theTable of contents you automatically go to the right page chapter When you click on a page number reference chapter or internetsite in the text you go there Clicking on the blue language tab in the right top corner brings you back to theTable of contents 1 1 What s in the box Please verify that the packa...

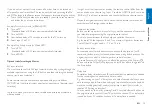
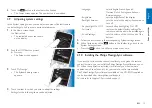
Page 4: ...the top right corner of the screen Notes Operation time of a fully charged battery is approximately 1 month but also depends on the intensity of usage When the battery is almost empty the battery low icon flashes in the top right corner of the screen Recharge the battery as described above When the battery cannot be recharged anymore it needs to be replaced For this refer to chapter 7 2 2 Replacin...

Page 5: ...ation PVR HDD DVR VCR Video cassette player and recorder PC Personal Computer Windows Media Center Game Console Game Console MP3 Player Dock MP3 player docking station and audio video accessories Switches AppleTV etc Digital Media Receiver Digital Media Receiver Media Adapter Squeezebox Receiver AV Receiver Amplifier Tuner combination sound processor HomeTheatre System HomeTheatre System Home Ente...

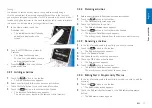
Page 6: ...emote control to operate your devices For operation the appropriate hard buttons on the remote control can be used as well as the touchscreen buttons that are displayed when a device is selected 3 1 Selecting devices 1 Press the HOME button The Home screen appears The Devices tab is highlighted and the devices for which the remote control is set up are displayed For adding devices refer to chapter...

Page 7: ...mode When in normal operation mode pressing the HOME button for 3 seconds will display a toolbar This toolbar enables you to configure the current screen and contains the following tools add adds items devices activities etc to the current screen delete deletes items devices activities etc from the current screen edit renames and reconfigures items devices activities etc done confirms settings and...

Page 8: ...t of devices select the device you wish to delete The Delete device screen appears 2 Touch the button in the toolbar 3 Touch the Yes button to confirm 4 Touch the button in the toolbar when finished The Home screen appears The device is now deleted from the remote control memory Note Buttons of the deleted device that are used elsewhere e g in an activity or the volume buttons will be deleted as w...

Page 9: ...e buttons will not be available for testing 4 2 5 Rearranging devices 1 In the list of devices select the device you wish to rearrange 2 Touch the button in the toolbar 3 Use the arrows to move the device to the preferred position 4 Touch the button in the toolbar when finished The Home screen appears 4 3 Setting up activities Activities enable you to turn a number of devices on and off with a sin...

Page 10: ...etc Try all input commands and check whether your device reacts Maybe the original remote control does not have discrete commands but nevertheless the Prestigo supports them Command sequences Before you set up a macro it is useful to try out the sequence of commands you intend to program using the original remote control You may encounter issues that can help you optimize the macro E g for mostTVs...

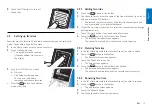
Page 11: ...hed The last used Activities screen appears The activity is now stored in the remote control memory 4 3 2 Deleting activities 1 Select an activity and follow the on screen instructions 2 Touch the button in the toolbar The Delete activity screen appears 3 Touch the Yes button to confirm The Setup Activities screen appears 4 Touch the button in the toolbar when finished The last used Activities scr...

Page 12: ... the toolbar should not be visible 2 Start an activity by touching its Home Devices WatchTV Listen to music Watch a movie Play a game Activities button on the screen Use the keypad s and appropriate hard buttons on the remote control to operate the activity devices Touch the button to go to the next keypad With the button you go back to the previous keypad If a Start Activity macro has been set up...

Page 13: ... the favorite channel name and icon are available in the internal database 3 Follow the on screen instructions to select the channel name and assign button presses to it Touch the Help button if you need extra information 4 Touch the button in the toolbar when finished The last used Favorites screen appears The channel is now added to the remote control memory 4 5 2 Deleting favorites 1 In the lis...

Page 14: ...t of favorites navigate to the page which contains the favorite for which you wish to change the channel number 2 Keep the HOME button pressed for 3 seconds to enter Setup mode 3 Select the favorite you wish to edit 4 Touch the button in the toolbar The Edit favorite screen appears 5 Touch the Edit channel macro button The Edit macro screen appears The action list for this channel is displayed 6 U...

Page 15: ...selected channel Touch the and buttons to scroll through your favorites 4 7 Reconfiguring buttons The remote control is equipped with the most used functions for operating your devices However if you miss certain functions from your original remote control you can add these functions via the Setup menu In this menu you can also delete rename and rearrange button functions and repair buttons that d...

Page 16: ...ton in the toolbar The Edit button screen appears 3 Touch the Rename button 4 Use the keyboard to enter the new name 5 Touch the OK button when finished The Setup screen appears 6 Touch the button in the toolbar when finished The last used Setup screen appears The button is now stored under the new name 4 7 4 Repair a button If a device does not respond properly to a button command you can have th...

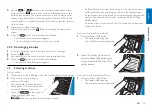
Page 17: ... on a flat surface like a coffee table and aim them in such way that the IR transmitter at the top of the original remote control points at the IR receiver at the bottom of the SRT9320 Keep about 25 50 mm in between the remote controls You may need to adjust the height of one of the remote controls to achieve this 25 50 mm 2 Touch the button in the toolbar The Edit button screen appears 3 Press to...

Page 18: ...turn off automatically when a new activity is selected you can turn off the device by pressing the corresponding Off button in the Power screen 1 Select an activity 2 Press the Power B button The Power screen appears 3 Keep the HOME button pressed DVD On DVD Off for 3 seconds The Setup screen appears 4 Select the On or Off button you wish to change 5 Follow the on screen instructions 6 Touch the b...

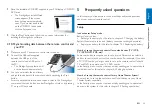
Page 19: ... time out sets the time for the display illumination to turn off Key backlight On Off turnes button backlighting On Off Full reset restores the default factory settings The remote control needs to be installed again Sound settings sets the volume of the click sound of the buttons 5 Follow the instructions in the corresponding System settings screen 6 When finished touch the button in the toolbar t...

Page 20: ...ou find answers to the most frequently asked questions about your universal remote control Setup I cannot enter Setup mode Battery level too low Recharge the battery For this refer to chapter 2 1 Charging the battery Battery lifetime came to an end battery cannot be recharged anymore Replace the battery For this refer to chapter 7 2 2 Replacing the battery How do I set up the remote control for co...

Page 21: ...level too low Recharge the battery For this refer to chapter 2 1 Charging the battery When operating the device point the remote control at the device and make sure that there are no obstructions between the remote control and the device Battery lifetime came to an end battery cannot be recharged anymore Replace the battery For this refer to chapter 7 2 2 Replacing the battery Not all button funct...

Page 22: ...he battery No All user settings will be stored in the flash memory of the remote control 6 Technical specifications Power adapter 100 240VAC 50 60Hz power adapter 5VDC 2A output 7 Service and support 7 1 Need help First of all read this user manual carefully When you have additional questions about setup usage spare parts warranty etc of the SRT9320 see www philips com support 1 At www philips com...

Page 23: ...k can be ordered at www philips com support For this refer to chapter 7 1 Need help Warning Replace the batteries only with batteries of the same type otherwise the warranty is no longer valid and hazardous situations could occur Battery safety instructions 1 Lithium polymer batteries have a soft aluminium foil package therefore Do not strike the batteries with any sharp edged parts Make sure the ...

Page 24: ... Please do not dispose of your batteries with your normal household waste FCC Compliancy USA Canada only This device complies with Part 15 of the FCC Rules Operation is subject to the following two conditions This device may not cause harmful interference This device must accept any interference received including interference that may cause undesired operation Caution USA Canada only User changes...

Page 25: ...emote control Receiver Home Theater System Brand Model number Model number of original remote control DVD Player Blu Ray player Brand Model number Model number of original remote control Game Console Brand Model number Model number of original remote control PC Brand Operating System Service Pack number Other equipment Brand Model number Model number of original remote control Equipment list ...

Page 26: ...ted in this document does not form part of any quotation or contract is believed to be accurate and reliable and may be changed without notice No liability will be accepted by the publisher for any consequence of its use Publication there of does not convey nor imply any license under patent or other industrial or intellectual property rights November 2008 www philips com N MW RR RD 4908 ...

Reviews: