


3
2
1
6
5
4
9
8
7
0
STATUS/EXIT
ALT. CH
FM
MENU
MUTE
VOL.
VOL.
CH.
CH.
_
3
2
1
6
5
4
STATUS/EXIT
MENU
MUTE
VOL.
VOL.
CH.
CH.
3
2
1
6
5
4
9
8
7
0
STATUS/EXIT
ALT CH
FM
MENU
MUTE
VOL.
VOL.
CH.
CH.
POWER
STATUS/EXIT
SLEEP
TV/AUX
MENU
MUTE
VOL.
VOL.
CH.
CH.
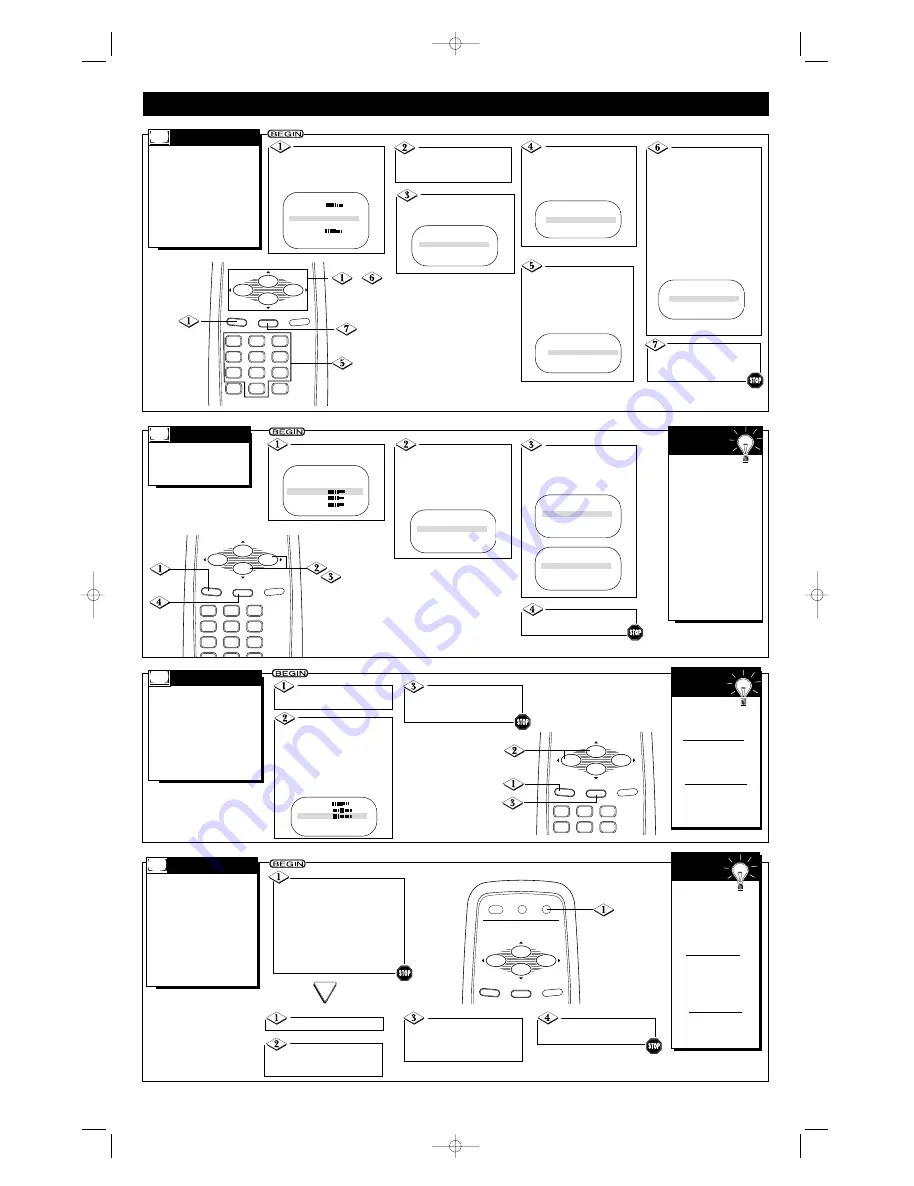
Press the MENU
button.
Press the CH(annel)
▲
or
▼
button to select
VOLUME. Then, press the
VOL(ume)
B
/
{
buttons to
adjust the volume level.
Pressing the VOL(ume)
B
but-
ton when the sound is muted
will restore the sound.
Press the
STATUS/EXIT button to
remove the menu.
SHARPNESS
34
TINT
-05
VOLUME
13
SLEEPTIMER
OFF
SET UP
B
F
EATURES
T
here are three ways to adjust
the TV’s volume. Follow these
steps to adjust the volume using
the on-screen menu.
Or, you can adjust the volume
using the VOL(ume)
B
/
s
buttons on the remote control or
the VOLUME
o
/
p
buttons on
the TV.
V
OLUME
The Volume indi-
cator should appear on
the screen when you
adjust the volume.
The simplest way to
adjust the volume is by
pressing the VOL(ume)
B
/
s
buttons.
The TV must be set to an
active channel in order
for the Volume control
to work properly.
S
MART
H
ELP
A
UTO INSTALL (see page 5)
memorizes all the channels on
your Antenna or Cable TV system.
CHANNEL EDIT makes it easy
for you to add other channels or
drop unwanted channels from the
TV’s memory. Then, when you
use the CH(annel)
o
/
p
buttons,
you will only scan through the
channels you want.
C
HANNEL
E
DIT
Press the MENU but-
ton, then press the
CH(annel)
▲
or
▼
button
to select SETUP.
Press the VOL(ume)
B
or
{
button to continue
to the SETUP menu.
Press the VOL(ume)
B
or
{
button to continue
to the CHANNEL EDIT
menu.
CHANNEL will be selected.
While CHANNEL is
selected, press the
VOL(ume)
B
or
{
button
or the Number buttons to
select the channel you
want to add or skip.
Press the CH(annel)
▲
or
▼
button to select
SKIPPED.
Then,
press the VOL(ume)
B
or
{
button to set
SKIPPED to YES (if you want
to skip past the channel when
using the CH(annel)
▲
/
▼
but-
tons) or NO (if you want the
channel to be available when
you are using the CH(annel)
▲
/
▼
buttons
).
Press the
STATUS/EXIT button
when you are finished.
EXIT
B
CHANNEL
10
SKIPPED
YES
EXIT
B
CHANNEL
18
SKIPPED
YES
CHANNEL
18
SKIPPED
NO
EXIT
B
F
ollow these steps to
change the language of
the on-screen menus and
displays.
Press the MENU
button.
Press the CH(annel)
▲
or
▼
button to select
SETUP, then press the
VOL(ume)
B
or
{
button
to continue. LANGUAGE
will be selected.
L
ANGUAGE
Press the VOL(ume)
B
or
{
button to select
ENG for English menus or
ESP for Spanish menus.
Press the
STATUS/EXIT button.
If you accidentally
choose Spanish and need
English:
1) Press the MENU
button.
2) Press the CH(annel)
▲
or
▼
button to select
INSTALACION, then
press the VOL(ume)
B
or
{
button to continue.
3) IDIOMA will be
selected. Press the
VOL(ume)
B
or
{
button to have ENG
appear beside
LANGUAGE.
4) Press the
STATUS/EXIT button.
S
MART
H
ELP
- 6 -
H
ave you ever fallen asleep
in front of the TV, only to
have it wake you up at 2 a.m.
with a test pattern screeching
in your ears? Well, your TV
can save you all that trouble by
automatically turning itself off.
Set the Sleeptimer simply by
pressing the SLEEP button, or
you may use the on-screen
menu.
Press the SLEEP button
repeatedly to pick the amount of
time ( 15 minutes to 120 minutes
in 15-minute increments) before
the TV turns itself off. The length
of time will appear on the screen.
One minute before the TV shuts
itself off, the seconds will count
down on the screen.
To see how
many minutes remain
before the TV shuts
itself off, press the
SLEEP button once or
press the
STATUS/EXIT button.
To cancel a
SLEEPTIMER setting,
press the SLEEP but-
ton twice so that OFF
appears on the screen.
A power failure will
cancel the Sleeptimer
but you may reset it.
S
MART
H
ELP
S
LEEPTIMER
Press the CH(annel)
▲
or
▼
button to select
SLEEPTIMER.
Press the VOL(ume)
B
or
{
button repeatedly to set
the amount of time or to select
OFF.
Press the STATUS/EXIT
button to remove the menu.
Press the MENU button.
OR
VOLUME
13
SLEEPTIMER
OFF
SETUP
B
EXIT
B
BRIGHTNESS
24
Press the CH(annel)
▲
or
▼
button to select
CHANNEL EDIT.
LANGUAGE
ENG
AUTO INSTALL
B
CHANNEL EDIT
B
FM ANTENNA
INT
EXIT
B
SETUP
B
EXIT
B
BRIGHTNESS
33
COLOR
29
PICTURE
36
ANTENA FM
INT
SALIDA
B
IDIOMA
ESP
AUTOPROGRAMACION
B
REVISAR CANAL
B
FM ANTENNA
INT
EXIT
B
LANGUAGE
ENG
AUTO INSTALL
B
CHANNEL EDIT
B
FM ANTENNA
INT
EXIT
B
LANGUAGE
ENG
AUTO INSTALL
B
CHANNEL EDIT
B
PR0930x4 3/1/02 10:21 AM Page 6
All manuals and user guides at all-guides.com
all-guides.com