


- 4 -
H
OOKING
U
P
Y
OUR
TV (A
NTENNA
/C
ABLE
C
ONNECTIONS
) (C
ONT
’
D
)
3/16"(5mm) x 1-9/16"(40mm)
Screw (Vis)
Washer
(Rondelle)
Hexagonal Nut
(Ecrou hexagonal)
5/32"(4mm) x 11/16"(18mm)
Screws (Vis)
Swivel Base
(Base pivotante)
TV
(Téléviseur)
F
ollow the instructions below
to install the TV beneath a
kitchen cabinet.
S
uivre les instructions
ci-dessous pour installer le
téléviseur en-dessous d’un meu-
ble de cuisine.
C
ABINET
I
NSTALLATION
/ I
NSTALLATION SUR UN
M
EUBLE
C
ABINET
I
NSTALLATION
I
NSTALLATION SUR UN
M
EUBLE
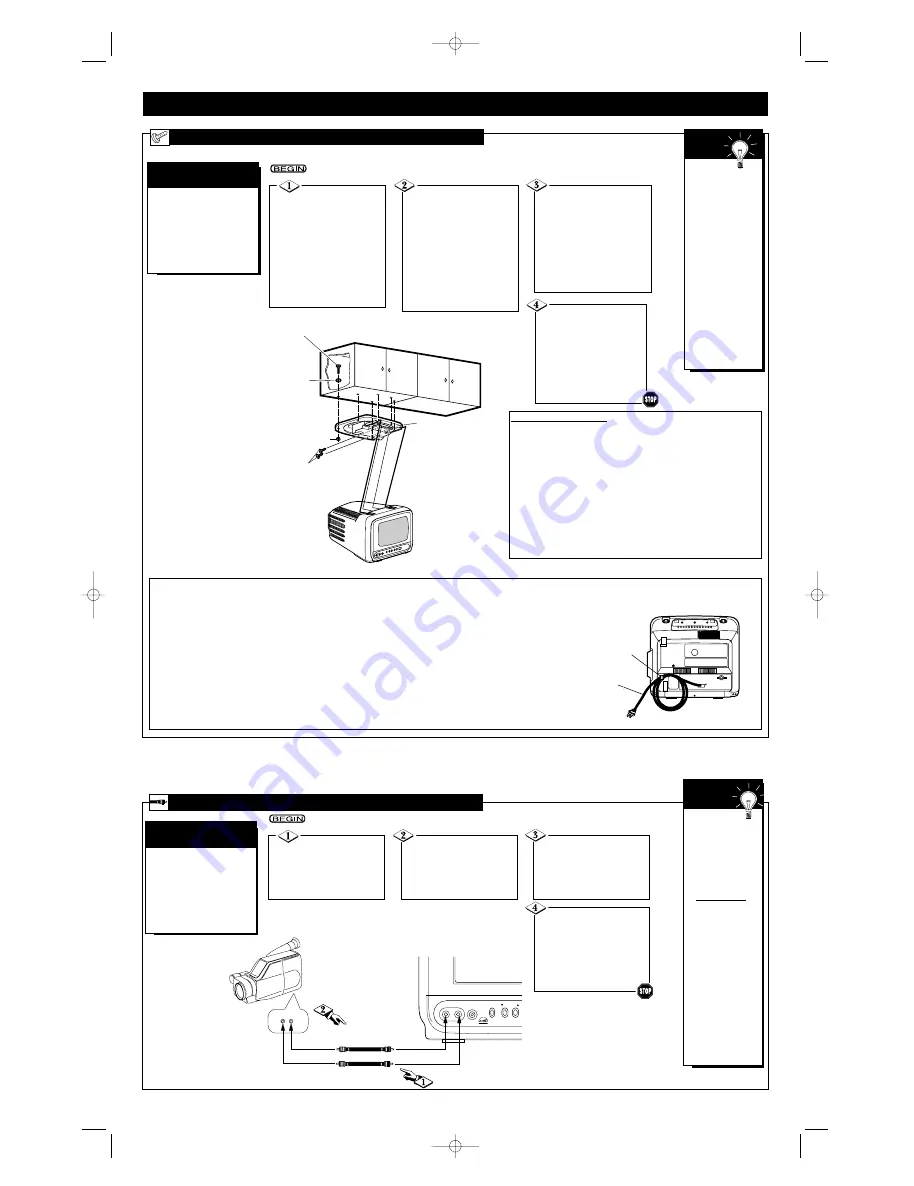
Drill six 1/4-inch
holes through the under-
side of the cabinet using the
six circles on the swivel base
(supplied) as guides.
Percer six trous de 1/4 de
pouce dans le dessous du
meuble en se guidant à
l’aide des six cercles sur la
base pivotante (fournie).
Make sure
the area directly
beneath the TV is
not used for cook-
ing and does not
contain an appliance
that generates heat
or steam.
Veiller à ce que la
zone directement
en-dessous du
téléviseur ne soit
pas utilisée pour
cuire et ne conti-
enne pas d’appareils
générateurs de
chaleur ou de
vapeur.
S
MART
H
ELP
Slide the TV onto the
hook on the swivel base
and push it backward until
the TV locks into place.
Faire glisser le téléviseur
sur le crochet de la base
pivotante et le repousser
jusqu’à ce que le téléviseur
se verrouille en place.
Attach the swivel base
to the cabinet using six of
each of the following: screws,
washers, and hexagonal nuts
(supplied). Refer to the draw-
ing shown below.
Fixer la base pivotante au
meuble à l’aide des six vis,
rondelles et écrous hexago-
naux (fournis). Référez vous au
dessin ci dessous.
Secure the TV to the
swivel base using two
5/32”(4mm) x 11/16”(18mm)
screws (supplied).
Fixer le téléviseur sur la
base pivotante à l’aide de
deux vis de 5/32”(4mm) x
11/16”(18mm) (fournies).
CAUTION: To reduce the risk of fire, do not place any heating or cooking appliances beneath this unit.
ATTENTION: Afin de réduire les risques d’incendie, ne placer aucun appareil chauffant ou de cuisson en-dessous de cette unité.
NOTE:
Screws that are too short will not screw far enough into the nuts to securely hold
the TV. Screws that are too long will protrude below the base of the cabinet and
may scratch the TV when it is swiveled.
REMARQUE: Des vis trop courtes ne se visseront pas suffisamment profondément dans les
écrous pour maintenir le téléviseur en toute sécurité. Des vis trop longues
dépasseront de la base du meuble et pourront rayer le téléviseur lorsque il pivotera.
NOTE:
Route and arrange the excess AC cord as illustrated at right so it will not drape
where it can be pulled on or tripped over.
REMARQUE: Acheminer et arranger le cordon CA en excès, comme montré dans l’illustration,
de telle sorte qu’il ne puisee pas être tiré ou accroché.
ANT. IN
AC 120V
Wire Tie
(Attache-câble)
Power Cord
(Cordon
d’alimentation)
F
or more convenient tape
playback from a camcorder
or VCR, use the AUDIO and
VIDEO In jacks on the front of
the TV. These easily accessible
jacks allow quick connections
between the TV and the VCR
or camcorder.
U
SING THE
F
RONT
A
UDIO
/V
IDEO
I
N
J
ACKS
A
UDIO
/V
IDEO
I
N
J
ACKS
Connect a video
cable (not supplied) to the
VIDEO OUT jack of the
camcorder/VCR and to the
yellow VIDEO In jack on
the front of the TV.
When you are
finished watching
the tape, press the
TV/AUX button on
the TV remote con-
trol to return to
viewing normal TV
channels.
If the VCR or cam-
corder has Right
and Left AUDIO
OUT jacks, you will
need a “Y” connec-
tor cable in order
to connect the cam-
corder/VCR to the
TV. Or, check the
owner’s manual of
the camcorder or
VCR. It may explain
how to connect to
a TV that has a sin-
gle AUDIO In jack.
S
MART
H
ELP
When you play a tape on
the VCR or camcorder, select
A/V IN at the TV.
Press the TV/AUX button
to select A/V IN. A/V IN will
appear on the screen.
Connect an audio cable
(not supplied) to the
AUDIO OUT jack of the
camcorder/VCR and to the
white AUDIO In jack on
the front of the TV.
Turn on the cam-
corder/VCR and press the
PLAY button on the cam-
corder/VCR.
When you are finished
watching the tape, press
the STOP button on the
camcorder/VCR.
Cabinet Installation
• Keep in mind your normal work pattern, especially the way in
which you use other electrical appliances, when you are thinking
about where to install the TV.
• Hold the TV in various locations. In each location, turn the TV on
so you may check reception.
• If you are going to use the rod antenna, allow enough space around
the TV to extend and adjust the antenna.
• Make sure the TV is close enough to an electrical outlet that the
power cord can reach it.
• Allow enough room on all sides of the TV for ventilation, access to
control knobs, and room to swivel the TV for ease of viewing.
• Route and arrange the excess AC cord so that it will not drape
where it can be pulled on or tripped over unintentionally.
VIDEO
OUT
AUDIO
Audio Cable (white) from
AUDIO OUT to AUDIO
Video Cable (yellow) from
VIDEO OUT to VIDEO
AUDIO
VIDEO
EARPHONE
MENU
VOLUME
PR0930x4 3/1/02 10:21 AM Page 4
All manuals and user guides at all-guides.com


