background image


EN           55  


En

gl

is

480i - 60 Hz 
480p - 60 Hz 
576i - 50 Hz 
576p - 50 Hz 
720p - 50Hz, 60 Hz 
1080i - 50Hz, 60 Hz 
1080p - 24Hz, 25Hz, 30Hz, 50Hz, 60 Hz 


Multimedia 

Supported multimedia connections


Note: 

Multimedia file names must not 

exceed 128 characters. 


USB: Connect only those USB devices 
that consume 500 mA of power or less. 
 

  - NTFS, FAT 16 (Read only) 


  - FAT 32 


Ethernet LAN RJ-45 (For certain 
models) 

Supported image files


JPEG: *.jpg, *.jpeg, *.mpo, *.jps 


GIF (87a, 89a): *.gif 


PNG: *.png, * .pns 


BMP: *.bmp, *.dib 


JPS: *.jps 


PNS: *.pns 


BMS: *.bms 


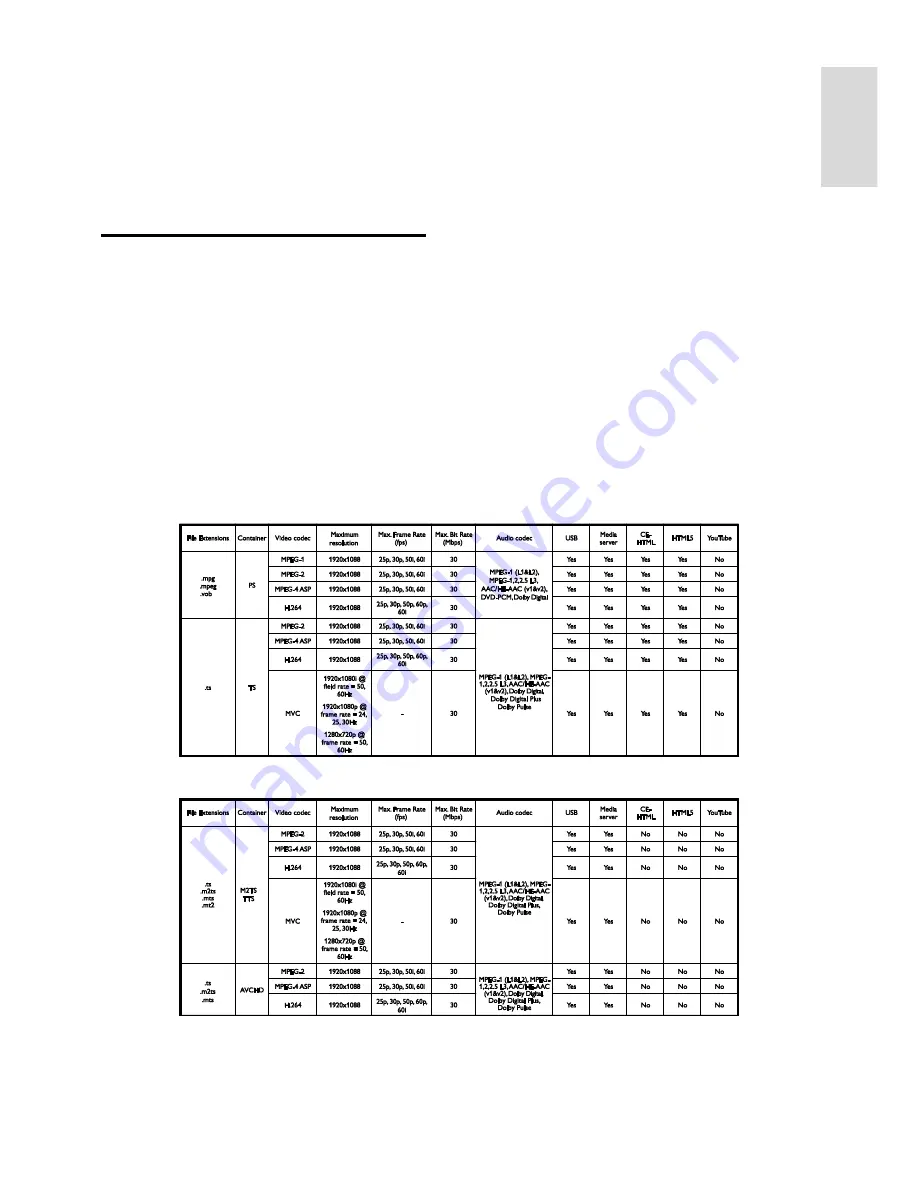
Supported audio/video formats


Supported audio/video formats


Summary of Contents for PFL30 8

Page 1: ...EN User Manual Register your product and get support at www philips com welcome PFL43x8 PFL31x8 PFL30x8 ...

Page 2: ...anguage settings 33 Universal access settings 34 Other settings 35 Update software 35 Reset all 36 5 Connect your TV 37 About cables 37 Connect antenna 38 Connect devices 38 Connect more devices 44 Watch connected devices 46 Set up EasyLink devices 46 Connect a CAM Conditional Access Module 49 6 Troubleshooting 50 General issues 50 Channel issues 51 Picture issues 51 Sound issues 52 Connection iss...

Page 3: ...power cord can loosen connections and cause arcing To disconnect the TV from the mains power the power plug of the TV must be disconnected When disconnecting the power always pull the power plug never the cord Ensure that you have full access to the power plug power cord and outlet socket at all times Risk of damage to the TV Two people are required to lift and carry a TV that weighs more than 25k...

Page 4: ...r headphones at high volumes or for prolonged periods of time Low temperatures If the TV is transported in temperatures below 5 C or 41 F unpack the TV and wait until the TV temperature matches room temperature before connecting the TV to the power outlet 3D health warning For 3D TVs only If you or your family have a history of epilepsy or photosensitive seizures consult a medical professional bef...

Page 5: ...t heat fire or water This may result in a product malfunction or fire Do not drop bend or apply force to the lenses of the 3D glasses Do not use cleaning chemicals containing alcohol solvent surfactant or wax benzene thinner mosquito repellent or lubricant Using these chemicals can cause discolouration or cracks CHOKING HAZARD Keep the product out of reach of children under three years of age at a...

Page 6: ...pressly prohibited in this manual or any adjustments and assembly procedures not recommended or authorised in this manual shall void the warranty Pixel characteristics This LCD LED product has a high number of colour pixels Although it has effective pixels of 99 999 or more black dots or bright points of light red green or blue may appear constantly on the screen This is a structural property of t...

Page 7: ...DMI and HDMI High Definition Multimedia Interface and the HDMI Logo are trademarks or registered trademarks of HDMI Licensing LLC in the United States and other countries Kensington and Micro Saver are registered US trademarks of ACCO World Corporation with issued registrations and pending applications in other countries throughout the world Covered by one or more of the following U S patents 7 29...

Page 8: ...matically after a period of inactivity While you watch TV press the Green button and select Auto switch off Then select the period after which the TV switches off Switch off inactive devices Switch off connected EasyLink HDMI CEC Consumer Electronic Control compliant devices that are inactive While you watch TV press the Green button and select Inactive devices off Power management An advanced pow...

Page 9: ...on To exit from the Help menu press Visit the Philips website If you can t find what you need in the onscreen Help visit the Philips support website at www philips com support On the Philips support website you can also Find answers to Frequently Asked Questions FAQ Download a printable PDF version of this user manual Email us a specific question Chat online with Philips Consumer Care available in...

Page 10: ...crease or decrease volume Sensors and indicators For PFL4xx8 1 Remote control sensor Point the remote control at the sensor Make sure that the line of sight between the remote control and the TV is not blocked For PFL3xx8 1 Remote control sensor Point the remote control at the sensor Make sure that the line of sight between the remote control and the TV is not blocked ...

Page 11: ... Change the picture format to suit the video source 11 INFO Display information about the current activity 12 OPTIONS Access currently available options picture and sound menus 13 Back Return to the previous menu page or exit from a TV function 14 CH Switch channels 15 Volume Adjust volume 16 Mute Mute or restore audio 17 Colour buttons Select tasks or options The buttons function according to the...

Page 12: ...n power If the TV is not switched on the standby LED remains off Press on the TV If the standby LED is lit press on the remote control Note There is a short delay before the TV responds Tip If you cannot find your remote control and want to switch on the TV from standby press any button on the TV Switch TV to standby Press on the remote control The standby LED on the TV switches to red Switch off ...

Page 13: ...e remote control to enter a channel number Manage favourite channels You can view all channels or only a list of your favourite channels Create a list of your favourite channels 1 Press LIST The channel list is displayed 2 Select the channel to mark as favourite then press OPTIONS 3 Select Add remove favourites then press OK The selected channel is marked with an asterisk To remove a channel from ...

Page 14: ...t is displayed 2 Select the channel to rename then select OPTIONS 3 Select Rename then press OK The onscreen keyboard is displayed 4 Press the Navigation buttons to select each character then press OK 5 Once complete select Done then press OK to confirm Reorder channels After the channels have been installed you can reorder the channel list 1 While you watch TV press LIST The channel list is displ...

Page 15: ...d settings Original Settings that suit most environments and types of audio Movie Ideal settings for movies Music Ideal settings for listening to music Game Ideal settings for games News Ideal settings for spoken audio such as the news Change picture format You can change the picture format to suit the video source 1 Press FORMAT 2 Select a picture format then press OK The available picture format...

Page 16: ...adcaster 1 In the programme guide press OPTIONS 2 Select an option then press OK Update TV guide Update programme guide information Change day Select the day to display programme guide Search by genre Search programmes by genre All reminders Display a list of all programme reminders Watch 3D What you need For PFL43x8 only Your TV is a 3D TV Before you watch 3D read the health warning information i...

Page 17: ...t Picture and sound 3D settings 3 Select a setting then press OK 3D Side by side Select if the TV displays pictures that overlap vertically 3D Top bottom Select if the TV displays pictures that overlap horizontally 3D top bottom inverted or 3D side by side inverted Select if the TV displays distorted images such as the background appearing nearer to you Convert 2D to 3D You can convert any 2D prog...

Page 18: ...lect Repeat to play the video file repeatedly or Play once to play the video file once Media server When you play content from a media server you can select another media server Shuffle on Shuffle off Enable or disable random play of video files DivX VOD Display the DivX registration and deregistration codes for this TV Note To view information about a video for example played position duration ti...

Page 19: ... your computer you must first activate DivX VOD on the TV The DivX VOD activation of your TV is free of charge Register the TV If the TV is not yet activated when you start the playback of a rental DivX video the TV displays the DivX registration code to activate this TV To register follow these steps 1 When the TV displays the 8 or 10 digit registration code write down the code and go to http vod...

Page 20: ...nor is it responsible for damage to or loss of data in the device Formatting removes all data from the connected USB hard drive The USB hard drive is formatted exclusively for this TV Keep it permanently connected to the TV You cannot access the contents of the USB hard drive from another TV or PC Do not overload the USB port If you connect a USB hard drive device that consumes more than 500mA pow...

Page 21: ...as future TV programmes Note Recording is only supported in countries with programme guides In Nordic countries the TV provides limited support for subtitles while recording TV programmes What you need Tune your TV to receive digital TV channels such as DVB broadcasts See Change your TV settings Channels Automatic installation Page 30 Connect a USB 2 0 compatible hard drive with a minimum capacity...

Page 22: ...hard drive until this process is complete Start recording One touch recording You can record the programme you are currently watching with a single button 1 While you watch TV press Recording starts immediately A pop up window is displayed indicating the end time of the programme 2 Optional Use the Navigation buttons to mark the end time of the recording 3 Select Confirm then press OK 4 To stop re...

Page 23: ...a scheduled recording 1 Press 2 Select Recordings then press OK A list of recordings is displayed 3 Select the recording then select Remove The schedule recording is cancelled Watch recordings 1 Press 2 Select Recordings then press OK A list of recordings is displayed 3 Select a recording from the list then press OK The recording starts to play Sort recordings 1 Press 2 Select Recordings then pres...

Page 24: ... views With the two player gaming glasses each player can experience different views on the same TV 1 Press SOURCE 2 Select the game console then press OK 3 If needed load a game disc on the game console 4 On the game console select a multi player or two player game then select split screen viewing 5 Press OPTIONS on the TV remote control 6 Select Picture and sound Two player gaming 7 Select Top b...

Page 25: ...Text 2 5 is broadcast by a channel it is switched on by default Text language For digital TV channels where the broadcasters provide different text languages you can select your preferred primary and secondary languages 1 Press 2 Select Setup Channel settings or Satellite settings 3 Select Languages Primary Text or Secondary Text 4 Select a language then press OK Subpages If the text page contains...

Page 26: ...or Country dependent is selected 1 In the Clock menu select Daylight saving 2 Select Standard time or Daylight saving time then press OK Set the clock manually You can set the date and time manually Before you start set the clock mode to Manual 1 In the Clock menu select Date or Time then press OK 2 Set the time or date with the Navigation buttons 3 Select Done then press OK Sleep timer You can sw...

Page 27: ... programmes with age ratings lower than your child s age This restriction only applies to digital channels from broadcasters that rate their programmes according to age 1 Press 2 Select Setup Channel settings or Satellite settings 3 Select Child lock Parental rating You are prompted to enter the child lock code 4 Enter the child lock code with the Numeric buttons 5 Select an age rating then press ...

Page 28: ...ness Enable superior sharpness especially on lines and contours in the picture Dynamic contrast Dynamically enhance the details in the dark medium and light areas of the picture Dynamic backlight Select a backlight level to optimise dynamic power consumption and picture contrast Colour enhancement Dynamically enhance the vividness and details of colours Advanced Access advanced settings such as ga...

Page 29: ...annel and Stereo Audio Out levelling Set the output level for stereo audio Select Less for a certain amount of loss in intensity or signal strength Select More for no loss in intensity or signal strength HDMI 1 ARC Enable audio output from the ARC compliant device connected to the HDMI 1 connector Audio out delay Automatically sync the image on the TV to the audio from a connected home theatre You...

Page 30: ...en press OK 4 Select the system for your country or region then press OK Step 2 Search and store new TV channels 1 While you watch TV press 2 Select Setup Channel settings Channel installation 3 Select Analogue Manual installation Search channel then press OK 4 Find the channel If you know the channel frequency enter it with the Navigation buttons or Numeric buttons If you do not know the channel ...

Page 31: ...nnels then press OK 3 Follow the onscreen instructions to update the channels Copy channels ATTENTION This feature is intended for dealers and service personnel You can copy channel lists from one Philips TV to another through a USB storage device You do not need to search for channels or install them again on the second TV The channel list file is small enough to fit on any USB storage device Wha...

Page 32: ... Copy to TV then press OK The channel list is copied to the second TV 12 Disconnect the USB storage device Satellite settings What you can do This TV can receive signals from 4 different low noise block down converters LNBs An LNB is mounted at the end pole of the dish antenna and captures signals from a satellite Note Satellite reception is available for certain models only Search for satellite i...

Page 33: ...check the antenna connections and the position of the dish antenna then select Search again 5 If you are satisfied with the added satellite select Next to install all channels from the satellite The installation can take several minutes Remove a satellite 1 Press 2 Select Setup Search for satellite Remove satellite then press OK 3 Select the satellites you want to remove then select Remove and pre...

Page 34: ...s OPTIONS 2 Select Universal access Key beep On then press OK Hearing impaired access To make sure that a hearing impaired audio language is available press OPTIONS then select Audio language Languages that support hearing impaired audio are indicated with an ear shaped icon Switch on hearing impaired audio and subtitles 1 While you watch TV press OPTIONS 2 Select Universal access Hearing impaired...

Page 35: ... OK Home mode Some TV settings may not be available in Shop mode To make sure that the correct TV settings are applied set the TV to Home mode 1 While you watch TV press 2 Select Setup then press OK 3 Select TV settings General settings Location 4 Select Home or Shop then press OK 5 Restart the TV Update software Check version 1 Press 2 Select Setup Software settings Current software inf then pres...

Page 36: ...inues the upgrade as soon as power is restored If an error occurs during the upgrade retry the upgrade from the beginning If the error reoccurs contact Philips Consumer Care 1 Remove all USB devices such as a Wi Fi adapter from the TV then switch on the TV 2 Connect the USB flash drive to the TV The software upgrade starts automatically The upgrade is complete when a notification message appears o...

Page 37: ...e to the CVBS Y connector on the TV HDMI An HDMI connection has the best picture and sound quality An HDMI cable combines video and audio signals Connect HDMI for high definition HD TV signals and to switch on EasyLink An HDMI Audio Return Channel ARC connector allows output of TV audio to an HDMI ARC compliant device Connect HDMI cables shorter than 5 meters 16 4 feet Y Pb Pr Component video Y Pb...

Page 38: ...a Connect the antenna to the TV Connect devices Blu ray or DVD disc player Connect the disc player with an HDMI cable to the TV Connect the disc player to the TV with a component video cable Y Pb Pr and an audio L R cable ...

Page 39: ... digital TV receiver to the TV with an antenna cable For certain models only Connect the satellite or digital TV receiver to the TV with an HDMI cable Connect the digital TV receiver to the TV with a component video cable Y Pb Pr and an audio L R cable ...

Page 40: ...EN 40 Connect the digital TV receiver to the TV with a SCART cable Video recorder Connect the recorder to the TV with an antenna cable Connect the recorder to the TV with an HDMI cable ...

Page 41: ...ish Connect the recorder to the TV with a component video cable Y Pb Pr and an audio L R cable Connect the recorder to the TV with a SCART cable Game console Connect the game console with an HDMI cable to the TV ...

Page 42: ...o the TV with a component video cable Y Pb Pr and an audio L R cable Home theatre Connect an HDMI ARC compliant home theatre to the TV with an HDMI cable Connect the home theatre to the TV with an HDMI cable and a coaxial audio cable ...

Page 43: ...onnect the home theatre to the TV with a component video cable Y Pb Pr and an audio L R cable Connect the home theatre to the TV with a SCART cable Digital camera Connect the digital camera to the TV with a USB cable ...

Page 44: ...igital camcorder to the TV with an HDMI cable Connect the digital camcorder to the TV with a component video cable Y Pb Pr and an audio L R cable Connect more devices USB storage device Connect the USB hard drive to the TV with a USB cable ...

Page 45: ...EN 45 English Connect the USB flash drive with a USB cable to the TV Computer Connect the computer to the TV with an HDMI cable Connect the computer to the TV with a DVI HDMI cable and an audio cable ...

Page 46: ...k enhanced control features Connect your HDMI CEC compliant devices through HDMI to your TV and control them at the same time with your TV remote control Note Other brands describe HDMI CEC functionality differently Some examples are Anynet Samsung Aquos Link Sharp or BRAVIA Sync Sony Not all brands are fully compatible with Philips EasyLink After you have switched on Philips EasyLink the followin...

Page 47: ...ff then press OK Tips To switch back to TV control press then select Watch TV To control another device press then select the device from the Home menu EasyLink buttons You can control HDMI CEC compliant devices with the following buttons on the TV remote control Switch the TV and the connected device on or to standby Play buttons Control video or music play Numeric buttons Select a title chapter ...

Page 48: ...reaming You can switch audio between TV speakers and a connected amplifier at any time 1 Press OPTIONS 2 Select Picture and sound Speakers 3 Select one of the following then press OK TV On by default Stream TV audio through TV and the connected HDMI CEC audio device until the connected device switches to system audio control TV audio is then streamed through the connected device Amplifier Stream a...

Page 49: ...eed Caution To protect the CAM from damage insert the CAM as instructed Note Refer to the documentation from your service operator on how to insert a smart card into the Conditional Access Module 1 Switch off the TV 2 Follow the directions printed on the CAM to insert the CAM into the Common Interface slot at the side of the TV Push the CAM in as far as it will go 3 Switch on the TV then wait for ...

Page 50: ... When the TV is disconnected and reconnected to the power supply the startup screen is displayed at the next startup To switch on the TV from standby press on the remote control or press any key on the TV The standby light on the TV blinks red Disconnect the power cable from the power outlet Wait until the TV cools down before you reconnect the power cable If the blinking reoccurs contact Philips ...

Page 51: ...ctly There is poor TV reception from an antenna connection Make sure that the antenna is properly connected to the TV Loud speakers unearthed audio devices neon lights high buildings and other large objects can influence reception quality If possible try to improve the reception quality by changing the antenna direction or moving devices away from the TV If reception on only one channel is poor fi...

Page 52: ...s Note that HDCP High bandwidth Digital Content Protection support can delay the time taken for a TV to display content from an HDMI device If the TV does not recognise the HDMI device and no picture is displayed switch the source from one device to another and back again If there are intermittent sound disruptions make sure that output settings from the HDMI device are correct If you use an HDMI ...

Page 53: ... www philips com support You can also consult and contribute to the Philips TV community at www supportforum philips com If you wish to speak to or email a Philips representative contact the Philips Consumer Care in your country You can find the contact details in the leaflet accompanying this TV or at www philips com support Note your TV model and serial number before you contact Philips These nu...

Page 54: ... Display and sound Picture Display Display type LED backlight Full HD Diagonal size 81 cm 32 inches 99 cm 39 inches 102 cm 40 inches 107 cm 42 inches 117 cm 46 inches 127 cm 50 inches 140 cm 55 inches Aspect ratio 16 9 widescreen Panel resolution 1920x1080p Full HD Picture enhancement Pixel Precise Perfect Motion Rate PMR For PFL43x8 200 Hz For PFL3xx8 100 Hz For PFL43x8 3D 3D Max Sound Output pow...

Page 55: ...s Note Multimedia file names must not exceed 128 characters USB Connect only those USB devices that consume 500 mA of power or less NTFS FAT 16 Read only FAT 32 Ethernet LAN RJ 45 For certain models Supported image files JPEG jpg jpeg mpo jps GIF 87a 89a gif PNG png pns BMP bmp dib JPS jps PNS pns BMS bms Supported audio video formats Supported audio video formats ...

Page 56: ...EN 56 Supported audio video formats Supported audio video formats Supported audio video formats Supported audio video formats ...

Page 57: ...ing Windows 1250 CP 1250 Central Europe and Eastern Europe Latin Czech Hungarian Polish Slovak Slovenian Croatian Romanian Serbian Windows 1251 CP 1251 Cyrillic Windows 1252 CP 1252 Western Europe Latin Windows 1253 CP 1253 Greek Windows 1254 CP 1254 Turkish UTF 8 Multi byte character encoding for Unicode ...

Page 58: ...thernet LAN RJ 45 for certain models SERV U Service port CVBS Y Pb Pr Audio L R Composite video and audio DIGITAL AUDIO OUT Coaxial TV ANTENNA 75 ohm coaxial IEC SCART RGB CVBS SCART adaptor SAT F pin satellite for certain models Side CI Common Interface HDMI USB Headphones stereo 3 5mm mini jack Help version UMv 300812125204 ...

Page 59: ...l 30 channels install satellite 32 channels logo 14 channels reinstall 36 channels rename 14 channels sort 14 channels switch 13 channels update 31 child lock 26 CI 49 clock 26 codecs supported 55 Common Interface 49 Conditional Access Module 49 connect computer 45 connect digital camcorder 44 connect digital camera 43 connect disc player 38 connect external hard disk 44 connect game console 41 co...

Page 60: ...tre connect 42 I install channels automatic 30 K Kensington lock 5 key beep 34 L language menu 33 language subtitles 34 lock TV 5 M mode home or shop 35 multimedia play files 17 multimedia play options 18 multimedia supported formats 55 O online forum 9 P parental rating 27 pause TV 20 pause TV USB hard drive 20 PC display resolutions 54 picture format 15 picture settings 28 picture settings reset...

Page 61: ...e digital update 36 software USB update 35 sound settings 29 sound settings reset 29 sound specifications 54 source select 15 standby 12 standby LED 10 subtitles analog 33 subtitles digital 34 subtitles language 34 sustainability 8 switch TV on off 12 T teletext search 25 text 2 5 25 text digital text 25 text dual screen 25 text enlarge 25 text language 25 text subpages 25 text Table Of Pages 25 t...

Page 62: ...Specifications are subject to change without notice Philips and the Philips shield emblem are registered trademarks of Koninklijke Philips Electronics N V and are used under license from Koninklijke Philips Electronics N V 2013 TP Vision Netherlands B V All rights reserved www philips com ...

Reviews: