background image

English

9

Preparations

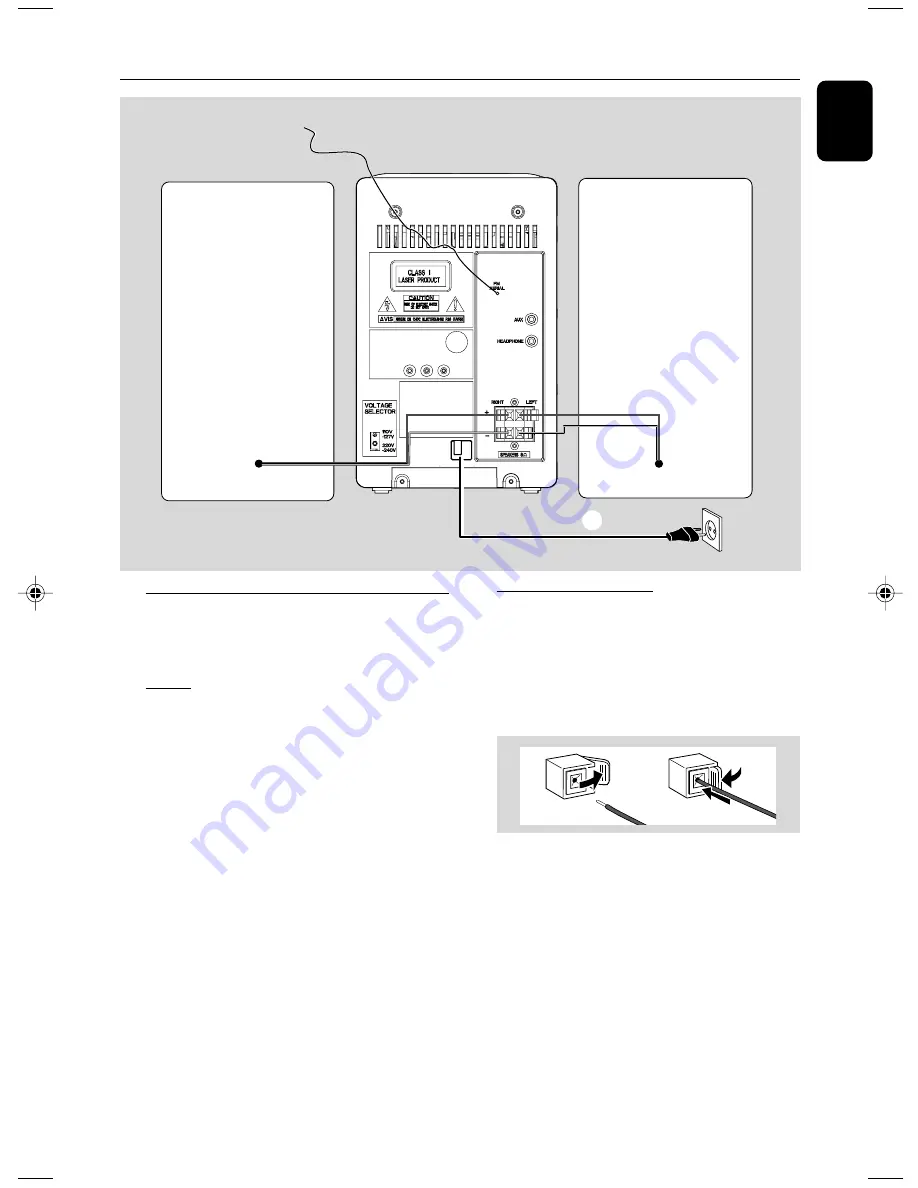
Rear connections

The type plate is located at the rear of the
system.

A

Power

– Before connecting the AC power cord to the

wall outlet, ensure that all other connections
have been made.

– If your system is equipped with a Voltage

Selector, set the VOLTAGE SELECTOR to the
local power line voltage.

WARNING!
– For optimal performance, use only the
original power cable.
– Never make or change any connections
with the power switched on.

To avoid overheating of the system, a safety
circuit has been built in.  Therefore, your
system may switch to Standby mode
automatically under extreme conditions. If
this happens, let the system cool down
before reusing it 

(not available for all versions)

.

B

Speakers Connection

Front Speakers

Connect the speaker wires to the SPEAKERS
terminals, right speaker to "

RIGHT

" and left

speaker to "

LEFT

", coloured (marked) wire to

"

+

" and black (unmarked) wire to "

-

".

Fully insert the stripped portion of the speaker
wire into the terminal as shown.

Notes:
– For optimal sound performance, use the supplied
speakers.
– Do not connect more than one speaker to any
one pair of 

+

/

-

 speaker terminals.

– Do not connect speakers with an impedance
lower than the speakers supplied.  Please refer to
the SPECIFICATIONS section of this manual.

1

2

speaker

(right)

speaker

(left)

AC power cord

FM wire antenna

A

A

B

pg001-pg022_MCM149

2007.8.28, 11:20 AM

9

Summary of Contents for MCM149

Page 1: ...MCM149 Micro Hi Fi System User manual Register your product and get support at www philips com welcome ...

Page 2: ...2 CAUTION Use of controls or adjustments or performance of procedures other than herein may result in hazardous radiation exposure or other unsafe operation ...

Page 3: ...EN CLOSE 3mm PULLTO OPEN MICRO SYSTEM MCM149 SOURCE DBB STANDBY ON VOL VOL TUNING MODE PROG CD CD R CD RW COMPATIBLE ALBUM PRESET PULLTO OPEN iR 1 2 7 8 9 0 3 4 5 6 1 5 3 0 9 4 PROG ALB CLOCK DISPLAY PRESET ...

Page 4: ...4 ...

Page 5: ...5 English 6 English Index ...

Page 6: ...on Loading a disc 13 Basic playback controls 13 Playing an MP3 disc 13 14 Different play modes SHUFFLE and REPEAT 14 Programming track numbers 14 Reviewing the programme 14 Erasing the programme 14 Radio Reception Tuning to radio stations 15 Programming radio stations 15 Automatic programming 15 Manual programming 15 Tuning to preset radio stations 15 Tape Operation Recording Tape playback 16 Gene...

Page 7: ...sed as the disconnet device the disconnet device shall remain readily operable The apparatus shall not be exposed to dripping or splashing Install the unit near the AC outlet and where the AC power plug can be easily reached Place the system in a location with adequate ventilation to prevent internal heat build up in your system Allow at least 10 cm 4 inches clearance from the rear and the top of ...

Page 8: ...re To establish a safe volume level Set your volume control at a low setting Slowly increase the sound until you can hear it comfortably and clearly without distortion Listen for reasonable periods of time Prolonged exposure to sound even at normally safe levels can also cause hearing loss Be sure to use your equipment reasonably and take appropriate breaks Be sure to observe the following guideli...

Page 9: ... Standby mode automatically under extreme conditions If this happens let the system cool down before reusing it not available for all versions B Speakers Connection Front Speakers Connect the speaker wires to the SPEAKERS terminals right speaker to RIGHT and left speaker to LEFT coloured marked wire to and black unmarked wire to Fully insert the stripped portion of the speaker wire into the termin...

Page 10: ...rate the system 1 Aim the Remote Control directly at the remote sensor IR on the front panel 2 Do not put any objects between the Remote Control and the system while operating the system CAUTION Remove batteries if they are exhausted or if the Remote Control is not being used for a long time Do not use old and new or different types of batteries in combination Batteries contain chemical substances...

Page 11: ...st rewinds winds the tape STOP OPENÇ0 stops the tape opens the tape compartment PAUSEÅ interrupts recording or playback AUX jack located on the back panel connects an external source 3 5 mm socket HEADPHONE located on the back panel connects headphones Controls available on the remote control only REP ALL for CD selects Repeat All play mode for MP3 WMA selects Repart All or Repeat Album play mode ...

Page 12: ... the Plug and Play installation the function will be restarted when you next turn on the main supply again Note During Plug and Play if no button is pressed within 15 seconds the system will exit Plug and Play mode Switching the system on Press STANDBY ON 2 or SOURCE POWER DISC TAPE TUN or AUX on the remote control The system will switch to the last selected source To switch the system to standby ...

Page 13: ... TAPE or AUX you select standby Playing an MP3 WMA disc 1 Load an MP3 WMA disc The disc reading time may exceed 10 seconds due to the large number of songs compiled into one disc AXX TXXX is displayed AXX is the total album number and TXXX is the total track number 2 Press ALBUM PRESET to select a desired album IMPORTANT The lens of the CD player should never be touched Loading a disc This CD play...

Page 14: ...ected SHUFFLE playback starts automatically 3 To return to normal playback press MODE on the system or press REP REPALL or SHUF on the remote control until the various SHUFFLE REPEAT modes are no longer displayed You can also press 9 to cancel your play mode Note The SHUFFLE and REPEAT functions cannot be used simultaneously Programming track numbers Programme in the STOP position to select and st...

Page 15: ...the memory already 1 Press ALBUM PRESET to select the preset number where programming should start Note If no preset number is selected default is preset 1 and all your presets will be overridden 2 Press PROG for more than 2 seconds to activate programming AUTO is displayed and available stations are programmed in order of waveband reception strength The first preset automatically stored will then...

Page 16: ...ge within a CD track Press and hold down on 4 à á on the remote control Release the control when you recognize the passage you want To pause CD playback press 2 Recording starts from this exact point in the track when you press RECORD 6 To pause press PAUSE Press again to resume 7 To stop recording press STOP OPENÇ0 Tape playback 1 Select TAPE source Display shows TAPEthroughout tape operation 2 O...

Page 17: ...e You can listen to the sound of the connected external device through your system s speakers 1 Press SOURCE on the set repeatedly or press AUX on the remote control to select AUX source 2 Use a cinch cable not supplied to connect MCM 149 s AUX jack 3 5 mm located on the back panel to an AUDIO OUT or headphone jack on an external equipment such as CD player orVCR The making of unauthorized copies ...

Page 18: ...er prolonged use dirt or dust may accumulate at the disc lens To ensure good playback quality clean the disc lens with Philips CD Lens Cleaner or any commercially available cleaner Follow the instructions supplied with cleaner Maintenance Cleaning the Heads and theTape Paths To ensure good recording and playback quality clean the heads A the capstan s B and pressure roller s C after every 50 hours...

Page 19: ...ars from the display Setting the clock 1 In standby mode press and hold CLOCK DISPLAY on the remote control set for 2 seconds 2 Press PROG to select 12 hour or 24 hour display 3 Press CLOCK DISPLAY to confirm The clock digits for the hours flash 4 Press TUNING 4 à á on the remote control to set the hours 5 Press CLOCK DISPLAY again The clock digits for the minutes flash 6 Press TUNING 4 à á on the...

Page 20: ...B sensitivity 5 mV m Total harmonic distortion 5 TAPE DECK Frequency response Normal tape type I 125 8000 Hz 8 dB Signal to noise ratio Normal tape type I 40 dBA Wow and flutter 0 4 JIS SPEAKERS Bass reflex system Dimensions w x h x d 134 x 230 x 152 mm GENERAL INFORMATION AC Power 110 127 220 240V 50 60 Hz switchable Dimensions w x h x d 148 x 233 x 216 mm Weight with without speakers approx 3 65...

Page 21: ... only NORMAL IEC I tape Apply a piece of adhesive tape over the missing tab space Remove and reconnect the AC power plug and switch on the system again Adjust the volume Disconnect the headphones Check that the speakers are connec ted correctly Check if the stripped speaker wire is clamped Make sure the MP3 CD was recorded within 32 256 kbps bit rate with sampling frequencies at 48 kHz 44 1 kHz or...

Page 22: ...een the remote control and the system Insert the batteries with their polarities signs aligned as indicated Replace the batteries Point the remote control directly towards the IR sensor Set the clock correctly PressTIMER to switch on the timer If recording or tape dubbing is in progress stop recording Power has been interrupted or the power cord has been disconnected Reset the clock timer Troubles...

Page 23: ...pañol Português Português Deutsch Nederlands Italiano Svenska Dansk Suomi Polski Polski English Printed in China CLASS 1 LASER PRODUCT MCM149 PDCC LL 0734 Meet Philips at the Internet http www philips com ...

Reviews: