7
Inst
a
lla
ti
o
n
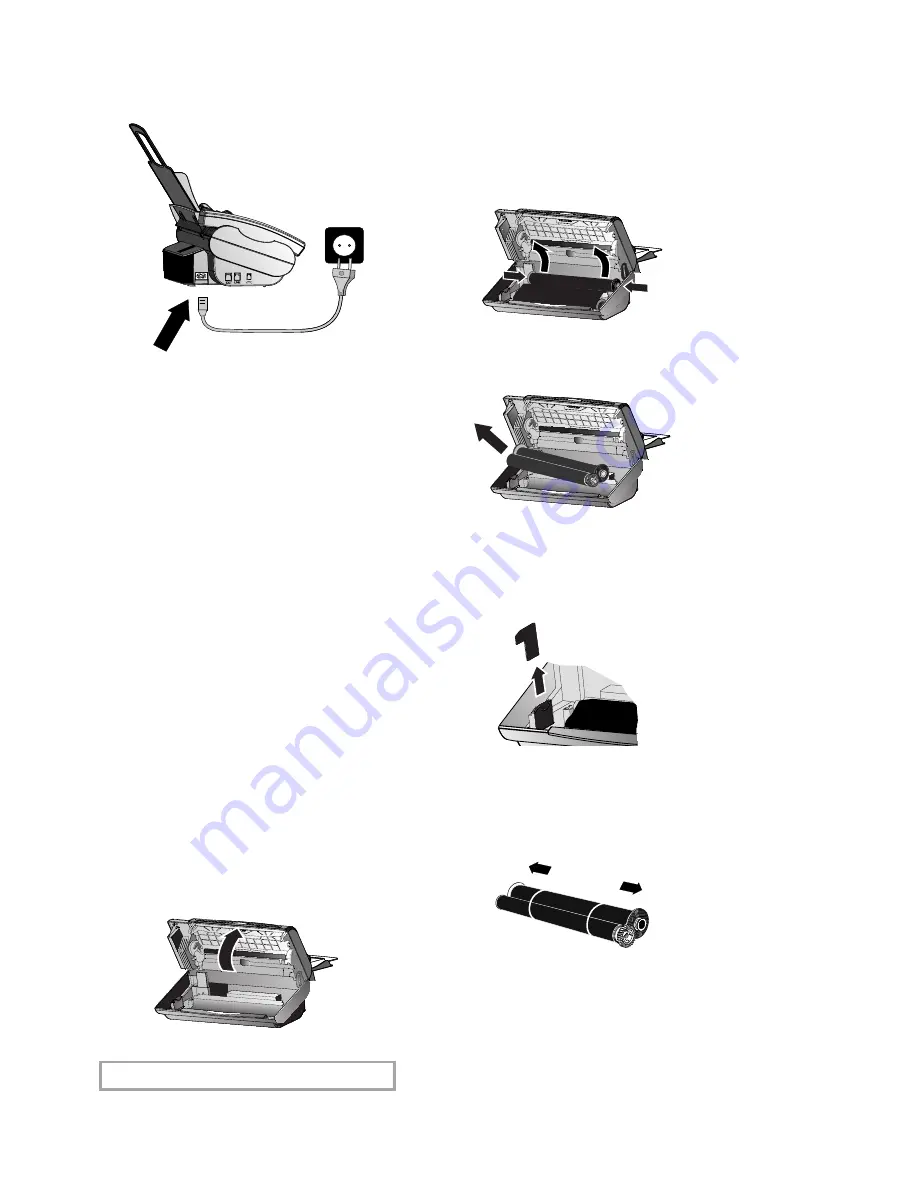
Power supply
Ink film
You cannot receive or copy documents unless an
ink fi lm is loaded in the fax machine. The ma-
chine is therefore supplied complete with a free
ink fi lm for a few trial pages.
The symbols
áéíó
indicate how much ink
fi lm has already been used.
The consumption and print setting are stored
on the supplied Plug‘N’Print card. A new
Plug’n’Print card therefore has to be inserted
with each new ink fi lm (the settings were made at
the factory for the initial free ink fi lm. Only this
one therefore will work without a Plug‘N‘Print
card). If this is missing or if it is not replaced the
message
CHANGE CARD
appears on the display.
If the ink fi lm is fi nished or if there is no ink
fi lm in the fax machine, the red display lamp
fl ashes, and the following message appears:
REFILL INKFILM
.
1
Before loading a new ink fi lm you must re-
move the paper from the paper feed mecha-
nism! Also follow the instructions on your ink
fi lm packaging!
2
Open the fax machine by lifting the operating
panel in the middle until it clicks in place.
v
For use with Philips ink fi lms only!
Removing the ink film
1
Lift the rear ink fi lm roll holding both sides
with your index fi ngers upwards, in order to
remove it out of its seat and place it next to
the front ink fi lm roll.
2
Remove both ink fi lm rolls. They cannot be
reused.
3
Remove the old Plug‘N‘Print card from the
slot to the left of the ink fi lm compartment
(only the initial free ink fi lm does not have a
Plug‘N‘Print card).
Loading the ink film
1
Carefully remove the rubber rings from the
new ink fi lm. Take care not to damage the ink
fi lm.
Summary of Contents for M3
Page 1: ...PHILIPS M3 ...


