Philips JETStream Quick Start Manual Download Page 2

Erica Sommer 

Page 2 

4/10/2006 

Philips Jetstream to Codonics EP-1000 Printer Setup 

3.  Insert the power connector into the back of the Ethernet converter. Plug the Ethernet converter power 

module into a 120 vac power source. Ensure that the Pwr indicator at the back of the converter is lit. 

4.  Connect a network cable to the back of the Ethernet converter as follows: 


Use the straight-through cable (blue cable provided with EP-1000) if the EP-1000 and the 
JETStream are part of a network. 


Use the crossover cable (gray cable provided with the EP-1000) if the EP-1000 is to connect directly 
to the JETStream

5.  Verify that the orange Link indicator is lit. 

Driver and Network Configuration 

Administrative privileges on Windows XP are required to install print drivers. By default, JETStream users 
should have XP administrative privileges. If you do not have administrative privileges, please contact your 
system administrator.  

1.  Determine the IP address to be used by the EP-1000: 


If on a large network, obtain network address information from the System Administrator. 


If directly connected or on an isolated network, choose an unused address that differs only in the 
last section (octet). For example, if the JETStream is at 192.9.200.10, the EP-1000 could use 
192.9.200.50 if no other device was already using it. 

NOTE: The JETStream IP address can be determined by opening a command window (Start 

 Run 


cmd

) and then typing 

ipconfig <Enter>

2.  Locate the EP-1000 driver CD which can be found in the EP-1000 shipping box. Place it in the CD drive 

of the JETStream

3. Use 

My Computer

 or 

Windows Explorer

 to browse to the CD. Doubleclick on the file 

ep-

1000_windriver.exe

 to start the automated driver loading process. Follow the prompts. 
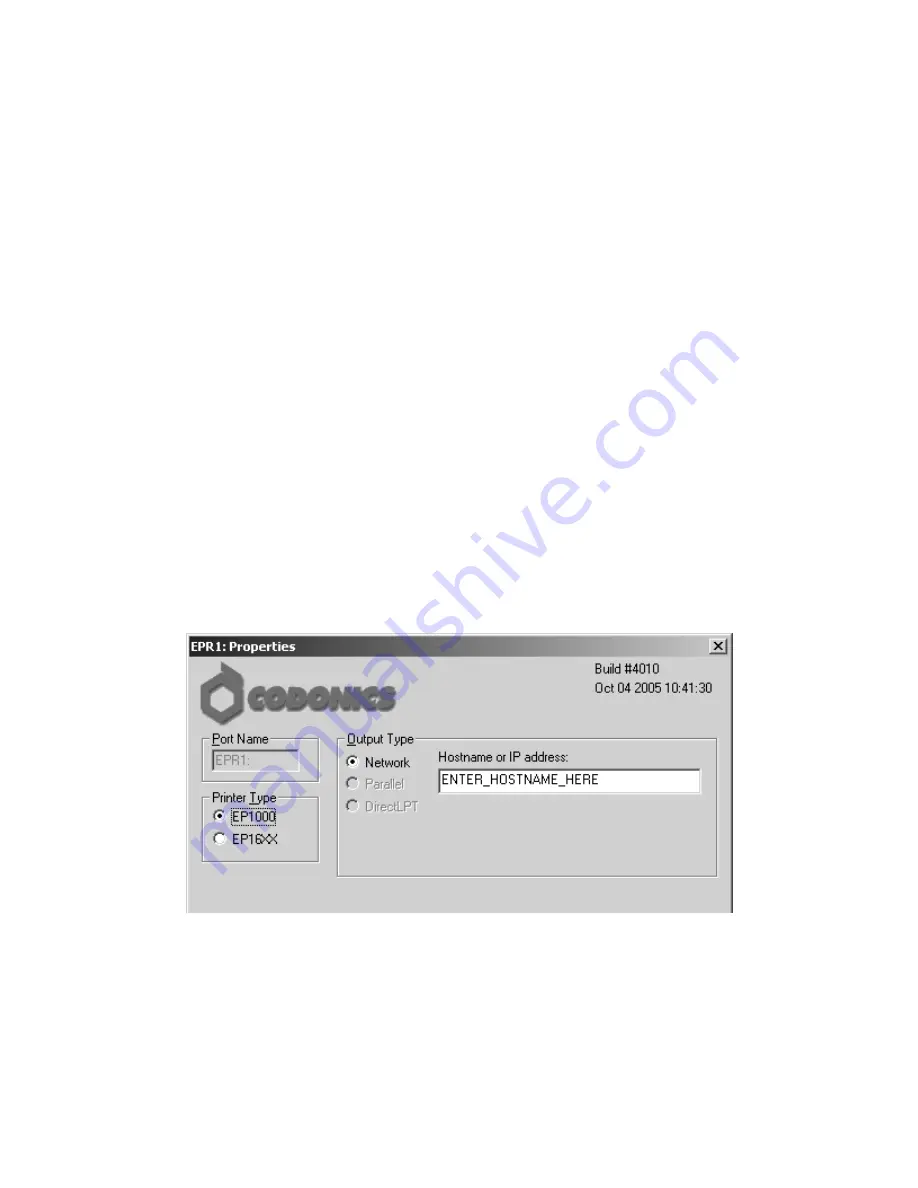
4. A 

special 

EPR1 printer port will be automatically created which must be used for the EP-1000. When the 

EPR1 configuration screen is displayed, type the IP address determined in step 1 in the box labeled 

Host name or IP address

5.  The Add Printer Wizard will launch automatically. Please note the following very important points: 

A.  The EP-1000 must be installed as a Local printer. Do not choose “Network Printer Installation.” 
B.  The special EPR1 local port must be used for the EP-1000. Do not choose or create a TCP port. 
C.  When prompted for drivers, click 

Have Disk

, but DO NOT browse to the driver CD. The driver files 

will be found on the JETStream at the following path: 

 
c:\CODONICS\drivers\win2k_xp 

Summary of Contents for JETStream

Page 1: ...e starter kit Place the paper into the cassette so that the shiny side is up 5 Insert the loaded media cassette into the front of the EP 1000 6 Load ribbon carrier as follows A Remove and unwrap the green ribbon carrier from the EP 1000 shipping box B Unwrap the 50 print starter ribbon that is provided in the starter kit C Snap the ribbon into the carrier The spools are keyed so that the ribbon on...

Page 2: ...rk choose an unused address that differs only in the last section octet For example if the JETStream is at 192 9 200 10 the EP 1000 could use 192 9 200 50 if no other device was already using it NOTE The JETStream IP address can be determined by opening a command window Start Run cmd and then typing ipconfig Enter 2 Locate the EP 1000 driver CD which can be found in the EP 1000 shipping box Place ...

Page 3: ...er networks obtain the proper values from the Network Administrator 4 When completed there should be a message indicating that the Parameters were set OK In some cases the parameters may set up properly but a failure to verify message may be displayed If this failure message does occur do the following A Type ping IP address Enter If a response indicating a successful ping is returned then the Eth...

Page 4: ...stem to ensure proper connectivity and printer operation 1 Click the Windows Start button Then click Settings then Printers and Faxes 2 Right click on the icon for the Codonics EP 1000 3 Click Properties and then select the General tab Click Print Test Page which will immediately initiate the sending of a test page to the EP 1000 Within about 10 seconds you should see the interface lights on the E...

Page 5: ...l Color Matching MCM setting Any of the five MCM settings can be used to provide a starting point for matching printed colors to the colors as displayed on the monitor Note that MCM 104 and 105 were specially designed for Philips MCM 105 replicates the colors of the NP 1600 series printer for customers who prefer that appearance Once the MCM is selected the EP 1000 provides three other adjustments...

Page 6: ...Erica Sommer Page 6 4 10 2006 Philips Jetstream to Codonics EP 1000 Printer Setup Print to Preferences Preferences to Advanced ...

Page 7: ... and mov formats This can be useful for troubleshooting color matching issues To save the image click on the Screen Capture icon Anonymizing Images JETStream has a feature for when an image needs to be printed without its identifying data called De Identify Click the De Identify icon to strip an image of the patient name Use this when sending images to Codonics Technical Support ...

Reviews: