background image

20

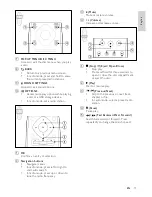
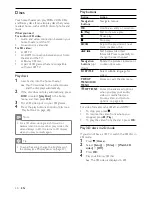
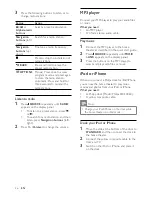
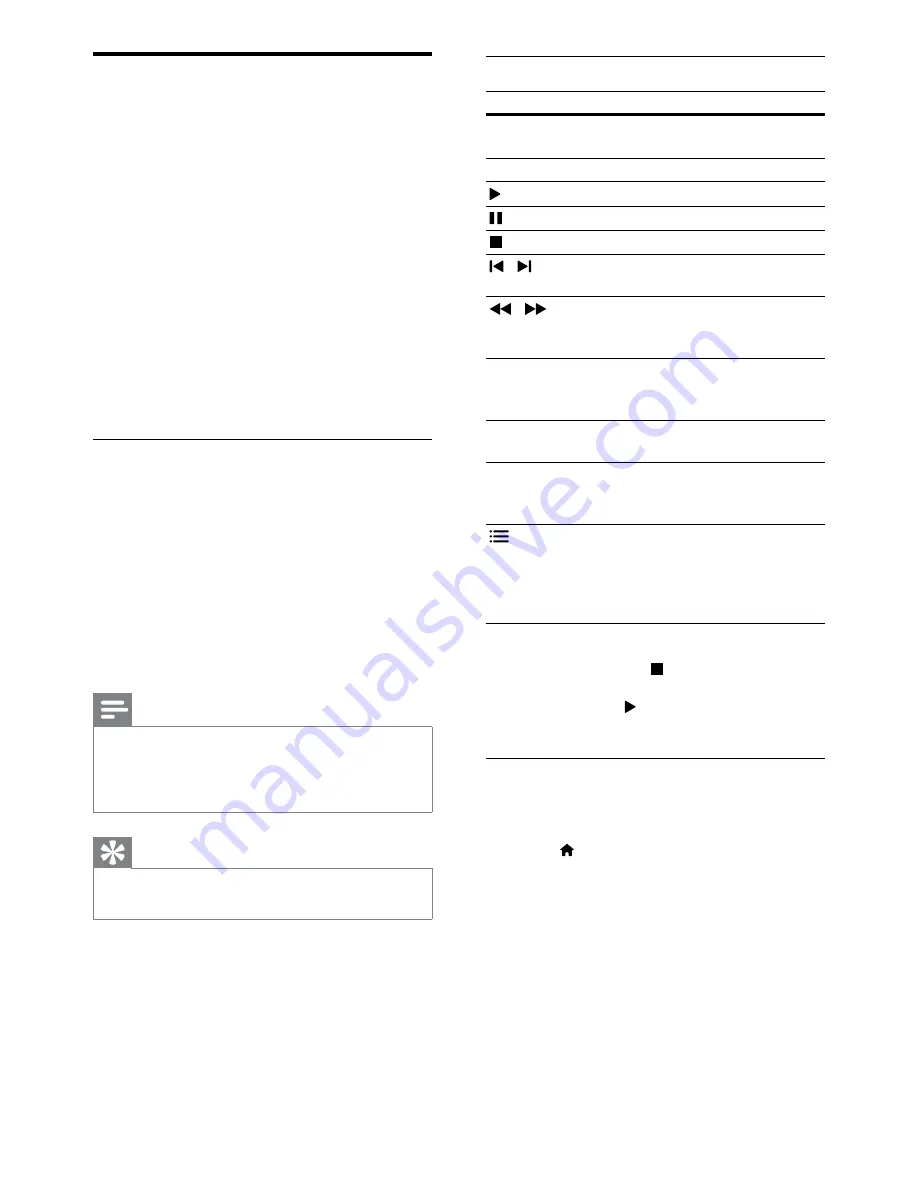
Play buttons

Button

Action

Navigation 

buttons

Navigate menus.

OK

Confirm an entry or selection.

 (

Play

)

Start or resume play.
Pause play.
Stop play.

 / 

Skip to the previous or next 

track, chapter or file.

 / 

Fast backwards or fast 

forwards. Press repeatedly to 

change the search speed.

Navigation 

buttons

 (up/

down)

Rotate the picture clockwise or 

counter-clockwise.

SUBTITLE

Select subtitle language for 

video.

POP-UP 

MENU/DISC 

MENU

Access or exit the disc menu.

 OPTIONS

Access the advanced options 

when you play your audio, 

video, or media files (see 

‘Audio, video, and picture 

options’ on page 24).

For video formats such as DivX and WMV:

• 

To stop play, press  .

• 

To resume the video from where you 

stopped, press   (

Play

).

• 

To play the video from the start, press 

OK

.

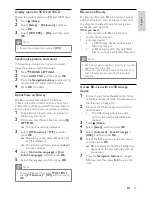
Play 3D discs in 2D mode

If you do not have a 3D TV, watch the 3D disc in 

2D mode.

1

 Press  (

Home

).

2

 Select 

[Setup]

 > 

[Video]

 > 

[Watch 3D 

video]

 > 

[Off]

.

3

 Press 

OK

.

4

  Play your Blu-ray 3D disc.


»

The 3D video is displayed in 2D.

Discs

Your home theater can play DVDs, VCDs, CDs, 

and Blu-ray discs. It can also play discs that you’ve 

made at home, such as CD-R discs of photos and 

music.

What you need

For audio or 2D video: 

• 

Audio and video connection between your 

home theater and the TV.

• 

An audio or a video disc.

For 3D video:

• 

A 3D TV.

• 

An HDMI connection between your home 

theater and the TV.

• 

A Blu-ray 3D disc.

• 

A pair of 3D glasses that are compatible 

with your 3D TV.

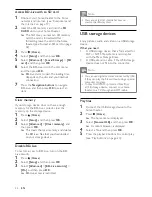
Play discs

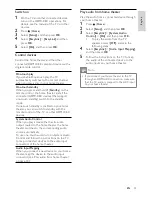
1

  Insert a disc into the home theater.


»

Your TV switches to the correct source 

and the disc plays automatically.

2

  If the disc does not play automatically, press 

DISC

 or select 

[play Disc]

 in the home 

menu, and then press 

OK

.

3

  For a 3D video, put on your 3D glasses.

4

  Press the play buttons to control play (see 

‘Play buttons’ on page 20).

Note


For a 3D video, during search forward or 

backward, and in some other play modes, the 

video displays in 2D. It returns to 3D display 

when you play normally again.

Tip


To avoid flickering, change the brightness of 

the display (see ‘Display panel’ on page 37).

EN

Summary of Contents for HTS7201

Page 1: ...nwijzing PL Instrukcja obsługi PT Manual do utilizador SV Användarhandbok TR Kullanım kılavuzu HTS7201 HTS7202 HTS7212 EN User manual DA Brugervejledning DE Benutzerhandbuch EL Εγχειρίδιο χρήσης ES Manual del usuario FI Käyttöopas FR Mode d emploi IT Manuale utente EN User manual ...

Page 2: ......

Page 3: ... the Internet 37 Update software through USB 38 10 Product specifications 39 11 Troubleshooting 42 12 Language code 44 13 Index 45 Contents 1 Using help 4 Navigate the onscreen help 4 2 Help and support 5 Update your onscreen help 5 Tutorials 6 FAQs 6 Contact Philips 6 3 Notice 6 Open source software 6 Trademarks 6 4 Important 8 Safety 8 Care for your product 8 Care of the environment 9 3D health ...

Page 4: ...o develop products that contribute to a greener environment To save paper and the environment access the help on your home theater through the onscreen interface The onscreen help contains all the information that you need to set up your home theater However if you prefer to print the user manual download the PDF version from www philips com support Follow the instructions on the website to select...

Page 5: ...do not remove the USB flash drive from the home theater If an error occurs during the update retry the procedure If the error reoccurs contact Philips Consumer Care 2 Help and support Watch video tutorials download a software update and find answers to many frequently answered questions FAQs on your product at www philips com Update your onscreen help Philips continually tries to improve its produ...

Page 6: ...bove The texts of the licenses and acknowledgements for open source software used in this product are included in the user manual Trademarks Blu ray 3D and Blu ray 3D logo are trademarks of Blu ray Disc Association DVD Video is a trademark of DVD Format Logo Licensing Corporation Tutorials To set up your home theater and get additional information refer to the video tutorials at www philips com su...

Page 7: ... the United States and other countries SDHC Logo is a trademark of SD 3C LLC CLASS 1 LASER PRODUCT Java and all other Java trademarks and logos are trademarks or registered trademarks of Sun Microsystems Inc in the United States and or other countries BONUSVIEW BD LIVE and BONUSVIEW are trademarks of Blu ray Disc Association AVCHD and AVCHD logo are trademarks of Matsushita Electric Industrial Co ...

Page 8: ...re you use your home theater If damage is caused by failure to follow instructions the warranty does not apply Safety Risk of electric shock or fire Never expose the product and accessories to rain or water Never place liquid containers such as vases near the product If liquids are spilt on or into the product disconnect it from the power outlet immediately Contact Philips Consumer Care to have th...

Page 9: ...years of age as their visual system is not fully developed yet Care of the environment Your product is designed and manufactured with high quality materials and components which can be recycled and reused When this crossed out wheeled bin symbol is attached to a product it means that the product is covered by the European Directive 2002 96 EC Please inform yourself about the local separate collect...

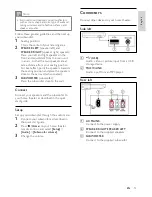
Page 10: ...h to Philips dock for iPod or iPhone HELP Access the onscreen help SOURCE Select an audio input source or radio source c Home Access the home menu 5 Your home theater Congratulations on your purchase and welcome to Philips To fully benefit from the support that Philips offers register your home theater at www philips com welcome Main unit a Standby On Switch the home theater on or to standby b SOU...

Page 11: ... backwards or forward Press repeatedly to change the search speed a POP UP MENU DISC MENU Access or exit the disc menu when you play a disc b BACK Return to a previous menu screen In radio mode press and hold to erase the current preset radio stations c SOUND SETTINGS Access or exit sound options d OPTIONS Access more play options while playing a disc or a USB storage device In radio mode set a ra...

Page 12: ...akers for best surround sound Position Speaker position plays a critical role in setting up a surround sound effect For best results place your speakers and the subwoofer as shown below a Alphanumeric buttons Enter values or letters using SMS style entry In radio mode select a preset radio station b TOP MENU Access the main menu of a video disc c SUBTITLE Select subtitle language for video EasyLin...

Page 13: ...s the center of your listening area 2 SPEAKER LEFT speaker left and SPEAKER RIGHT speaker right speakers Place your left and right speakers in the front and equidistant from the main unit in an arc so that the two speakers are at same distance from your seating position For best effect point the speakers towards the seating position and place the speakers close to the ear level when seated 3 SUBWO...

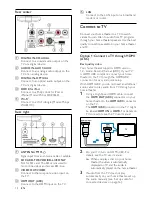
Page 14: ...l 2 On your TV turn on HDMI CEC For details see the TV user manual When you play a disc on your home theater the video is automatically displayed onTV and the audio is automatically played on the home theater 3 If audio from the TV does not play automatically on your home theater set up the audio manually see Set up audio for connected devices on page 16 TV Rear center a DIGITAL IN COAXIAL Connect...

Page 15: ... TV Option 2 Connect to TV through HDMI Best quality video If your TV is not HDMI ARC compliant connect your home theater to the TV through a standard HDMI connection With a standard HDMI connection you need an additional audio cable to play the audio from the TV through your home theater see Connect audio from TV and other devices on page 16 1 Using a High Speed HDMI cable connect the HDMI OUT AR...

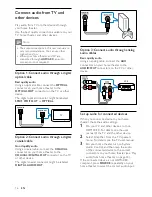
Page 16: ...o select the correct audio input VCR Connect audio from TV and other devices Play audio from TV or other devices through your home theater Use the best quality connection available on your TV home theater and other devices Note The audio connections in this user manual are only recommendations You can use other connections too When your home theater and TV are connected through HDMI ARC an audio c...

Page 17: ...reamed from your computer Play music photo and video from a computer or other media server on your network see Browse PC through DLNA on page 28 Net TV Not available in China Browse Net TV services to access online information games news music and other services see Browse Net TV on page 31 Software update Update the home theater software through the network see Update software through the Interne...

Page 18: ... dongle Model Philips WUB1110 A computer with media server software installed see Set up media server software on page 28 For Net TV and software update make sure that the network router has access to the Internet and is not restricted by firewalls or other security systems Set up the wireless network Connect your home theater to your router as shown below and then switch on the devices 1 Connect ...

Page 19: ...and low frequency bass settings of the home theater 1 Press SOUND SETTINGS 2 Select TREBLE MID or BASS and then press OK 3 Press the Navigation buttons up down to change the frequency 4 Press OK to confirm 7 Use your home theater This section helps you use the home theater to play media from a wide range of sources Before you start Make the necessary connections described in the quick start guide ...

Page 20: ...ay your Blu ray 3D disc The 3D video is displayed in 2D Discs Your home theater can play DVDs VCDs CDs and Blu ray discs It can also play discs that you ve made at home such as CD R discs of photos and music What you need For audio or 2D video Audio and video connection between your home theater and the TV An audio or a video disc For 3D video A 3D TV An HDMI connection between your home theater a...

Page 21: ...et connection 7 Press the Navigation buttons to navigate BD Live and then press OK to select an item Display menu forVCD and SVCD Display the content menu on VCD and SVCD discs 1 Press Home 2 Select Setup Preference and then press OK 3 Select VCD PBC On and then press OK Note To skip the content menu select Off Synchronize picture and sound If the audio and video are not synchronized delay the aud...

Page 22: ... internet see Computers and the Internet on page 17 2 Insert the SD memory card into the SD CARD slot on your home theater The first time you insert an SD memory card the card is formatted After formatting leave the card in the home theater see Format an SD card on page 32 3 Press Home 4 Select Setup and then press OK 5 Select Advanced Local Storage SD card and then press OK 6 Select the BD Live i...

Page 23: ...e has the same name as the video file For example if the video file is named movie avi save the subtitle file as movie srt or movie sub Your home theater can play subtitle files in the following formats srt sub txt ssa ass smi and sami These files do not appear in the file navigation menu If the subtitles do not appear correctly change the character set Play buttons Button Action Navigation button...

Page 24: ...to select a zoom factor Repeat Repeat a chapter or title Repeat A B Mark two points within a chapter or track to repeat play or turn off the repeat mode Picture Settings Select a predefined color setting Subtitle character set If the subtitles do not appear correctly change the character set that supports the DivX subtitle 1 Press OPTIONS The options menu is displayed 2 Press the Navigation button...

Page 25: ...While viewing a picture zoom into the picture rotate it add animation to a slideshow and change the picture settings 1 Press OPTIONS The picture options menu appears 2 Press the Navigation buttons and OK to select and change the following settings Rotate 90 Rotate the picture 90 degree clockwise Rotate 90 Rotate the picture 90 degree counter clockwise Zoom Zoom into a video scene or picture Press ...

Page 26: ...the dock to STANDARD and then connect the dock to the home theater 2 Connect the yellow composite cable to the dock and TV 3 Switch on the iPod or iPhone and place it on the dock 3 Press the following buttons to listen or to change radio stations Button Action or Alphanumeric buttons Select a preset radio station Navigation buttons left right Search for a radio station Navigation buttons up down F...

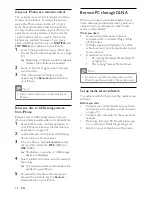
Page 27: ... exit the application press the home button on your iPhone Play music 1 Dock your iPod or iPhone see Dock your iPod or iPhone on page 26 2 Press DOCK for iPod on the home theater remote control 3 Browse on the iPod or iPhone screen to select music tracks To view the playlist on your TV and use the home theater remote control to select a track press DOCK for iPod again Play video and slideshows 1 D...

Page 28: ...re relevant to the play mode are enabled on your iPhone For example if you play pictures only the remote control buttons that are used to control the pictures are enabled However if you play a video additional buttons such as SUBTITLE and TOP MENU are enabled on your iPhone 1 Launch the application on your iPhone see Access the smartphone application on page 27 Depending on the play mode the relev...

Page 29: ... your PC 2 Click the Library tab and then select Media Sharing 3 The first time you select Media Sharing on your PC a pop up screen appears Check the Share my media box and click OK The Media Sharing screen is displayed 4 In the Media Sharing screen make sure that you see a device marked as Unknown Device If you don t see an unknown device after a minute or so check that your PC firewall is not bl...

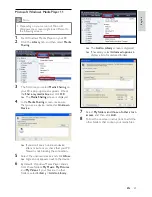
Page 30: ...of the Mac operating system you use your screens might look different to the following screens 1 Visit http www twonkymedia com to purchase the software or download a free 30 day trial to your Macintosh 2 Start Twonky Media on the Macintosh 3 In the Twonky Media Server screen select Basic Setup and First Steps The First steps screen is displayed Microsoft Windows Media Player 12 Note Depending on ...

Page 31: ...wsing history to remove passwords cookies and browsing data from your home theater 1 Press Home 2 Select Setup and then press OK 3 Select Network Clear Net TV Memory and then press OK 4 Type a name for your media server and then click Save changes 5 Back in the Twonky Media screen select Basic Setup and Sharing The Sharing screen is displayed 6 Browse and select folders to share and then select Sa...

Page 32: ...er supports Philips EasyLink which uses the HDMI CEC Consumer Electronics Control protocol EasyLink compliant devices that are connected through HDMI can be controlled by a single remote control Philips does not guarantee 100 interoperability with all HDMI CEC devices What you need HDMI CEC compliant devices An HDMI connection between the connected devices Rent online video Not available in China ...

Page 33: ...Control devices Control the home theater and the other connected HDMI CEC compliant devices with a single remote control One touch play If you enable One touch play the TV automatically switches to the correct channel when you play a disc in your home theater One touch standby When you press and hold Standby on the remote control the home theater and all the connected HDMI CEC devices that support...

Page 34: ...ess OK 3 Select Video Watch 3D video Auto and then press OK Subtitle position Automatically change the position of the subtitles to fit your TV screen 1 Press Home 2 Select Setup and then press OK 3 Select Preference Auto Subtitle Shift On and then press OK 8 Change settings This section helps you to change the settings of your home theater Caution Most of the settings are already configured with ...

Page 35: ... disc the home theater uses the default language of the disc Sound Change the sound settings to suit your preference HDMI audio To hear an HDMI audio output from your TV connect your home theater to the TV through an HDMI cable 1 Press Home 2 Select Setup and then press OK 3 Select Audio HDMI Audio and then press OK 4 Select the following options and then press OK Bitstream Enable bitstream output...

Page 36: ...mer The sleep timer can be set up to 60 minutes If the sleep timer is set to Off it switches off 5 Press OK to activate The home theater switches to standby after the specified time Disc subtitle 1 Press Home 2 Select Setup and then press OK 3 Select Preference Subtitle and then press OK 4 Select a subtitle language for discs and then press OK Disc menu 1 Press Home 2 Select Setup and then press O...

Page 37: ... When the software update is complete the home theater automatically switches off and restarts If it does not disconnect the power cord for a few seconds and then reconnect it Note If the home theater cannot connect to the Philips server press Home and then select Setup Network Network Installation to set up the network Screen saver Automatically switch your home theater to screen saver mode if it...

Page 38: ...flash drive Update software through USB What you need A USB flash drive with at least 75MB of memory The USB flash drive must be FAT or NTFS formatted Do not use a USB hard drive A computer with Internet access An archive utility that supports the ZIP file format for example WinZip for Microsoft Windows or Stufflt for Macintosh Step 1 Download the latest software 1 Connect a USB flash drive to you...

Page 39: ...0 kbps mka MKA DTS core 1 54 Mbps mka MKA MPEG 912 kbps mka MKA MP3 32 kbps 320 kbps mka MKA WMA 64 kbps 160 kbps mka MKA AAC HE AAC 192 kbps 10 Product specifications Note Specifications and design are subject to change without notice Region codes The type plate on the back or bottom of the home theater shows which regions it supports Media formats AVCHD BD BD R BD RE BD Video DVD Video DVD R RW ...

Page 40: ... AAC COOK RV30 RV40 20 Mbps peak 40 Mbps Video formats If you have a high definition TV your home theater allows you to play your video files with Resolution 1920 x 1080 pixels at Frame rate 6 30 frames per second avi files in AVI container Audio codec Video codec Bit rate PCM Dolby Digital DTS core MP3 WMA DivX 3 11 DivX 4 x DivX 5 x DivX 6 x 10 Mbps max MPEG 1 MPEG 2 20 Mbps peak 40 Mbps MPEG 4 ...

Page 41: ...pe Diode InGaN AIGaN BD AIGaInP DVD CD Wave length 405 7 nm 7 nm BD 655 10 nm 10 nm DVD 790 10 nm 20 nm CD Output power Max ratings 20 mW BD 6 mW DVD 7 mW CD Amplifier Total output power 440W RMS 30 THD Frequency response 20 Hz 20 kHz 3 dB Signal to noise ratio 65 dB CCIR A weighted Input sensitivity AUX1 AUX2 500 mV Music iLink 300 mV Video Signal system PAL NTSC HDMI output 480i 576i 480p 576p 7...

Page 42: ...d Cannot play a DivX file Make sure that the DivX file is encoded according to the Home Theater Profile with the DivX encoder Make sure that the DivX file is complete 11 Troubleshooting Warning Risk of electric shock Never remove the casing of the product To keep the warranty valid never try to repair the product yourself If you have problems using this product check the following points before yo...

Page 43: ...y a wired network installation see Set up the wired network on page 17 DivX or RMVB RM subtitles do not display correctly Make sure that the subtitle file name is the same as the movie file name see Subtitles on page 23 Select the correct character set 1 Press OPTIONS 2 Select Character Set 3 Select the supported character set 4 Press OK Cannot read the contents of a USB storage device Make sure t...

Page 44: ...574 Kurdish 7585 Lao 7679 Latina 7665 Latvian 7686 Letzeburgesch 7666 Limburgan Limburger 7673 Lingala 7678 Lithuanian 7684 Luxembourgish 7666 Macedonian 7775 Malagasy 7771 Magyar 7285 Malayalam 7776 Maltese 7784 Manx 7186 Maori 7773 Marathi 7782 Marshallese 7772 Moldavian 7779 Mongolian 7778 Nauru 7865 Navaho Navajo 7886 Ndebele North 7868 Ndebele South 7882 Ndonga 7871 Nederlands 7876 Nepali 786...

Page 45: ...rol disc play 20 Easylink HDMI CEC 12 main unit 10 parental control 36 radio 25 USB storage device 23 D disable audio post processing 35 BD Live 22 HDMI CEC 32 discs 2D video 20 13 Index 2 2D video 20 3 3D 3D disc in 2D mode 20 3D safety 9 3D video 20 A advanced BD Live security 22 enhanced audio 35 restore default settings 37 software update 37 software version 37 amplifier 41 audio formats 39 HD...

Page 46: ...ft Windows Media Player 11 29 Microsoft Windows Media Player 12 30 MP3 play 26 3D disc in 2D mode 20 3D video 20 audio 24 audio language 35 BD Live 21 Bonus View 21 control buttons 20 DivX 23 eject disc 10 menu language 36 options 24 picture 25 picture in picture 21 play 20 subtitle 36 synchronize picture and sound 21 time search 24 titles 24 display panel 10 DivX character set 24 subtitles 23 VOD...

Page 47: ...sc menu 36 display panel 37 menu language 35 parental control 36 screen saver 37 sleep timer 36 subtitle 36 product specifications 39 multimedia content from disc 20 from online stores 32 from PC 28 from USB storage device 22 N Net TV access 31 clear browsing history 31 online video stores 32 watch Net TV page 31 network home network 17 name a device 18 settings 17 troubleshooting 43 update home t...

Page 48: ...s 24 trademarks 6 treble 19 troubleshooting connection 42 main unit 42 network 43 picture 42 play 42 serial number 6 sound 42 tutorials 6 R radio control buttons 25 FM antenna 14 listen to radio 26 specifications 41 tune stations 25 ratings 36 recycling 9 region codes 39 remote control batteries 41 overview 10 rent video format SD card 32 online video stores 32 troubleshooting 42 repeat 24 S safet...

Page 49: ... navigate 4 read 4 update 5 V video HDMI deep color 34 online video 32 picture resolution 34 picture settings 34 specifications 41 synchronize picture and sound 21 video and slideshow 27 VOD code for DivX 23 watch 3D 20 video formats 41 video on demand format SD card 32 online video stores 32 video options 24 VOD code for DivX 23 W wired network settings 17 wired connection 17 wireless network set...

Page 50: ... 2011 Koninklijke Philips Electronics N V All rights reserved sgptt_1121 12_v2 ...

Reviews: