STANDARD NOTES FOR SERVICING
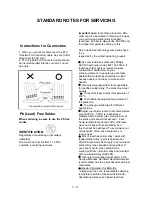
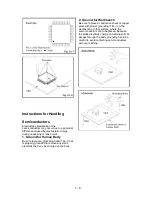
Circuit Board Indications
1. The output
pin of the 3 pin Reg
u
lato
r ICs i
s
indicated a
s
shown.
2. For othe
r ICs, pin 1 a
n
d
every fifth pin are
indicated a
s
shown.
3. The 1st pin
of every male con
n
e
c
tor i
s
indicated a
s
shown.
Instructions for Connectors
1. When you connect or disconnect the FFC
(Flexible Foil Connector) cable, be sure to first
disconnect the AC cord.
2. FFC (Flexible Foil Connector) cable should
be inserted parallel into the connector, not at
an angle.
Pb (Lead) Free Solder
When soldering, be sure to use the Pb free
solder.
IDENTIFICATION:
Regardless of special logo (not always
indicated)
One must treat all sets from 1.1.2005
onwards, a ccording next rules.
Important note:
In fact also products a little
older can also be treated in this way as long as
you avoid mixing solder-alloys (leaded/
lead-free). So best to always use SAC305 and
the higher temperatures belong to this.
Due to lead-free technology some rules have
to be
respected by the workshop during a repair:
Use only lead-free solder alloy Philips
SAC305 with order code 0622 149 00106. If
lead-free solder paste is required, please
contact the manufacturer of your
solder-equipment. In general use of solder
paste within workshops should be avoided
because paste is not easy to store and to
handle.
Use only adequate solder tools applicable
for leadfree solder alloy. The solder tool must
be able
To reach at least a solder-temperature of
400°C,
To stabilize the adjusted temperature at
the solder-tip
To exchange solder-tips for different
applications.
Adjust your solder tool so that a temperature
around 360°C - 380°C is reached and
stabilized at the solder joint. Heating-time of
the solder-joint should not exceed ~ 4 sec.
Avoid temperatures above 400°C otherwise
wear-out of tips will rise drastically and
flux-fluid will be destroyed. To avoid wear-out
of tips switch off un-used equipment, or
reduce heat.
Mix of lead-free solder alloy / parts with
leaded solder alloy / parts is possible but
PHILIPS recommends strongly to avoid mixed
solder alloy types (leaded and lead-free). If
one cannot avoid, clean carefully the
solder-joint from old solder alloy and re-solder
with new solder alloy (SAC305).
Use only original spare-parts listed in the
Service-Manuals. Not listed standard-material
(commodities) has to be purchased at external
companies.
Special information for BGA-ICs:
- always use the 12nc-recognizable soldering
temperature profile of the specific BGA (for
desoldering always use highest lead-free
Page 3 of 51
1 - 3
Summary of Contents for HTS3021/94
Page 14: ...3 4 ...
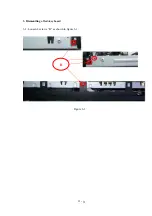
Page 18: ...3 Dismantling of 3 1 Loosen 4 screws B as shown in figure 3 1 Figure 3 1 B 4 3 led key board ...
Page 20: ...4 Dismantling of loader 4 1 Loosen 4 screws E as shown in figure 4 1 E Figure 4 1 4 5 ...
Page 22: ...7 Dismantling of amplifier board 7 1 Loosen 4 screw H as shown in figure 7 1 Figure 7 1 H 4 7 ...
Page 24: ...5 1 C4 C2 C1 C3 C5 C6 C7 C8 C10 C11 C13 C12 BLOCK WIRING DIAGRAM C9 ...
Page 25: ...6 1 AMPLIFIER BOARD SCHEMATIC DIAGRAM 1 3 ...
Page 26: ...6 2 AMPLIFIER BOARD SCHEMATIC DIAGRAM 2 3 ...
Page 27: ...6 3 AMPLIFIER BOARD SCHEMATIC DIAGRAM 3 3 ...
Page 28: ...6 4 AMPLIFIER BOARD TOP VIEW ...
Page 29: ...6 5 AMPLIFIER BOARD BOTTOM VIEW ...
Page 31: ...7 2 LED BOARD TOP VIEW KEY BOARD TOP VIEW LED KEY BOARD TOP VIEW ...
Page 32: ...LED BOARD BOTTOM VIEW KEY BOARD BOTTOM VIEW 7 3 LED KEY BOARD BOTTOM VIEW ...
Page 39: ...8 7 DECODE BOARD TOP VIEW ...
Page 40: ...8 8 DECODE BOARD BOTTOM VIEW ...
Page 42: ...9 2 POWER BOARD TOP VIEW ...
Page 43: ...9 3 POWER BOARD BOTTOM VIEW ...
Page 44: ...10 1 MECHANICAL EXPLODE VIEW ...
Page 51: ...REVISION LIST Version 1 0 Initial release 11 1 ...


