background image

11

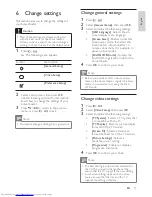
     Change general settings

    1

 Press 

   -  

 .

    2

 Select 


[General Setup]

 , then press  

OK

 .

    3

  Select and adjust the following settings:


• 

[OSD Language]

  : Selects the on-

screen display menu language.


• 

[Screen Saver]

  : Enables or disables 

screen saver mode. If enabled, the 
screen enters idle mode after 10 
minutes of inactivity (for example, in 
pause or stop mode).


• 

[DivX® VOD Code]

  : Displays the 

DivX VOD registration code for the 
home theater.

      4

 Press 


OK

  to con rm your choice.

 Note

 Before you purchase DivX videos and play 


them on the home theater, register the home 
theater on www.divx.com using the DivX 
VOD code.

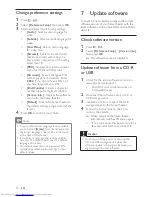
     Change video settings

    1

 Press 

   -  

 .

    2

 Select 


[Video Setup]

 , then press  

OK

 .

    3

  Select and adjust the following settings:


• 

[TV System]

  : Selects a TV system that 

is compatible with the TV.


• 

[TV Display]

  : Selects a picture display 

format to  t the TV screen.


• 

[Screen Fit]

  : Selects a full screen 

format that best  ts to the TV screen.


• 

[Picture Settings]

  : Selects a 

prede ned color setting.


• 

[Progressive]

  : Enables or disables 

progressive scan mode.

      4

 Press 


OK

  to con rm your choice.

 Note

 The best setting is automatically selected for 


the TV. If you need to change the setting, 
ensure that the TV supports the new setting.
  Some video settings depend on the video 


source, ensure that the disc and the TV 
support the setting or feature.

       6 Change 

settings

  This section helps you to change the settings of 
your home theater. 

 Caution

 Most of the settings are already con gured 


with the best value for the home theater. 
Unless you have a speci c reason to change a 
setting, it is best to leave it at the default value.

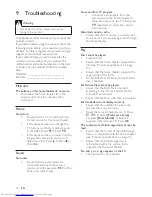
     1

 Press 

   -  

 .

    The following menu appears.


»

 Symbol

 Description


[General Setup]


[Video Setup]


[Preference Setup]

      2

  Select a setup menu, then press  

OK

 .

  See the following sections for information 
about how to change the settings of your 
home theater.

    3

 Press 

   -  

  to return to the previous 

menu, or press     -  

  to exit.

 Note

 You cannot change a setting that is grayed out.


English

EN

1_HTS2200_93-EN-US.indd   Sec1:11

7/19/2010   1:42:29 PM

Summary of Contents for HTS2200

Page 1: ...HTS2200 Register your product and get support at www philips com welcome EN User manual 1 Ⴌ߀ Ҭ ...

Page 2: ......

Page 3: ...V or other devices 7 5 Use your home theater 7 Before you start 7 Choose your sound 7 Play a disc 8 Play from a USB storage device 9 More play features for disc or USB 9 Play from radio 10 Play audio fromTV or other devices 10 6 Change settings 11 Change general settings 11 Change video settings 11 Change preference settings 12 7 Update software 12 Check software version 12 Update software from a ...

Page 4: ... generate the registration code locate the DivX VOD section in your device setup menu Go to vod divx com with this code to complete the registration process and learn more about DivX VOD 1 Notice Copyright This item incorporates copy protection technology that is protected by U S patents and other intellectual property rights of Rovi Corporation Reverse engineering and disassembly are prohibited A...

Page 5: ... clean the product 2 Important Read and understand all instructions before you use your home theater If damage is caused by failure to follow instructions the warranty does not apply Safety Risk of electric shock or re Never expose the product and accessories to rain or water Never place liquid containers such as vases near the product If liquids are spilt on or into the product disconnect it from...

Page 6: ...aterials and components which can be recycled and reused When this crossed out wheeled bin symbol is attached to a product it means that the product is covered by the European Directive 2002 96 EC Please inform yourself about the local separate collection system for electrical and electronic products Please act according to your local rules and do not dispose of your old products with your normal ...

Page 7: ...ks two points within a chapter or track for repeat play or turns off repeat mode o Selects a repeat mode In radio mode programs radio stations p Displays options for different camera angles q Selects a sound mode r Increases or decreases volume s Mute Mutes or restores volume t Returns to a previous menu screen u OK Con rms an entry or selection v Source buttons Selects an audio input source Switc...

Page 8: ...ed Y Cb Cr or YUV Cable not supplied ComponentVideo Out ComponentVideo In TV 4 Connect your home theater This section helps you connect your home theater to aTV and other devices The basic connections of the home theater with its accessories are provided in the Quick Start For a comprehensive interactive guide see www connectivityguide philips com Note Refer to the type plate at the back or bottom...

Page 9: ...tion movies and rock or pop music DRAMA JAZZ Clear mid and high range Ideal for drama movies and jazz music CONCERT CLASSIC Neutral sound Ideal for live concerts and classical music SPORTS Moderate mid range and surround effects for clear vocals and the atmosphere of a live sport venue NIGHT Dynamically controlled sound mode suitable for watching movies at night or for non intrusive background mus...

Page 10: ...ew Change surround sound mode Experience an immersive audio experience with surround sound modes Press repeatedly to cycle through the available surround modes Option Description VIRTUAL SURR Creates a highly compelling 5 1 channel listening experience STEREO Two channel stereo sound Ideal for listening to music Play a disc The home theater can play a wide variety of discs including video audio an...

Page 11: ...k time 3 Enter the time of the scene then press OK Use audio options Access several useful features while audio is played Button Action Repeats a track or the entire disc Marks two points within a track for repeat play or turns off repeat mode Play from a USB storage device The home theater is tted with a USB connector that allows you to view pictures listen to music or watch movies stored on a US...

Page 12: ... radio station Press to stop the installation of radio stations Manual Press once to access program mode and press again to store the radio station Automatic Press and hold for ve seconds to reinstall radio stations Note AM and digital radio are not supported If no stereo signal is detected or if fewer than ve stations are found you are prompted to install the radio stations again For the best rec...

Page 13: ...t that best ts to the TV screen Picture Settings Selects a prede ned color setting Progressive Enables or disables progressive scan mode 4 Press OK to con rm your choice Note The best setting is automatically selected for the TV If you need to change the setting ensure that the TV supports the new setting Some video settings depend on the video source ensure that the disc and the TV support the se...

Page 14: ...s 2 Select Preference Setup then press OK 3 Select and adjust the following settings Audio Selects audio language for video Subtitle Selects subtitle language for video Disc Menu Selects menu language for video disc Parental Restricts access to discs that are recorded with ratings To play all discs irrespective of the rating select level 8 PBC Displays or skips the content menu for VCD and SVCD di...

Page 15: ...onse 150 Hz 20 kHz Dimensions WxHxD 254 x 1001 x 254 mm Weight 3 71 kg Cable length 4 m Laser speci cation Type Semiconductor laser GaAIAs CD Wave length 645 665 nm DVD 770 800 nm CD Output power 6 mW DVD 7 mW VCD CD Beam divergence 60 degrees 8 Product specifications Note Speci cation and design are subject to change without notice Region code The type plate on the back or bottom of the home thea...

Page 16: ... the USB storage device is formatted with a le system that is supported by the home theater No entry or x sign appears on the TV The operation is not possible 9 Troubleshooting Warning Risk of electric shock Never remove the casing of the product To keep the warranty valid never try to repair the product yourself If you have problems using this product check the following points before you request...

Page 17: ... USB play 9 software update 12 10 Index A ampli er 13 audio connection 7 C care 3 change settings 11 connect audio from TV 7 10 guide 6 other devices 7 TV 6 connectors 6 contact us 14 D disc play 8 supported discs 13 disposal of your product 4 F le formats 13 O overview connectors 6 main unit 4 remote control 5 P picture slide show 9 troubleshooting 14 play disc 8 options 8 radio 10 troubleshootin...

Page 18: ... Lao 7679 Latina 7665 Latvian 7686 Letzeburgesch 7666 Limburgan Limburger 7673 Lingala 7678 Lithuanian 7684 Luxembourgish 7666 Macedonian 7775 Malagasy 7771 Magyar 7285 Malayalam 7776 Maltese 7784 Manx 7186 Maori 7773 Marathi 7782 Marshallese 7772 Moldavian 7779 Mongolian 7778 Nauru 7865 Navaho Navajo 7886 Ndebele North 7868 Ndebele South 7882 Ndonga 7871 Nederlands 7876 Nepali 7869 Norsk 7879 Nor...

Page 19: ... 2010 Koninklijke Philips Electronics N V All rights reserved sgptt_1028 93_v1 ...

Reviews: