background image

2.6

Connected devices

Select a device

Select from the Home menu

To select and watch a connected device or activity, press 

h

 to

open the 

Home menu

 and select the device or its activity and

.press 

OK

. Make sure the device is switched on

.Add a connected device to the Home menu for easy selection

Read more about Add your devices in 

Help

 > 

Basics

 > 

Menus

 >

.

Home menu

Select from the list of connections

To open the list of connections, press 

Ú

 SOURCE

. Select the

TV connection and press 

OK

 to switch to the device on that

.connection. Make sure the device is switched on

Operate devices

The remote control of the TV can also operate a connected

device. The device must have EasyLink (HDMI-CEC) and have it

switched on. The device must also be connected with an HDMI

.cable

Operate an EasyLink device

To operate such a device with the TV remote control, select the

device -or its activity- in the 

h

 Home menu and press 

OK

.

The commands of all keys, except the 

h

 key, the 

t

 ADJUST

.key and the 

r

 OPTIONS

 key, are forwarded to the device

If the key you need is not on the TV remote control, you can

.show extra keys on screen with Show device keys

Show device keys

To show the device keys on screen, press 

r

 OPTIONS

 and

.select 

Show device keys

. Select the key you need and press 

OK

.(To hide the device keys, press 

È

 (Back

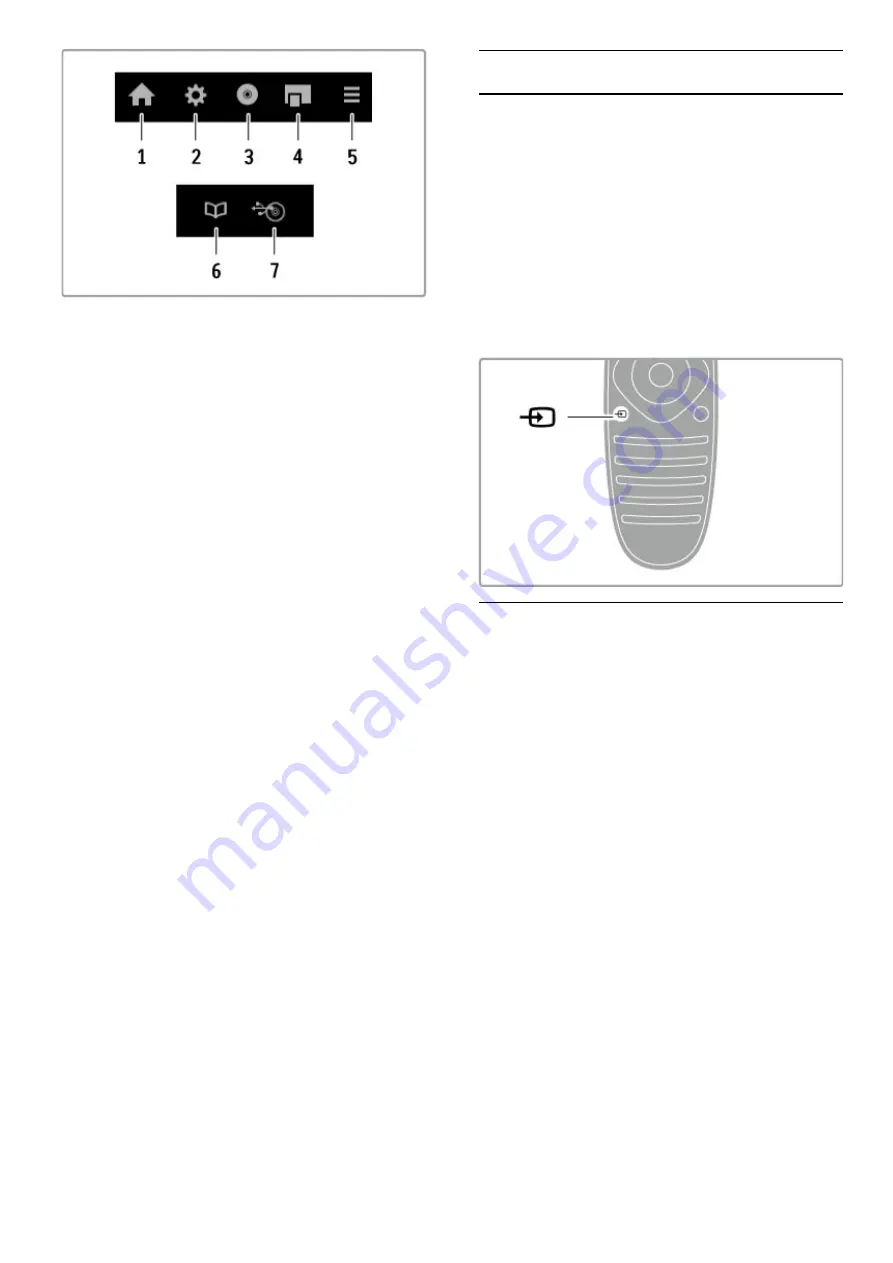
:In general, these keys open the following device menus

Home menu 

1

Setup menu 

2

(Disc menu (disc content 

3

Pop-up menu 

4

Options menu 

5

Programme guide 

6

Media selection 

7

Read more about EasyLink in 

Help

 > 

Setup

 > 

Devices

 >

.

EasyLink HDMI-CEC

Basics / Connected devices

27

Summary of Contents for Gold Series

Page 1: ... 012 301 0 43 15641 1 3 0 15 7 6 5189 1 41 0 1 50 1 1AB CDEF G CH ...

Page 2: ... 0 1 2 34 5 6 ...

Page 3: ...eos photos and music 33 Pause TV and recording 35 Games 37 Text 38 Setup 40 Picture and sound 40 Ambilight 42 Channels 44 Satellite channels 46 Network 48 Devices 50 Universal access 51 Software 52 Connections 53 First connections 53 Cables and connections 54 Connect devices 56 Connect more devices 64 Network 69 SD card 70 Common interface CAM 71 Troubleshooting 72 Contact information 72 TV and re...

Page 4: ...r check the TV guide View your photos and videos from your PC tablet PC or phone Connect a USB Hard Drive and pause a TV broadcast or record your favourite show Read more about Smart TV in Help Smart TV Read more about setting up the Internet connection in Help Setup Network 3D On this TV you can watch 3D programmes and movies with Easy 3D When 3D programmes are broadcast or you start a 3D movie t...

Page 5: ...ame which is ideal for gaming or change the Smart sound setting of the TV loudspeakers To open or close the OPTIONS menu r Open the Options menu to select optional settings related to what you are watching or doing on TV Back È With Back you can go back to the previous TV channel or go one step back in a menu Red With the red key you can select the red option or open digital Interactive TV or some...

Page 6: ...best picture and sound quality and if your device has EasyLink HDMI CEC the TV can add the device to the Home menu automatically When a device is added to the Home menu you can select it to watch its programme If the device has no EasyLink or you do not use the HDMI connection you must add the connected device in the Home menu using Add your devices Read more about Add your devices in Help Basics ...

Page 7: ... an HD game HD video clip To experience the stunning sharpness and picture quality of HD TV you can start the High Definition video clip from the Home menu Press Home Setup Watch demos on the second page of the Setup menu Contact your dealer for more information Go to www philips com support to find FAQs featuring the list of HD channels or providers in your country Satellite receiver Next to the ...

Page 8: ...lose to the wall VESA info Your TV is prepared for a VESA compliant wall mount bracket sold separately VESA codes to purchase the bracket VESA MIS F 400 400 M6 Use a screw length as shown in the drawing Position the TV Carefully read the safety precautions before you position the TV Position the TV where light does not shine directly on the screen Dim lighting conditions in the room for best Ambil...

Page 9: ...he TV Never connect the TV to the power outlet if the voltage is different Risk of injury to children Follow these precautions to prevent the TV from toppling over and causing injury to children Never place the TV on a surface covered by a cloth or other material that can be pulled away Ensure that no part of the TV hangs over the edge of the mounting surface Never place the TV on tall furniture s...

Page 10: ...r to adjust the volume Or use the or keys on the remote control Ambilight Press Ambilight to switch Ambilight on or off While the TV is on standby you can switch Ambilight on and create an Ambilight Lounge light effect in your room Read more about Ambilight and Lounge light in Help Setup Ambilight h Home Press h Home to open the Home menu on screen You can navigate the Home menu with the volume or...

Page 11: ...njoy a range of benefits including full support including downloads privileged access to information about new products exclusive offers and discounts the chance to win prizes and even participate in special surveys about new releases Go to www philips com welcome Getting started Register your TV 11 ...

Page 12: ...olve any Philips TV related problem you can consult our online support You can select your language and enter your product model number Go to www philips com support On the support site you can find your country s telephone number to contact us as well as answers to frequently asked questions FAQs You can download new TV software or the manual to read on your PC You can email a specific question o...

Page 13: ... the most used settings for picture sound Ambilight or 3D CH Next W 7 To switch to the next channel page or chapter CH Previous X 8 To switch to the previous channel page or chapter Source Ú 9 To switch directly to a TV connection Options r 10 To open or close the Options menu Back È 11 To go back to the previous channel To exit a menu without changing a setting To go back to the previous Text or ...

Page 14: ...eneral these keys open the following device menus Home menu 1 Setup menu 2 Disc menu disc content 3 Pop up menu 4 Options menu 5 Programme guide 6 Media selection 7 One Touch Play Insert a disc into an EasyLink HDMI CEC device and press Play on the device The TV switches on from standby and starts playing the disc System Audio Control If you connect an EasyLink audio system you can listen to the a...

Page 15: ... the batteries if you are not using the remote control for a long time Dispose of batteries according to the end of use directives Read Help Specifications Environmental End of use Cleaning Your remote control is treated with a scratch resistant coating To clean the remote control use a soft damp cloth Never use substances such as alcohol chemicals or household cleaners on the TV or remote control...

Page 16: ...nu select it and press r OPTIONS and then select Remove this device If a device or activity keeps appearing in the Home menu after you deleted it switch off the EasyLink setting on the device to prevent the icon from being automatically added again Read more about EasyLink in Help Basics Remote control Operate devices Reorder To reorder a device or an activity in the Home menu select it and press ...

Page 17: ...nd select TV Select Amplifier if you want to hear the sound through a connected Home Theatre System or Amplifier These settings temporarily override any EasyLink settings Surround To switch the TV automatically to the best surround sound mode only available when a Home Theatre System is connected close Help press t ADJUST select Surround and select On Picture shift You can shift the picture on scr...

Page 18: ...points or angles of the same event or different programmes on one TV channel The TV shows a message to advise if any such TV channels are available When available press r OPTIONS and select Video selection to select your choice Channel list In the Channel list you can look up all installed TV and radio channels While watching TV press FIND to open the Channel list Press FIND again or È Back to clo...

Page 19: ...ore devices Keyboard and mouse Hide channel You can hide a channel in the Channel list When looking through channels a hidden channel will be skipped In the Channel list highlight the channel you want to hide 1 Press r OPTIONS and select Hide channel The channel is 2 hidden as soon as you close the Channel list Show hidden channels You can recall all hidden channels and unhide them again In the Ch...

Page 20: ...guide information From the broadcaster Guide information comes from the broadcaster operator Smart picture and sound settings For easy picture or sound adjustment you can select a preset setting for each While watching TV press t ADJUST to open the Adjust menu and select Smart picture or Smart sound Make a selection from the list and press OK Smart picture and Smart sound Smart settings are a comb...

Page 21: ...ure to a 16 9 format Multi view With Multi view you can watch two screens simultaneously When you open Multi view the TV shows two screens one main and one small screen Open Multi view To open Multi view press h Home select Multi view and press OK With the remote control you can operate the main screen To close Multi view press FORMAT or press h Home and select another activity Main screen picture...

Page 22: ...To switch off the automatic switch off press the green key while you are watching TV channels and select Auto switch off and select Off 22 Basics Watch TV ...

Page 23: ...al 3D viewing For an optimal 3D viewing experience we recommend that you sit at least 3 times the height of the TV screen away from the TV but no further than 6 metres away avoid fluorescent lighting such as TL lighting or certain energy saving light bulbs which operate on a low frequency and direct sunlight as they may interfere with the 3D experience Health warning If you or your family has a hi...

Page 24: ...or radio channels Select list Select the list of channels from all satellites or from one specific satellite Or show a list of only your favourite satellite channels The list you select here determines which channels you will flick through with CH and CH while watching satellite Sort You can sort the Channel list by Name Number or in groups of free to air and scrambled channels Free scrambled Mark...

Page 25: ...hannels With the list on screen press r OPTIONS and select Select list Select Favourites from the list and press OK With this list selected you can flick through your favourite channels with CH and CH while watching satellite Read more about the options in the Channel list for satellite in Help Basics Watch satellite Channel list Channel lock To prevent children from watching you can lock channels...

Page 26: ... Forgotten your code To override the code in case you forget it enter 8888 26 Basics Watch satellite ...

Page 27: ...CEC and have it switched on The device must also be connected with an HDMI cable Operate an EasyLink device To operate such a device with the TV remote control select the device or its activity in the h Home menu and press OK The commands of all keys except the h key the t ADJUST key and the r OPTIONS key are forwarded to the device If the key you need is not on the TV remote control you can show ...

Page 28: ...re hearing or visually impaired Read Help Setup Universal access Child locks To prevent children from watching a channel or a programme you can lock channels or lock age rated programmes Parental rating Some digital broadcasters have rated their programmes When the rating is equal or higher than the rating you have set for your child s age the programme will be locked To watch a locked programme y...

Page 29: ...forum website Find out more on Net TV apps at the Net TV forum website www supportforum philips com Koninklijke Philips Electronics N V bears no responsibility regarding the content and the quality of the content provided by the content service providers What you need To enjoy Net TV you must connect the TV to a router with a high speed broadband connection the Internet You can use a home network ...

Page 30: ... Security info To view the level of security of the page you re on press r OPTIONS and select Security info Internet websites To browse Internet websites select the Internet app on the Net TV home page and press OK To open the on screen keyboard select a text entry field and press OK To remove a visited website from the list press r OPTIONS and select Remove from History Rent a movie With the vide...

Page 31: ...at you need To watch online TV programmes you need a high speed broadband Internet connection to the TV Read more about connecting to the network in Help Setup Network Watch online TV To watch an online TV programme in Net TV press h Home select Browse Net TV and press OK Select the broadcaster app on the Net TV home page and press OK You can add a online TV broadcaster app on your home page from ...

Page 32: ... to press the red key or OK key to open their interactive programme Close iTV pages Most iTV pages inform you which key to use to close For Digital Text and Red button press È Back To force an iTV page to close switch to the next TV channel and switch back Navigate iTV pages You can use the navigation and colour keys the number keys and the È Back key to navigate the iTV pages You can use the x Pl...

Page 33: ...show photos at the same time Start the photo slideshow after you started the music Select a folder with music files and press OK 1 Select a folder with photo files and press OK 2 To stop press r OPTIONS and select Stop Screen off If you only listen to music you can mute the TV screen to save energy To mute the screen press the green key select Screen off and press OK To switch the screen back on p...

Page 34: ...up project your PC screen on to the TV screen wirelessly You can project video music presentations or other content playing on your laptop or desktop PC Before you can project the PC screen on to TV you must install the Wi Fi MediaConnect software on your PC Read more about installing the Wi Fi MediaConnect software in Help Setup Network Wi Fi MediaConnect Start projecting To start projecting the ...

Page 35: ...ve is formatted leave the device connected permanently Warning The USB Hard Drive is formatted exclusively for this TV you cannot use the stored recordings on another TV or PC Do not copy or change recording files on the USB Hard Drive with any PC application This will corrupt your recordings When you format another USB Hard Drive the content on the former will be lost Pause TV While watching a TV...

Page 36: ...on standby and the USB Hard Drive switched on List of recordings To view the list of recordings and scheduled recordings select Recordings on the Programme guide page and press OK In this list you can select a recording to watch remove recorded programmes check the free drive space or schedule a recording not linked to a specific TV programme Expired recording Broadcasters can limit the number of ...

Page 37: ... views Two players watch the same TV but see two different screens to play the game The TV uses 3D technology to do this To watch each screen you need a pair of 3D glasses for each player What you need With this TV use the two player kit with 2 passive 3D glasses Philips PTA436 sold separately For two player split screen gaming the game console must be connected with HDMI Start a two player game S...

Page 38: ... on the device press r OPTIONS select Show device keys and select the B key and press OK Press È Back to hide the device keys To close Text press È Back again Digital Text UK only Some digital TV broadcasters offer dedicated Digital Text or interactive TV on their digital TV channels This includes normal Text using the number colour and navigation keys to select and navigate To close Digital Text ...

Page 39: ...anguage press h Set up Channel settings and select Primary or Secondary Text and select your preferred Text languages Text 2 5 If available Text 2 5 offers more colours and better graphics Text 2 5 is activated as a standard factory setting To switch it off select h Setup TV settings Preferences Text 2 5 Smart TV Text 39 ...

Page 40: ...s Watch TV Picture format Screen edges Slightly enlarge the picture to hide distorted edges Picture shift Move the picture up down or left right with the cursor keys Sound In the Sound menu you can adjust all sound settings individually To open Sound settings press h Setup TV settings Sound Bass Sets the level of low tones in the sound Treble Sets the level of high tones in the sound Surround Sets...

Page 41: ...ress t ADJUST select Smart picture and press OK Select ISF Day to watch TV during bright light conditions or select ISF Night for dark light conditions An ISF Calibration can be done on every activity in the Home menu like Watch TV or a connected Blu ray Disc player Calibration benefits are better picture clarity and sharpness better detail in bright and dark parts deeper and darker blacks better ...

Page 42: ...m colour To set an Ambilight colour of your own select Custom in the Ambilight Colour menu With Custom selected you can open the Custom colour menu Select Palette to choose your own colour Ambilight Custom colour is a fixed non dynamic colour setting Separation To set the difference in colour level between the lights on each side of the TV select Separation Separation Off gives a dynamic but unifo...

Page 43: ...t up the colour scheme in the Setup menu With the TV switched on press h and select Setup Select TV settings Ambilight Lounge light mood Select the colour scheme with which Lounge light will start up Setup Ambilight 43 ...

Page 44: ...country Both TVs have the same hardware type Check the hardware type on the TV type plate on the back of the TV Typically noted as Q LA Both TVs have compatible software versions When you upload an on screen message will warn you if software versions are not compatible Copy a Channel list Switch on the TV which has its channels installed Plug in a 1 USB memory device Press h Setup TV settings Pref...

Page 45: ...the options Symbol rate mode and Symbol rate are available For Symbol rate mode select Automatic unless your cable provider gave you a specific symbol rate value To enter the symbol rate value use the number keys Manual installation Analogue Analogue TV channels can be manually tuned in channel by channel To install analogue channels manually press h Setup Channel settings and press OK Select Chan...

Page 46: ...the LNB settings but if you are searching for a specific satellite on C band for instance you need to set the LNB you use for this satellite to Single Or if you are an expert user you might need a Custom setting for the LNBs you use Reset You might have lost track of the settings you set up To reset the satellite installation settings to factory settings select Reset in Settings and press OK Signa...

Page 47: ...holds the Channel list of 2 the other TV To start the Channel list upload press h Setup TV 3 settings Preferences Channel list copy Copy to TV and press OK You might be asked to enter the TV PIN code of this TV The TV notifies if the Channel list is copied to the TV 4 successfully Unplug the USB memory device To an already installed TV Verify the country setting of the TV To verify this setting 1 ...

Page 48: ...e instructions on screen WPS Wi Fi Protected Setup If your router has WPS Wi Fi Protected Setup go to the router and press the WPS button Return to the TV within 2 minutes select WPS and press OK The TV connects to your network This takes about 2 minutes Finish the installation Most new wireless routers have the WPS system and carry the WPS logo The WPS system uses WPA security encryption and cann...

Page 49: ...t on your PC read Help Smart TV Videos photos and music Wi Fi MediaConnect PC requirements Windows XP Vista Windows 7 PC only Minimum PC requirements Intel Pentium Core 2 Duo 1 8GHz 512MB RAM 200MB free hard disk space Wi Fi 802 11g Broadband Internet connection Recommended PC requirements Intel Pentium Core 2 Duo 2 1GHz 1GB RAM 200MB free hard disk space Wi Fi 802 11n for router and PC Broadband ...

Page 50: ...a device or activity from the Home menu select the item and press r OPTIONS and then select Remove this device If the device or activity keeps appearing in the Home menu after you deleted it switch off the EasyLink setting on the device to prevent the icon from being automatically added again Audio to Video sync With a Home Theatre System HTS connected to the TV the picture on TV and the sound fro...

Page 51: ... access in the Setup Read Help Setup Universal access Switch on Visually impaired Some digital TV channels broadcast special audio called Audio Description for visually impaired people The audio consists of a narrator describing what is happening in the programme during the pauses in the normal audio Switch on To switch this visually impaired audio press r OPTIONS select Universal access and press...

Page 52: ...up Update software Select USB Identify the TV 2 Insert the USB memory into the side of the TV select Start and press OK An identification file is written on the USB memory device Download the TV software 3 Insert the USB memory into your PC On the USB memory device locate the file update htm and double click it Click on Send ID If new software is available download the zip file After the download ...

Page 53: ...of time Read more about the power switch in Help Getting started Keys on the TV Power switch Make sure the power cable is securely inserted into the TV Make sure that the power plug in the wall socket is accessible at all times Antenna cable Locate the antenna connection at the back of the TV Insert the antenna cable securely into the Antenna a socket Satellite antenna cable Locate the F type sate...

Page 54: ... Connect a Home Theatre System to the HDMI ARC connection With HDMI ARC the extra audio cable from the TV to the HTS is not necessary With one HDMI cable connected to HDMI ARC Audio Return Channel both cables are combined Switch off HDMI ARC In case you would like to switch off the audio return signal on the HDMI ARC connection press h Setup TV settings EasyLink HDMI 1 ARC select Off and press OK ...

Page 55: ...r of the TV You can add the Audio L R connections VGA Use a VGA cable DE15 connector to connect a computer to the TV With this connection you can use the TV as a computer monitor You can add an Audio L R cable for sound mini jack 3 5 mm To connect a computer with the VGA connection read Help Connections Connect more devices TV as PC monitor Connections Cables and connections 55 ...

Page 56: ... If you use the HDMI ARC connections on both TV and device no other cable is needed If not read on If you do not use the HDMI ARC connection add a digital audio cable optical Blu ray Disc DVD player Use an HDMI cable to connect the device to the TV 56 Connections Connect devices ...

Page 57: ...DMI cable to connect the device to the TV If you use the HDMI ARC connections on both TV and device no other cable is needed If not read on If you do not use the HDMI ARC connection add a digital audio cable optical Connections Connect devices 57 ...

Page 58: ... more about Audio to Video sync in Help Setup Devices Audio to Video sync Do not connect the audio signal from a DVD player or other device directly to the Home Theatre System Always route the sound through the TV first Recorder Use 2 antenna cables to connect the antenna to the device and the TV Add an HDMI cable to connect the device to the TV 58 Connections Connect devices ...

Page 59: ...nt the TV from switching off automatically after a 4 hour period without a key press on the remote control of the TV To switch off the automatic switch off press the green key while you are watching TV channels and select Auto switch off and select Off Use 2 antenna cables to connect the antenna to the device and the TV Add an HDMI cable to connect the device to the TV Connections Connect devices ...

Page 60: ...ly after a 4 hour period without a key press on the remote control of the TV To switch off the automatic switch off press the green key while you are watching TV channels and select Auto switch off and select Off First use 3 antenna cables to connect the devices to the TV Then use an HDMI cable to connect the digital receiver to the TV Finally use an HDMI cable to connect the Disc Recorder to the ...

Page 61: ...e TV from switching off automatically after a 4 hour period without a key press on the remote control of the TV To switch off the automatic switch off press the green key while you are watching TV channels and select Auto switch off and select Off First use 3 antenna cables to connect the devices to the TV Then use an HDMI cable to connect the digital receiver to the TV Connections Connect devices...

Page 62: ...V and the device add a digital audio cable optical Digital HD receiver If you use a digital receiver to watch TV a set top box STB and you do not use the remote control of the TV then switch off the automatic switch off This will prevent the TV from switching off automatically after a 4 hour period without a key press on the remote control of the TV 62 Connections Connect devices ...

Page 63: ...f press the green key while you are watching TV channels and select Auto switch off and select Off First use 2 antenna cables to connect the device to the TV Use an HDMI cable to connect the device to the TV Connections Connect devices 63 ...

Page 64: ...connect the device to the side of the TV Or use a SCART adapter to connect the device to the TV HD Game Use an HDMI cable or YPbPr and Audio L R cables to connect a High Definition game console to the TV To connect a HD Game console read Help Connections Connect more devices Game Photo camera To view photos stored on your digital photo camera you can connect the camera directly to the TV Use the U...

Page 65: ...ect a camcorder to the side or back of the TV You can use an HDMI YPbPr or SCART connection If your camcorder only has Video CVBS and Audio L R output use a Video Audio L R to SCART adapter to connect to the SCART connection See the following pages to connect your camcorder Use an HDMI cable to connect the camcorder to the side of the TV Or use a SCART adapter to connect the device to the TV Conne...

Page 66: ...your keyboard lay out and test your selection If you select a Cyrillic or Greek keyboard lay out first you can select a secondary Latin keyboard lay out To change the keyboard lay out setting press h Setup TV settings Preferences USB mouse and keyboard Keyboard settings and press OK TV keys on your keyboard For channel renaming Enter  OK Backspace z delete character before cursor Navigation keys ...

Page 67: ...ect the USB mouse to one of the USB connections on the side of the TV You can also connect the USB mouse to a connected USB keyboard Mouse clicks Left click OK Right click Back È You can use the scroll wheel to scroll pages up and down TV as PC monitor You can connect the TV to your home network wireless With Wi Fi MediaConnect you can use the TV as a PC monitor Read Help Setup Network Wi Fi Media...

Page 68: ... to the back of the TV Ideal TV setting Set the TV picture format to Unscaled for the sharpest picture quality While watching TV press t ADJUST select Picture format and select Unscaled For a list of supported resolutions see Help Specifications Display resolutions 68 Connections Connect more devices ...

Page 69: ...work connection read Help Setup Network Wired To set up the wired network connection read Help Setup Network Connect the router to the TV with a network cable To fulfil EMC regulations use a shielded FTP Cat 5E Ethernet cable Connections Network 69 ...

Page 70: ...B of storage capacity For high definition HD video use an SD card with at least 8GB of storage capacity Use a speed class 2 card or more Read more about renting videos in Help Smart TV Net TV Video stores Insert the card Make sure to unlock the SD memory card before you insert it To format the SD card switch on the TV and insert the SD card into the SD card slot The TV will automatically start for...

Page 71: ...y It can take a few minutes before the CAM is activated Removing the CAM will deactivate the service on TV Watching a CAM service If a CAM is inserted and subscription fees have been paid the TV shows the programme from the digital TV service provider The applications their function the content and the onscreen messages all come from the CAM service CAM settings To set passwords or PIN codes for t...

Page 72: ...er Care If the TV problem is not solved you can call the Philips Consumer Care hotline in your country Look up the TV model and serial number before you call Find the telephone number on the documentation that came with the TV Or consult our website www philips com support TV model number and serial number Find these numbers on the packaging label or on the type label on the back or bottom of the ...

Page 73: ...heir orientation Clean the remote control and TV sensor lens During start up which can take up to two minutes with connected devices the TV and some external devices do not immediately respond to commands from the remote control The device is functioning normally and is not broken The TV switches off and the red light flashes Switch the TV off and on again with the switch at the bottom of the TV C...

Page 74: ...d select the list you need with Select list A channel could be hidden in the Channel list Read more about Channel list in Help Basics Watch TV Channel list No digital channel found during installation Check if the TV supports DVB T or DVB C in your country Check the Digital TV Country Compatibility sticker on the back of the TV 74 Troubleshooting TV channels ...

Page 75: ...TV is set to the Home location Press h Setup TV settings Preferences Location The picture does not fit the screen Press r OPTIONS Picture format and select Auto fill The picture position on screen is not correct To correct a shifted picture press r OPTIONS and select Picture shift Use the navigation keys to adjust the picture position Press OK to stop Picture shift If distorted screen edges are vi...

Page 76: ...n additional audio connection is in place to complete the DVI connection EasyLink HDMI CEC Check if the connected device supports the HDMI CEC standard and is properly set up Read the user manual that comes with the device Check if the HDMI cable is properly connected Check if EasyLink on the TV and device is switched on Make sure that the System audio control in your HDMI CEC audio devices is pro...

Page 77: ...re supported See the list in Help Specifications Multimedia Files from a USB device do not play back smoothly The transfer performance of the USB device limits the transfer rate The files on my PC are not shown To look for files on your home network with Browse PC your PC media server software should be set up to share the files with the TV See the list of compatible Media server software in Help ...

Page 78: ...work does not work properly in your home try the wired network installation Read Help Setup Network Wired installation Net TV does not work If the connection to the router is OK check the router connection to the Internet Browse PC or Net TV work slow Look in your wireless router s user manual for information on indoor range transfer rate and other factors of signal quality You need a high speed b...

Page 79: ...uct for which such offer is requested by the respective licences This offer is valid up to three years after product purchase to anyone in receipt of this information To obtain the source code please contact open source philips com If you prefer not to use email or if you do not receive a confirmation receipt within a week after mailing to this email address please write in English to Open Source ...

Page 80: ...of this product is the lower the energy it consumes On the label you can find the energy efficiency class the average power consumption of this product in use and the average energy consumption for 1 year You can also find the power consumption values for this product on the Philips website for your country at www philips com TV Energy saving 80 Specifications Environmental ...

Page 81: ... setting to check the corresponding values End of use Disposal of your old product and batteries Your product is designed and manufactured with high quality materials and components which can be recycled and reused When this crossed out wheeled bin symbol is attached to a product it means that the product is covered by the European Directive 2002 96 EC Please inform yourself about the local separa...

Page 82: ...75 ohm coaxial IEC75 Tuner bands Hyperband S Channel UHF VHF DVB DVB T terrestrial antenna COFDM 2K 8K DVB T2 only for TV types T 12 DVB C cable QAM Analogue video playback NTSC SECAM PAL Digital video playback MPEG2 SD HD ISO IEC 13818 2 MPEG4 SD HD ISO IEC 14496 10 Digital audio playback ISO IEC 13818 3 See selected countries on the TV type plate Satellite aerial input 75 ohm F type Input freque...

Page 83: ... x 1080p Colour processing 2250 trillion colours 17bit RGB Brightness 450 cd m2 Dynamic contrast 500 000 1 Response time typical 2 BEW equiv ms Sound Output power RMS 34W 30 THD Dolby Digital Dolby Digital Plus Dolby Pulse Dolby and the double D symbol are registered trademarks of Dolby Laboratories Speaker types 2 mid high speakers 1 woofer Specifications Display and sound 83 ...

Page 84: ... Hz 60 Hz 1080i 50 Hz 60 Hz 1080p 24 Hz 25 Hz 30 Hz 1080p 50 Hz 60 Hz Computer formats Resolutions amongst others x 480p 60 Hz 640 x 600p 60 Hz 800 x 768p 60 Hz 1024 x 768p 60 Hz 1280 x 765p 60 Hz 1360 x 768p 60 Hz 1360 x 1024p 60 Hz 1280 x 1080i 60 Hz 1920 x 1080p 60 Hz 1920 84 Specifications Display resolutions ...

Page 85: ... TVersity 1 9 3 pro for Windows XP Twonky Media PacketVideo 4 4 9 for PC and Intel MacOX Nero 9 Nero MediaHome for Microsoft Windows XP Sony Vaio Media Server for Microsoft Windows XP or Vista Sony PS3 media server for Windows XP Google Media Server Google desktop for Windows XP DiXiM for Windows XP Macrovision Network Media Server for Windows XP Philips NAS SPD8020 v 1 2 9 47 Fuppes for Linux uSh...

Page 86: ... v1 4 3D HDMI 2 in v1 4 3D HDMI 3 in v1 4 3D Audio In DVI to HDMI VGA stereo mini jack 3 5mm Audio Out L R display synchronised optical Headphones stereo mini jack 3 5mm Network LAN RJ45 TV Side HDMI Side in v1 4 3D 2x USB Common interface slot CAM SD card slot SD High Capacity as Video stores memory 86 Specifications Connectivity ...

Page 87: ...imensions and weights 50PFL7956 Width 1242 mm Height 580 mm Depth 37 mm Weight 22 kg with TV stand Height 633 mm Depth 253 mm Weight 25 kg UMv 3104 327 0051 2 110707 Specifications Dimensions and weights 87 ...

Page 88: ...clip 7 HDMI ARC 54 HDMI connection 54 Headphone volume 40 Help Search 12 Home menu 16 I Infrared sensor 14 Internet 48 ISF Calibration picture 41 K Keyboard on screen 19 L Lock code 28 M Media server software 85 Music with photos 33 N Net TV 29 Net TV connection 29 Net TV open 30 Network wired connection 69 Network wired installation 49 Network wireless installation 48 O One Touch Play 14 Online r...

Page 89: ...8 Surround mode 14 Surround sound 17 System standby 14 T Text dual screen 38 Text freeze 38 Text setup 39 Text T O P overview 38 TV network name 49 TV tour 6 U Universal access 51 USB Hard Drive 35 USB Hard Drive installation 35 USB keyboard 66 USB mouse 67 USB browse 33 V Video CVBS connection 55 Video selection 18 W Wall colour 42 Watch satellite 24 Watch TV 18 WEP security encryption 48 WPA sec...

Page 90: ...2 3 0 3 030 3 3 2 34 13 AAABCBHD6 1HGHUODQGV LHUELM YHUNODDUW 3KLOLSV QQRYDWLYH SSOLFDWLRQV 1 9 GDW GH H 3 31 3 0 13 330 3 0 3 3 3 30 M 3 3 30 30 3 20 3 3 UHOHYDQWH EHSDOLQJHQ YDQ ULFKWOLMQ VSDxRO 3 3 2 3 30 3 00 12 13 42 0 5676 34 2 2 TXH HO WHOHYLVRU FXPSOH FRQ ORV UHTXLVLWRV HVHQFLDOHV FXDOHVTXLHUD RWUDV GLVSRVLFLRQHV DSOLFDEOHV R H LJLEOHV GH OD LUHFWLYD WDOLDQR RQ OD SUHVHQWH 3KLOLSV QQRYDWLY...

Page 91: ...5 HIVH II IVI P Q 1RUWKHUQ UHODQG HLHH HNN VLLG DǴDǷFǿDǺ HHM MGM GNH VV IM P 9 Q 8 9 NGM OMVRI P Q 8 2 VMGGLLRV P Q X HPERXUJ X HPEXUJ HLHH GV NNH P9 0 0 1 Q KS3B 6 0 10 0DJ DURUV iJ HV LHHIL ILR P2 0 6Z5 0Q 5 5 HLHH HGO HHMV P 0Q KS3B 6 0 10 1RUJH GGMH LIII P 9 0 Q KS3B 6 0 10 gVWHUUHLFK HLHH ILH HIV P9 0 0Q KS3B 6 0 10 3ROVND SRãĀF HQLH ORNDOQH 3RUWXJDO LHH MLH RHO P 0Q KS3B 6 0 10 5RPüQl HLHH L...

Reviews: