background image

GC7540

7-8

•  Due to the high wattage of the iron, only the specified cord set must be used.

•  Should damage be observed on the 

HOSE-CORD ASSY

 or 

CORDSET 55

, they must be replaced. 

Continued usage is not allowed.

•  When replacing the 

MICROSWITCH ASSY  9

, please dress the 2 attached wires such that they are free of tension. 

Pulling force on the wires may affect the steam triggering.

•  To avoid damage to the sealing & components of the 

BOILER ASSY  38

NEVER

 clean the boiler assy with vinegar, 

descaling agent or other corrosive chemicals.

• When replacing 

ELECTROVALVE 40

 or 

PUMP ASSY  45

, please be reminded to apply loctite at the joints for good 

sealing.

•  After the product has been repaired, it should function properly and has to meet the safety requirements & legal regulations 

as laid down & officially established at this moment.

•  The following tests are common checks that are conducted on a repaired product before it is returned to the consumer.

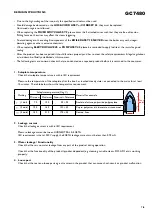
1. Soleplate temperature

Check that soleplate temperature is within IEC requirement.

Measure the temperature of the soleplate after the iron has reached steady state i.e connected to the mains for at least 
15 minutes.  The table below shows the temperature requirement.

Marking

Soleplate temperature (Deg C)

Material, for example

Test-
point

==

Minimum

Maximum N Tolerance

 (1 

dot)

 70

120

 95 

 25

Acetate, elastane, polyamide, polyproylene

••

 (2 

dots)

100

160

130 

 30

Cupro, polyester, silk, triacetate, viscose, wool

•••

 (3 dots)

140

210

175 

 35

Cotton, linen

2. Leakage current

Check that leakage current is within IEC requirement.

Measure leakage current between LIVE/NEUTRAL & EARTH.
IEC requirement is that at 230 V supply, the EARTH leakage current must be less than 0.75 mA.

3.  Water leakage / Functionality

Check that there is no water leakage from any part of the product during operation.

Check that the functionality of the product (product dependent) eg. steaming, variable steam, SOS, ASO etc is working 
properly.

4. Loose part

Check that there are no loose parts eg. extra screw in the product that can cause short-circuit or product malfunction.

REPAIR INSTRUCTIONS

GC7480

Summary of Contents for GC7480

Page 1: ...nterference suppression on radio and TV After the product has been repaired it should function properly and has to meet the safety requirements as officially laid down at this moment TECHNICAL INFORMATION Voltage 220 240V Frequency 50 60 Hz Power Iron 800 W Boiler 1370 W Product dimension 42 9 x 40 x 20 6 cm Weight of iron 1 2 kg Weight of iron base 4 5 kg Water advice If the tap water in your are...

Page 2: ...g 2 Wiring at rear HOUSING Part 2 INLAY 17 STEAM LOCK 13 LAMP MOUNTED ASSY 8 MICROSWITCH ASSY 11 TRIGGER 12 THERMOSTAT DIAL ASSY 15 HOUSING PRINTED 10 SOLEPLATE COVER 6 THERMOSTAT BUSH 9 RUBBER HOSE 3 SOLEPLATE ASSY 1 Remove Screw A Disassemble BACKPLATE 18 Release Inlay rear catch Disassemble INLAY 17 Disassemble STEAM LOCK 13 Disassemble MICROSWITCH ASSY 11 Remove Screw C Disassemble TRIGGER 12 ...

Page 3: ... 4239 026 48151 4239 021 31782 4239 021 36861 4239 026 13222 4239 021 68681 Soleplate cover Steam deviator assy Lamp mounted assy Thermostat bush Housing Blue Printed Dark blue 11 12 13 14 15 4239 021 31793 4239 026 48171 4239 026 48181 4239 010 09293 4239 021 68691 Microswitch assy Trigger Steam lock Trigger spring Thermostat dial assy Blue Blue Dark blue 16 17 18 19 4239 026 48201 4239 026 48211...

Page 4: ...GC7540 4 8 A S N L E B1 B2 D3 E2 D2 C D1 E1 E3 13 14 4 17 18 16 11 10 6 7 2 9 1 3 8 19 12 15 5 EXPLODEDVIEW IRON GC7480 ...

Page 5: ... PUMP Disconnect DE AIRTUBE Disassemble WATERTANK ASSY 34 Disassemble BRAIDED RUBBER HOSE BOILER Disassemble PUMP ASSY 45 Remove Torx screws L1 L2 L3 Disassemble TOP SPACER Disassemble BOILER ASSY 38 DISASSEMBLY ADVICE STAND PARTS LIST STAND Note For Pos 45 please replace both components together when either one is faulty The 2 components come as a service kit Pos Service code Description Remark 3...

Page 6: ...GC7540 6 8 F1 K1 K2 K4 K3 F2 G F3 40 56 38 42 36 52 50 65 L2 L3 L1 30 34 Clamping plate 33 H1 H2 37 J1 J2 45 55 Cord clamp 43 EXPLODEDVIEW STAND GC7480 ...

Page 7: ...leplate temperature Check that soleplate temperature is within IEC requirement Measure the temperature of the soleplate after the iron has reached steady state i e connected to the mains for at least 15 minutes The table below shows the temperature requirement Marking Soleplate temperature Deg C Material for example Test point Minimum Maximum Nominal Tolerance 1 dot 70 120 95 25 Acetate elastane p...

Page 8: ...GC7540 8 8 Single wire connector BLACK BLACK A LIGHT GREY Dual wire connector Pump Assy Wire connections Connector positions in DOTTED circle cannot be interchanged REPAIR INSTRUCTIONS GC7480 ...

Reviews: