


1.
y
y
(Standby-on)
To switch DVD/ VCR ON or OFF.
2. AUDIO
To choose audio languages or sound modes (DVD).
To choose sound modes (VCR).
3. 0-9 numerical key pads/+10
To select numbered items in a menu.
Use +10 button to enter number 10 and above (DVD).
To select TV channels in VCR mode.
4. DISPLAY
To access or remove the display screen during playback (DVD).
To access or remove VCR’s on-screen status display (VCR).
5. VCR
Press to put the DVD/ VCR in VCR mode and before using the
remote control for VCR features.
6. PLAY
B
To start disc playback (DVD).
To start tape playback (VCR).
7. REW
h
To view DVD picture in fast reverse motion (DVD).
When tape playback is stopped, press to rewind the tape at
high speed (VCR).
During playback, press to rewind the tape while the picture
stays on the screen (VCR).
8. STOP
C
To stop disc playback (DVD).
To stop playback, recording (VCR).
5
Functional Overview
9. FFW
g
To view DVD picture in fast forward motion (DVD).
When tape playback is stopped, press to fast forward the tape
at high speed (VCR).
During playback, press to fast forward the tape while the picture
stays on the screen (VCR).
10. REC
I
To record the TV channel selected at this moment or press
repeatedly to start a One-Touch Recording (VCR).
11. DISC/VCR MENU
To display the menu of the DVD disc or to access VCR menu.
12. DVD SETUP
Press to access or remove the player’s setup menu (DVD).
13. TITLE
To display title menu of a disc (DVD).
14. MODE
To set up programmed or random playback (DVD).
15. ZOOM
To enlarge part of image (DVD).
16. SUBTITLE
Subtitle language DVD selector (DVD).
17. ANGLE
To select DVD camera angle or rotate a picture of JPEG file
(DVD).
18. REPEAT
To repeat chapter, track, title, group, disc (DVD).
19. REPEAT A-B
To repeat a specific segment (DVD).
20. SEARCH
To access or remove search display (DVD).
Press to call up the index or time search menu (VCR).
21. TIMER SET
To put the DVD/ VCR into standby mode for a timer recording (VCR).
22. BACK
To return to the previous screen, or to remove the setup
menu (DVD).
23.
K
/
L
/
{
/
B
(up/down/left/right)
To select an item in the menu.
24. OK
To acknowledge menu selection (DVD).
25. DVD
Press to put the DVD/ VCR in DVD mode and before using
the remote control for DVD features.
26. PAUSE
k
To pause playback temporarily / frame-by-frame playback (DVD).
To pause playback and during recording temporarily (VCR).
27. VCR SLOW
To view tape playback in slow motion (VCR).
28. REC MODE
To change the recording speed (SP or LP) (VCR).
29. NEXT
3
/PREV
To skip chapter/tracks (DVD).
To cancel the point for repeat A-B (DVD).
30. CLEAR
To reset the setting (DVD).
To reset the counter (VCR).
31. OPEN/CLOSE
To insert discs into or remove them from the tray (DVD).
To remove the tape from the VCR (VCR).
32. CH +/CH -
To change TV channels (VCR).
To adjust the tracking manually during playback (VCR).
4. DVD S-VIDEO OUT jack
Connect an S-Video cable (not supplied) here and to a TV’s S-VIDEO
in jack.
This supplies the picture for the DVD player only.
5. DVD COMPONENT VIDEO OUT jacks (Y C
B
/P
B
C
R
/P
R
)
(green, blue, red)
Connect component video cables (not supplied) here and to the
Component Video in jacks of a TV.
This supplies the picture for the DVD player only.
6. DVD/VCR AUDIO OUT and VIDEO OUT jacks
(red, white, yellow)
Connect the supplied audio and video cables here and to a TV’s
Audio and Video in jacks.
This supplies sound and picture for both the VCR and the DVD player.
7. VCR AUDIO IN and VIDEO IN jacks
Connect audio and video cables from a camcorder,VCR, etc., here.
This will be useful if you want to copy a video tape or watch mate-
rial that is playing other equipment.
8. AERIAL jack
Connect to an antenna or cable.
9. RF OUT jack
Use supplied RF Coaxial cable to connect to the ANTENNA IN on
your TV, cable box or Direct Broadcast System.
VCR SLOW
VCR
DVD
OPEN/CLOSE
SUBTITLE
AUDIO
ANGLE
ZOOM
DVD
SETUP
MENU
DISC/VCR
DISPLAY
TIMER SET
BACK
PLAY
REW
FFW
PREV
NEXT
PAUSE
REC
STOP
OK
REPEAT
REPEAT
A-B
CH
+
-
CLEAR
REC MODE
SEARCH
MODE
TITLE
27
5
23
10
18
19
20
28
30
7
32
21
13
14
3
9
4
2
6
22
17
25
12
15
31
1
24
8
26
29
11
16
COAXIAL
DVD
VCR
DVD/VCR
L
L
Y
L
R
R
R
DIGITAL
AUDIO OUT
COMPONENT
VIDEO OUT
AUDIO
OUT
S-VIDEO
OUT
C
B
/
P
B
C
R
/
P
R
AUDIO IN
AUDIO OUT
VIDEO OUT
VIDEO IN
1
3
2
4 5 6 7
8
9
AERIAL
RF OUT
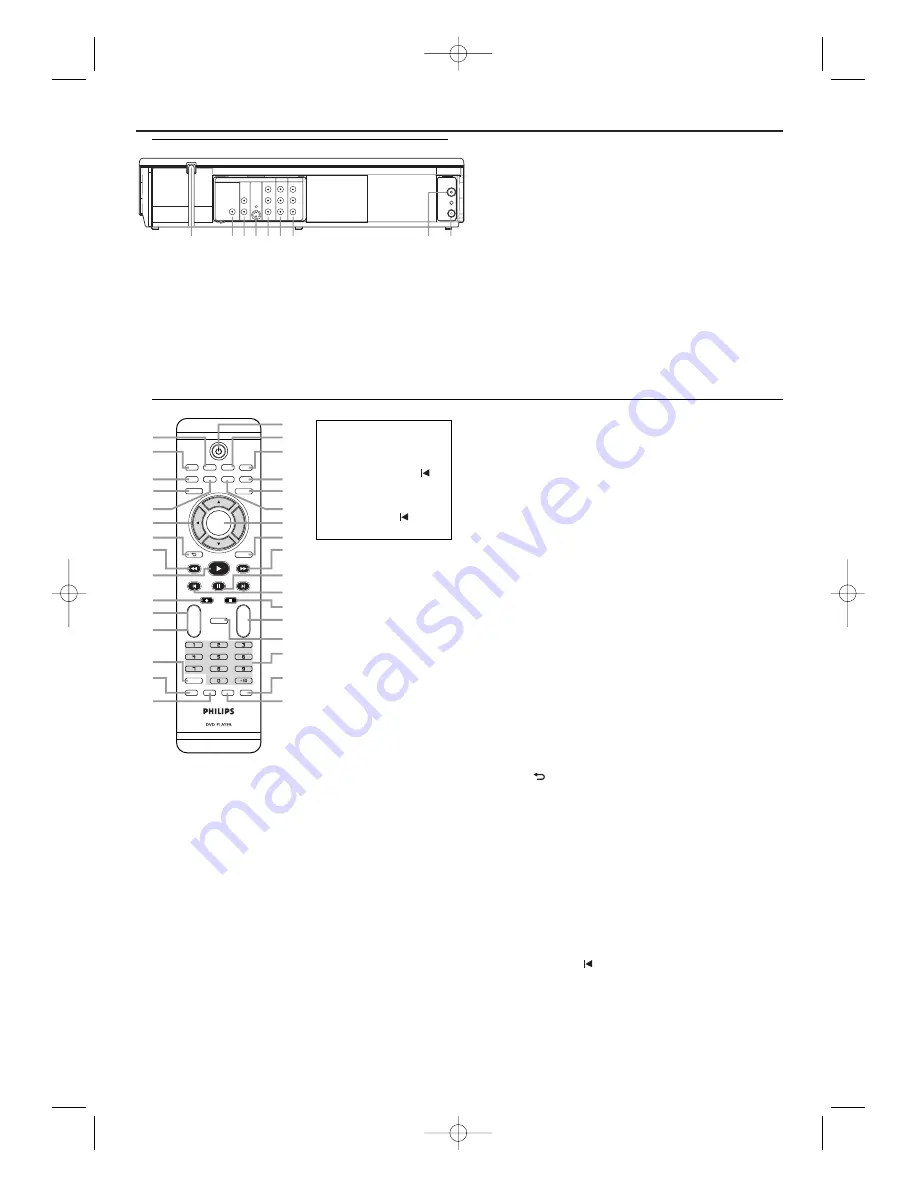
Remote Control
Rear Panel
1. AC Power Cord
Connect to a standard AC outlet to supply power to the unit.
2. DVD COAXIAL DIGITAL AUDIO OUT jack (black)
Connect a coaxial digital audio cable (not supplied) here and to a
Stereo’s Coaxial Digital Audio in jack.
This supplies audio for the DVD player only.
3. DVD AUDIO OUT jacks Left (white), Right (red)
Connect the supplied audio cables here and to the Audio in jacks of
a TV or Stereo.
These jacks supply audio for the DVD Player only.
Use these if you want a secondary connection between the DVD
Player and another TV, etc.
• For DVD player features,
press DVD first.
• For VCR features, press
VCR first.
• In VCR mode, PREV
works as CH -, and
NEXT
3
works as CH +.
• In DVD mode, CH -
works as PREV
, and
CH + works as NEXT
3
.
E8B23AD_EN 5/16/06 12:03 PM Page 5


