background image

12

Programming a Recording (TIMER)

Other Functions

How to check, correct or delete
a programmed recording (TIMER)

1

Press TIMER  SET.
• If the unit’s power is off, press 

y

y

instead of TIMER SET, then

go to the next step.

2

Repeat steps 

1

to 

3

in the “Programming a Recording” section.

3

Select the timer block number you want to check by pressing

K

/

L

.

• The details of the selected timer block appears on the TV

screen.

• Press 

B

B

and then go to the digit you want to change by

pressing 

s

B

.Then, enter correct numbers by pressing

K

/

L

.

• You may cancel the entire programme by pressing 

s

while

the timer block number flashes.

4

Press DISC/VCR MENU to exit.

5

Press TIMER SET to return to timer standby mode.

Hint for Timer Recording

• If there is a power failure or the unit is unplugged for more

than 1 minute, the clock setting and all timer settings will be
lost.

• If a tape ends during timer recording, the unit will stop, eject

the tape, and switch to the DVD mode automatically as ‘

flashes. (If the DVD power is off, the unit will become the
STANDBY status.)

• If a tape is not in the unit or does not have a record  tab, ‘

flashes and timer recording will not operate. Please insert a
recordable tape.

• When timer recordings are set, ‘

’ will come on.To use the

unit as usual until the time for the recording, press TIMER SET
so that ‘

’ disappears. Press VCR to choose VCR mode, then

continue with the other features as described in this manual.

Note:

- When all the programmed recordings are finished,

will

flash (or be lit when there are more recordings left).To use
the unit, release it from the timer standby mode by
pressing TIMER SET on the remote control or 
STOP/EJECT 

C  A

on the front panel.

How to use the DVD player during a VCR timer recording
or while ‘

’ is on or flashes.

• You can use the DVD player while ‘

’ is on or flashes, or

during a timer recording. Press 

y

y

to turn on the DVD player.

Press DVD on the remote control to choose DVD mode,
then continue with the other DVD features as described in
this manual.You don’t have to set the TIMER off to use the
DVD only.

How to stop timer programme already started

• Press STOP/EJECT 

C A

on the front panel.

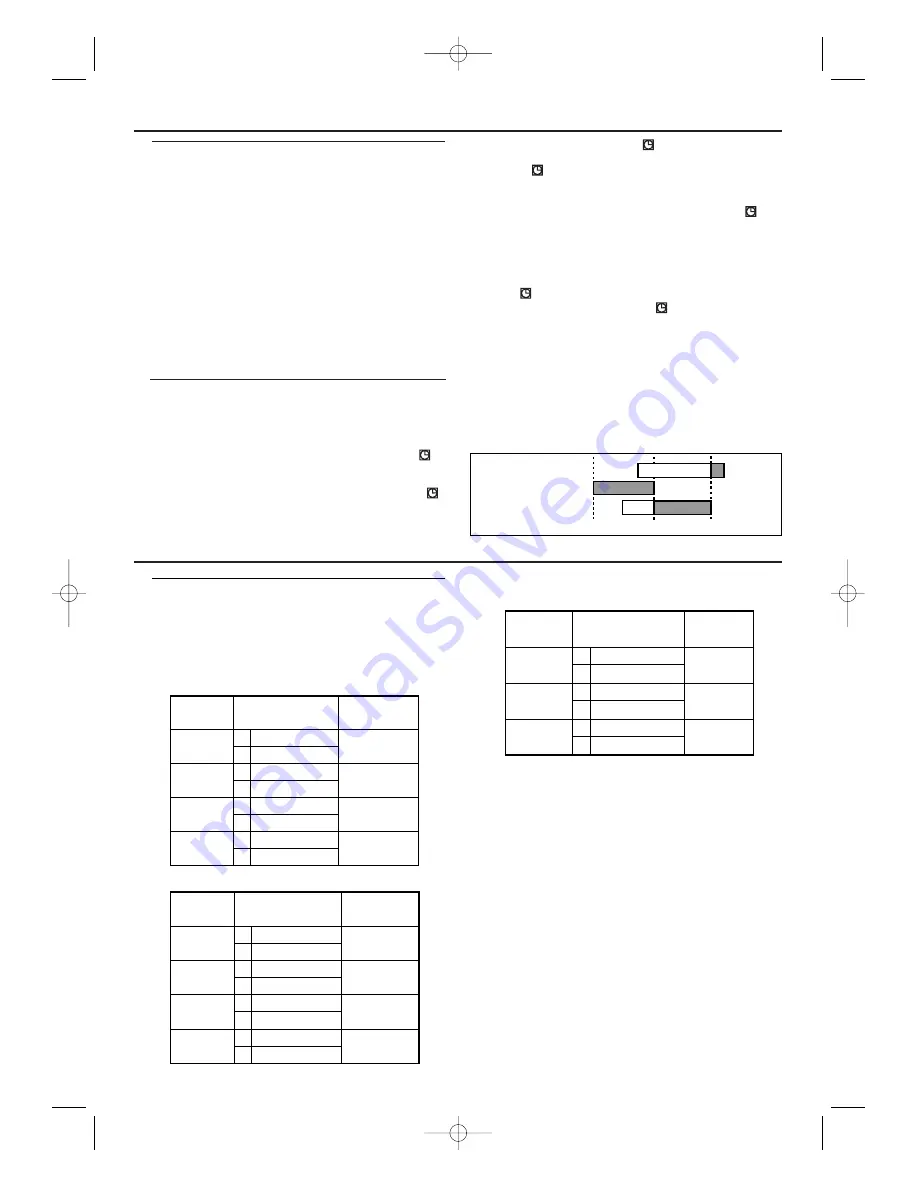
To avoid overlap of timer programmes

• A timer programme will not work whilst another programme

is under execution.

9:00

10:00

11:00

Programme 1

Programme 2

Programme 3

• Reception of stereo broadcasts:

STEREO

LEFT

RIGHT

NONE

Display on 

the TV screen

Mode

Stereo

L

R

Monaural

L Audio

R Audio

L Audio

L Audio

R Audio

R Audio

L

+ R  Audio

L

+ R  Audio

L

R

L

R

L

R

L

R

AUDIO OUTPUT

• During playback of the recorded tape in Hi-Fi mode:

Mode

Stereo

L

R

MONO

STEREO

LEFT

RIGHT

NONE

Display on 

the TV screen

Hi Fi L Audio

Hi Fi R Audio

Hi Fi L Audio

Hi Fi L Audio

Hi Fi R Audio

Hi Fi R Audio

Normal Audio

Normal Audio

L

R

L

R

L

R

L

R

AUDIO OUTPUT

Selecting the sound channel

This unit will record and playback Hi-Fi stereo sound. In addi-
tion it has a NICAM/A2 stereo sound decoder.
This equipment will receive stereo and bilingual broadcasts and
there are several ways of recording and playing back the sound.
You can select each mode by pressing AUDIO on the remote
control. Each mode is indicated on the TV screen as following.

• During reception of bilingual broadcasts:

Display on 

the TV screen

Mode

MAIN

SUB

MAIN

SUB

MAIN

SUB

MAIN

SUB

Main Audio

Main Audio

Sub Audio

Sub Audio

Main Audio

Sub Audio

L

R

L

R

L

R

AUDIO OUTPUT

Notes:
– If you play non-Hi-Fi tapes, the unit will play 

automatically in monaural regardless of the mode you
select.

– If the stereo signal becomes weak, the broadcast is 

automatically recorded in monaural.

E8B23AD_EN  5/26/06  10:12 AM  Page 12

Summary of Contents for DVP3200V/75

Page 1: ...er Manual first for quick tips that make using your Philips product more enjoyable If you have read your instructions and still need assistance you may access our online help at www philips com support DVP3200V 75 DIGITALVIDEO DISC PLAYER VIDEO CASSETTE RECORDER E8B23AD_EN 5 16 06 12 03 PM Page 1 ...

Page 2: ...t inside the unit Should this occur the unit would not operate normally Leave the unit on for about one hour with no disc in the unit until normal playback is possible The mechanical parts of the set contain self lubricating bearings and must not be oiled or lubricated Never spill liquid of any kind on this unit If liquid is spilled into the unit consult qualified service engineer Do not stand the...

Page 3: ...laying a Disc Basic Playback 13 General Features 13 Pause 13 Disc Menus 13 Title Menu 13 Calling Up a Menu During Playback 13 Step by Step Playback 13 Resume 13 Fast Forward Reverse Search 13 Slow Forward Slow Reverse 14 x1 3 and x0 8 Rapid Play with Voice 14 Zoom 14 Track Search 14 Title Chapter Search 14 Time Search 14 Repeat 14 Programmed Playback 15 Random Playback 15 MP3 Windows Media Audio J...

Page 4: ...URCE DVD VCR To select between DVD and VCR mode 9 VCR light VCR Light appears when the unit is in VCR mode 10 CHANNEL LK VCR To select a programme number on the TV 11 IR Infrared Remote Sensor DVD VCR To receive signals from remote control 12 REC I VCR Press once to start recording repeatedly to start an One Touch Recording Lights up when the inserted disc is being played back Displays a type of t...

Page 5: ...hange the recording speed SP or LP VCR 29 NEXT 3 PREV To skip chapter tracks DVD To cancel the point for repeat A B DVD 30 CLEAR To reset the setting DVD To reset the counter VCR 31 OPEN CLOSE To insert discs into or remove them from the tray DVD To remove the tape from the VCR VCR 32 CH CH To change TV channels VCR To adjust the tracking manually during playback VCR 4 DVD S VIDEO OUT jack Connect...

Page 6: ...udio input jacks Audio Left White Audio Right Red To AUDIO OUT jacks C Digital audio connection You can make this connection using a coaxial digital cable Connecting an amplifier with a Dolby Digital MPEG Audio digital surround processor to your VCR DVD s coaxial digital jack provides richer and more powerful audio play DIGITAL IN COAXIAL DIGITAL AUDIO OUT COAXIAL COMPONENT VIDEO OUT AUDIO OUT S V...

Page 7: ...s appear on the picture the RF converter must be set to a different channel between CH28 and CH69 Continue with step 3 3 Press DISC VCR MENU 4 Press K L to select INITIAL then press B 5 Press K L to select RF OUT then press B The RF OUT CH menu will appear 6 Press K L to select a channel between CH28 and CH69 which is not used for broadcasts in your area then press B 7 Press DISC VCR MENU to exit ...

Page 8: ...U 2 Press K L to select INITIAL then press B 3 Press K L to select CH TUNING then press B 4 Press K L to select MANUAL then press B 5 Press K L to select POSITION then press B When a weak signal is received in Manual Tuning mode you can change the background to solid blue or the static screen by pressing CLEAR 6 Use numerical key pads or K L to select your desired position number then press B You ...

Page 9: ...on with picture scanning If you want to skip or repeat a scene during playback press REW h or FFW g Press PLAY B to return to normal playback Still picture slow motion You can freeze the picture on TV screen by pressing PAUSE F during playback You can advance the picture one frame at a time by pressing PAUSE F during the Still mode When the picture begins to vibrate vertically stabilize the pictur...

Page 10: ...ion tab on the back edge of the cassette If you decide to record on the tape again cover the hole with plastic tape Tab Normal Recording 1 Insert a cassette tape with its erase prevention tab in place Press VCR If necessary rewind or fast forward the tape to the point at which you want to begin recording 2 Press the numerical key pads or CH or CH to select the channel to be recorded 3 Press REC MO...

Page 11: ...k section Then set the timer When you press B after pressing K L during steps 3 to 10 the input mode will move to the next step If you do not press B within 5 seconds of setting an item the input mode will move to the next step Press s to go back one step from the current setting during steps 4 to 9 If s is pressed when the TIMER NUMBER is flashing the entire timer block will be erased 3 Programme...

Page 12: ...during a VCR timer recording or while is on or flashes You can use the DVD player while is on or flashes or during a timer recording Press y y to turn on the DVD player Press DVD on the remote control to choose DVD mode then continue with the other DVD features as described in this manual You don t have to set the TIMER off to use the DVD only How to stop timer programme already started Press STOP...

Page 13: ...lection 4 Press K L s B to select an item and OK to confirm selection DVD V DVD V Calling Up a Menu During Playback Press DISC VCR MENU to call up the DVD main menu Press TITLE to call up the title menu Note Contents of menus and corresponding menu operations may vary between discs Refer to the manual accompanying the disc for details DVD V Step by Step Playback 1 During playback press PAUSE k Pla...

Page 14: ... Press OK to switch among x1 3 x0 8 and OFF Plays back approximately at 1 3 times of normal playback Plays back approximately at 0 8 times of normal playback OFF No effects 3 To resume normal playback press PLAY B Notes During Rapid Play with Voice Audio Language Setting and Virtual Surround Setting cannot be changed Virtual Surround does not function The PCM sound will be output if using the digi...

Page 15: ...3 files The symbol is shown on the top of Windows Media Audio files The symbol is shown on the top of JPEG files The symbol is shown on the top of DivX files MP3 Windows Media Audio or JPEG files recorded on a DVD will not play on this unit The system can recognise up to 255 groups folders and up to 999 tracks files and this applies even to the case where mixed MP3 Windows Media Audio and JPEG fil...

Page 16: ... is playing L1 Layer 1 is playing DVD V JPEG Transition Mode for a Slide Show You can switch the transition mode for a slide show during playback 1 Press MODE during playback The slide show mode screen will appear The slide show mode cannot be switched when it is stopped or from the file list screen 2 Press OK The slide show mode will change CUT IN OUT The entire image appears in one time FADE IN ...

Page 17: ... file if available playback 1 Press DVD then SUBTITLE during playback 2 Press SUBTITLE repeatedly to select your desired subtitle language The selected language will be displayed on the status bar at the top of the screen When no subtitles are available NOT AVAILABLE appears on the status bar 3 To turn off subtitles press SUBTITLE repeatedly until OFF appears Notes If your language is not shown af...

Page 18: ...t does not set the TV aspect automatically STILL MODE AUTO select it usually FIELD pictures in the Still mode will be stabilised although they will be coarse due to a little amount of data FRAME pictures in the Still mode will be highly defined although they will be blurred due to outputting two fields at the same time Press K L to select an option then press OK The default setting is AUTO PROGRES...

Page 19: ...ervices You need to have a registration code to purchase or rental VOD files Please visit www divx com vod for more details Notes You cannot play back the DivX VOD files obtained with different registration codes on this player You cannot play back the DivX VOD files of which rental period has been expired In such case press MENU and select other files that can be played back Some DivX VOD files a...

Page 20: ...rsican 4961 Croatian 5464 Czech CZE 4965 Danish DAN 5047 Dutch DUT 6058 English ENG 5160 Esperanto 5161 Estonian 5166 F H Faroese 5261 Fiji 5256 Finnish FIN 5255 French FRE 5264 Frisian 5271 Galician 5358 Georgian 5747 German GER 5051 Greek GRE 5158 Greenlandic 5758 Guarani 5360 Gujarati 5367 Hausa 5447 Hebrew 5569 Hindi 5455 Hungarian HUN 5467 I K Icelandic ICE 5565 Indonesian 5560 Interlingua 55...

Page 21: ... 233 mm Weight Approximately 3 1 kg POWER SUPPLY UNIVERSAL Power inlet 230 240 V 50 Hz Power usage 21 W Power usage standby 9 2 W standby 5 0 W When Clock Display set to OFF Specifications Specifications subject to change without prior notice Information Solution Check if the AC power cord is properly connected Check if the TV is switched on Check the video connection Sometimes a small amount of p...

Page 22: ...nty does not cover a Mileage or travelling time pickup or delivery installations and cost of insurance b Mileage or travel outside the normal service area covered by selected Authorised Service Centre c Service costs arising from failure to correctly adjust the controls of the product or to observe the instructions or inspections that reveal that the product is in normal working order d Product fa...

Page 23: ...23 E8B23AD_EN 5 16 06 12 03 PM Page 23 ...

Page 24: ...CLASS 1 LASER PRODUCT DVP3200V 8239 300 47571 JpnCN 0616 75 1 1VMN22793 E8B23AD Meet Philips at the Internet http www philips com support E8B23AD_EN 5 16 06 12 03 PM Page 24 ...

Reviews: