background image

77

快速入门

  (继续)

步骤三:电视频道设定

在 DVD 录放像机可以开始录制电视频道
节目之前,您需要搜寻可以观看的电视频
道,然后将这些频道储存在本机中。

注意:

请确认 DVD 录放像机、电视、卫

星接收器/电缆电视转换器 (如有) 所有必
要的连接均已妥善接好,且已开启。

当光碟托盘中没有光碟时,才可以变
更调谐器的设定�

 SYSTEM 

SETUP

OK

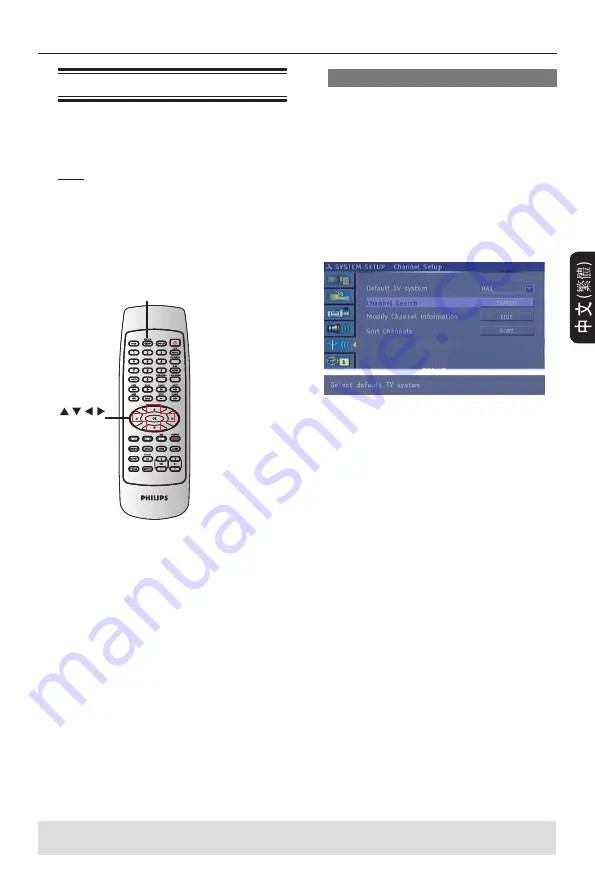
自动电视频道搜寻

这会自动扫描所有可以接收到的电视频道
以及电缆电视转换器/卫星接收器上的电缆
电视节目,并将这些频道储存在 DVD 录
放像机上。

A

 按一下遥控器上的 

SYSTEM-SETUP

 电视上会显示系统菜单。

B

 使用 



 键选取

{ System Setup 

- Channel Setup }

 (系统设置-频道扫

描)并按一下 

OK

C

 使用 



 键选取 

{ Channel Search 

}(扫台)

并按一下

OK

 开始自动搜寻电视频道。此步骤可能需

要几分钟的时间。 
搜寻完毕,电视上会显示搜寻到的频道数
目。

提示: 

按一下 

 回到前一个菜单项目。


按一下 

SYSTEM-SETUP

 退出菜单。

1

Summary of Contents for DVDR3408

Page 1: ...3408 User Manual 4 58 ...

Page 2: ...cabo fácilmente Visite la página www philips com support para buscar información sobre actualizaciones de software Da das Disk Format je nach Hersteller verschieden ist ist für Ihr DVD System möglicherweise die Erweiterung der Spielbarkeit oder eine Aktualisierung erforderlich Da die DVD Technologie sich ständig weiterentwickelt werden sich diese Erweiterungen durchsetzen und einfach auszuführen s...

Page 3: ...ents Use of this copyright protection technology must be authorized by Macrovision and is intended for home and other limited viewing uses only unless other wise authorized by Macrovision Reverse engineering or disassembly is prohibited U S Patent Number 4 631 603 4 819 098 4 907 093 5 315 448 and 6 516 132 58 ...

Page 4: ...ks Inc and are used under license This connection is also known as FireWire and IEEE 1394 This connection is used for the transfer of high bandwidth digital signals as used by digital video DV camcorders Audio and video signals are transmitted using a cable Philips DVD recorders support dual media recording the ability to create recordings on and discs DVD R RW DVD R DL DVD R RW Special Features ...

Page 5: ...hat are Titles and Chapters A DVD disc contains Titles and Chapters which are similar to the Titles and Chapters of a book A Title is often a complete movie and is broken down into Chapters or individual scenes from the movies Programs are recorded as a single title it may consist of one chapter or a few chapters within a title depending on the recording settings How do I set up Titles and Chapter...

Page 6: ...g S VIDEO In or VIDEO In jack 16 Main Unit 17 Jacks behind the flap 17 Remote control 18 20 Display window 21 Getting Started Step 1 Inserting Batteries 22 Using the remote control to operate the system 22 Step 2 Finding your viewing channel 22 Step 3 TV channel programming 23 Automatic TV channel search 23 Modifying Channel Information 24 Sorting the TV channels 25 Step 4 Setting the time date 25...

Page 7: ...ng a Divx disc 42 Playing an MP3 disc 42 Playing a picture disc or musical slide show 42 43 Additional Playback Features Changing to another title chapter track 44 Pausing playback and step play 44 Searching forward backward 44 Zooming in 44 Using TITLE options 45 Selecting various repeat shuffle functions 45 Programming disc tracks 46 Changing the audio soundtrack language 46 Changing subtitle la...

Page 8: ... local regulations regarding disposal of packaging materials exhausted batteries and old equipment Care and Safety Information CAUTION High voltage Do not open the device You run the risk of getting an electric shock The machine does not contain any user serviceable parts Please leave all maintenance work to qualified personnel Setup Finding a suitable location Place the set on a flat hard and sta...

Page 9: ... telephone numbers and e mail addresses are given in the guarantee booklet Refer to the type plate on the rear or bottom of the product for identification and supply ratings Accessories supplied Remote control and batteries Audio Video AV cables RF coaxial cable Quick Start Guide User Manual Region codes DVD films are usually not released at the same time in all regions of the world thus all DVD p...

Page 10: ...lete connection to your TV A Connect existing Antenna Cable TV signal or from the Cable Box Satellite Receiver RF OUT or TO TV to the ANTENNA IN jack on the DVD recorder B Use the supplied RF coaxial cable to connect ANTENNA OUT jack on the DVD recorder to the antenna input jack on your TV VHF UHF RF IN TIPS Before making or changing any connections make sure that all the devices are disconnected ...

Page 11: ...k or labeled as Y C or S VHS on the TV Option 3 Using ComponentVideo jack best picture quality A Use the component video cables red blue green not supplied to connect the Y Pb Pr OUT jacks on the DVD recorder to the corresponding component video input jacks or labeled as Y Pb Cb Pr Cr or YUV Y Pb Pr on the TV B If your TV accepts Progressive Scan signal see page 49 for detailed Progressive Scan se...

Page 12: ...ng a Coaxial cable You can connect the DVD recorder to an AV amplifier receiver in order to enjoy multichannel surround sound l Use a coaxial cable not supplied to connect the COAXIAL socket on the DVD recorder to the digital input on the AV amplifier receiver with a digital multi channel sound decoder Before you start operating set the Digital Audio Output accordingly see page 55 If the Digital O...

Page 13: ...nnection from the Cable Box Satellite Receiver to your TV B Use the audio video cables to connect the VIDEO AUDIO IN EXT on the DVD recorder to the matching VIDEO AUDIO output jacks on the Cable Box Satellite Receiver C Use the audio video cables to connect the VIDEO AUDIO OUT on the DVD recorder to the matching VIDEO AUDIO input jacks on the TV Back of a Cable Box or Satellite Receiver Example on...

Page 14: ...he TV C Use the audio video cables to connect the VIDEO AUDIO IN EXT on the DVD recorder to the matching VIDEO AUDIO output jacks on the VCR D Use the audio video cables to connect the VIDEO AUDIO OUT on the DVD recorder to the matching VIDEO AUDIO input jacks on the TV Helpful Hints You may use the S VIDEO Y C jack instead of VIDEO CVBS jack if the connected device has the same S VIDEO input outp...

Page 15: ...on the Cable Box Satellite receiver to the ANTENNA IN jack on the DVD recorder C Use the supplied RF coaxial cable to connect the ANTENNA OUT jack on the DVD recorder to the antenna input jack on the TV D Use the audio video cables to connect the VIDEO AUDIO IN EXT on the DVD recorder to the matching VIDEO AUDIO output jacks on the VCR E Use the audio video cables to connect the VIDEO AUDIO OUT on...

Page 16: ...al Computer It is not possible to record from the DVD recorder to your camcorder via the DV IN jack on your DVD recorder Option 2 Using S VIDEO In or VIDEO In jack Use S VIDEO connection if you have a Hi8 or S VHS C camcorder It provides better picture quality Alternatively you can use VIDEO connection if your camcorder has only a single video output Composite Video CVBS A Connect the S VIDEO or V...

Page 17: ...t for camcorders or video recorders l DV IN Input for digital camcorders or other suitable devices using this connector Press REC SOURCE on the remote control to select DV in order to view the input source a STANDBY ON 2 Turns on or off the DVD recorder b Disc tray c OPEN CLOSE ç Opens closes the disc tray d n STOP Stop playback recording e ÉPLAY Play a disc f Skips to previous or next Chapter Tra...

Page 18: ...the current TV channel or the current video input source f Skips to previous or next Chapter Track g TOP MENU For DVD R RW and DVD R DL only Enters the disc editing menu h AUDIO Selects an audio language DVD VCD or an audio channel i SUBTITLE Selects a DVD subtitle language j REC MODE Toggles between recording modes 1 2 2 5 3 4 and 6 hours mode This determines the quality of the recording and the ...

Page 19: ...Stores confirms an entry Confirms a selection o PLAYÉ Plays a disc p STOP n Stops playback recording q Å Pauses the playback or recording Press repeatedly to advance a paused picture one frame at a time r EDIT For DVD R RW R DL only Enters exits the video editing menu s ZOOM Enlarges a picture on the TV screen t TITLE MENU Enters exits the TITLE menu u ADD CLEAR Selects Removes a track chapter fil...

Page 20: ...W Slow forward there are four modes 1 2 1 4 1 8 1 16 28 ANGLE Change camera angle must be supported by the disc 29 REPEAT Set repeat functions 30 REPEAT AB Repeat specified program segment 31 P SCAN Switch the scanning mode of video output Progressive Interlace 32 CH Select TV channel or external signal source 33 SHUFFLE Play program in random sequence 34 VOL Adjust the audio output volume Remote ...

Page 21: ...English 21 Display window Display window TIPS DTS discs are supported via passthrough mode through Digital Coaxial connection only ...

Page 22: ...Step 2 Finding your viewing channel A Press STANDBY ON 2 on the DVD recorder to turn it on B Turn on the TV and set it to the correct video in channel You should see the blue DVD background screen Usually this channel is between the lowest and highest channels and may be called FRONT A V IN VIDEO See your TV s manual for more details Or you may go to channel 1 on your TV then press the Channel dow...

Page 23: ... disc tray SYSTEM SETUP OK AutomaticTV channel search This will automatically scan all the receivable TV channels and the cable programs from the Cable Box Satellite Receiver and store these channels on the DVD recorder A Press SYSTEM SETUP on the remote control The system menu appears on the TV B Use keys to highlight System Setup Channel Setup and press OK C Use keys to highlight Channels Search...

Page 24: ...the current TV channel TIPS Press to go back to previous menu item Press SYSTEM SETUP to exit the menu If required use keys to start the automatic frequency search or press STOP stop search Sound mode Set the TV system that produces the least distortion of picture and sound Use keys to select a suitable sound mode then press OK to confirm See chapter TV System Guide at the back of this manual for ...

Page 25: ...hannel to the desired position and press OK or t The selected channel will be inserted before the current position F Repeat steps D E until you have sorted all the TV channels you want Step 4 Setting the time date If the DVD recorder has not set the time and date correctly set the clock manually by following the steps below A Press SYSTEM SETUP The system menu appears B Use keys to select System S...

Page 26: ... capacity 8 5GB It offers two recordable layers on a single DVD disc The layers are accessible from the same side of the disc so recording can occur completely uninterrupted IMPORTANT Unrecordable pictures Television programs films video tapes discs and other materials may be copy protected and therefore cannot be recorded on this recorder Recording settings The default recording settings allow yo...

Page 27: ...ecording The interval depends on discs 5 minutes per chapter for disc with single layer 10 minutes per chapter for disc with double layer C Press OK to confirm Default Recording Source You can define your preferred source of recording The default source is selected when the DVD recorder is turned on To change the current recording source without changing the default setting you can press REC SOURC...

Page 28: ...DEO CVBS IN EXT and AUDIO L R jacks on the back panel Rear S Video Input source from the device connected to the S VIDEO Y C IN EXT and AUDIO L R jacks on the back panel DV Input source from the device connected to DV IN jack at the front panel D Press REC l to start recording The recording will start automatically after the last recording on the DVD R RW R DL E To stop the recording press STOP n ...

Page 29: ...r Recording to automatically start and stop a recording at a later date time The DVD recorder will tune to the right program channel and begin recording at the specified time To make a timer recording your DVD recorder needs to know The date you want to make the recording The recording input source The start and stop time of the recording The recording quality see page 27 TIMER OK TIPS Ensure that...

Page 30: ...formation Follow the steps A H of Timer Recording manually on pages 29 30 Source Use Source keys to select TV Tuner as the input channel and press OK to confirm C Leave the Satellite Receiver Cable Box on for the recording Recording continued Source Use keys to select the recording input source Rec Mode Use keys to select your option See pages 26 27 on Recording settings Default Recording Mode Mod...

Page 31: ...he entry field and make the necessary changes G Once complete select in the menu and press OK to save the changes H Press TIMER to exit the menu Watching anotherTV channel during recording You can watch another TV channel while recording is in progress by using the TV s remote control to change the TV channels Helpful hint Remember to turn the TV back to its video input channel if you want to watc...

Page 32: ... disc content and settings of a recorded DVD R RW R DL from the disc editing menu The edited contents may not be available if you play the disc on another DVD player The displayed options in the disc editing menu differ depending on the type of disc Play Start playing from the beginning of the disc Erase Disc DVD RW only Erase all the recordings in the disc Rename Disc Change the name of the disc ...

Page 33: ... content of the DVD RW including those that was not recorded on this DVD recorder Once the existing content is erased it can be used for recording A Press TOP MENU then use keys to select Erase Disc and press OK A warning message will appear B Select in the menu to proceed or to abort then press OK to confirm Record a new title This function allows you to start a new recording at the remaining emp...

Page 34: ... not try to open the disc tray or turn the power off as this may render the disc unusable C Select to abort Editing Finalizing Recording continued TIPS No further recording and editing can be carried out on a finalized DVD R DVD RW DVD R DL Press to go back to the previous menu Lock Unlock disc DVD RW only You can choose to protect the recorded DVD RW in order to prevent accidental loss of recordi...

Page 35: ...ssing title editing menu A Insert a recorded DVD R RW R DL into the DVD recorder The Index Picture screen appears on the TV l During playback press DISC MENU to access the Index Picture screen B Use keys to highlight a title recording and press The title editing menu appears C Use keys to access different options and OK to select Instructions and explanation of the options are provided in the foll...

Page 36: ...izing Recording continued TIPS No further recording and editing can be carried out on a finalized DVD R DVD RW DVD R DL Press to go back to the previous menu Rename title The original title name is automatically generated by the DVD recorder You can give a new name to the title by following the steps below A In title editing menu use keys to select Rename Title and press OK The keyboard screen app...

Page 37: ...r Hide the unwanted scene in the recording Index Picture Select a scene in the recording as the index picture screen Split Title Divide the recording into two under separate titles T Elapsed x xx xx Display the elapsed time Accessing video editing menu EDIT PLAY OK A Insert a recorded DVD R RW R DL disc into the DVD recorder The Index Picture screen appears on the TV B Use keys to select a title r...

Page 38: ...ack A During playback press EDIT to display the video editing menu then use keys to select Play and press OK B Use keys to select a playback mode and press OK Editing Finalizing Recording continued Creating chapter marker You can create a chapter by inserting chapter marker at any point within a title during playback This will allow you to access a specific point in the recording easily or set a c...

Page 39: ...int All the hidden chapters will be played back while in video editing mode Changing Index Picture The index picture is the picture of the title you will see when the DVD recorder loads up the Index menu Normally the first frame of a recording is shown as the title s index picture l Press EDIT to display the video editing menu then use keys to select Index Picture and press OK to select the curren...

Page 40: ...DVD discs and players are designed with regional restrictions Before playing a disc make sure the disc is for the same region as your player Do not push on the disc tray or put any objects other than discs on the disc tray It may cause the disc player to malfunction Inserting a disc A Press STANDBY ON to turn on the DVD recorder B Press OPEN CLOSE ç on the front of the DVD recorder The disc tray o...

Page 41: ...hapter and input your title chapter number using the numeric keypad 0 9 B To stop playback press STOP n TIPS Some discs cannot be played on this DVD recorder due to the configuration and characteristics of the disc or due to the condition of recording and authoring software Playing a Super Video CD Super Video CDs may feature PBC Play Back Control This allows you to play the video CDs interactivel...

Page 42: ...disc B Use keys to navigate within the menu and press OK to access the folder album C Use keys to select the track file to play l To go to the previous menu press DISC MENU D To create a playlist highlight the track file and press ADD CLEAR The selected tracks files will appear on the right screen Use tu keys to toggle between the left and right screen E Press OK to start playback F During playbac...

Page 43: ...own to top Left to right Right to left Extend center V l Press ANGLE on the remote control repeatedly to choose a slide show playback animation The selected animation settings will appear in the top left corner of the TV screen l Press ZOOM on the remote control to enlarge the picture F To stop playback press STOP n File format The file extension has to be JPG JPE or JPEG It can only display DCF s...

Page 44: ...al playback press PLAY Searching forward backward You can fast forward or fast reverse a disc at two four sixteen or thirty two times the normal playback speed A During playback press tt REW or uu F FWD to switch to the search function The search status bar appears It displays the search speed 2x 4x 16x 32x backward or forward DVD VCD CD MP3 DivX The sound will be muted DVD VCD WMA or intermittent...

Page 45: ...pecific segment within a title chapter track Press OK to mark the start and end of the segment you want to repeat Chapter Repeat Select this to repeat playback on the current chapter DVD DVD R RW R DL only Repeat Track Title Select this to repeat playback on the current track title Repeat Directory Select this to repeat playback on the current folder directory MP3 JPEG picture disc only Repeat Dis...

Page 46: ... Menu press DISC MENU Programming disc tracks You can play the contents of the disc in the order you want by programming the tracks to be played A Press DISPLAY twice on the remote control The TITLE menu appears B Use keys to select Mode Program and press OK The program menu appears Edit program play list Title Program Title 1 Title 2 Title 3 Title 4 Title 5 Title 6 Title 7 Title 8 C If the disc i...

Page 47: ...ccess the disc menu press DISC MENU Switching camera angles This option is only available with DVDs that contain sequences recorded from different camera angles This allows you to view the picture from different angles This function can be also accessed via angle key on the remote control A Press DISPLAY twice on the remote control The TITLE menu appears B Use keys to select Angle and press to ent...

Page 48: ...ages D To exit press SYSTEM SETUP Screen Saver A screen saver prevents damage to the TV screen by avoiding exposure to a static image for too long A In System Setup General use keys to highlight Screen Saver and press OK On Select this if you wish to turn off the TV screen after playback has been stopped or paused for more than 5 minutes Off Select this to disable the screen saver B Use keys to se...

Page 49: ...TV should match Only then will it be possible to play a DVD on this system Before changing the TV system determine the colour system of your TV A In System Setup General use keys to select Video Output Format and press OK PAL Select this if the connected TV has the PAL colour system It will change the video signal of an NTSC disc and output it to PAL format NTSC Select this if the connected TV has...

Page 50: ...rding to the TV type you have connected The format you select must also be available on the disc If it is not the setting for TV display will not affect the picture during playback A In System Setup Playback use keys to select TV Aspect Ratio and press OK 16 9 Select this for wide screen TV frame ratio 16 9 4 3 panscan Select this for a full height picture with both side trimmed 4 3 Letterbox Sele...

Page 51: ...ontrols and allow all discs to play select Cancel Rating explanations Off Parental Control is not active 8 Adult Mature material should be viewed only by adults due to graphic sexual material violence or language 7 NC 17 No children under age 17 not recommended viewing for children under age 17 5 PG R 6 R Restricted recommended that parents restrict children under 17 from viewing or allow to view ...

Page 52: ...and press OK to confirm To abort the change select and press OK Digital Audio Output After connecting the DVD recorder to your TV and other devices you may need to change the digital output setting Adjust the Digital Output only if you used the DVD recorder s coaxial jack A In System Setup Playback use keys to select Digital Audio Output and press OK ALL Select this if you use the COAXIAL jack to ...

Page 53: ...settings Accessing System Menu Channel Setup See pages 23 25 on TV channel programming Accessing System Menu Clock Date andTime See page 25 on Setting the time date TIPS The underlined option is the factory default setting Press t to go back to previous menu item Press SYSTEM SETUP to exit the menu item ...

Page 54: ...pression formats Dolby Digital MP3 MPEG2 Multichannel PCM MP3 bit rates 32 256 kbps and VBR Still Picture Playback Disc formats DVD R RW DVD R RW Picture CD Picture compression formats JPEG Picture enhancement Rotate Specifications Storage Media Recording media DVD R DVD RW DVD R DL Recording speed 2 4x Tuner Reception Transmission TV system PAL Aerial Input 75 Ohm coaxial IEC75 Connectivity Rear ...

Page 55: ...source Insert the disc with the label facing up Wrong region code The DVD must be coded for ALL regions or Region 6 in order to play on this DVD recorder There is no recording on the disc or wrong disc type Read chapter Playback Playable discs for details Make sure the disc is not scratched or warped Clean the disc or replace a new one Check if the disc is defective by trying another disc Check th...

Page 56: ...ck and white cannot be recorded The TV channel you want to record is not stored or you selected the wrong program number Check TV channels stored If you adjust the clock after you set a timer recording you have to reset the timer recording If the DVD recorder cannot read the disc you cannot record You cannot use the DVD recorder to duplicate copyrighted materials DVDs or videotapes onto a DVD R RW...

Page 57: ...1 or MPEG 1 Audio Layer 3 By using the MP3 format one CD R or CD RW can contain about 10 times more data then a regular CD MPEG Motion Picture Experts Group A collection of compression systems for digital audio and video Multichannel DVDs are formatted to have each sound track constitute one sound field Multichannel refers to a structure of sound tracks having three or more channels PBC Playback C...

Page 58: ...s 的授权制造 Dolby 和双 D 符号为 Dolby Laboratories 的商标 DivX DivX Certified 和相关标志均为 DivX Networks Inc 的商标且凭授权使用 这种连接亦称为 FireWire 和 IEEE 1394 用于数位摄像机 DV 等高频宽的数 位信号传输 影音频号通过电缆进行传输 飞利浦DVD刻录机支持 双媒体 刻录 可 以在 和 碟片上进行刻录 DVD R RW DVD R DL DVD R RW ...

Page 59: ... 与书的标题 和章节类似 标题通常是指一部完整的影 片 影片再细分为数个章节或个别片段 节目是以单一标题录制 标题下可能含有 一个或数个章节 视录制的设定而定 如何设定标题和章节 每次开始录制新的节目时 本 DVD 录放像 机便会自动建立一个新标题 然后您就可 以手动添加章节 或以 5 分钟的间隔让其 自动插入章节 光碟 最终化处理 是做什么 光碟最终化处理会将光碟锁定 使其无法 继续录制 只有 DVD R R DL 才需这个 步骤 随后光碟即可与几乎任何 DVD 播放 机相容 如欲在不要最终化处理的情况下 关闭该光碟 只需停止录制并将光碟退出 即可 如果光碟内仍有空间 您还可以继 续录制 录制的品质如何 您可以在 一小时模式 高品质 与 六 小时模式 VHS 品质 范围内 选择数种 品质等级 按动遥控器上的 REC MODE 按 钮 选择最适合您的用途与题材长度的品 质等级 Maximu...

Page 60: ...选项一 使用 DV IN 插孔 70 选项二 使用 S VIDEO 或 VIDEO 输入插孔 70 主机 门盖后面的插孔 71 遥控器 72 74 显示窗口 75 快速入门 步骤一 放入电池 76 使用遥控器操作系统 76 步骤二 查找收看频道 76 步骤三 电视频道设定 77 自动电视频道搜寻 77 修改频道信息 78 电视频道排序 79 步骤四 设定时间和日期 79 录像 录像光碟 80 录像设定 80 自动章节标记 81 预设来源 81 预设录影品质 81 手动录像 82 单键录像 自动关闭 82 关于定时录像 83 定时录像 手动 83 外接有线电视转换器 卫星接收器的 定时录像设定 84 变更 删除定时录像 86 录像期间观看另一个电视频道 85 录像的编辑 最终化处理 关于光碟编辑 86 浏览光碟编辑菜单 86 重新命名光碟 87 删除光碟 仅限于 DVD RW 87 录制新标...

Page 61: ... 播放超级影音光碟 SVCD 95 播放音乐光碟 95 播放 DVD R RW R DL 光碟 95 播放 DivX 光碟 96 播放 MP3 WMA 光碟 96 播放图片光碟 或音乐幻灯片 96 97 高级播放功能 转到另一个标题 章节 曲目 98 暂停播放和逐步播放 98 前进 倒转搜寻 98 放大 98 使用标题 章节选项 99 选择各种重复 随机播放的功能 99 设定光碟曲目 100 变更音讯声道语言 100 变更字幕语言 101 切换拍摄角度 101 时间搜寻 101 浏览系统菜单 普通 102 屏幕保护程序 102 DVD 系统菜单选项 视频輸出格式 103 恢复原厂设定 103 工厂设置 103 浏览系统菜单 播放 104 電視長寬比 104 家长分级控制 105 设定或变更密码 106 数码音讯输出 106 浏览系统菜单 录像 107 浏览系统菜单 频道设定 107 浏览系...

Page 62: ...制 本电子 装置含有多种可回收材料 如果您要丢弃 旧的机器 请将它送至回收中心 请遵守 当地有关包装材料 废电池和旧设备的弃 置规定 保养和安全信息 警告 高电压 请勿打开机盖 您会有触电 的危险 本机器内不存在客户可自行维修的部 件 所有维修工作请交由专业人员处 理 设定 寻找合适的位置 将本机置于平稳坚固的表面 请勿将本 机放在地毯上 请勿将本机置于其他可能导致其温度升 高的设备上面 如接收器或扩音器 请勿在机器下放置任何东西 如 CD 和杂志 将此设备安置在 AC 电源插座附近以及 容易够着 AC 电源插头的地方 通风空间 请将机器置于通风良好的地方 以免内 部温度升高 机器后侧和上部请保持至少 10 公分 4 5 英吋 的空隙 左右两侧 保持 5 公分 2 3 英吋 的空隙 以免 过热 10cm 4 10cm 4 5cm 2 5cm 2 避免接触高温 湿气 水份和尘埃 避免让本机遭...

Page 63: ...息及注意事 项 提示 使用时如有疑问或遇到问题 请参 阅 故障排除 一节 如需进一步协助 请致电所在国家的客 户支持服务中心 相关的电话号码和电邮 地址请参阅保证书 请参考产品后部或底部的类型标志牌上 的标示信息和供电额定值 随附配件 遥控器和电池 两节 音频 视频 AV 连接线 RF 同轴电缆 快速使用指南 用户手册 区域码 DVD 影片通常不会在世界各地同一时间发 行 因此所有的 DVD 播放机均由特定区 域码锁定 区域码标示在本机背面 如果 DVD 上标示 的是其它区域码 则无法在本机上播放 版权声明 任何没有获得许可而对有版权保护的内容 包括电脑软件 广播 和音响制录等 进行 的抄录行为可属版权侵犯 并构成刑事责 任 此机器不应当被使用于以上行为 区域 中国 Calcos Islands Walls 和 Futuna Islands ALL 6 可以播放的 DVD ...

Page 64: ...步骤一 连接天线 此连接可让您使用本 DVD 录放像机收看 和录制电视节目 如果天线信号是经由 VCR 电缆电视转换器或卫星接收器连接 的 请确定这些装置均有开启 才能收看 或录制电缆电视节目 l 如欲连接到 VCR 或机顶盒 卫星接收 器 请参阅第 67 69 页 了解与电视的完 整连接方式 A 将现有的天线 电缆电视信号 或从电缆 电视转换器 卫星接收器 RF OUT 或 TO TV 连接到 DVD 录放像机的 ANTENNA IN插孔上 B 使用随附的 RF 同轴电缆 连接 DVD 录放 像机的 ANTENNA OUT 插孔和电视的天线 输入插孔 VHF UHF RF IN 提示 在进行或变更任何连接之前 请确定拔下所有装置的电源插头 English ...

Page 65: ...In Video In 或 Composite 选项二 使用 S VIDEO 插孔 更好影 像品质 l 使用 S VIDEO电缆 未提供 连接 DVD 录放像机的 S VIDEO 插孔和电视的 S VIDEO输入插孔 标示为 R C 或 S VHS 选项三 使用色差视频插孔 最好影 像品质 A 使用色差视频电缆 红 蓝 绿 未 提供 连接 DVD 录放像机的 Y Pb Pr OUT 插孔和电视对应的色差视频输入 插孔 标示为 Y Pb Cb Pr Cr 或 YUV Y Pb Pr B 如果您的电视可以接收逐行扫描信 号 请参阅第 103 页 了解详细的逐行扫 描设定 重要 逐行扫描视频品质仅可通过 Y Pb Pr 连接才能使用 且电视机需具有逐行 扫描的功能 建议最好先完成 DVD 录 放像机的安装 然后再启动逐行扫描 功能 选项 3 选项 2 选项 1 提示 在进行或变更任何连接之前 请...

Page 66: ... 双声道模拟立体声接收器 选项二 使用同轴电缆 连接 DVD 录放像机和 AV 扩音器 接收 器 即可享受多声道的环绕音效 l 使用同轴电缆 未提供 连接 COAXIAL 插孔和具有相同输入插孔的装置 COAXIAL IN 或 DIGITAL IN AV 扩音器 接收器 具有数位多声道 的音效解码器 在开始使用之前 请按照说明设定数码音 频输出 请参阅第 106 页 如果数位输 出设定不符合您的立体声性能 立体声可 能会发出强大刺耳的声音 或者无任何声 音 提示 请勿将电视的音频输出插孔连接到 DVD 录放像机的 AUDIO L R IN EXT 插孔 上 因为这会产生刺耳的噪音 选项 2 选项 1 提示 在进行或变更任何连接之前 请确定拔下所有装置的电源插头 AU D IO O U T S V ID E O IN V ID E O IN TV DIGITAL IN ...

Page 67: ...音频 输出插孔 A 请保留机顶盒 卫星接收器上现有天线和电 视的连接 B 使用音频 视频电缆 连接 DVD 录放像机 的 VIDEO AUDIO IN EXT 和机顶盒 卫 星接收器对应的 VIDEO AUDIO 输出插孔 C 使用音频 视频电缆 连接 DVD 录放像 机的 VIDEO AUDIO OUT和电视对应的 VIDEO AUDIO 输入插孔 电缆电视转换器或 卫星接收器背面 仅供范例参考 B 天线 电缆电 视信号 提示 在进行或变更任何连接之前 请确定拔下所有装置的电源插头 RF S VIDEO OUT IN AUDIO R L VIDEO AU D IO O U T S V ID E O IN V ID E O IN TV ...

Page 68: ...IO IN EXT 和 VCR 对应的 VIDEO AUDIO 输出插孔 D 使用音频 视频电缆 连接 DVD 录放像 机的 VIDEO AUDIO OUT和电视对应的 VIDEO AUDIO 输入插孔 提示 如果所连接的装置具有相同的 S VIDEO 输入 输出插孔 您可以使用 S VIDEO Y C 插孔 代替视频 CVBS 插孔 此视频连接可提供较佳的影像品质 多数市售的卡式录像带和 DVD 均有版权 保护 因此不可转录 将 DVD 录放像机直接连接至电视 如 果在中间连接 VCR 或其他装置 由于 DVD 录放像机内含版权保护系统 影像品质可 能不理想 VCR 背面 仅供范例参考 天线 电缆电 视信号 分配器 提示 在进行或变更任何连接之前 请确定拔下所有装置的电源插头 VIDEO IN 晻 晻 AUDIO L AUDIO R VIDEO OUT AUDIO L AUDIO R V...

Page 69: ... RF 同轴电缆 连接 VCR 的天线输 出 RF OUT 插孔和机顶盒 卫星接收器的 天线输入 RF IN 插孔 然后 连接机顶 盒 卫星接收器的天线输出 RF OUT 插 孔和 DVD 刻录机的 ANTENNA IN 插 孔 C 使用随附的 RF 同轴电缆 连接 DVD 刻录 机的 ANTENNA OUT 插孔和电视的 天线输入插孔 D 使用音频 视频电缆 连接 DVD 录放像机 的 VIDEO AUDIO IN EXT 和 VCR 对应 的 VIDEO AUDIO 输出插孔 E 使用音频 视频电缆 连接 DVD 录放像 机的 VIDEO AUDIO OUT和电视对应的 VIDEO AUDIO 输入插孔 提示 如果所连接的装置具有相同的 S VIDEO 输入 输出插孔 您可以使用 S VIDEO Y C 插孔 代替视频 CVBS 插孔 此视频连接可提供较佳的影像品质 天线 电缆电 视信...

Page 70: ...阅第80 82 页 提示 DV IN 插孔不支持与个人电脑的连接 您无法通过 DVD 录放像机上的 DV IN 插孔 从 DVD 录放像机转录到摄像机 选项二 使用 S VIDEO 或 VIDEO 输 入插孔 如果您有 Hi8 或 S VHS C 摄像机 即 可使用 S VIDEO 连接 此连接可提供较 佳的影像品质 或者 如果摄像机只有一个视频输出 Composite Video CVBS 请使用 VIDEO 连接 A 连接 DVD 录放像机前方面板上的 S VIDEO 或 VIDEO 插孔和摄像机对应的 S VHS 或视频输出插孔 B 使用音频连接线 红 白接头 连接 DVD 录放像机前方面板上的 AUDIO L R 插孔 和摄像机的音频输出插孔 在开始使用之前 重复按下遥控器上 的 REC SOURCE 并选择 Front S VIDEO 或 Front CVBS 作为输入通 道 视...

Page 71: ...的电视频道或目前的影像输 入来源 重复按下按钮 即可设定 30 分钟间隔的 单键录像功能 h 系统显示面板 显示有关 DVD 录放像机目前状态的信息 门盖后面的插孔 按照右边角落 OPEN 标签的指示 打 开门盖 i S VIDEO S 视频 SVHS Hi8 摄像机或 SVHS Hi8 录放像机 的 S 视频输入 按一下遥控器上的 REC SOURCE 并选 择 Front S Video 设定输入源 j VIDEO 视频 摄像机或录放像机的视频输入 按一下遥控器上的 REC SOURCE 键并选 择 Front CVBS 设定输入源 k L R AUDIO 左 右音频 摄像机或录放像机的音频输入 l DV IN 数位摄像机输入 数位摄像机或其他适合此连接装置的输 入 按一下遥控器上的 REC SOURCE 并选 择 DV 设定输入源 ...

Page 72: ...系统 菜单 进入 退出系统菜单 d 左右键可以向左向右移动搜寻 上下键可以向上向下移动搜寻 e REC l 录像 开始录制目前的电视频道或目前的影像输 入来源 f 跳到前一个或下一个章节 曲目 g TOP MENU 编辑菜单 仅限于 DVD R RW R DL h AUDIO 音频 选择音频语言 DVD VCD 或声道 i SUBTITLE 字幕 选择 DVD 的字幕语言 j REC MODE 录像模式 在录像模式间切换 1 小时 2 小时 2 5 小时 3 小时 4 小时 和 6 小时模式 这会决定您在 DVD R RW R DL 上录制的 品质和时间长短 遥控器 ...

Page 73: ...U 光碟 菜单 浏览 DVD 的光碟菜单或 DVD R RW R DL 的索引画面 切换PBC ON和OFF状态 n OK 储存 确认输入 确认选取 o PLAYÉ 播放 播放光碟 p STOP n 停止 停止播放 录像 q Å 暂停播放或录像 重复按下按钮 将暂停画面逐次前进一 帧 r EDIT 编辑 仅限于 DVD R RW R DL 进入 退出影像编辑菜单 s ZOOM 缩放 放大电视画面的影像 tTITLE MENU 标题 章节 进入 退出标题 章节菜单 u ADD CLEAR 清除 添加或清除设定菜单中的曲目 章节 文 件 清除定时录像 遥控器 继续 ...

Page 74: ...模式 2X 4X 16X 32X z F FWD 快进 有四种模式 2X 4X 16X 32X 27 SLOW 慢进 有四种模式 1 2 1 4 1 8 1 16 28 ANGLE 对具有多角度镜头的碟片进行角度切换 29 REPEAT 设置重复功能 30 REPEAT AB AB段重复功能设置 31 P SCAN 切换本机视频输出的扫描方式 隔行 逐 行 32 CH 选择电视频道及外部信号输入源 33 SHUFFLE 乱序播放功能 34 VOL 音量加 减 遥控器 继续 22 24 25 28 29 31 33 26 23 30 32 27 34 ...

Page 75: ...75 显示窗口 提示 只有在数字同轴连接是时 通过直通模式支持DTS碟片 显示窗口 ...

Page 76: ...的 REC SOURCE 并选择所 需的控制模式 如 Front CVBS 步骤二 查找收看频道 A 在 DVD 录放像机上按一下 STANDBY ON 2 将其启动 B 打开电视机并设定正确的视频输入通道 您应该会看到蓝色的 DVD 背景画面 通常该通道是介于最低和最高之间的通 道 可称为 FRONT A V IN 和 VIDEO 详 情请参阅电视机的使用手册 或者 转到电视的第一频道 然后重 复按 Channel Down 按钮 直到出现 Video In 通道 或者 电视遥控器可能有选择不同视频 模式的按钮或开关 重要 在完成连接后初次启动 DVD 录放像机 时 建议您先作几个基本设定 请参阅下列页面有关使用系统菜单功 能来设定电视频道和进行菜单语言设 定 这将能大幅提升 DVD 录放像机的 性能表现 快速入门 1 3 2 ...

Page 77: ...且已开启 当光碟托盘中没有光碟时 才可以变 更调谐器的设定 SYSTEM SETUP OK 自动电视频道搜寻 这会自动扫描所有可以接收到的电视频道 以及电缆电视转换器 卫星接收器上的电缆 电视节目 并将这些频道储存在 DVD 录 放像机上 A 按一下遥控器上的 SYSTEM SETUP 电视上会显示系统菜单 B 使用 键选取 System Setup Channel Setup 系统设置 频道扫 描 并按一下 OK C 使用 键选取 Channel Search 扫台 并按一下OK 开始自动搜寻电视频道 此步骤可能需 要几分钟的时间 搜寻完毕 电视上会显示搜寻到的频道数 目 提示 按一下 回到前一个菜单项目 按一下 SYSTEM SETUP 退出菜单 1 ...

Page 78: ...的搜 寻模式 使用 键选择 Channel 频 道 S Channel 特殊频道 或 Frequency 频率 然后按 OK 确 认 Frequency 频率 显示目前电视频道的频率 必要时 请使用 键开始自动频 率搜寻 或按Ç键停止搜寻 Sound Mode 声音模式 将电视系统的影像和音效调整至最低失真 的情况 使用 键选择最适合的声音模 式 然后按 OK 确认 详情请参阅本手册后面的 电视系统指 南 章节 Skip 跳台 选择此项设定要略过的频道 您只能按下 遥控器上相关的号码才可以使用跳过的频 道 如果要略过此频道 请使用 键 选择 Yes 然后按 OK 确认 Fine Tune 微调 如果收讯不良 请选择此项手动微调电视 频道 使用 键调整频率 E 完成后 在菜单内选择 然后按 OK 确认并退出回到前一个菜单页面 如果不要储存变更 选择 并 按 OK 提示 按一下 回到前一个菜单...

Page 79: ... 一下 OK 或 选定的频道将移至画面右侧 E 使用 键将电视频道移至所需位置 然后再按一下 OK 选定的频道将会安插在目前位置之前 F 重复步骤 D 至 E 直到将所有的电视频 道按所需位置排好为止 步骤四 设定时间和日期 如果 DVD 录放像机尚未正确设定时间和日 期 请按照以下步骤手动设定时钟 A 按一下 SYSTEM SETUP 将出现系统菜单 B 使用 键选取 System Setup Clock 系统设置 时间 并按一下 确认 C 按一下 OK 设定 Date dd mm yy 日期 日 月 年 D 使用 键变更号码 并使用 键 选择不同的输入栏目 然后按 OK 确认 l 或者 使用遥控器上的数字键盘 0 9 输 入号码 E 按一下 OK 确认 F 移至 Time hh mm ss 时间 时 分 秒 然后重复步骤 D 至 E 提示 按一下 回到前一个菜单项目 按一下 SYSTE...

Page 80: ... DVD R 完成此程序后 该光碟就无法再增加任何数据了 DVD R DL DVD R DL DVD R 双层 DVD R碟片仅用于单层刻录 唯一不同的 是DVD R DL的容量是 8 5G 在一张DVD碟 片上有两个刻录层 这两层的刻录能在碟 片的同一面实现 所以要完全不间断的刻 录 重要 不可录制影像 电视节目 影片 录像带 光碟和其他资 料可能有版权保护 不可在本机上录制 录像设定 预设录像设定可以设定自动章节标记 所 需影像输入来源和录像模式 使用遥控器 所做的任何变更仅适用于目前的录像设 定 下次录像仍会使用预设的录像设定 A 按一下遥控器上的 SYSTEM SETUP 电视上会显示系统菜单 B 使用 键选择 System Setup Record 系统设置 录 制 然后按一下 确认 C 使用 键选择您要变更的设定 然后 按 OK 确认 下列页面将有选项的指示说明 D 欲退出菜单...

Page 81: ...xtended Play SLP VHS quality Super Long Play 1 hour 2 hours 2 5 hours 3 hours 4 hours 6 hours Values are estimates only Parts of the HDD storage capacity will be reserved for the operations of this recorder and time shifting C 按一下 OK 确认 录像 继续 自动章节标记 录像时 您可以在标题内插入章节标记 这样您就可以在录制好的光碟上浏览特定 片段 就如同您在其他 DVD 上选择章节 一样 A 使用 键选择 Auto Chapter Marker 自动分章节 然后按一下 浏览其中的选项 B 使用 键选择其中一项 Off 关闭 关闭此功能 On 开启 章节标记会在录像...

Page 82: ...VIDEO 和 AUDIO L R 插 孔相连接的输入来源 Rear CVBS 后置 CVBS 跟背后面板的 VIDEO CVBS IN EXT 和 AUDIO L R 插孔相连接的输入来源 Rear S Video 后置 S 视频 跟背后面板的 S VIDEO Y C IN EXT 和 AUDIO L R 插孔相连接的输入来源 DV 数位摄像机 跟前方面板的 DV IN 插孔相连接的输入 来源 D 按一下 REC l 开始录像 将接着 DVD R RW R DL 上次录像的 最后部份自动开始录制 E 欲停止录像 按一下 STOP n 暂停录像 A 录像时 按一下 Å 您可以使用此功能 避免录下广告片 段 B 欲继续录像 按一下 REC l 单键录像 自动关闭 A 请按照第 82 页的 手动录像 步骤 A 至 C 进行 B 按两次 REC l 开始 30 分钟的录像 之 后每按一次 REC...

Page 83: ...菜单上选择想要编辑的一项并按 OK 将出现定时录像编辑菜单 D 使用 键在菜单上选择一个项目 然 后按 进入该选项 关于定时录像 使用 定时录像 可在稍后的日期 时间 自动开始和停止录像 DVD 录放像机会转 到正确的节目频道 并于指定的时间开始 录像 欲进行定时录像 DVD 录放像机需要 知道 您想要录像的日期 影像输入来源 录像开始和结束时间 录像品质 请参阅第 81 页 TIMER OK 提示 录像之前请确定 DVD R RW R DL 有足够的空间 您必须先将 DVD R R DL 最终化处理 才 可以在其他播放机上播放 请参阅第 88 页 ...

Page 84: ...出菜单 G 在 DVD 录放像机中放入一片 DVD R RW R DL H 按一下 STANDBY ON 关闭 DVD 录放像机 如果 DVD 录放像机不是处于待机模 式 在开始录像之前将会出现警告讯息 并持续三分钟 如果您忽略此警告讯息 DVD 录放像机 将自动切换至待机模式 以备在指定时间 进行定时录像 在定时录像设定完成之后 刻录机自动 切换到待机状态 提示 将定时录像设定比节目开始时间早一分 钟 由于光碟约需 30 秒钟准备录像 这 样可确保录下完整节目 外接有线电视转换器 卫星接收器的定 时录像设定 如果有通过 S VIDEO Y C 或 VIDEO CVBS 将卫星接收器 机顶盒连接到 DVD 录放像机 请参阅第 67 页 请按照以 下步骤设定录像 A 选择要在卫星接收器 电缆电视转换器上录 像的频道 B 设定录像所需信息 请按照第 83 页 的 定时录像 手动 步骤 A 至 ...

Page 85: ...时录像输入项目 请按一下遥控 器上的 ADD CLEAR E 欲变更定时录像排程 请按一下 OK 进入 所选定时录像节目的定时录像编辑菜单 F 选择输入栏目 并进行必要的变更 G 完成后 在菜单上选择 并按 OK 储存变更 H 按一下 TIMER 退出菜单 录像期间观看另一个电视频道 在录像期间 您可以使用电视遥控器变更 电视频道 观看另一个频道 提示 如果您想通过 DVD 录放像机观看电视频 道或播放录制好的光碟 记得将电视转回 其视频输入通道 提示 录像之前请确定 DVD R RW R DL 有足够的空间 您必须先将 DVD R R DL 最终化处理 才 可以在其他播放机上播放 请参阅第 88 页 ...

Page 86: ...R RW R DL 的光 碟内容和设定 光碟经编辑后 如果在其 它 DVD 播放机上播放 其内容可能无法 读出 光碟编辑菜单中所显示的选项会根据光碟 类型而有所不同 Play 播放 从光碟头开始播放 Rename Disc 重新命名光碟 变更光碟的名称 Erase Disc 删除光碟 仅限于 DVD RW 删除光碟内的所有录制内容 Record New Title 录制新标题 从光碟最后的空标题开始录像 Overwrite Disc 重写光碟 仅限于 DVD RW 从光碟头开始新的录像 所有先前录制的 内容将被重写 Lock Unlock Disc 锁定光碟 解除锁定 仅限于 DVD RW 锁定光碟或解除锁定以避免发生意外删除 或变更 Finalize Disc 光碟最终化处理 仅限于 DVD R DVD RW和DVD R DL 将光碟最终化处理 使其能在其他的 DVD 播放机上播放 此后...

Page 87: ...限于 DVD RW 这会删除 DVD RW 的内容 包括非在本 DVD 录放像机所录制的内容 一旦现有内 容删除完毕后 即可再进行录像 A 按一下 TOP MENU 使用 键选择 Erase Disc 擦除碟片 并按 OK 将出现警告讯息 B 在菜单中选择 继续进行或选择 中止 然后按 OK 确认 录制新标题 此功能可让您在 DVD R DVD RW R DL 内 剩余的空间录制新的内容 A 按一下 TOP MENU 使用 键选择 Record a New Title 录制一个 新标题 并按 OK B 选择要录像的来源并按一下 REC l 开始 录像 重刻光碟 仅限于 DVD RW 此功能可让您从 DVD RW 光碟的起始处进 行重新刻录 无论刻录碟的内容怎样 A 按一下 TOP MENU 使用 键选择 Overwrite disc 重新刻录光 碟 并按 OK B 选择要录像的来源并按一下...

Page 88: ... 将出现警告讯息 B 在菜单中选择 并按 OK 开始进 行 最终化处理需要几分钟时间 请勿开启 光碟托盘或关闭电源 因为这样可能会使 得该光碟无法使用 C 选择 退出 录像的编辑 最终化处理 继续 提示 DVD R DVD RW R DL 经过最终化处理后便无法再继续录制和编辑 按一下 回到前一个菜单项目 88 锁定光碟 解除锁定 仅限于 DVD RW 您可以选择保护录制好的 DVD RW 以避 免发生意外录像损失 A 按一下 TOP MENU 使用 键选择 Lock Disc 碟片加锁 并按 OK 该片光碟将被锁定 仅限在本 DVD 录 放像机上使用 当光碟被锁定时 光碟编辑菜单中的 选项将变为 Unlock Disc 碟片解 锁 B 如果您想在防护的光碟上进行重写或编 辑 请选择 Unlock Disc 碟片解 锁 最终化处理光碟 仅限于 DVD R DVD RW和DVD R DL l...

Page 89: ...像 现有标题 录像 将会被 重写 Overwrite Disc 重写光碟 从光碟现有选取的标题开始重写到最后部 份 Append Title 添加标题 在上一次现有录像的最后部份插入新的录 像 浏览标题编辑菜单 A 在 DVD 录放像机中放入一片录制好的 DVD R RW R DL 电视上会显示索引影像的画面 l 播放期间 按一下 DISC MENU 浏览索引 影像的画面 B 使用 键选取一个标题 录像 然后 按一下 将出现标题编辑菜单 C 使用 键浏览不同的选项并按 OK 进 行选取 下列页面将有选项的指示说明 D 欲退出 按一下 編輯錄影 此功能可让您浏览影像编辑菜单 详情 请参阅第91页的 关于录像编辑 l 在标题编辑菜单中 使用 键选择 Edit Title 编辑标题 并按 OK 将出现影像编辑菜单 DVD 录放像机将播放选定的标题 录像的编辑 最终化处理 继续 提示 DVD R ...

Page 90: ...ase Title 擦除标题 并 按 OK 将出现警告讯息 B 在菜单中选择 继续进行或选择 中止 然后按 OK 确认 提示 DVD R DVD RW R DL 经过最终化处理后便无法再继续录制和编辑 按一下 回到前一个菜单项目 重写标题 仅限于 DVD RW 此功能可以让您从 DVD RW 目前的标题片 头开始录制一个新标题 A 在标题编辑菜单中 使用 键选择 Overwrite Title 覆盖标题 并按 OK B 选择要录像的来源并按一下 REC l 开始 录像 从选定的标题开始重写 仅限于 DVD RW 您可以选择只从光碟选定的标题开始重写 到最后部份 A 在影像编辑菜单中 使用 键选择 Overwrite Disc 覆盖整碟 并 按 OK B 选择您想要刻录的地方 按 REC 键开始 刻录 添加录影 此功能可让您接续上一次现有标题的最后 部份添加新的录像 A 在标题编辑菜单中 使...

Page 91: ...章节标记 在录像中插入一个章节或删除一个 或全 部 章节标记 Hide Chapter 隐藏章节 隐藏不要的录像画面 Index Picture 索引影像 选择一个录像画面 作为索引影像的画 面 Split Title 分割标题 将录像分为两个个别的标题 T Elapsed x xx xx 标题播 放 x xx xxx 显示播放的时间 浏览影像编辑菜单 EDIT PLAY OK A 在 DVD 录放像机中放入一片录制好的 DVD R RW R DL光碟 电视上会显示索引影像的画面 B 使用 键选择一个标题 录像 C 按一下 PLAY 开始播放 D 按一下遥控器上的 EDIT 将出现影像编辑菜单 E 使用 键浏览不同的选项并按 OK 进 行选取 下列页面将有选项的指示说明 F 欲退出 按一下 EDIT 录像的编辑 最终化处理 继续 提示 DVD R DVD RW R DL 经过最终化处理后便...

Page 92: ... 你可以选择1 2 1 4 1 8 或1 16倍速进行慢放 A 播放期间 按一下 EDIT 显示影像编辑菜 单 然后使用 键选择 PLAY 播放 并按 OK B 使用 键选择播放模式并按 OK 录像的编辑 最终化处理 继续 制作章节标记 播放期间 您可以在标题的任何片段插入 章节标记来制作章节 这样您就可以轻松 浏览录像的特定片段或设定您要隐藏的章 节 A 播放期间 按一下 EDIT 显示影像编辑菜 单 然后使用 键选择 Chapter Marker 章节标记 并 按 OK B 使用 键选择其中一项并按 OK 确 认 Insert Chapter Marker 插入 章节标记 选择此项在目前的播放点插入一个新的章 节标记 Delete Chapter Marker 删除 章节标记 选择此项删除目前的章节标记 系指最靠近 目前播放点之前的标记 目前的章节将与 之前的章节合并起来 Delete...

Page 93: ...在编辑模式中 将会播放隐藏的章节 B 使用 键选择 Unhide Chapter 显示章节 并按 OK 目前的章节会在播放时出现 提示 所有隐藏的章节皆能在录像编辑模式中 进行播放 变更索引影像 索引影像是指当 DVD 录放像机载入索引 菜单时您将会看到的标题影像 通常 录 像的第一个画面会显示作为标题的索引影 像 l 按一下 EDIT 显示影像编辑菜单 然 后使用 键选择 Index Picture 标题图片 并按一下 OK 以选择目前画面为标题的索引影像 分割标题 仅限于 DVD RW 您可以将目前的标题分成两个新的标题 每个标题均有各自的索引影像 警告 标题一旦进行分割 就无法回复 l 播放期间 按一下 EDIT 显示影像编辑菜 单 然后使用 键选择 Split Title 切分标题 并按 OK 在目前的播放位置分割标题 索引影像画面将会显示新的标题 录像的编辑 最终化处理 继续 提...

Page 94: ...Super Video CD 超级影音光碟 播放 DivX Disc DivX 光堞 DivX 3 11 4 x 5 x 6 SACD 只支持CD层 重要 按下按钮时如果电视画面上出现禁 止图示 错误 即表示目前光碟上或 目前时间下不提供该功能 DVD 光碟和播放机的设计有区域性 限制 播放光碟之前 请确定光碟与 您的播放机属于同一区域 请勿推压光碟托盘或放入光碟以外 的其他物件 这样可能会使光碟播放 机发生故障 放入光碟 A 按一下 STANDBY ON 启动 DVD 录放像机 B 按一下 DVD 录放像机前面的 OPEN CLOSE ç 将开启光碟托盘 C 小心将光碟放入拖盘中 印标签面朝上 然后按一下 OPEN CLOSE ç 请确定将光碟标签面朝上 对于双面光碟 将要播放的一面光碟标签 面朝上放置 D 打开电视机电源 选择电视正确的视频输 入通道 请参阅第 76 页 E 将自动开始...

Page 95: ...下遥控器上的 DISPLAY 菜 单 使用 键选择 Title 标 题 或 Chapter 章节 然后 使用数字键盘 0 9 输入标题 章节号码 B 欲停止播放 按一下 STOP n 提示 有些光碟由于光碟的配置和特性或因录制情况和制作软体而无法在本 DVD 录放像机上播放 播放超级影音光碟 SVCD 超级影音光碟 SVCD 可能具有 PBC 播 放控制 功能 此功能可让您以互动方式 按照显示的菜单播放影音光碟 A 放入一片超级影音光碟 如果 PBC 功能开启 电视上将会显 示光碟索引的菜单 B 使用数字键盘 0 9 输入您的选择或选择 播放项目 l 欲开启 关闭播放控制模式 播放时请按两 下遥控器上的 DISPLAY 菜单 然后使用 键选择 PBC On PBC开 或 PBC Off PBC关 C 欲停止播放 按一下 STOP n 播放音乐光碟 A 放入一片音乐光碟 将自动开始播放 B ...

Page 96: ...an Hill Faith Hill 1 2 3 4 5 6 7 8 注意 由于光碟含有众多的歌曲 影像 因此 DVD 录放像机可能需要较长的时间 才能在电视上显示光碟的内容菜单 B 使用 键浏览菜单 然后按一下 OK 浏览文件夹 专辑 C 使用 键选择要播放的曲目 文件 l 欲回到前一个菜单 请按一下 DISC MENU D 欲建立播放清单 请选取曲目 文件并按一 下 ADD CLEAR 选定的曲目 文件将会显示在右画面 中 使用 键切换左右画面 欲删除播放清单的曲目 文件 按一下 ADD CLEAR E 按一下 OK 开始播放 F 播放期间 您可以按一下 选择 下一个 前一个曲目 G 欲停止播放 请按一下 STOP n 提示 仅会播放多段落光碟的第一个段落 收听 MP3 光碟时 偶尔会出现 跳 跃 的情形是很正常的 播放图片光碟 或音乐幻灯片 您可以在选定的片中自动连续播放 JPEG ...

Page 97: ...ise 0 Type Mode Trick Wipe Zoom Rotate Top to bottom Down to top Left to right Right to left Extend center V l 重复按下遥控器上的 ANGLE 并选择幻灯 片播放动画 选定的动画设定将会显示在电视屏幕的 左上角 l 按一下遥控器上的 ZOOM 放大影像 F 欲停止播放 请按一下 STOP n 可播放 JPEG 图片光碟 文件格式 文件的后缀必须为 JPG JPE 或 JPEG 仅可显示 DCF 标准的静态图片或 JPEG 图片 如 TIFF 但无法播放移动 影像 动态 JPEG 渐进式 JPEG 和其他 格式 或是 JPEG 以外的影像格式或影音 等 由于光碟含有众多的歌曲 影像 因此 DVD 录放像机可能需要较长的时间 才能 在电视上显示光碟的内容菜单 提示 此处所提及的操作功能...

Page 98: ...放大屏幕影像并在放大影像 中作平移调整 A 按一下遥控器上的 ZOOM 启动放大功能 150 或 200 B 使用 键平移放大的影像 C 欲退出 按一下 ZOOM 直到影像回到原来 的大小为止 转到另一个标题 章节 曲目 当光碟含有一个以上的曲目 标题或章 节 您可以按照以下方式转到不同的曲 目 标题或章节 播放期间 l 按一下 到下一个标题 章节 曲目 l 按一下 回到上一个标题 章节 曲目 的开始 或者 l 使用数字键盘 0 9 输入标题 章节 曲目 号码 l 按TITLE MENU进入菜单 按 键选择 标题 章节 使用数字键盘 0 9 输入标 题 章节 曲目号码 提示 本功能仅适合DVD碟 暂停播放和逐步播放 A 播放期间 按一下 Å 暫停播放並顯示靜 止畫面 B 再按一下 Å 将会往前进一个画面逐帧播 放 C 欲继续一般播放 请按一下 PLAY 高级播放功能 提示 此处所提及的操作...

Page 99: ...t Track Title 重复曲 目 标题 选择此项重复播放目前的曲目 标题 Repeat Directory 重复菜单 选择此项重复播放目前的文件夹 菜单 仅限于 MP3 JPEG 和影像光碟 Disc Repeat 重复光碟 选择此项重复播放整个光碟 Program 编程 选择此项进行编程 Shuffle 随机播放 选择此项随机播放光碟的所有曲目 仅限 于 MP3 WMA 和音乐光碟 Normal 一般 选择此项取消重复播放模式 然后回到一 般播放 D 欲取消重复播放 按一下 STOP n 或选 择 Normal 一般 并按 OK 高级播放功能 提示 此处所提及的操作功能可能不适用于某些光碟 请务必参阅光碟的随附说明 使用标题 章节选项 TITLE MENU ADD CLEAR OK DISPLAY A 播放期间 按一下遥控器上的 DISPLAY 电视上将出现标题 章节菜单 B 使用...

Page 100: ...键选择曲目 文件 章节进行设 定 然后按一下遥控器上的 ADD CLEAR 选定的曲目 文件 标题将会显示在右画 面中 右画面中的顺序将是设定播放的顺序 删除选择的设定项目 E 按一下 键移至右画面 选择曲目 文件 章节 然后按一下遥控器 上的 ADD CLEAR 欲开始设定播放 F 按一下 键移至右画面并按 OK 将按照设定的顺序 从选定的曲目 文 件 章节开始播放 欲退出设定播放 G 按一下 STOP n 退出设定播放 变更音讯声道语言 此操作仅适用于具有多声道语言的 DVD 或 多音频声道的 VCD 您也可以按遥控器上的 AUDIO 使用此功 能 A 按两下遥控器上的 DISPLAY B 使用 键选择 Audio 音 频 然后按一下 浏览选项 C 使用 键选择声音语言并按 OK 确 认 语言会以号码或缩写表示 如 En 即 表示英文 如果光碟上没有所选择的语言 则会使 用光碟的预设语...

Page 101: ...英文 如果光碟上没有所选择的语言 则会使 用光碟的预设语言 提示 有些 DVD 只能从 DVD 的光碟菜单才可 以变更字幕语言 欲浏览光碟菜单 按一 下 DISC MENU 切换拍摄角度 此选项仅适用于含有不同拍摄角度所录制 片段的 DVD 您可以从不同的角度检视影 像 您也可以按遥控器上的 角度 键 使用此功能 A 按两下遥控器上的 DISPLAY 将出现标题 章节菜单 B 使用 键选择 Angle 角度 按 OK 输入数字 将出现可选择的拍摄角度 C 使用数字键盘 0 9 键选择要切换的拍 摄角度 然后按 OK 确认 高级播放功能 继续 提示 此处所提及的操作功能可能不适用于某些光碟 请务必参阅光碟的随附说明 时间搜寻 此选项可让您跳至目前光碟上某个特定的 点 A 按一下遥控器上的GOTO或 DISPLAY 将出现标题 章节菜单 B 使用 键选择 T Time 然后使 用数字键盘 0 ...

Page 102: ...果您想在播放停止或暂停超过 5 分钟后 关闭电视屏幕 请选择此项 Off 关闭 选择此项关闭屏幕保护程序 B 使用 键选择设定 然后按 OK 确 认 序扫描 交错扫描 浏览系统菜单 普通 SYSTEM SETUP OK A 按一下遥控器上的 SYSTEM SETUP 电视上将出现系统菜单 B 使用 键选择 System Setup General 系统设置 常 规 然后按一下 浏览选项 C 使用 键选择您要变更的设定 然后 按 OK 确认 下列页面将有选项的指示说明 D 欲退出 按一下 SYSTEM SETUP 高级播放功能 继续 提示 此处所提及的操作功能可能不适用于某些光碟 请务必参阅光碟的随附说明 ...

Page 103: ...ystem Setup General 中 使 用 键选取 Restore Factory Settings 恢复厂家设置 并 按 OK 将出现警告讯息 B 在菜单中选择 继续进行或选择 中止 然后按 OK 确认 视频輸出格式 与标准的交错电视频道扫描相比 顺序扫描 可提供较高的影像画质 唯有将 DVD 录放 像机的 Y Pb Pr 插孔和有支持顺序视频输入 的电视机相连接才可以使用此功能 否则 画面可能无任何影像或影像变形 详情请查 阅您的电视使用手册 A 在 System Setup General 中 使 用 键选取 Video Output Format 视频输出格式 并 按 OK NTSC 如果连接的电视具有 NTSC 颜色系统 请 选择此项 系统将会变更 PAL 光碟的视频 信号并将它输出为 NTSC 格式 PAL 如果连接的电视具有 PAL 颜色系统 请选 择此项 系统将会变...

Page 104: ...说明 D 欲退出 按一下 SYSTEM SETUP DVD 系统菜单选项 继续 提示 有下划线标示的选项是指原厂预设值 按一下 回到前一个菜单项目 按一下 SYSTEM SETUP 退出菜单 電視長寬比 按照所连接的电视设定 DVD 录放像机的长 宽比 您所选择的格式必须符合光碟提供 的格式 如果没有所选格式 播放时电视 显示的影像设定将不会起作用 A 在 System Setup Playback 中 使用 键选取 TV Aspect Ratio 并按 OK 16 9 对于宽屏幕电视 画面比例 16 9 请选择此项 4 3 PanScan 对于全屏幕画面 左右边均 被切除 4 3 Letterbox 对于电视屏幕上下部 份显示为黑带的 宽屏幕 请 选择此项 B 使用 键选择设定 然后按 OK 确 认 ...

Page 105: ...此分级限制功 能并不会限制该光碟的播放 家长分级控制 某些 DVD 在整张光碟或某些片段中设有分 级限制 此功能可限制播放的等级 分级限制分为 1 级至 8 级 并随国家而 有所不同 您可以藉此禁播某些不适合您 的小孩观看的光碟 或只播放光碟中其他 画面 A 在 System Menu Playback 中 使 用 键选取 Parental Rating Level 父母锁 并按 OK 系统会提示您输入四位数密码 Enter Password OK Cancel OK Enter password B 使用数字键盘 0 9 输入您的四位数密码 第一次进行此设定时 请输入预设密 码 3308 将出现设定分级菜单 Set Rating Level New password 4 PG 13 5 PG R 4 PG 13 OK New OK Select rating level l 如果忘记您的...

Page 106: ...nter new password C 使用数字键盘 0 9 输入新的四位数密码 然后按一下 选择下一个输入栏目 再输 入一次同样的密码 D 移至菜单中的 并按一下 OK 确 认 欲中止变更 请选择 并按 OK DVD 系统菜单选项 继续 提示 有下划线标示的选项是指原厂预设值 按一下 回到前一个菜单项目 按一下 SYSTEM SETUP 退出菜单 数码音讯输出 将 DVD 录放像机和电视及其他装置连接 后 您可能需要变更数位输出设定 如果使 用 DVD 录放像机的同轴插孔 才需要调整 数位输出 A 在 System Setup Playback 中 使用 键选取 Digital Audio Output 数字音频输出 并按 OK ALL 如果将 DVD 录放像机的同轴插孔和内建多 声道解码器的立体声接收器相连接 请选 择此项 LPCM 如果连接的音响设备无法进行多声道 Dolby Dig...

Page 107: ...107 浏览系统菜单 录像 请参阅第 80 85 页的 录像设定 浏览系统菜单 频道设定 请参阅第 77 79 页的 电视频道设 定 浏览系统菜单 时钟 日期和时间 请参阅第 79 页的 设定时间和日期 DVD 系统菜单选项 继续 提示 有下划线标示的选项是指原厂预设值 按一下 回到前一个菜单项目 按一下 SYSTEM SETUP 退出菜单 ...

Page 108: ...ivX 影音光碟播放系统 PAL NTSC 音频播放 光碟播放媒体 CD CD R RW MP3 CD MP3 DVD WMA 压缩格式 Dolby Digital MP3 MPEG2 多声道 PCM DivX MP3 位元率 32 256 kbps 和 VBR 静态图片播放 光碟格式 DVD R RW 影像光碟 影像压缩格式 JPEG 影像功能 旋转 储存媒体 录像媒体 DVD R DVD RW DVD R DL 录像速度 2 4 倍 规格 调谐器 收讯 传输 电视系统 PAL 天线输入 75 Ohm 同轴电缆 IEC75 连接 后置连接 S Video 输出 视频 CVBS 输出 左右音频输出 数位音频输出 同轴 RF 天线输入 RF 电视输出 Y Pb Pr输出 S Video输入 Video CVBS 输入 左右音频输入 前置连接 i LINK DV 输入 IEEE 1394 端子...

Page 109: ...放影机和遥控器之间的任何阻碍物移走 尝试将遥控器从不同角度和 或距离对准录放影机 电池电力减弱 请更换电池 按一下遥控器上的 REC SOURCE 选择输入来源 将光碟标签一面朝上放入 区域码错误 DVD 必须以 ALL 全区 或 第 6 区 编码才可以在本机上播放 光碟上没有任何录像或光碟类型错误 详情请参 阅 播放 播放光碟 一节 请确定光碟并无刮损或变形 清洁光碟或更换一片 新的光碟 尝试播放另一片光碟以检查该光碟是否有故障 检查音频连接 红白插孔 详情请参阅 快速入门 连接音频电缆 一节 请根据与本机连接的设备 正确设定数位输出 详 情请参阅 浏览系统菜单 数位音频输出 一 节 请勿用任何电缆连接本机和扩音器的 Phono 输 入 请勿将本机的同轴 DIGITAL AUDIO OUT 插孔和连 接装置上的模拟插孔 红 白 相连接 打开电视机并设定正确的视频输入频道 变更电视 频道 ...

Page 110: ...播放节目 您要录像的电视频道并没有被储存 或您选错节目 号码 检查储存的电视频道 如果在设定定时录像后调整时钟 您必须重新设定 定时录像 如果 DVD 录放像机无法读取光碟 您就无法进行 录像 您无法用本机将有版权保护的资料 DVD 或录像 带 拷贝到 DVD R RW R DL 上 可能使用了经过最终化处理的 DVD R 请更换光 碟 安装电视频道 详情请参阅 步骤三 电视频道设 定 如果录像的片长太短 DVD 播放机可能无法侦测 到 请注意以下的 最短录像时间 录像模式 1 hour 1 小时 5 分钟 2 hours 2 小 时 10 分钟 2 5 hours 2 5 小时 13 分钟 3 hours 3 小时 15 分钟 4 hours 4 小时 20 分钟 6 hours 6 小 时 30 分钟 您必须将 DVD R R DL 最终化处理 详情请参 阅 在其他 DVD 播放机上播...

Page 111: ...所提出的静态 图片资料压缩系统 尽管影像经过高度压缩 影像 的品质仅稍微减低 MP3 含有音效资料压缩系统的文件格式 MP3 是 Motion Picture Experts Group 1 或 MPEG 1 Audio Layer 3 的缩写 使用 MP3 格式 一片 CD R 或 CD RW 可以比一般 CD 包含多十倍以上 的资料 MPEG 全名为 Motion Picture Experts Group 是 数位影音压缩系统的集合 多声道 DVD 经过格式化后 将每个声轨构成一 个音场 多声道是指含有三个以上声道的声轨结构 PBC 播放控制 指影音光碟或 SVCD 上所录制 信号的播放控制 使用支持播放控制的影音光碟 或 SVCD 上的菜单画面 您可以进行互动播放和 搜寻 PCM 脉冲编码调变 数位音频解码系统 家长控制功能 根据使用者的年龄或不同国家的限 制分级 来限制光碟播放 ...

Page 112: ...h s i l g n E CLASS 1 LASER PRODUCT DVDR3408 ...

Reviews: