background image

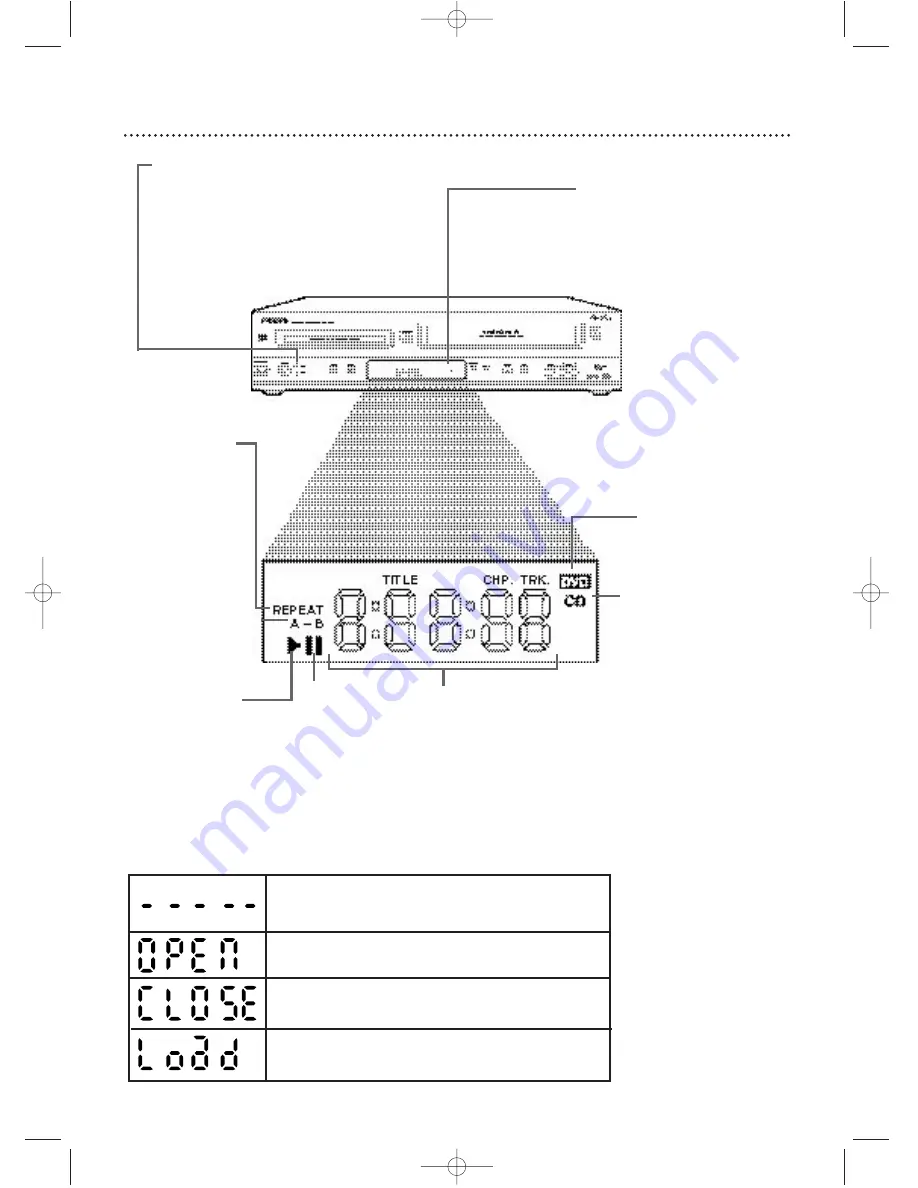
20 Display Panel (DVD)

Display
Messages about current Disc
operations appear here.
See Display Messages below.

DVD Light (red)
This light appears when the DVD/VCR is in
DVD mode.You can only watch DVDs when
the red DVD light is on.To make the red DVD
light come on, press SOURCE on the front of
the DVD/VCR or DVD on the remote.

Appears after the disc tray closes if the tray is empty, if 
there is an error reading the disc, or if an unacceptable 
disc is installed.

Tray is opening or is open.

Tray is closing.

Disc is loading.

Display Messages

REPEAT:Appears
during Repeat
Playback of a Disc,
along with A-B,
TITLE, CHP., or
TRK., depending on
the type of Repeat
Playback you have
selected. Details are
on page 57.

A-B:Appears during A-
B Repeat Playback.
Details are on page 57.

B

:Appears during

Disc playback.

F

:Appears

when play is
paused.

DVD: Lights when a
DVD is in the tray and
ready for playback.

CD: Lights when a
CD is in the tray and
ready for playback.

Displays the elapsed playing time of the
current Title or Track. Briefly displays
Title, Chapter, or Track  numbers.

H9421CD/DVD750(EN).pgs1-51.QX3  03.4.11 11:29 AM  Page 20

Summary of Contents for DVD750/001

Page 1: ...IDE YOU THROUGH CONNECTIONS FIRST TIME SETUP AND ANY OF THE FEATURES WE WANT YOU TO START ENJOYING YOUR NEW PRODUCT RIGHT AWAY CALL US BEFORE YOU CONSIDER RETURNING THE PRODUCT 1 800 531 0039 OR VISIT US ON THE WEB AT WWW PHILIPS COM Important Return your Warranty Registration Card within 10 days See why inside STANDBAY ON STANDBAY ON H9421CD DVD750 EN pgs1 51 QX3 03 4 11 11 29 AM Page 1 ...

Page 2: ...your PHILIPS product you must return your Warranty Registration Card within 10 days So please mail it to us right now Know these safetysymbols This bolt of lightning indi cates uninsulated material within your unit may cause an electrical shock For the safety of everyone in your household please do not remove product covering The exclamation point calls attention to features for which you should r...

Page 3: ... can be determined by turning the equipment off and on the user is encouraged to try to correct the interference by one or more of the following measures 1 Reorient or relocate the receiving antenna 2 Increase the separation between the equipment and the receiver 3 Connect the equipment into an outlet on a circuit different from that to which the receiver is connected 4 Consult the dealer or an ex...

Page 4: ...ing with theVCR Plus Programming System 42 43 Repeat Play 44 Tape Counter 45 Time Search Index Search 46 Special Effects Playback 47 Automatic Operation Features 48 AdditionalVCR Features Multi Channel Television Sound 49 50 Hi Fi Stereo 51 Disc Playback Features DVD Disc Menus 52 Fast Forward Reverse Search 53 Title Chapter Playback Specific Time Playback 54 Track Playback 55 Paused and Step by S...

Page 5: ...e menus If the DVD has a menu access it by pressing DVD then DISC VCR MENU on the remote control Details are on page 52 DVD Player Setup Menu Some instructions explain how to use the DVD Player s Setup menu to set up features of the DVD Player or a DVD Access the DVD Player menu by pressing SYSTEM MENU on the remote control when playback is stopped Even if a feature is set in the DVD Player s menu...

Page 6: ...y must be recorded in the NTSC sys tem You cannot play DVDs recorded in other formats The color system of the DVD may be listed on the DVD or on the Disc case Playable Video Cassettes The VCR of this DVD VCR has a High Quality HQ system and is compatible with existing Video Home System VHS equipment Use only video cassettes that have the mark The use of other tapes may result in poor picture quali...

Page 7: ...e best sound quality If you use only this audio connection only Disc sound no VCR will be available Details are on page 15 If digital audio connections are not possible connect the DVD VCR s red and white DVD VCR AUDIO OUT jacks to the Audio In jacks of your Stereo or TV This connection provides sound for both the DVD Player and the VCR Details are on pages 11 14 Before you begin Refer to the manu...

Page 8: ...w If you cannot use channel 3 at your TV you can change the DVD VCR s output channel to channel 4 To do so press the VCR button to put the DVD VCR in VCR mode The green VCR light will be on the front of the DVD VCR Insert a videotape and press PLAY B to start playback During playback press and hold the VCR PLAY B button on the front of the DVD VCR for three to five seconds Each time you do this th...

Page 9: ...econds during tape play back For more details see step 4 on page 8 4 Select the channel you want to view record at the Cable Box Satellite Receiver You may not view a channel other than the one you are recording You can only program a timer recording for one channel at a time Set your Cable Box Satellite Receiver to the channel you want to record When you enter the channel you want to record in a ...

Page 10: ...Press VCR to put the DVD VCR in VCR mode The green VCR light will appear on the front of the DVD VCR 3 Press VCR TV on the remote to choose VCR position 4 Press SKIP3 CHo or SKIP CHp to select the channel you want to record at the DVD VCR Press RECORD or RECORD to start the recording 5 Press VCR TV on the remote once to put the DVD VCR in TV position 6 Select the channel you want to watch at the C...

Page 11: ...e TV s single AUDIO IN jack 3 Connect the yellow video cable supplied to the DVD VCR VIDEO OUT jack on the DVD VCR and to the VIDEO IN jack on the TV The VIDEO IN jack on the TV is usually yellow and may be labelled CVBS Composite or Baseband video 4 Connect the power cords of the TV and the DVD VCR to a power outlet Turn on the TV and set it to the correct Audio Video In chan nel Go to your lowes...

Page 12: ...ct the supplied yellow video cable see step 3 on page 11 If your TV is compatible with progressive scanning 480p connect the TV to the Component Video Output jacks of the DVD player and make sure INTERLACE PRO GRESSIVE SCAN SELECTOR is set to PROGRESSIVE P 4 Connect the power cords of the DVD VCR and TV to a power outlet Turn on the TV and set it to the Component Video In channel for DVD Player fe...

Page 13: ...see step 2 on page eight To connect the supplied yellow video cable see step 3 on page 11 4 Connect the power cords of the DVD VCR and TV to a power outlet Turn on the TV and set it to the S Video In channel for DVD Player features If you are using the RF coaxial cable for VCR playback choose channel 3 or 4 at the TV If you are using the yellow video cable for VCR playback choose the Video In chan...

Page 14: ...he yellow video cable or RF coaxial cable for VCR features 4 Connect the power cords of the DVD VCR TV and Stereo to a power outlet Turn on the TV and set it to the Video In channel Or simply go to your TV s lowest channel 02 or 03 and continue changing chan nels downward at the TV until you see VCR or DVD playback on the TV screen To help you find the right Video In channel at the TV turn on the ...

Page 15: ...cable instead for the DVD Player see pages 12 13 You will still need the yellow video cable or RF coaxial cable forVCR features 4 Plug in the power cords of the Stereo TV and DVD VCR Turn on the Stereo and select its Auxiliary IN channel Turn on theTV and set it to the correctVideo In channel Go to your TV s lowest channel 01 or 02 and change channels downward until you see DVD orVCR material on t...

Page 16: ...materials that can be recycled and reused Specialized companies can recycle your product to increase the amount that needs to be properly dis posed Your product uses batteries that should not be thrown away when depleted but should be disposed of as small chemical waste Please find out about the local regulations on disposal of your old product batteries and packaging whenever you replace existing...

Page 17: ...k and press B again Repeat this process if the power fails To stop the Channel Setup while AUTO SET UP is flashing press DISC VCR MENU Helpful Hints Before turning on your DVD VCR make sure batteries are in the remote control and the DVD VCR and TV are connected correctly You cannot program channels if you are using a Cable Box or a Satellite Receiver These menus may not appear if you have already...

Page 18: ... The VCR light will appear on the front of the DVD VCR If the tape s record tab has been removed play will start automatically If the DVD VCR power is already on press VCR to put the DVD VCR in VCR mode if necessary The green VCR light will appear on the front of the DVD VCR 3 If playback does not start automatically press VCR then press PLAY B 4 Press STOP C to stop playback 5 Press h to rewind t...

Page 19: ...to turn on the DVD VCR 2 Press DVD so the red DVD light appears on the front of the DVD VCR 3 Press OPEN CLOSE A to the right of the disc tray on the front of the DVD VCR to open the Disc tray 4 Place a Disc into the tray If the DVD is recorded on only one side place the Disc in the tray with the label fac ing up and the shiny side facing down Some DVDs are recorded on both sides Make sure the lab...

Page 20: ...alled Tray is opening or is open Tray is closing Disc is loading Display Messages REPEAT Appears during Repeat Playback of a Disc along with A B TITLE CHP or TRK depending on the type of Repeat Playback you have selected Details are on page 57 A B Appears during A B Repeat Playback Details are on page 57 B Appears during Disc playback F Appears when play is paused DVD Lights when a DVD is in the t...

Page 21: ...I RECORD TIMER RECORD RECORD PLAY VIDEO AUDIO IR RECORD TIMER RECORD RECORD PLAY VIDEO AUDIO VCR light green This light appears when the DVD VCR is in VCR mode You can only watch videotapes or access VCR features and TV channels when the green VCR light is on To make the green VCR light come on press VCR on the remote control or SOURCE on the front of the DVD VCR Counter Clock Channel If there is ...

Page 22: ...IR Infrared Remote Sensor Receives a signal from your remote control so you can work your DVD VCR from a distance Point the remote control toward the DVD VCR s IR sensor not yourTV STANDBY ON Button Press to turn the power on or off AUDIO and VIDEO In Jacks Connect audio and video cables coming from the audio and video out jacks of a camcorder another VCR another DVD Player or audio system here Th...

Page 23: ...nly for the DVD Player Details are on page 15 ANT IN Antenna In jack Connect your antenna or Cable TV signal here Details are on pages 8 15 ANT OUT Antenna Out Jack Use the supplied RF coaxial cable to connect this jack to the ANTENNA IN jack on your TV Cable Box or Satellite Receiver Details are on pages 8 10 VCR VIDEO IN Jack yellow Connect a video cable coming from the video out jack of a camco...

Page 24: ... are on page 57 A B REPEAT Button Press to set up A B Repeat Details are on page 57 RETURN Button Press to return to the previ ous level of the DVD Player s Setup menu or to remove the Setup menu SKIP3 CHo and SKIP CHp Buttons In DVD mode press to skip Chapters or Tracks In VCR mode press to change TV channels at the DVD VCR RECORD I Button Press to start a VCR record ing Details are on page 32 SE...

Page 25: ...e Details are on page 63 STANDBY ON PLAY VCR TV VCR DVD OK MENU MENU SYSTEM RETURN TITLE A B CLEAR RESET SLOW SUBTITLE ZOOM ANGLE REPEAT REPEAT AUDIO SEARCH MODE DISPLAY SKIP CH DISC VCR PAUSE STOP VCR Plus RECORD TIMER SET SPEED 1 2 3 7 6 5 4 8 9 0 10 MODE Button Press to set a Program Details are on page 64 Press to start Random playback Details are on page 65 SYSTEM MENU Button Press to access ...

Page 26: ... to select CHANNEL SET UP Then press B 3 Press o or p to select AUTO SET UP Press B 4 AUTO SET UP will flash while the DVD VCR sets up the available channels When setup is complete the lowest available channel will appear on the TV Now when you press SKIP3 CHo or SKIP CHp you will scan only through available channels You still can select any channel using the Number buttons CHANNEL SET UP BAUTO SE...

Page 27: ...your choice is flashing press CLEAR RESET The channel you added or deleted will be the current channel Added channels are available when you flip through channels using the SKIP3 CHo and SKIP CHp buttons You still can select deleted channels with the Number buttons 4 Press o or p until the channel number you want to add or delete appears on the screen STANDBY ON PLAY VCR TV VCR DVD OK MENU MENU SY...

Page 28: ...appears Press B The day of the week will appear automatically CLOCK SET MONTH DAY YEAR 0 3 2 0 THU 2 0 0 3 HOUR MINUTE AM PM CLOCK SET MONTH DAY YEAR 0 3 HOUR MINUTE AM PM If the clock has never been set the CLOCK SET menu may appear when you press DISC VCR MENU If so follow the instructions from step 3 above Press DISPLAY until the time appears on theTV screen Power failures of more than 30 secon...

Page 29: ... PM space CLOCK SET MONTH DAY YEAR 0 3 2 0 THU 2 0 0 3 HOUR MINUTE AM PM 0 5 4 0 P M AM B PM 9 Press CLEAR RESET or B to start the clock To reset the clock follow steps 1 2 on page 28 Select the information you want to change using B or s When the information is flash ing use o or p to enter the cor rect information Press CLEAR RESET to set the clock Helpful Hint STANDBY ON PLAY VCR TV VCR DVD OK ...

Page 30: ...A then press B 3 Press o or p to select ENGLISH 4 Press CLEAR RESET Helpful Hint LANGUAGE SELECT BENGLISH ON FRANCAIS ESPAÑOL STANDBY ON PLAY VCR TV VCR DVD OK MENU MENU SYSTEM RETURN TITLE A B CLEAR RESET SLOW SUBTITLE ZOOM ANGLE REPEAT REPEAT AUDIO SEARCH MODE DISPLAY SKIP CH DISC VCR PAUSE STOP VCR Plus RECORD TIMER SET SPEED 1 2 3 7 6 5 4 8 9 0 10 2 3 4 1 M E N U 1 BTIMER PROGRAMMING AUTO REPE...

Page 31: ...number and the availability of stereo or second audio will also appear The time also will appear on the display panel on the front of the DVD VCR 3 Press DISPLAY again to remove all the displays If the channel you select has no broadcast the screen will be solid blue You cannot access a status dis play when viewing a still picture during slow motion or during for ward and reverse searching Channel...

Page 32: ...CORD I or press PAUSE k again The red RECORD light will come on again 7 To stop recording press STOP C Recording Prevention Video Cassettes have record tabs to ensure that recordings are not accidentally erased 1 To prevent recording break off the tab with a screwdriver 2 To allow recording cover the hole with clear tape Other recording options are on pages 33 39 The VCR will record in a preset vo...

Page 33: ...ress VCR then press RECORD I to record the current TV channel Details are on page 32 2 Press VCR TV once to put the DVD VCR in TV posi tion 3 Use the TV remote control to select the channel you want to watch at the TV 4 To return to the channel being recorded use the TV remote control to select channel 03 or 04 at the TV Details are on page eight Or if you connected the DVD VCR to the TV using aud...

Page 34: ...r of the screen When an OTR finishes the DVD VCR will either switch to DVD model or turn itself off If it changes to DVD mode press STAND BY ON to turn it off After an OTR the RECORD TIMER light flashes because the VCR is still on standby for timer recordings Press TIMER SET on the remote or STOP EJECT A on the DVD VCR to cancel timer standby and use the VCR normally again The remaining recording ...

Page 35: ...VCR ANT IN ANT OUT AUDIO OUT VIDEO OUT AUDIO IN VIDEO IN L R L R DVD VCR VCR ANT IN ANT OUT DVD VCR 1 Playing unit DVD VCR 2 Recording unit 1 Audio cables from AUDIO OUT jacks red and white of DVD VCR 1 to AUDIO IN jacks of DVD VCR 2 2 Video cable from yellowVIDEO OUT jack of DVD VCR 1 to VIDEO IN jack of DVD VCR 2 3 RF coaxial cable from the ANT OUT Antenna Out jack of DVD VCR 2 to theTV s ANTENN...

Page 36: ...a timer recording stored will flash TIMER PROGRAMMING PROG 12345678 DATE START TIME END TIME CHANNEL REC SPEED 3 Press o or p to select an empty program Then press B PROGRAM NUMBER 1 B ONCE DAILY WEEKLY 4 Press o or p to select ONCE DAILY orWEEKLY Then press B ONCE TheVCR will record a TV program on any day you choose up to 12 months away DAILY TheVCR will record aTV program at the same time on th...

Page 37: ...rocedure in step 6 to set the record ing s end time 8 Press o or p until the channel number appears Then press B If you are using a standard antenna Cable TV hookup as shown on page eight select the channel of the TV pro gram you want to record If you are recording from other equipment select L1 or L2 To determine L1 or L2 refer to the Helpful Hint on page 38 If you are using a Cable Box Satellite...

Page 38: ... VCR in VCR mode by press ing VCR or SOURCE You must first press TIMER SET to cancel the timer recording temporarily Then you can use the VCR features again ONE TIME PROGRAM PROGRAM NUMBER 1 DATE 0 5 0 4 SUN START TIME 0 7 3 0 P M END TIME 0 8 3 0 P M CHANNEL 1 6 REC SPEED S P B SP SLP If you are recording from other equipment set CHANNEL to L1 or L2 If you connected the other equipment to the AUD...

Page 39: ...ress RECORD I to start recording The red RECORD light will appear on the front of the DVD VCR 4 Press DVD Press PLAY Bto play the disc 5 To pause the recording pressVCR then press PAUSE k once The red RECORD light will flash To resume recording press RECORD I or press PAUSE k again The red RECORD light will come on again 6 To stop recording pressVCR then press STOP C DISC 3 5 6 1 5 2 4 5 6 STANDBY...

Page 40: ...with your local channel information To fill in the boxes you will need 1 a cable channel list if applicable you can request one from your cable company and 2 a chart that lists VCR Plus channel numbers Guide channels which you can find in your TV guide or the TV listings of your local newspaper NOTE If you are using a Cable Box DBS the User channel must be 3 or 4 the Cable Box DBS output channel f...

Page 41: ...owing steps 3 7 3 Press VCR then press DISC VCR MENU until MENU 2 appears M E N U 2 BGUIDE CHANNEL SET GUIDE CHANNEL MAP GUIDE CHANNEL SET GUIDE CH 25 USER CH _ _ 6 Press the Number buttons o or p until the User channel number you want appears If you have an antenna choose channels 2 69 If you have Cable TV choose channels 1 125 To select L1 line input press 0 0 on the remote control Press s to go...

Page 42: ... fails for more than 30 seconds pro grammed timer recordings will be restored when the clock is reset Helpful Hints 3 2 3 1 1 Press VCR 2 Press VCR Plus 3 Press Number buttons to enter the PlusCode pro gramming number of the program you wish to record Then press VCR Plus 4 Press o or p to select a ONCE DAILY or WEEKLY recording Then press B ONCE The VCR will record a TV program on any day you choo...

Page 43: ...mer recording If you want to use the VCR until time for the recording don t press TIMER SET until a few minutes before the recording should start Or press TIMER SET only when you know you won t be using the VCR anymore until after the recording When the RECORD TIMER light is on you can not put the DVD VCR in VCR mode by pressing VCR or SOURCE You must first press TIMER SET to cancel the timer reco...

Page 44: ...TIMER PROGRAMMING AUTO REPEAT OFF CHANNEL SET UP CLOCK SET LANGUAGE SELECT AUDIO OUT TV STEREO ON SAP M E N U 1 TIMER PROGRAMMING BAUTO REPEAT OFF CHANNEL SET UP CLOCK SET LANGUAGE SELECT AUDIO OUT TV STEREO ON SAP M E N U 1 TIMER PROGRAMMING BAUTO REPEAT ON CHANNEL SET UP CLOCK SET LANGUAGE SELECT AUDIO OUT TV STEREO ON SAP To cancel AUTO REPEAT follow steps 1 2 At step 3 press B so OFF appears b...

Page 45: ...ld like to refer to later Press STOP C to stop the tape 2 Press DISPLAY to see the status display 3 While the counter is on the screen press CLEAR RESET to reset the counter to zero STOP SLP 0 00 00 HIFI 4 When you later want to return to this point on the tape press DISPLAY so you can see the counter while tape play is stopped Press hor g As the tape rewinds or forwards watch the counter When it ...

Page 46: ...ark Find the start of a recording by following these steps 1 PressVCR then press SEARCH until the INDEX SEARCH screen appears 2 Within 30 seconds press o or p until the number of programs you want to skip appears beneath INDEX SEARCH Include the current program in your number 3 Within 30 seconds press s for a reverse search or B for a forward search When the tape finishes rewinding or forwarding p...

Page 47: ...t a time press PAUSE k repeatedly 3 To release the still picture and return to playback press PLAY B Viewing a Slow Motion Picture 1 During tape playback press SLOW The tape will play in slow motion 2 To return to normal playback press PLAY B Slow and Still modes will switch to Stop mode after five minutes to protect the DVD VCR and the tape from damage SP LP SLP means this feature will work with ...

Page 48: ...h the DVD VCR power on or off but the DVD VCR must be plugged in If a timer recording is set and the RECORD TIMER light is on pressing STOP EJECT A will turn on the DVD VCR and or cancel the timer recording The RECORD TIMER light will turn off Press STOP EJECT A again to remove the tape Remember to insert a tape and press TIMER SET to reset the timer recording Automatic Tracking Adjustment TheVCR ...

Page 49: ... you play that tape on the DVD VCR it will be in stereo or second audio Read the directions on this page to familiarize yourself with the stereo and second audio setups Then fol low the directions on page 50 to record in stereo or second audio or follow the directions on page 51 to play tapes recorded in Hi Fi stereo Understanding Displays When you watch TV channels through the DVD VCR portions of...

Page 50: ... page 49 to deter mine if the program is in stereo or second audio If SAP is ON but the program is not broadcast in Second Audio you will hear and record the program in nor mal audio Helpful Hints M E N U 1 BTIMER PROGRAMMING AUTO REPEAT OFF CHANNEL SET UP CLOCK SET LANGUAGE SELECT AUDIO OUT TV STEREO ON SAP To set the DVD VCR to receive programs in stereo or second audio follow these steps 1 Pres...

Page 51: ... tape not recorded in Hi Fi stereo You can change to MONO if you want monaural audio playback Follow steps 1 2 then press o or p to select MONO Press DISC VCR MENU HIFI will disap pear from the status display If you play non Hi Fi tapes while AUDIO OUT is set to HIFI HIFI will not appear on the status display The tape will play in monaural sound Please see additional notes on page 81 Helpful Hints...

Page 52: ...nts 52 DVD Disc Menus DVDs contain menus that describe the contents of the DVD or allow you to customize DVD playback For example the menu may offer choices for subtitle languages special features or scene selec tion To use the DVD Disc menu and select playback features fol low these steps 1 Press DVD to put the DVD VCR in DVD mode 2 Press DISC VCR MENU The DVD s main Disc menu will appear 3 Press...

Page 53: ...will be muted during searching During Audio CD playback you may search only at 16 times the normal playback speed An h 16 or g 16 will appear briefly on the TV screen Sound will be inter mittent during searching on an Audio CD During MP3 playback you can search at only eight times the normal speed An h 8 or g 8 will appear briefly on the TV 3 Press PLAY B to return to normal playback STANDBY ON PL...

Page 54: ...playback will start at the specified time Example 1 hour 23 minutes and 30 seconds 1 2 3 3 0 Make sure the time you enter is within the total time of the current Title or Track If it is not the time space will clear and playback will continue at its current point The total time available in the current Track or Title will appear in the Time Search display If you make a mistake entering the time pr...

Page 55: ...TR appears Within 30 seconds press the Number buttons to select the Track number Playback will begin at the selectedTrack For a sin gle digitTrack 1 9 enter a zero first For example to playTrack 5 press 0 5 You do not have to use the 10 button in Search Mode C Using SKIP3 CHo or SKIP CHp During playback press SKIP3 CHo to skip the current Track and move to the next Track The Track number will appe...

Page 56: ...ss PLAY to play from here To play the beginning press STOP first and then PLAY Paused and Step by Step Playback 1 Press DVD 2 During DVD or Audio CD playback press PAUSE k Play will pause and the sound will be muted 3 When playing a DVD press PAUSE k repeatedly to see the picture advance one frame or step at a time The sound will remain mute Pressing PAUSE k repeatedly during Audio CD MP3 or JPEG ...

Page 57: ...ess PLAY B to play the Disc to the point at which you want repeated playback to begin 3 Press A B REPEAT to set the starting point A A will appear on the TV screen 4 Play or fast forward the Disc to the point at which you want repeated playback to end then press A B REPEAT again A B will appear on the TV The sec tion will begin to play repeatedly 5 To cancel A B Repeat press A B REPEAT OFF will ap...

Page 58: ...r and its elapsed playing time Audio CD will appear 4 To return to a Marker during playback press SEARCH until you see the Markers Press s or B to choose the Marker you want then press OK Disc play will continue from the marked point Opening the disc tray or turning off the DVD VCR will erase all the Markers To erase a single Marker press SEARCH until you see the Markers Press s or B to select a M...

Page 59: ...uages are available 6 After a few seconds the subti tles will appear Or press SUBTITLE to turn off subtitles STANDBY ON PLAY VCR TV VCR DVD OK MENU MENU SYSTEM RETURN TITLE A B CLEAR RESET SLOW SUBTITLE ZOOM ANGLE REPEAT REPEAT AUDIO SEARCH MODE DISPLAY SKIP CH DISC VCR PAUSE STOP Camera Angles Some DVDs contain scenes recorded from different angles The camera angle will not change if the DVD does...

Page 60: ...ess the Number buttons to enter a four digit pass word The password numbers will appear on the screen Write down the password so you will not forget it Press OK The previous menu will reappear 7 Press SYSTEM MENU to remove the menu QUICK SETUP PLAYER MENU ENGLISH TV ASPECT 4 3 LETTER BOX DOLBY DIGITAL ON OK The default password is 4737 If you forget your password press Number buttons 4 7 3 7 at st...

Page 61: ...an on screen message will indicate the DVD cannot play Remove the DVD then set PARENTAL LEVEL to ALL Reload the DVD and begin play back Some DVDs may let you enter your four digit password to begin playback Follow the on screen mes sages as prompted You cannot use the default password 4737 to play a DVD Helpful Hints ALL Parental Controls is inactive all discs can play 8 Adult material 7 NC 17 Not...

Page 62: ...iation You cannot adjust the Stereo Sound Mode whenVirtual Surround is active Details are on page 74 Helpful Hints Stereo Sound Mode If you connected the DVD VCR to a Stereo or TV using the COAXIAL DIGITAL AUDIO OUT jack as described on page 15 you cannot adjust Stereo Sound Mode Otherwise adjust Stereo Sound to determine whether you will hear the left channel the right channel or both channels st...

Page 63: ... four times as large as normal Either x2 or x4 will appear beside the zoom icon on the TV screen 2 While the picture is enlarged press o p s or B to move the zoomed image up down left or right The gray box with an inner blue box that shows during Zoomed playback is the position guide To remove it or show it press OK The position of the blue box inside the gray box indicates the position of the zoo...

Page 64: ... or SEARCH to select anotherTrack while playing a Program Use SKIP3 CHo or SKIP CHp to select otherTracks within the Program You cannot combine random play back with programmed playback You may play a Program or a Track within a Program repeatedly During programmed playback press REPEAT so ALL allTracks in the Program orTRACK appears The entire Program or the current Track will play over and over ...

Page 65: ... MODE twice so the RANDOM screen appears 3 While the RANDOM screen appears press PLAY B The Tracks will play in random order After all the Tracks have played once playback will stop STANDBY ON PLAY VCR TV VCR DVD OK MENU MENU SYSTEM RETURN TITLE A B CLEAR RESET SLOW SUBTITLE ZOOM ANGLE REPEAT REPEAT AUDIO SEARCH MODE DISPLAY SKIP CH DISC VCR PAUSE STOP VCR Plus RECORD TIMER SET SPEED 1 2 3 7 6 5 4...

Page 66: ...they were recorded i e 1 2 3 If you select a Folder and press OK the Tracks or Files within that Folder will appear Press K or L to select the Track or File you want then press PLAY B or OK Choose FIRST PLAY to start play from the first individual File or Track listed Press TITLE to return to the first item on the first MP3 or JPEG screen You also can press to return to previous screens During JPE...

Page 67: ...g time of the current Track will appear Or the following may appear to indicate Repeat play TRACK The current Track will play repeatedly GROUP Tracks in the current Folder will play repeatedly ALL AllTracks will play repeatedly 3 Press DISPLAY again to remove the display STANDBY ON PLAY VCR TV VCR DVD OK MENU MENU SYSTEM RETURN TITLE A B CLEAR RESET SLOW SUBTITLE ZOOM ANGLE REPEAT REPEAT AUDIO SEA...

Page 68: ...ct display then press OK QUICK SETUP PLAYER MENU ENGLISH TV ASPECT 4 3 LETTER BOX DOLBY DIGITAL ON OK 3 Press B to select CUSTOM at the top of the menu then press OK LANGUAGE AUDIO ORIGINAL SUBTITLE OFF DISC MENU ENGLISH PLAYER MENU ENGLISH OK STANDBY ON PLAY VCR TV VCR DVD OK MENU MENU SYSTEM RETURN TITLE A B CLEAR RESET SLOW SUBTITLE ZOOM ANGLE REPEAT REPEAT AUDIO SEARCH MODE DISPLAY SKIP CH DIS...

Page 69: ...ose 4 3 PAN SCAN for a full height picture with both sides trimmed Some companies refer to this as reformatting the picture to fit your TV screen and may call it the regular or normal format Choose 16 9 WIDE if a widescreen TV is connected to the DVD VCR If you selected ANGLE ICON press OK repeatedly to turn ANGLE ICON ON or OFF The default setting is ON Choose ON to see the Angle icon when multip...

Page 70: ... FRANCAIS ESPANOL OK 3 Press B to select CUSTOM at the top of the menu then press OK If the DVD s default settings for Audio and Subtitle are the same language the subtitles may not show unless you turn them on Use the AUDIO and SUBTITLE buttons to select Audio and Subtitles available on the DVD Details are on pages 59 and 62 If you set AUDIO to ORIGINAL the default setting of the DVD Audio will p...

Page 71: ...ch 6058 English 5160 Esperanto 5161 Estonian 5166 F H Faroese 5261 Fiji 5256 Finnish 5255 French 5264 Frisian 5271 Gaelic Scots 5350 Galician 5358 Georgian 5747 German 5051 Greek 5158 Greenlandic 5758 Guarani 5360 Gujarati 5367 Hausa 5447 Hebrew 5569 Hindi 5455 Hungarian 5467 I K Icelandic 5565 Indonesian 5560 Interlingua 5547 Interlingue 5551 Inupiak 5557 Irish 5347 Italian 5566 Japanese 5647 Jav...

Page 72: ...repeatedly to choose ON or OFF Choose ON to set downsampling to 48 kHz Choose OFF to set downsampling to 96 kHz 7 Press SYSTEM MENU to remove the menu STANDBY ON PLAY VCR TV VCR DVD OK MENU MENU SYSTEM RETURN TITLE A B CLEAR RESET SLOW SUBTITLE ZOOM ANGLE REPEAT REPEAT AUDIO SEARCH MODE DISPLAY SKIP CH DISC VCR PAUSE STOP VCR Plus RECORD TIMER SET SPEED 1 2 3 7 6 5 4 8 9 0 10 2 7 AUDIO DRC OFF DOL...

Page 73: ...Current Repeat setting if active T Track repeat A All Tracks repeat A B A B repeat CH 7 49 0 01 46 0 03 27 CH Chapter Current Chapter number total Chapters Elapsed playing time of the current Chapter remaining playing time of the current Chapter STANDBY ON PLAY VCR TV VCR DVD OK MENU MENU SYSTEM RETURN TITLE A B CLEAR RESET SLOW SUBTITLE ZOOM ANGLE REPEAT REPEAT AUDIO SEARCH MODE DISPLAY SKIP CH D...

Page 74: ...d in Dolby Digital or Pulse Code Modulation PCM Check the Disc case for details on availability 1 Press DVD 2 During Disc playback press MODE so the Virtual Surround icon appears in the top left corner of the TV screen 3 While the Virtual Surround icon appears press OK to choose 1 2 or OFF The default setting is OFF The icon will disappear after about 10 seconds Virtual Surround is available only ...

Page 75: ...scs Always store the Disc in its protective case when it is not in use Checking the Laser If the DVD VCR does not operate as described in this manual the DVD Player s laser may be dirty Consult an Authorized Service Center for inspection and cleaning of the laser Caring for Video Cassettes Use only cassettes with the mark Remove any light adhesive stick on notes from the video cassette before putt...

Page 76: ...e other video equipment to the AUDIO and VIDEO In jacks on the front of the DVD VCR select L2 If you used the AUDIO and VIDEO IN jacks on the back of the DVD VCR select L1 If you accidentally enter Line Input mode press SKIP3 CHo or SKIP CHp or the Number buttons to select anoth er channel OTR One Touch Recording a timed recording on the VCR that starts immediately and records for 30 minutes to 8 ...

Page 77: ...Technology Industries Association Dynamic Range DVD linear sound 102 dB Audio CD 99 dB JEITIA Total Distortion Factor Audio CD 0 003 JEITIA DVD 0 0025 Wow and Flutter Below the measurement limitation 0 001 W PEAK JEITIA Power Requirement 120V AC 10 60 Hz 0 5 Power Consumption Power on 24 W Power off 7 0 W Operating Temperature 41 F 5 C to 104 F 40 C Relative Humidity 30 to 80 Dimensions 17 1 8 W x...

Page 78: ...VD VCR This means the DVD VCR is in DVD mode To use the VCR press VCR then try the other VCR feature buttons Press VCR so the green VCR light appears on the front of the DVD VCR This means the DVD VCR is in VCR mode There is no picture in DVD mode Make sure the video cable is connected correctly You may connect either the yellow video cable sup plied an optional S Video cable or optional component...

Page 79: ... segments recorded from different camera angles See if multiple angles are available by referring to the Disc case or DVD Disc menu Details are on page 59 You cannot change the audio or subtitle language of a DVD The DVD does not contain audio or subtitles in the desired language Not all DVDs contain audio or sub titles in multiple languages See if other languages are available by referring to the...

Page 80: ...ecordings differently Details are on page nine Finish programming a timer recording at least five minutes before it is set to begin 12 p m is noon 12 a m is midnight There is no picture or the picture is noisy or has streaks during video cassette playback Put the DVD VCR in VCR mode Press VCR or OUTPUT so the green VCR light appears on the front of the DVD VCR If you used the supplied RF coaxial c...

Page 81: ...sound if you connect the DVD VCR AUDIO OUT jacks on the DVD VCR to the AUDIO IN jacks on your TV and if the TV is on its Audio Video In channel See your TV owner s manual for details When you connect the DVD VCR AUDIO OUT jacks on the DVD VCR to the AUDIO IN jacks on your TV the stereo light on the TV might not glow If the status display indicates you are receiving stereo you are Details are on pa...

Page 82: ...luding but not limited to rental purposes WHERE IS EXCHANGE AVAILABLE Warranty exchange is available in all countries where the product is officially distributed by Philips In countries where Philips does not distribute the product the local Philips ser vice organization will attempt to exchange the product although there may be a delay if the appropriate product is not readily available MAKE SURE...

Page 83: ...ded by Philips For details call 1 800 531 0039 A replacement will be sent to you via UPS within 48 business hours of Philips receipt of the product When it is necessary for you to ship the product to Philips for exchange you will pay the shipping costs for shipment to Philips Philips will pay the shipping costs when returning a product to you EXCHANGE INSTRUCTIONS EXCHANGE FORM Your Address street...

Page 84: ...61 password 60 pause button 25 47 56 63 play button 18 19 22 24 player menu 70 playing discs 19 playing tapes 18 power cord 23 light 21 program 64 quick setup 69 70 72 random 65 rear panel 23 rec record button 24 32 rec record light 21 record button 22 32 34 recording basic 32 one channel watching another 33 prevention 32 timer 36 38 with the vcr plus programming system 42 43 remote control batter...

Page 85: ...OUVONS VOUS AIDER AVEC LES CONNEXIONS LA PREMIÈRE INSTALLATION ET L UTILISATION DES DIFFÉRENTES FONCTIONS NOUS SOUHAITONS VOUS VOIR UTILISER VOTRE NOUVEL APPAREIL LE PLUS TÔT POSSIBLE APPELEZ NOUS AVANT DE SONGER À RETOURNER LE PRODUIT 1 800 531 0039 OU VISITEZ NOUS SUR LE WEB À WWW PHILIPS COM ARRÊTEZ Important Envoyez nous votre carte d enregistrement de garantie dans les 10 jours Voyez pourquoi...

Page 86: ...pareil et pouvant causer un choc électrique Pour assurer la sécurité des membres de votre famille veuillez ne pas enlever le couvercle de votre produit Les points d exclamation ont pour but d attirer votre attention sur des caractéristiques à propos desquelles vous devez lire soigneusement la documentation accompagnant l appareil afin d éviter tout problème d exploitation ou d entretien AVERTISSEM...

Page 87: ...adio ou télévision ce qui peut être déterminé en mettant l appareil hors tension puis sous tension l utilisateur peut corriger le problème en effectuant l une ou l autre des procédures suivantes 1 Réorientation ou déplacement de l antenne de réception 2 Augmentation de la séparation entre le dispositif et le récepteur 3 Connexion du dispositif dans une prise sur un circuit différent de celui auque...

Page 88: ... système de programmation VCR Plus 40 41 Enregistrement programmé avec le système de programmation VCR Plus 42 43 Lecture répétitive 44 Compteur de défilement de cassette 45 Recherche chronologique Recherche indexée 46 Lecture d effets spéciaux 47 Fonctions de commande automatique 48 Fonctions additionnelles de magnétoscope Son de télévision multi audio 49 50 Stéréo haute fidélité 51 Fonctions de ...

Page 89: ...e DVD dispose d un menu accédez au menu de disque DVD en appuyant sur DVD puis sur le bouton DISC VCR MENU de la télécommande Des détails supplémentaires se trouvent à la page 52 Menu de réglage du lecteur DVD Certaines instructions expliquent comment utiliser le menu de réglage du lecteur DVD pour effectuer la configuration des fonctions du lecteur DVD ou d un DVD Accédez au menu du lecteur DVD e...

Page 90: ...e enregistrés dans le système NTSC Il est impossible de faire la lecture de DVD enregistrés dans d autres formats Le système de couleur du DVD apparaît quelquefois sur le DVD ou sur son coffret Vidéocassettes lisibles Le magnétoscope de ce lecteur DVD magnétoscope est doté d un système Haute Qualité HQ et est compatible avec le matériel VHS actuel N utilisez que des vidéocassettes dotées de cette ...

Page 91: ...io Si vous n utilisez que cette connex ion audio seule l audio du lecteur DVD sera disponible pas celle du magnétoscope Plus de détails en page 15 Si la connexion audio numérique n est pas possible connectez les prises AUDIO OUT rouge et blanc du lecteur DVD magnétoscope aux prises Audio In de votre chaîne stéréophonique ou téléviseur Cette connexion fournit l audio pour le lecteur DVD ainsi que l...

Page 92: ...anal 4 Pour ce faire appuyez sur le bouton VCR pour mettre le lecteur DVD magnétoscope en mode VCR Le voyant vert de magnétoscope se trouve sur le devant du lecteur DVD magnétoscope Insérez une vidéocassette et appuyez sur PLAY B pour commencer la lecture Lors de la lecture appuyez et maintenez enfoncé le bouton PLAY B Magnétoscope sur le devant du lecteur DVD magnétoscope entre trois et cinq seco...

Page 93: ...cture de la cassette Consultez l étape 4 à la page 8 pour de plus amples détails 4 Sélectionnez le canal que vous voulez regarder enregistrer à partir du boîtier du service du câble système RDS Il est impossible de visionner un canal autre que celui que vous enregistrez Il n est possible d effectuer un enregistrement programmé que pour un canal à la fois Syntonisez votre boîtier du service du câbl...

Page 94: ...agnétoscope Le voyant vert du magnétoscope apparaît sur le devant du lecteur DVD magnétoscope 3 Appuyez sur le bouton VCR TV de la télécommande pour sélectionner la position VCR 4 Appuyez sur SKIP 3 CHo ou SKIPw3 CHp pour sélectionner le canal que vous voulez enregistrer sur le lecteur DVD magnétoscope Appuyez sur RECORD pour faire démarrer l enregistrement 5 Appuyez une fois sur le bouton VCR TV ...

Page 95: ...ne fourni à la prise DVD VCR VIDEO OUT du lecteur DVD magnétoscope et à la prise VIDEO IN du téléviseur La prise VIDEO IN du téléviseur est généralement jaune et peut être étiquetée CVBS Composite ou Bande de base 4 Branchez les cordons d alimentation du téléviseur et du lecteur DVD magnétoscope dans une prise d alimentation Allumez le téléviseur et réglez le au canal Audio Video In approprié Pass...

Page 96: ...dez le téléviseur aux prises Component Video Output du lecteur DVD et assurez vous que le bouton de lecture INTERLACE PROGRESSIVE est réglé à P PROGRESSIF 4 Branchez les cordons d alimentation du lecteur DVD magnétoscope et du téléviseur dans une prise d alimentation Allumez le téléviseur et réglez le au canal Component Video In pour les fonctionnalités du lecteur DVD Si vous utilisez le câble coa...

Page 97: ...éviseur et du lecteur DVD magnéto scope dans une prise d alimentation Allumez le téléviseur et réglez le au canal d entrée S Vidéo pour les fonctions du lecteur DVD Si vous utilisez le câble coaxial RF pour la lecture du magnétoscope choisissez le canal 3 ou 4 à partir du téléviseur Si vous utilisez le câble vidéo jaune pour la lecture du magnétoscope choisissez le canal Video In à partir de votre...

Page 98: ...alimentation du lecteur DVD magnétoscope du téléviseur et de la chaîne stéréophonique dans une prise de courant Allumez le téléviseur et réglez le au canal Video In Ou passez au canal de télévision le plus bas 02 ou 03 puis continuez à changer les canaux vers le bas jusqu à ce que la lecture en provenance du magnétoscope ou du lecteur DVD soit affichée à l écran du téléviseur Pour vous aider à tro...

Page 99: ...dons d alimentation de la chaîne stéréophonique du téléviseur et du lecteur DVD magnétoscope Allumez la chaîne stéréophonique et sélectionnez son canal Auxiliary IN Allumez le téléviseur et réglez le au canal Video In approprié Passez au canal de télévision le plus bas 01 ou 02 puis changez les canaux vers le bas jusqu à ce que la lecture en provenance du magnétoscope ou du lecteur DVD soit affich...

Page 100: ...tériaux qui peuvent être recyclés et réutilisés Des entreprises spécialisées peuvent recycler votre produit en vue de concentrer les matériaux réutilisables et de minimiser la quantité de matériel à mettre au rebut Les piles utilisées dans votre produit ne doivent pas être simplement jetées lorsqu elles sont épuisées mais mises au rebut comme déchets chimiques dans un centre de recyclage Veuillez ...

Page 101: ...B de nouveau Effectuez la procédure de nouveau si le courant est coupé Pour interrompre le réglage des canaux lorsque RÉGLAGE AUTO clig note appuyez sur DISC VCR MENU Astuces Avant d allumer votre lecteur DVD magnétoscope assurez vous que les piles sont dans la télécommande et que le lecteur DVD magnétoscope et le téléviseur sont raccordés correctement Il est impossible de programmer des canaux si...

Page 102: ...agnétoscope Le voyant du magnétoscope est allumé à l avant du lecteur DVD magnétoscope Si la languette de protection de la cassette a été enlevée la lecture commence automatiquement Si le voyant d alimentation DVD VCR est déjà allumé appuyez sur VCR pour mettre le lecteur DVD magnétoscope au mode Magnétoscope au besoin Le voyant vert du magnétoscope s allume sur le devant du lecteur DVD magnétosco...

Page 103: ...uton POWER pour allumer le lecteur DVD magnétoscope 2 Appuyez sur DVD pour allumer le voyant rouge du lecteur DVD sur le devant du lecteur DVD magnéto scope 3 Appuyez sur OPEN CLOSE OUVRIR FERMER A à la droite du tiroir du disque sur le devant du lecteur DVD magnétoscope pour ouvrir le tiroir du disque 4 Placez un disque dans le tiroir Si le DVD est enregistré sur un côté seulement placez le disqu...

Page 104: ... du tiroir du disque si le tiroir était vide en présence d une erreur de lecture ou si un disque non conforme est utilisé Le tiroir est en cours d ouverture ou est ouvert Le tiroir est en cours de fermeture Le disque est en cours de chargement Messages d affichage REPEAT Répétition Affiché lors de la lecture répétée d un disque ainsi que A B TITLE TITRE CHP CHAPITRE ou TRK PISTE selon le type de r...

Page 105: ...D TIMER RECORD RECORD PLAY VIDEO AUDIO IR RECORD TIMER RECORD RECORD PLAY VIDEO AUDIO Voyant du magnétoscope vert Ce voyant s allume lorsque le lecteur DVD magnétoscope est en mode VCR Il n est possible de visionner des vidéocassettes ou d accéder aux fonctions du magnétoscope et aux canaux de télévision que lorsque le voyant VCR vert est allumé Pour allumer le voyant vert du magnétoscope appuyez ...

Page 106: ... détails en page 34 Capteur à distance IR Infrarouge Reçoit un signal de votre télécommande vous permettant de faire fonctionner votre lecteur DVD magnétoscope à distance Dirigez la télécommande vers le capteur IR du lecteur DVD magnétoscope et non pas vers le téléviseur Bouton STANDBY ON y y Appuyez sur ce bouton pour mettre l appareil hors tension et sous tension Prises d entrée AUDIO et VIDÉO C...

Page 107: ...5 Prise ANT IN entrée d antenne Connectez votre signal d antenne ou du service du câble ici Plus de détails aux pages 8 15 Prise ANT OUT Sortie d antenne Utilisez le câble coaxial RF fourni pour connecter cette prise à la prise ANTENNA IN de votre téléviseur boîtier du service du câble ou système RDS Plus de détails aux pages 8 10 Prise VCR VIDEO IN Entrée vidéo magnétoscope jaune Raccordez un câb...

Page 108: ...A B Appuyez sur ce bouton pour régler la fonction A B Repeat Plus de détails en page 57 Boutons SKIP 3 CHo et SKIPw3 3 CHp En mode DVD appuyez sur ces boutons pour sauter des chapitres ou des pistes En mode VCR appuyez sur ces boutons pour changer les canaux de télévision à partir du lecteur DVD magnétoscope Bouton RECORD I ENREGISTRER Appuyez sur ce bouton pour commencer un enregistrement par mag...

Page 109: ...fichier JPEG Plus de détails en page 63 STANDBY ON PLAY VCR TV VCR DVD OK MENU MENU SYSTEM RETURN TITLE A B CLEAR RESET SLOW SUBTITLE ZOOM ANGLE REPEAT REPEAT AUDIO SEARCH MODE DISPLAY SKIP CH DISC VCR PAUSE STOP VCR Plus RECORD TIMER SET SPEED 1 2 3 7 6 5 4 8 9 0 10 Bouton MODE Appuyez sur ce bouton pour régler un programme Plus de détails en page 64 Appuyez sur ce bouton pour faire une lecture a...

Page 110: ... se met à clignoter pendant que le lecteur DVD magnétoscope effectue le réglage des canaux disponibles Lorsque le réglage est terminé le canal le plus bas disponible est affiché à l écran du téléviseur Lorsque vous appuyez sur SKIP 3 CHo ou SKIPw3 CHp vous ne faites défiler que les canaux disponibles Vous pouvez quand même sélectionner n importe quel canal à l aide des touches numérotées STANDBY O...

Page 111: ...Le canal que vous avez ajouté ou supprimé sera le canal en cours Les canaux ajoutés sont disponibles lorsque vous faites défiler les canaux à l aide des boutons SKIP 3 CHo et SKIPw3 CHp Vous pouvez toujours sélectionner les canaux supprimés à l aide des touches 4 Appuyez sur o ou p jusqu à ce que le numéro de canal que vous voulez ajouter ou supprimer apparaisse à l écran STANDBY ON PLAY VCR TV VC...

Page 112: ...araisse Appuyez sur B Le jour de la semaine est affiché automatiquement Si l horloge n a jamais été réglée le menu RÉGLAGE HORLOGE peut être affiché lorsque vous appuyez sur DISC VCR MENU Si c est le cas suivez les instructions de l étape 3 ci dessus Appuyez sur DISPLAY jusqu à ce que l heure apparaisse à l écran du téléviseur Les pannes d électricité de plus de 30 secondes peuvent effacer ces rég...

Page 113: ... les informations que vous voulez modifier à l aide de B ou s Lorsque l information clignote utilisez o ou p pour entrer les informations appropriées Appuyez sur CLEAR RESET pour régler l horloge Astuce STANDBY ON PLAY VCR TV VCR DVD OK MENU MENU SYSTEM RETURN TITLE A B CLEAR RESET SLOW SUBTITLE ZOOM ANGLE REPEAT REPEAT AUDIO SEARCH MODE DISPLAY SKIP CH DISC VCR PAUSE STOP VCR Plus RECORD TIMER SE...

Page 114: ...puyez sur p pour choisir SÉLECTION LANGUE ou SELEC IDIOMA puis appuyez sur B 3 Appuyez sur o ou p pour sélectionner ENGLISH 4 Appuyez sur CLEAR RESET Astuce STANDBY ON PLAY VCR TV VCR DVD OK MENU MENU SYSTEM RETURN TITLE A B CLEAR RESET SLOW SUBTITLE ZOOM ANGLE REPEAT REPEAT AUDIO SEARCH MODE DISPLAY SKIP CH DISC VCR PAUSE STOP VCR Plus RECORD TIMER SET SPEED 1 2 3 7 6 5 4 8 9 0 10 2 3 4 1 SELECTI...

Page 115: ...dez la télévision le numéro de canal et la disponibilité de STEREO ou SAP est également affichée L heure est également affichée sur le devant du lecteur DVD magnétoscope 3 Appuyez sur DISPLAY de nouveau pour supprimer tous les écrans Si le canal que vous avez sélectionné n est pas en cours de transmission l écran est entièrement bleu Il est impossible d accéder à un écran d état lors de l affichag...

Page 116: ...r Pour reprendre l enregistrement appuyez sur RECORD I ou sur PAUSE k de nouveau Le voyant RECORD rouge s allume de nouveau 7 Pour interrompre l enregistrement appuyez sur STOP C Prévention contre l enregistrement Toute cassette vidéo dispose d une languette de sécurité afin d assurer que l enregistrement ne soit pas effacé par accident 1 Pour empêcher d enregistrer enlevez la languette à l aide d...

Page 117: ...cours Plus de détails en page 32 2 Appuyez sur VCR TV une fois pour mettre le lecteur DVD magnétoscope en position TV 3 Utilisez la télécommande du téléviseur pour sélectionner le canal que vous voulez regarder sur le téléviseur 4 Pour retourner au canal en cours d enregistrement utilisez la télécommande du téléviseur pour sélectionner le canal 03 ou 04 à partir du téléviseur Plus de détails en pa...

Page 118: ...télévision Lorsque l enregistrement immédiat est terminé le lecteur DVD magnétoscope bascule vers le mode DVD ou se met hors tension S il passe au mode DVD appuyez sur POWER y pour le mettre hors tension Suivant un enregistrement immédiat le voyant RECORD TIMER se met à clignoter parce que le magnétoscope est toujours en attente d un enregistrement programmé Appuyez sur le bouton TIMER SET de la t...

Page 119: ... IN ANT OUT AUDIO OUT VIDEO OUT AUDIO IN VIDEO IN L R L R DVD VCR VCR ANT IN ANT OUT Lecteur DVD Magnétoscope 1 Dispositif de lecture Dispositif d enregistrement du lecteur DVD magnétoscope 2 1 Câbles audio en provenance des prises AUDIO OUT rouge et blanche du lecteur DVD magnétoscope 1 aux prises AUDIO IN du lecteur DVD Magnétoscope 2 2 Câble vidéo de la prise VIDEO OUT jaune du lecteur DVD magn...

Page 120: ...ettent à clignoter 3 Appuyez sur o ou p pour sélectionner un programme vide Ensuite appuyez sur B 4 Appuyez sur o ou p pour sélectionner UNIQUE QUOT IDIEN ou HEBDO Ensuite appuyez sur B NORMAL Le magnétoscope enregistre un programme de télévision le jour de votre choix pour les 12 prochains mois QUOTIDIEN Le magnétoscope enregistre un programme de télévision à la même heure sur le même canal tous ...

Page 121: ...procédure à l étape 6 pour régler l heure de fin de l enregistrement 8 Appuyez sur o ou p jusqu à ce que le numéro de canal apparaisse Ensuite appuyez sur B Si vous utilisez une connexion d antenne standard du service du câble tel qu indiqué à la page huit sélectionnez le canal de télévision que vous voulez enregistrer Si vous voulez enregistrer à partir d un autre dispositif sélectionnez L1 ou L2...

Page 122: ...uyer sur TIMER SET pour annuler l enregistrement programmé temporairement Vous pouvez ensuite utiliser les fonctions du magnétoscope de nouveau Si vous enregistrez à partir d un autre appareil réglez CHAÎNE à L1 ou L2 Si vous avez connecté l autre dispositif aux prises AUDIO et VIDEO In sur le devant du lecteur DVD magnétoscope sélectionnez L2 Si vous avez raccordé les câbles audio et vidéo aux pr...

Page 123: ...ls sur la vitesse des cassettes en page 76 3 Appuyez sur RECORD I pour commencer l enregistrement Le voyant RECORD rouge est allumé sur le devant du lecteur DVD magnétoscope 4 Appuyez sur DVD Appuyez sur PLAY Bpour faire jouer le disque 5 Pour interrompre l enregistrement appuyez sur VCR puis sur PAUSE k une fois Le voyant RECORD rouge se met à clignoter Pour reprendre l enregistrement appuyez sur...

Page 124: ...r les cases vous devrez vous procurer 1 une liste des canaux du service du câble s il y a lieu vous pouvez en obtenir une auprès de votre service du câble et 2 un tableau énumérant les numéros de canaux VCR Plus canaux de Guide que vous trouverez dans votre guide de télévision ou votre journal local REMARQUE si vous utilisez un boîtier du service du câble système RDS le canal utilisateur doit être...

Page 125: ...étoscope en effectuant les étapes 3 7 3 Appuyez sur VCR puis sur DISC VCR MENU jusqu à ce que MENU 2 soit affiché 4 Appuyez sur o ou p pour sélectionner RÉGLAGE DE CANAL GUIDE puis appuyez sur B 5 Appuyez sur les touches numérotées o ou p jusqu à ce que le numéro de canal de guide de votre choix soit affiché Ensuite appuyez sur B 6 Appuyez sur les touches numérotées o ou p jusqu à ce que le numéro...

Page 126: ...enregistrement NORMAL QUOTIDIEN ou HEBDO MADAIRE Ensuite appuyez sur B NORMAL Le magnétoscope peut enregistrer une émission de télévision n importe quel jour de la semaine pour les douze prochains mois QUOTIDIEN Le magnétoscope peut enregistrer le même canal tous les jours du lundi au vendredi en commençant à la même heure et en enregistrant pour la même période de temps HEBDOMADAIRE Le magnétosco...

Page 127: ... éteindre Vous pouvez utiliser le lecteur DVD lors d un enregistrement programmé Si vous voulez utiliser le magnétoscope jusqu au moment de l enregistrement n appuyez sur TIMER SET que quelques minutes avant que ne commence l enregistrement Ou appuyez sur TIMER SET seulement lorsque vous savez que vous n utiliserez plus le magnétoscope jusqu après l enregistrement Lorsque le voyant RECORD TIMER es...

Page 128: ... de télévision sont affichés à l écran pendant le rembobinage de la cassette Pour annuler RÉPÉTITION AUTOMATIQUE effectuez la procédure suivante 1 2 À l étape 3 appuyez sur B de façon à ce que A ARRÊT soit affiché à côté de REP AUTO Appuyez sur CLEAR RESET Astuce STANDBY ON PLAY VCR TV VCR DVD OK MENU MENU SYSTEM RETURN TITLE A B CLEAR RESET SLOW SUBTITLE ZOOM ANGLE REPEAT REPEAT AUDIO SEARCH MODE...

Page 129: ...ous référer plus tard Appuyez sur STOP C pour interrompre la cassette 2 Appuyez sur DISPLAY pour afficher l écran d état 3 Avec le compteur à l écran appuyez sur CLEAR RESET pour réinitialiser le compteur à zéro 4 Lorsque vous voulez retourner à cet endroit de la cassette appuyez sur DISPLAY pour afficher le compteur alors que la lecture de cassette est interrompue Appuyez sur hou g Alors que la c...

Page 130: ...t placé automatiquement au commencement de chaque enregistrement Essentiellement un repère est un signet Trouvez le point de départ d un enregistrement en effectuant la procédure suivante 1 Appuyez sur VCR puis sur SEARCH jusqu à ce que RECHERCHE INDEX apparaisse à l écran 2 Dans les 30 secondes appuyez sur o ou p jusqu à ce que le nombre de programmes que vous voulez sauter apparaisse en dessous ...

Page 131: ... sur PAUSE k à plusieurs reprises 3 Pour libérer l image fixe et reprendre la lecture appuyez sur PLAY B Affichage d une image au ralenti 1 Pendant la lecture de la bande appuyez sur SLOW La lecture de la cassette s effectue au ralenti 2 Pour reprendre la lecture normale appuyez sur PLAY B Les modes Ralenti et Fixe sont interrompus automatiquement après cinq minutes pour éviter d endom mager le le...

Page 132: ...e avec le lecteur DVD magnétoscope sous tension ou hors tension mais le lecteur DVD magnétoscope doit être branché Si un enregistrement programmé est réglé et que le voyant RECORD TIMER est allumé STOP EJECT A allume le lecteur DVD magnéto scope et ou annule l enregistrement programmé Le voyant RECORD TIMER s éteint Appuyez sur STOP EJECT A de nouveau pour enlever la cassette N oubliez pas d insér...

Page 133: ...e vous faites la lecture de cette cassette sur le lecteur DVD magnétoscope celle ci est effectuée en stéréophonie ou en deuxième voie sonore Lisez les instructions sur cette page pour vous famil iariser avec les réglages de la stéréophonie et de la deuxième voie sonore Effectuez ensuite la procédure à la page 50 pour enregistrer en stéréo ou en deuxième voie sonore ou effectuez la procédure à la p...

Page 134: ...deuxième voie sonore Si SAP est à MARCHE mais que le programme n est pas diffusé en deuxième voie sonore vous entendrez et enregistrerez le programme en audio ordinaire Astuces Pour régler le lecteur DVD magnétoscope afin de recevoir les programmes en stéréophonie ou deuxième voie sonore effectuez la procédure suivante 1 Appuyez sur VCR puis sur DISC VCR MENU STANDBY ON PLAY VCR TV VCR DVD OK MENU...

Page 135: ...té Vous pouvez passer à MONO si vous voulez une lecture en monophonie Effectuez les étapes 1 2 puis appuyez sur o ou p pour sélectionner MONO Appuyez sur DISC VCR MENU HIFI disparaît de l écran d état Si vous faîtes la lecture de cassettes non haute fidélité alors que SORTIE AUDIO est réglé à HIFI HIFI n est pas affiché à l écran d état La lecture de la cassette s effectue en monophonie Veuillez c...

Page 136: ...nne pas avec tous les DVD Astuces 52 Menus de disque DVD Les disques DVD contiennent des menus décrivant leur contenu ou vous permettant d en personnaliser la lecture Par exemple le menu peut présenter des choix de langue de sous titres de fonctions spéciales ou de sélection de scène Pour utiliser le menu de disque DVD et sélectionner des fonctions de lecture effectuez la procédure suivante 1 Appu...

Page 137: ...ant rapide Le son est mis en sourdine lors d une recherche Lors de la lecture d un CD audio vous pouvez effectuer une recherche arrière ou avant à seulement 16 fois la vitesse normale de lecture Les valeurs h 16 ou g 16 apparaissent brièvement à l écran du téléviseur L audio est intermittent lors de la recherche d un CD audio Lors de la lecture d un fichier MP3 vous pouvez effectuer une recherche ...

Page 138: ...z l heure en heures minutes et secondes La lecture commencera dans quelques secondes à l heure spécifiée Exemple 1 heure 23 minutes et 30 secondes 1 2 3 3 0 Assurez vous que le temps que vous entrez se situe à l intérieur du temps total du titre ou de la piste en cours Dans le cas contraire l espace de temps est effacé et la lecture continue à partir du point en cours Le temps total disponible de ...

Page 139: ...yez sur SEARCH pour afficher l écran de recherche de piste TR Dans les 30 secondes appuyez sur les touches numérotées pour sélectionner le numéro de piste La lecture commence à la piste sélectionnée Pour une piste à un seul chiffre 1 9 entrez d abord un zéro Par exemple pour lire la piste 5 appuyez sur 0 5 Aucun besoin d utiliser la touche 10 dans le mode de recherche C À l aide des touches SKIPw3...

Page 140: ...r commencer la lecture du disque depuis le début Appuyez sur PLAY pour commencer partir d ici Pour commencer depuis le d but appuyez d abord sur STOP puis sur PLAY REPRISE EN COURS Lecture en pause et en pas à pas 1 Appuyez sur DVD 2 Lors de la lecture d un DVD ou d un CD audio appuyez sur PAUSE k La lecture est suspendue et le son est mis en sourdine 3 Pendant la lecture d un DVD appuyez sur PAUS...

Page 141: ... section d un DVD ou CD audio à plusieurs reprises 1 Appuyez sur DVD 2 Appuyez sur PLAY B pour faire la lecture du disque au point où vous voulez reprendre la lecture de nouveau 3 Appuyez sur REPEAT A B pour régler le point de départ A A est affiché à l écran du téléviseur 4 Faites la lecture ou faites avancer rapidement le disque au point où vous voulez que la répétition de lecture se termine pui...

Page 142: ... de lecture écoulé DVD ou le numéro de piste et son temps de lecture écoulé CD audio sont affichés à l écran 4 Pour retrouver le marqueur plus tard appuyez sur SEARCH jusqu à ce que vous voyiez les marqueurs Appuyez sur s ou B pour sélectionner le marqueur de votre choix puis appuyez sur OK La lecture du disque continue à partir du point marqué L ouverture du tiroir du disque ou la mise hors tensi...

Page 143: ...les 6 Après quelques secondes les sous titres sont affichés Ou appuyez sur SUBTITLE pour désactiver les sous titres STANDBY ON PLAY VCR TV VCR DVD OK MENU MENU SYSTEM RETURN TITLE A B CLEAR RESET SLOW SUBTITLE ZOOM ANGLE REPEAT REPEAT AUDIO SEARCH MODE DISPLAY SKIP CH DISC VCR PAUSE STOP Angles de caméra Certains DVD contiennent des scènes enregistrées sous des angles différents L angle de caméra ...

Page 144: ... 5 Appuyez sur p pour sélectionner CHANGEMENT puis appuyez sur OK 6 Appuyez sur les touches numérotées pour entrer un mot de passe de quatre chiffres Les chiffres du mot de passe apparaissent à l écran Prenez ce mot de passe en note afin de ne pas l oublier Appuyez sur OK Le menu précédent est affiché de nouveau 7 Appuyez sur SYSTEM MENU pour supprimer le menu CONF RAP MENU DU LECTEUR ENGLISH ASPE...

Page 145: ...d un DVD dont le classement dépasse le niveau réglé un message est affiché à l écran indiquant qu il n est pas possible de faire la lecture du DVD Enlevez le DVD puis réglez NIVEAU PARENTAL à TOUT Réinsérez le DVD puis recommencez la lecture Certains DVD vous demandent d entrer votre mot de passe de quatre chiffres avant de commencer la lecture Suivez les messages à l écran Il n est pas possible d...

Page 146: ...ation Il est impossible de régler le mode de son stéréo lorsque Virtual Surround est activé Plus de détails en page 74 Astuces Mode de son stéréo Si vous avez raccordé le lecteur DVD magnétoscope à une chaîne stéréophonique ou à un téléviseur à l aide de la prise COAXIAL DIGITAL AUDIO OUT tel que décrit à la page 15 il n est pas possible d effectuer le réglage du mode de son stéréo Dans le cas con...

Page 147: ...ou x4 est affiché à côté de l icône de zoom à l écran du téléviseur 2 Lorsque l image est agrandie appuyez sur o p s ou B pour faire déplacer l image agrandie vers le haut le bas la droite ou la gauche La boîte grise dotée d une boîte bleue à l intérieur et qui est affichée lors d une lecture avec zoom est un guide de position Pour la supprimer ou l afficher appuyez sur OK La position de la boîte ...

Page 148: ...T T T T T T T T Vous ne pouvez pas utiliser les touches numérotées ou SEARCH pour sélectionner une autre piste lorsque vous effectuez la lecture d un programme Utilisez les boutons SKIPw3 CHp ou SKIP CHo pour sélectionner d autres pistes dans le programme Il est impossible de combiner une lecture aléatoire et une lecture programmée Vous pouvez faire jouer un programme ou une piste à l intérieur d ...

Page 149: ...mpue appuyez deux fois sur MODE pour afficher l écran ALÉATOIRE 3 Avec l écran ALÉATOIRE affiché appuyez sur PLAY B La lecture des pistes s effectue dans l ordre aléatoire Lorsque les pistes ont été lues une fois la lecture s arrête ALÉATOIRE PROGRAMME ALÉATOIRE PAS D INDICATION CD SON STANDBY ON PLAY VCR TV VCR DVD OK MENU MENU SYSTEM RETURN TITLE A B CLEAR RESET SLOW SUBTITLE ZOOM ANGLE REPEAT R...

Page 150: ... des pistes fichiers s effectue dans l ordre où vous les avez programmés c est à dire 1 2 3 Si vous sélectionnez un dossier et que vous appuyez sur OK les pistes ou fichiers de ce dossier sont affichés Appuyez sur K ou L pour sélectionner le fichier ou la piste de votre choix puis appuyez sur PLAY B ou OK Choisissez PREMIER TITRE pour commencer la lecture à partir du premier fichier ou piste indiv...

Page 151: ... piste en cours sont affichés dans la partie supérieure de l écran Ou ce qui suit peut être affiché pour indiquer une lecture répétitive TRACK PISTE La lecture de la piste en cours sera effectuée à plusieurs reprises GROUP GROUPE La lecture des pistes du dossier en cours sera effectuée à plusieurs reprises ALL TOUTES La lecture de toutes les pistes sera effectuée à plusieurs reprises 3 Appuyez sur...

Page 152: ...F OK 4 Appuyez sur s ou B pour sélectionner affichage puis appuyez sur OK CONF RAP MENU DU LECTEUR ENGLISH ASPECTTV 4 3 BOÎTE AUX LETTRES DOLBY DIGITAL EF OK 3 Appuyez sur B pour sélectionner CUSTOM dans le haut du menu puis appuyez sur OK LANGUE SON ORIGINAL SOUS TITRE HF MENU DU DISQUE ENGLISH MENU DU LECTEUR ENGLISH OK STANDBY ON PLAY VCR TV VCR DVD OK MENU MENU SYSTEM RETURN TITLE A B CLEAR RE...

Page 153: ...box ou format extra large Sélectionnez 4 3 PANORAMIQUE pour une image pleine hauteur avec les deux côtés coupés Certaines sociétés parlent de formatage pour l ajuster l image à l écran du téléviseur ou de format normal Choisissez 16 9 LARGE si un téléviseur grand écran est raccordé au lecteur DVD magnétoscope Si vous sélectionnez ICÔNE D ANGLE appuyez sur OK à plusieurs reprises pour mettre ICÔNE ...

Page 154: ...ez sur B pour sélectionner CUSTOM dans le haut du menu puis appuyez sur OK SON ORIGINAL SOUS TITRE HF MENU DU DISQUE ENGLISH MENU DU LECTEUR ENGLISH LANGUE Si les paramètres par défaut de l audio et des sous titres du DVD sont dans la même langue les sous titres peuvent ne pas être affichés à moins que vous ne les activiez Utilisez les boutons AUDIO et SUBTITLE pour sélectionner l audio et les sou...

Page 155: ...nois 7254 Corse 4961 Croate 5464 Tchèque 4965 Danois 5047 Hollandais 6058 Anglais 5160 Espéranto 5161 Estonien 5166 F H Féringien 5261 Fidji 5256 Finlandais 5255 Français 5264 Frison 5271 Gaélique Écosse 5350 Galicien 5358 Géorgien 5747 Allemand 5051 Grec 5158 Groenlandais 5758 Guarani 5360 Goujrati 5367 Haoussa 5447 Hébreu 5569 Hindi 5455 Hongrois 5467 I K Islandais 5565 Indonésien 5560 Interling...

Page 156: ...onnez HF Si vous sélectionnez SOUS ÉCHANTILLON appuyez sur OK à plusieurs reprises pour sélectionner EF ou HF Sélectionnez EF pour régler le sous échantillonnage à 48 kHz Sélectionnez HF pour régler le sous échantillonnage à 96 5 Appuyez sur SYSTEM MENU pour supprimer le menu STANDBY ON PLAY VCR TV VCR DVD OK MENU MENU SYSTEM RETURN TITLE A B CLEAR RESET SLOW SUBTITLE ZOOM ANGLE REPEAT REPEAT AUDI...

Page 157: ... du CD audio en cours Temps de lecture restant du CD audio en cours T Paramètre de répétition en cours si activé T répétition de piste A répétition de toutes les pistes A B répétition A B CH 7 49 0 01 46 0 03 27 CH Chapitre numéro du chapitre en cours nombre total de chapitres Temps de lecture écoulé du chapitre en cours temps de lecture restant du chapitre en cours STANDBY ON PLAY VCR TV VCR DVD ...

Page 158: ...nregistrés en Dolby Digital ou en PCM Pulse Code Modulation Regardez sur le coffret du disque pour plus de détails sur la disponibilité de ces fonctions 1 Appuyez sur DVD 2 Lors de la lecture du disque appuyez sur MODE pour afficher l icône Virtual Surround dans le coin supérieur gauche de l écran du téléviseur 3 Lorsque l icône Virtual Surround est affichée à l écran appuyez sur OK pour sélection...

Page 159: ...es disques Toujours ranger le disque dans son coffret de protection lorsqu il n est pas utilisé Vérification du laser Si le lecteur DVD magnétoscope ne fonctionne pas comme il est décrit dans ce guide il est possible que le laser du lecteur DVD soit sale Communiquez avec un centre de service autorisé pour une inspection et un nettoyage du laser Soins des cassettes vidéo N utilisez que des cassette...

Page 160: ... lecteur DVD magnétoscope sélectionnez L2 Si vous utilisez les prises AUDIO et VIDEO IN à l arrière du lecteur DVD magnétoscope sélectionnez L1 Si vous passez au mode Entrée de ligne par erreur appuyez sur SKIP3w CHp ou SKIP CHo ou sur les touches numérotées pour sélectionner un autre canal OTR ou Enregistrement immédiat de l anglais One touch recording un enregistrement pro grammé sur magnétoscop...

Page 161: ...on Technology Industries Association Gamme dynamique DVD son linéaire 102 dB CD audio 99 dB JEITIA Facteur de distorsion total CD audio 0 003 JEITIA DVD 0 0025 Pleurage et scintillement Inférieurs aux limites de mesure 0 001 W CRÊTE JEITIA Puissance nécessaire 120V CA 10 60 Hz 0 5 Consommation de puissance Sous tension 24 W Hors tension 7 0 W Température d exploitation 41 F 5 C à 104 F 40 C Humidi...

Page 162: ...Pour utiliser les fonctions de magnétoscope appuyez sur VCR puis essayez les autres boutons de fonction de magnétoscope Appuyez sur VCR pour allumer le voyant VCR vert sur le devant du lecteur DVD magnétoscope Ceci indique que le lecteur DVD magnétoscope est en mode VCR Il n y a pas d image en mode DVD Assurez vous que le câble vidéo est connecté de la façon appropriée Vous pouvez connecter le câb...

Page 163: ...istré avec des angles de caméra différents Se référer au coffret du disque ou au menu de disque DVD pour vérifier si ces angles multiples sont disponibles Plus de détails en page 59 Vous ne pouvez pas modifier la langue de l audio ou des sous titres d un DVD Le DVD ne contient pas d audio ou de sous titres dans la langue désirée Certains DVD seulement contiennent l audio ou les sous titres en lang...

Page 164: ... avant qu il ne commence 12 p m désigne midi 12 a m désigne minuit Il n y a pas d image ou il y a du bruit ou des lignes dans l image lors de la lecture de la cassette vidéo Placez le lecteur DVD magnétoscope en mode VCR Appuyez sur VCR ou OUTPUT pour allumer le voyant VCR vert sur le devant du lecteur DVD magnétoscope Si vous avez utilisé le câble coaxial RF fourni pour raccorder votre lecteur DV...

Page 165: ...n stéréophonique haute fidélité Lors de la lecture l audio haute fidélité peut basculer vers l audio normal lors du réglage de l alignement Lorsque vous raccordez le lecteur DVD magnétoscope à un téléviseur avec les câbles audio rouge et blanc vous n obtiendrez de la stéréophonie que si vous raccordez les prises AUDIO OUT du lecteur DVD magnétoscope aux prises AUDIO IN de votre téléviseur et si le...

Page 166: ...arantie est disponible dans tous les pays où le produit est distribué officiellement par Philips Consumer Electronics Company Dans le cas où Philips n est pas distribu teur du produit dans votre pays l organisme de service Philips local tentera d échanger le produit bien qu il y ait possibilité d un délai si le produit approprié n est pas disponible tout de suite CONSERVER DANS UN ENDROIT SÛR tout...

Page 167: ...ervice UPS assur ances et transport payés à l adresse fournie par Philips Pour de plus amples détails composez le 1 800 531 0039 Un produit de replacement vous sera envoyé via UPS dans les 48 heures jours ouvrables à partir de la réception du produit par Philips Lorsque vous devez renvoyer le produit à Philips pour l échanger vous êtes responsable des frais d expédition Philips s en gage à payer l...

Page 168: ...utre canal 33 prévention 32 programmé 36 38 enregistrement immédiat 34 enregistrement programmé annulation 38 paramètres 36 38 garantie 82 83 glossaire 76 horloge 21 28 29 icône angle 69 image fixe 47 56 ir télécapteur infrarouge 22 jpeg 66 67 langue dvd 70 71 langue magnétoscope 30 lecture de cassettes 18 lecture de disques 19 lecture en pas à pas 56 lecture mp3 66 logement de cassette 21 lp 76 m...

Reviews: