background image

12

Connections (cont’d)

MODEL NUMBER: DSX 5540

Serial No : 81476039DSX 5540C

Receiver ID No : 1234 5678 9012

Rear of VCR

Rear of DVD

COAXIAL OPTICAL

VIDEO

S-VIDEO

Y

Pb

Pr

12V

FL

SL

CENTER

FR

SR

SUBW.

LEFT OUT

RIGHT OUT

MULTI-5.1

CH3 CH4

OUT

IN

ANT

V OUT

L OUT

R OUT

CH3 CH4

OUT

IN

ANT

V IN

L IN

R IN

VIDEO

LEFT OUT

RIGHT OUT

Audio cables

Video cable

Audio
cables

Video 
cable

Video cable

Rear of DIRECTV

®

 Receiver

Output options for
VCR recording

A/V Matrix

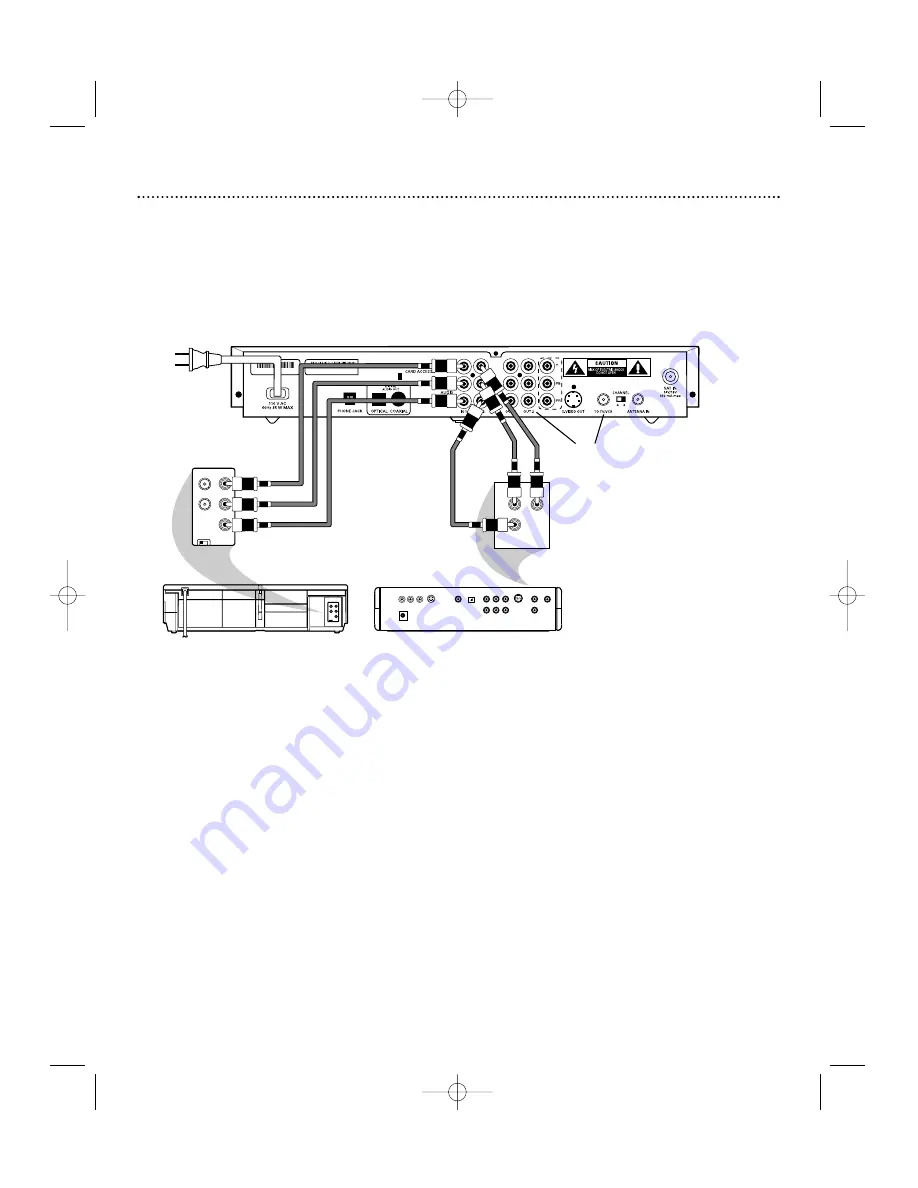
Unplug all equipment from the AC outlet before making connections. 
Does your TV have only one video or RF input but you own a VCR, DVD player or other video equipment? Philips
offers the industry’s first A/V Matrix that allows you to command and control other video devices such as a DVD player
or a VCR without additional equipment. You can use this DIRECTV® Receiver as the video gateway of your entertain-
ment center.

1. Connect the outputs of your other devices (such as a DVD player or VCR) to the corresponding VIDEO and AUDIO

LEFT/RIGHT inputs (IN1 or IN2) of the A/V Matrix on the rear of the DIRECTV Receiver.

2. To record satellite programming, connect the VIDEO and AUDIO LEFT/RIGHT outputs of OUT2 on the rear of the

DIRECTV Receiver to the corresponding video and audio inputs on the VCR. These outputs always output satellite
programming and are not affected by the A/V Matrix. Alternatively, you can connect the TO TV/VCR RF output to
the RF input on the VCR but this output will output the selected video source of the A/V Matrix when this feature is
enabled.

3. To use the A/V Matrix, you must use video output option C (VIDEO OUT1) or D (TO TV/VCR) from page 10 and

you must first enable it in the Main Menu (refer to page 28).

Note: For additional hookups and operation information, refer to the owner’s manuals for the devices you are 
connecting to the DIRECTV Receiver.

DSX5500_5540  11/13/02  12:21 PM  Page 12

Summary of Contents for DSX 5500

Page 1: ...t started If you have any problems Philips Representatives can help you get the most from your new product by explaining Hookups First Time Setup and Feature Operation Do not attempt to return this product to the store For fast help call us first 1 800 464 1131 Thank you for making Philips a part of your home 3111 176 50891 DSX5500_5540 11 13 02 12 21 PM Page 1 ...

Page 2: ...antly you can count on our uncompromising commitment to your total satisfaction All of this is our way of saying welcome and thanks for investing in a PHILIPS product Sincerely Lawrence J Blanford President and Chief Executive Officer Know these safety symbols C A U T I O N RISK OF ELECTRIC SHOCK DO NOT OPEN CAUTION TO REDUCE THE RISK OF ELECTRIC SHOCK DO NOT REMOVE COVER OR BACK NO USER SERVICEAB...

Page 3: ... to proper grounding of the mast and supporting structure grounding of the lead in wire to an antenna discharge unit size of grounding conductors location of antenna discharge unit connection to grounding electrodes and require ments for the grounding electrode See Figure A 13 Phone Line Use Avoid using a telephone other than a cordless type during an electrical storm There may be a remote risk of...

Page 4: ...product ANALOG DEVICE WARNINGS Federal Communication Commission FCC Part 68 and Administrative Council for Terminal Attachments ACTA This device complies with Part 68 of the FCC rules and the requirements adopted by the ACTA A label on the rear panel of this equipment contains among other information a product identifier in the format US AAAEQ TXXXX If requested this information must be provided t...

Page 5: ...University nor the names of its contributors may be used to endorse or promote products derived from this software without specific prior written permission THIS SOFTWARE IS PROVIDED BY THE REGENTS AND CONTRIBUTORS AS IS AND ANY EXPRESS OR IMPLIED WARRANTIES INCLUDING BUT NOT LIMITED TO THE IMPLIED WARRANTIES OF MERCHANTABILITY AND FITNESS FOR A PARTICULAR PUR POSE ARE DISCLAIMED IN NO EVENT SHALL...

Page 6: ...product by explaining Hookups First Time Setup and Feature Operation Do not attempt to return this product to the store For fast help call us first 1 800 464 1131 Thank you for making Philips a part of your home 3111 176 50891 Important Return your Warranty Registration Card within 10 days See why inside 10 16 02 1 26 PM Page 1 User Manual Power Supply Cord RF Coaxial Cable RCA Type Audio Video Co...

Page 7: ...te programming use the arrows to channel up or down Power indicator Lights when the DIRECTV Receiver is on Rear Panel MODEL NUMBER DSX 5540 Serial No 81476039DSX 5540C Receiver ID No 1234 5678 9012 Phone jack Connect the supplied phone cord here and to a wall phone jack in your home Dolby Digital outputs optical and coaxial DSX 5540 only Card Access Install Access Card here Details are on page 8 R...

Page 8: ...ch access card has a unique number Be sure to record this number in the space provided on the second page of this manual in the For Customer Use section for future reference 1 Hold the card with the arrow facing upwards and pointing toward the slot in the DIRECTV Receiver rear panel 2 Gently push the card into the slot until it meets the stop Do not use undue force when inserting The end will be v...

Page 9: ...T IN jack 2 If you have cable CATV or an off air antenna connect its RF coaxial cable to the ANTENNA IN jack 3 Using the telephone cord supplied connect one end of it to a phone jack in your home Connect the other end to the PHONE JACK input on the rear of the Receiver To enjoy uninterrupted programming and to order pay per view programs the DIRECTV Receiver must be continuously connected to a lan...

Page 10: ...V VCR DSX 5540 Only Note The TV rear jack panel shown above has jacks for all possible connections Your TV s rear jack panel may differ A For model DSX 5540 only Using a component cable not included connect the jacks on one end to the component Y green PB blue PR red jacks on the rear of the Receiver Connect the other ends to the TV s COMPONENT IN jacks Select the proper input on your TV B Using a...

Page 11: ...IO LEFT RIGHT OUT1 DSX 5540 Only A For model DSX 5540 only Using an OPTICAL cable not included connect one end to the OPTICAL DIGITAL AUDIO OUT on the Receiver to the home theater stereo receiver or TV s OPTICAL IN jack B For model DSX 5540 only Using a COAXIAL cable not included connect one end to the COAXIAL DIGITAL AUDIO OUT on the Receiver to the home theater stereo receiver or TV s COAXIAL DI...

Page 12: ...o gateway of your entertain ment center 1 Connect the outputs of your other devices such as a DVD player or VCR to the corresponding VIDEO and AUDIO LEFT RIGHT inputs IN1 or IN2 of the A V Matrix on the rear of the DIRECTV Receiver 2 To record satellite programming connect the VIDEO and AUDIO LEFT RIGHT outputs of OUT2 on the rear of the DIRECTV Receiver to the corresponding video and audio inputs...

Page 13: ... can use for Guide and channel surfing FAVORITES Allows you to select one of four cus tom lists to view or edit GUIDE Switches between the DIRECTV ADVANCED PROGRAM GUIDE and the Guide Menu OK Confirms a selection CHANNEL Displays the next or previous channel While in the guide or menu allows you to page up and down BACK While in the menu or guide returns you to the previous screen While watching T...

Page 14: ... the remote control doesn t operate your TV and if there is more than 1 code for your TV brand repeat steps 2 8 10 For future reference list the 4 digit code numbers you program into your remote TV code __ __ __ __ VCR code __ __ __ __ DVD code __ __ __ __ 11 If you cannot find a code that operates your TV If the remote still does not operate your TV follow the Automatic Search steps below Automat...

Page 15: ...ley 0081 Crown 0066 0207 Curtis Mathes 0087 0057 0043 0066 0074 0078 0081 0083 0120 0172 0181 0193 0478 0774 Daewoo 0119 0046 0478 0066 Daytron 0046 Denon 0172 Dumont 0044 0046 Dwin 0747 0801 Electroband 0027 Emerson 0263 0207 0205 0206 0490 0204 0309 0066 0046 0181 Envision 0057 Fisher 0181 Fujitsu 0206 0710 Funai 0207 0198 0206 Futuretech 0207 GE 0048 0074 0078 0205 0478 0120 0162 0309 0774 Gibr...

Page 16: ...l TV INPUT Switch through TV inputs if applicable POWER Press to turn TV on or off CH CH Change channel up or down MUTE Switches audio on and off Once programmed refer to page 14 your DIRECTV Remote Control should control certain functions of your TV Be sure to press the TV button before operating your TV TV Functions Note All features on your TV may not be supported by this remote DSX5500_5540 11...

Page 17: ...VD Press to put the remote control in DVD mode LED will blink when other buttons are pressed while in DVD mode FF VCR When tape playback is stopped press to advance the tape at high speed During tape playback press to advance the tape while the picture stays on the screen DVD Press and release to select next chapter Press and hold to scan forward PLAY Press to play a tape or disc PAUSE Press to pa...

Page 18: ...s This screen will ONLY appear the very first time your DIRECTV Receiver is turned on a Enter the ZIP code Note The ZIP code is critical to point your dish accurately refer to page 32 b Configure the dish refer to page 32 c Point the dish refer to page 32 d Test the System refer to page 33 5 After you have installed your DIRECTV System you should contact DIRECTV to order DIRECTV programming at 1 8...

Page 19: ...Audio Track The alternate audio icon indi cates an alternate audio track is available To change audio tracks press the or button on the remote Favorites page 21 status SmartSurf page 20 statue On screen Display OSD message space indicates error messages or status or song ID information when you select a channel that contains audio only Watching TV To do this Do this Display the banner Press INFO b...

Page 20: ...cally 1 Press the PPV button on the remote 2 Use the to select a time period to search in Note The full 3 5 day search takes about 10 seconds and cannot be interrupted and press OK 3 Use the to select a pay per view program and press OK View details about your selected pay per view program purchase it or display other showings of your selection SmartSurf by Category Arrow up down to scroll Press O...

Page 21: ... Favorites 1 Select Customize Favorites and press OK 2 You can manually select deselect channels by highlighting a channel and pressing OK Use the buttons to navigate through the list or use the PAGE buttons to scroll the list up or down by a complete page Select All selects all channels in the list You can then manually deselect any channel Deselect All deselects all the channels in the list You ...

Page 22: ...he total number of channels The Channel List shows the channels available Arrows indicate that the program extends beyond the time slot shown The Clock indicates that a Reminder for the program has been set for future viewing If a Reminder is set it will always dis play in the Guide cell You will get notification before the program starts so that you can tune to it The Program List shows all the p...

Page 23: ...fied of the shows you want to see In the Guide Reminders display as a clock to the right of the program title If you wish to record a program using your VCR set the VCR s timer recording also Refer to your VCR s owner s manual for timer recording instructions The DIRECTV Receiver will turn on at the correct time and tune to the channel if a Reminder is set To set a Reminder for a 1 Highlight a fut...

Page 24: ...ed mansion during the waning days of World War II Rating PG 13 All Channels 106 PPV G The Young Father 107 PPV G Young Father 108 PPV G Young Father 109 PPV G All 110 PPV G All 111 PPV All ALLDAY ALLDAY ALLDAY ALLDAY ALLDAY Go To Time Pay Per View Reminder List Time Reminder Jump to specific time slot in guide EZ Search Pay Per View see page 20 List of Reminders set see page 23 Set a Reminder by s...

Page 25: ...and accents For example enter JOHN S as JOHNS and DAY TO DAY as DAYTODAY For entering a full name enter FIRST space LAST Search for an Actor Press OK to select Arrow up down to scroll Press EXIT to cancel Guide Menu Search Title Actor Director To search for a specific title actor or director 1 Use the buttons to scroll through the alphabet Highlight the letter you want and press OK Repeat until yo...

Page 26: ...Wink Communications offers an interactive television service that lets you use your remote control to access up to the minute news sports and weather get program trivia respond to free offers and shop all while you watch TV Look for the flashing and press OK to open the interactive window To learn more about the DIRECTV INTERACTIVE services 1 Press MENU 2 Use to highlight Interactive Services and ...

Page 27: ...anguage from the list Press OK If desired repeat steps 3 4 to change the other option Note Once the language of the Menu Guide menu is changed the Receiver will reset and the new language will be used Preferences Screen Format To select a screen format 1 Press MENU 2 Press to select Preferences and press OK 3 Press to select the Screen Format and press OK 4 Use the buttons to choose from the optio...

Page 28: ...by assigning a separate ID number to each remote To change the ID number of the remote control 1 Press MENU 2 Press to select Preferences and press OK 3 Press to select Remote Control ID and press OK 4 The only option available is the alternate ID Select and press OK 5 Press and hold down the SAT and MUTE buttons on the remote until the SAT light stays on 6 To set the ID number to 1 enter 111 or t...

Page 29: ... icon in the banner indicates a locked system To lock or unlock the system 1 Choose Lock The System or Unlock The System from the Parental Controls menu 2 When the system prompts you for a password enter it using the numeric buttons on the remote control If locking the system you will need to confirm it before it takes effect If you have for gotten or lost your password contact your service provid...

Page 30: ...ontrols Replace Access Card Use this menu to replace your current card with a new one sent by your service provider Be sure to follow the on screen instruc tions For information on inserting access cards see page 8 To replace your access card 1 Press MENU 2 Use the buttons on the remote control to highlight Parental Controls Press OK 3 Choose Replace Access Card then press OK Be sure the current a...

Page 31: ...chased through the DIRECTV Receiver Note You cannot cancel a PPV purchase if you have already tuned to the program To cancel purchases 1 Press MENU 2 Choose Purchases from the main menu and press OK 3 Choose Upcoming Purchases and press OK 4 A list displays of upcoming purchases that were ordered but not viewed You can scroll through the list using the but tons or using the PAGE buttons to scroll ...

Page 32: ...play will tell you how to align your dish based on your ZIP code To point your dish 1 At the Setup menu select Point Dish and press OK 2 A signal strength meter displays Adjust the dish until the signal strength meter stabilizes at a maximum reading The range is 0 to 100 It is recommended to obtain a signal strength of at least 60 An audible tone will help with this procedure The tones or beeps ge...

Page 33: ...e or modification is sent reception may be interrupted for a minute or two Reception should return to normal after the modification is complete Your DIRECTV Receiver must be plugged in to receive an upgrade Do not unplug your DIRECTV Receiver while an upgrade is in progress Consult the System Upgrades Menu to find a schedule of upgrades or modifications planned by DIRECTV To view past or future up...

Page 34: ...ges Main Menu Caller ID Note You must have phone line connected to your Receiver and be subscribed to Caller ID service from your phone service provider When a phone call comes in a display will appear containing call information To enable or disable Caller ID 1 Press the MENU button Use the buttons to select Caller ID and press OK 2 Use the buttons to select Enable Disable and press OK 3 Use the ...

Page 35: ... SAT button on the remote 5 If remote control ID was changed so the DIRECTV Receiver and the remote no longer com municate change the ID number back to the previous ID number see page 28 1 Cannot order a It may be too late to purchase the program Check for other show times b Check phone cord connection on rear panel of the DIRECTV Receiver and at the wall jack Keep phone cord connected 2 Cannot ca...

Page 36: ...utside the unit a product that requires modification or adaptation to enable it to operate in any country other than the country for which it was designed manufactured approved and or authorized or repair of products damaged by these modifications a product used for commercial or institutional purposes DIRECTV service is separate and distinct from this product hardware warranty WHERE IS EXCHANGE A...

Reviews: