background image

13

English

EN

Switch DS9100W to Assisted Wi-Fi 

Setup mode

• 

After successful boot-up (see 'Turn 

DS9100W on' on page 8), press and hold 

 on the front panel of the unit.


»

The   indicator blinks white and 

yellow alternately.


»

A new Wi-Fi network of DS9100W 

itself is created, with the network name 

(SSID) of 

Philips_Install XXXXXX

.


»

It takes about 45 seconds for successful 

creation of this new Wi-Fi network.

Note


After you finish manual Wi-Fi setting for DS9100W, this 

new Wi-Fi network disappears.


If you fail to enter Assisted Wi-Fi Setup mode, power 

off DS9100W and power on it, then try again after 

successful boot-up.


Make sure that there are no other Philips AirPlay-

enabled devices in Assisted Wi-Fi Setup mode at the 

same time. Multiple new Wi-Fi networks created this 

way may interfere with each other.

Connect your Wi-Fi enabled device to 

the newly created Wi-Fi network

The new Wi-Fi network created by 

DS9100W only allows access of one Wi-

Fi enabled device. To avoid interference 

from any other Wi-Fi devices, you are 

recommended to temporarily disable the 

Wi-Fi function on your other Wi-Fi devices.
 

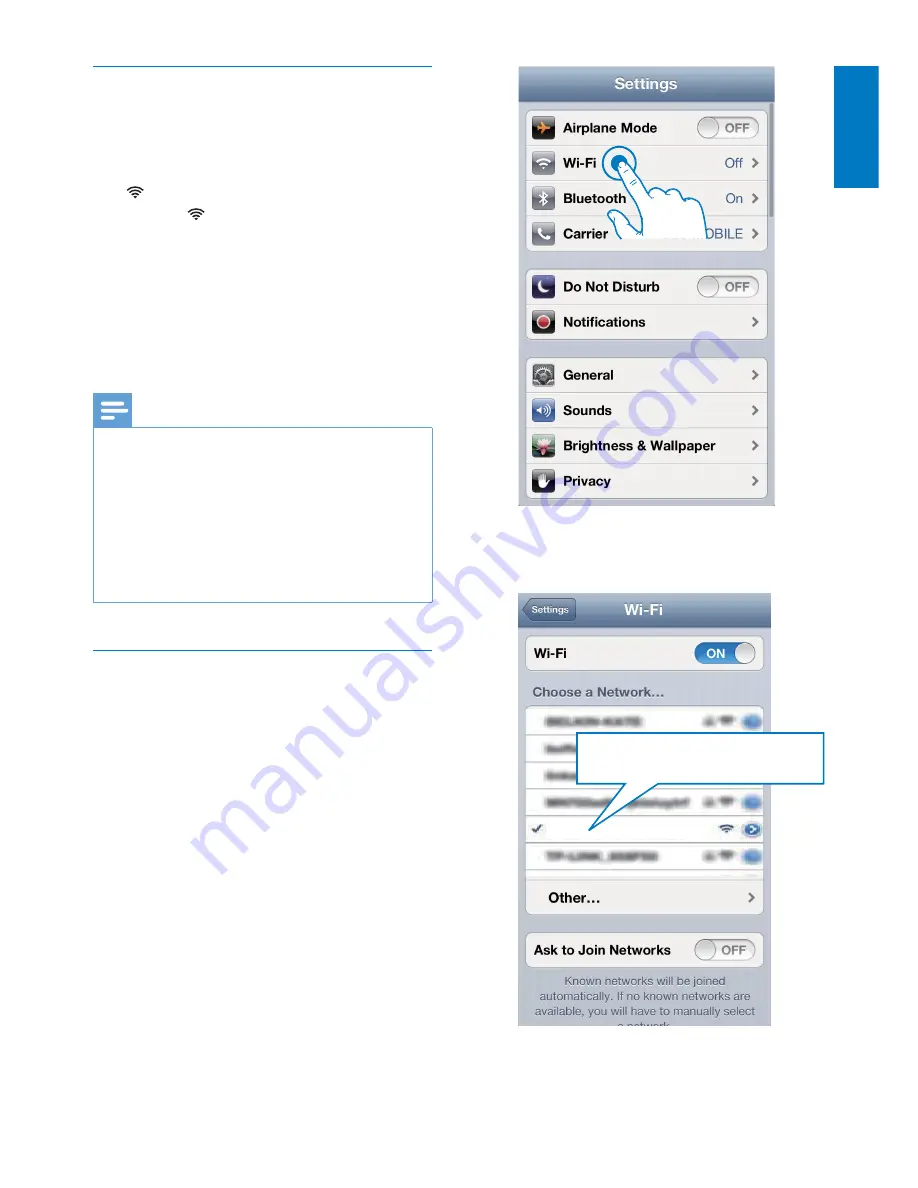
Option 1: Use your iPod touch/iPhone/iPad

Select 

Settings 

-> 

Wi-Fi

 on your iPod 

touch/iPhone/iPad.


Select 

Philips_Install XXXXXX

 from the 

list of available networks.


Philips_Install XXXXXX 

Philips_Install XXXXXX 

Summary of Contents for DS9100W

Page 1: ...www philips com welcome User manual Always there to help you Register your product and get support at DS9100W Question Contact Philips ...

Page 2: ......

Page 3: ... 10 Method 1 Use Wi Fi network login sharing 10 Method 2 Connect to a WPS router 11 Method 3 Connect to a non WPS Wi Fi router 12 5 Play 18 Stream audio from your iTunes music library to DS9100W 18 Play and charge your iPod iPhone iPad through the dock connector directly 19 Control play 20 Use advanced sound settings 21 Play from an external device 21 6 Update firmware 22 Option 1 Update through P...

Page 4: ...ve easy access to the power cord plug or adaptor to disconnect this apparatus from the power Risk of overheating Never install this apparatus in a confined space Always leave a space of at least four inches around this apparatus for ventilation Ensure curtains or other objects never cover the ventilation slots on this apparatus Information about the use of batteries Caution Risk of leakage Only us...

Page 5: ...olored black 2 Connect the brown wire to the terminal marked L or colored red 3 Do not connect either wire to the earth terminal in the plug marked E or e or colored green or green and yellow Before you replace the plug cover make sure that the cord grip is clamped over the sheath of the cable and not just over the two wires in the cable Notice Hereby WOOX Innovations declares that this product is...

Page 6: ...ree materials cardboard box polystyrene foam buffer and polyethylene bags protective foam sheet Your system consists of materials which can be recycled and reused if disassembled by a specialized company Please observe the local regulations regarding the disposal of packaging materials exhausted batteries and old equipment Made for iPod Made for iPhone and Made for iPad mean that an electronic acc...

Page 7: ...bled devices you want to play music on if you have more than one such devices in your house stream audio to multiple AirPlay enabled devices at the same time from the iTunes music library on your PC Mac only Tip Please visit www philips com welcome for information about more Philips AirPlay enabled devices With DS9100W you can also charge or play music from your iPod iPhone iPad directly through t...

Page 8: ...eration iPad 2 iPad iPod touch 5th generation iPod touch 4th generation iPod touch 3rd generation Overview of the main unit FrontView a b cd e a IR sensor Detect signals from the remote control Point the remote control directly at the sensor b Lightning dock for iPod iPhone iPad c Turn the unit on off d button indicator Connect the unit to a Wi Fi network Show the current status of the unit e Adju...

Page 9: ...ough the iPod iPhone iPad menu d Left right keys Fast reverse or fast forward within a track on your iPod iPhone iPad Skip to the previous next track e Start or pause play f VOL Adjust volume g MENU Access the iPod iPhone iPad menu h OK Confirm a selection a b c d e f g h i i Switch between the AirPlay audio source and the iPod iPhone iPad dock source ...

Page 10: ...kes about 25 seconds During boot up the indicator on front panel blinks yellow After boot up for first time setup the indicator turns solid yellow and the unit is ready for Wi Fi setup If a Wi Fi connection has been set up previously the indicator blinks amber and white slowly to search for the set up Wi Fi network To switch the unit to standby mode press on the front panel To switch the unit on f...

Page 11: ...utton on the remote control first select the correct source with the remote control instead of the main unit If you are not going to use the remote control for a long time remove the battery Point the remote control directly at the IR sensor on the front of DS9100W for better reception ...

Page 12: ...hod 3 see Method 3 Connect to a non WPS Wi Fi router on page 12 Tip You can also set up and enjoy AirPlay through other Apple devices such as iPhone 4 iPhone 4S iPad 2nd generation iPod touch 4th generation In this case you can choose Method 2 or Method 3 for AirPlay setup Before connection of DS9100W to you home Wi Fi network make sure that a your Wi Fi router is powered on and working properly b...

Page 13: ...indicator blinks yellow and green alternately Within 2 minutes the indicator turns solid white and the unit beeps DS9100W is connected to your home Wi Fi network successfully Tip For some Wi Fi routers you may need to hold the WPS button for Wi Fi connection or enable the WPS PBC function from the router configuration pages See the user manuals of the specific routers for details If the indicator ...

Page 14: ... Fi network temporarily see Connect your Wi Fi enabled device to the newly created Wi Fi network on page 13 4 Open the built in web page of DS9100W with the Internet Browser of your Wi Fi enabled device see Open the built in web page of DS9100W on page 15 5 Configure the internal Wi Fi settings of DS9100W based on the settings you wrote on paper at step 1 see Configure the internal Wi Fi settings ...

Page 15: ...d power on it then try again after successful boot up Make sure that there are no other Philips AirPlay enabled devices in Assisted Wi Fi Setup mode at the same time Multiple new Wi Fi networks created this way may interfere with each other Connect your Wi Fi enabled device to the newly created Wi Fi network The new Wi Fi network created by DS9100W only allows access of one Wi Fi enabled device To...

Page 16: ... of your PC Mac for how to connect your PC Mac to a Wi Fi network During Wi Fi network connection do not connect any network cable to your PC Mac 1 Open the Wi Fi setup tool or control panel on your PC Mac 2 Scan the available Wi Fi networks 3 Select Philips_Install XXXXXX from the list of available networks 4 Wait until successful Wi Fi connection on your PC Mac Tip If Philips_Install XXXXXX is n...

Page 17: ...ngs that you wrote on paper 192 168 1 1 Follow the on screen instructions to configure and confirm the internal Wi Fi settings of DS9100W After a while the indicator on the front panel of DS9100W stops blinking and turns solid white and the unit beeps DS9100W is connected to your existing home Wi Fi network successfully Note If the indicator on DS9100W does not stay white steadily it means that th...

Page 18: ...on paper 1 Select Settings Wi Fi on your iPod touch iPhone iPad Or open the list of available Wi Fi networks on your PC Mac 2 Select your network name SSID from the list of available wireless networks 3 Enter the network key if required 4 Wait until successful Wi Fi connection to your home Wi Fi network Optional Change the internal Wi Fi settings or rename your device through Safari If you use Saf...

Page 19: ...onjour for Bookmarks bar 3 Select Philips DS9100W XXXXXX from the Bonjour pull down list shown at the bookmarks bar The DS9100W configuration web page is displayed 4 Here you can change the internal Wi Fi settings or rename your device easily Philips DS9100W XXXXXX Philips DS9100W XXXXXX ...

Page 20: ... iPhone iPad installed with iOS 4 3 3 or later or a Wi Fi enabled PC Mac installed with iTunes 10 2 2 or later Stream from your iPod touch iPhone iPad 1 Launch the iPod Music application on your iPod touch iPhone iPad 2 Tap the AirPlay icon 3 Select Philips DS9100W XXXXXX or user customized name from the AirPlay list 4 Select a media file and start play After a while you will hear music from DS910...

Page 21: ... from the AirPlay list Philips DS9100W XXXXXX 4 Select a media file and start play After a while you will hear music from DS9100W Tip When you stream audio from your iTunes music library on a PC Mac you can select more than one AirPlay enabled devices if available at step 3 to stream music to all of them at the same time If you are using an earlier version of iTunes the AirPlay icon may be instead...

Page 22: ... options from either your iTunes host device or DS9100W Note The operations below are based on the supplied remote control of DS9100W Make sure that you have successfully streamed audio from your iTunes music library to DS9100W To start or pause play in AirPlay or dock mode press To skip to the previous or next track in AirPlay or dock mode press left right keys To adjust volume press VOL repeated...

Page 23: ...SoundStudio app directly see Option 1 Update through Philips SoundStudio recommended on page 22 If your iTunes host device is a Wi Fi enabled PC Mac For advanced sound settings you can use the equalizer available on iTunes directly View Show Equalizer Tip See the iTunes help documentation for more details Play from an external device You can also listen to an external audio player through DS9100W ...

Page 24: ...ilips com support 2 Enter the model number to find the latest firmware upgrade file available 3 Unzip and save the upgrade file to your hard drive Update firmware Note To use an Internet browser other than Apple Safari on your PC Mac remember to go to the Wi Fi router configuration page and write down the IP address of your DS9100W See the user manual of your Wi Fi router for how to find the IP ad...

Page 25: ...Fi router configuration page at the address bar The DS9100W configuration web page is displayed 4 Select the Firmware Update tab and follow the on screen instructions to complete the update process Note In case the firmware update fails try the above procedures again After successful firmware update if there is any problem with the Wi Fi connection restart DS9100W and then try to set up the Wi Fi ...

Page 26: ...ohm Speakers Speaker Impedance 6 ohm Speaker Driver 110 mm woofer 42 mm tweeter Sensitivity 85 dB m W Wireless Wireless standard 802 11b g Wireless security WEP 64 or 128 bit WPA WPA2 8 63 characters Frequency range 2412 2462 MHz CH1 CH11 for 79 37 55 97 2412 2472 MHz CH1 CH13 for 12 10 05 PBC one button push Yes General information AC power 100 240V 50 60Hz Operation Power Consumption 100 W Dimen...

Page 27: ...ith the remote control instead of the main unit Reduce the distance between the remote control and the unit Insert the battery with its polarities signs aligned as indicated Replace the battery Aim the remote control directly at the IR sensor on the front of DS9100W Wi Fi network connection failed Check if your Wi Fi router is Wi Fi 802 11b g certified This device is only compatible with Wi Fi 802...

Page 28: ... routers No AirPlay icon on my iTunes host device Make sure that DS9100W is already connected to your home Wi Fi network Before you open iTunes make sure that you have enabled Bonjour service in your PC Take Windows XP for example to enable the service you can click Start Control Panel and double click AdministrativeTools Services Bonjour Service then click Start followed by OK on the pop up menu ...

Page 29: ......

Page 30: ... Innovations Limited or one of its affiliates further referred to in this document as WOOX Innovations and is the manufacturer of the product WOOX Innovations is the warrantor in relation to the product with which this booklet was packaged Philips and the Philips Shield Emblem are registered trademarks of Koninklijke Philips N V DS9100W_UM_10_V3 0 ...

Reviews: