background image

21

User manual

ENGLISH

D


Note

The 

Delete Indices

 menu item is available only if 

the current file has at least one index mark.

Assign a keyword

4.4 

One or more keywords, such as the author’s 
name, can be assigned to every recording. 
Keywords can be used to identify recordings 
and automatic file routing in 

Philips SpeechExec


software.

D


Note

Keywords must first be set up with 

Philips 

Speech Exec

 software. See 

Advanced configuration


on page 18 for more information. By default, 
the keyword category 

Author

 with the keywords 

‘DPM 9500’ and ‘- - -’ (empty) and the category 

Work type

 with the keywords ‘Memo’, ‘Letter’, 

‘Fax’ and ‘Report’ are available on the Digital 
Pocket Memo.

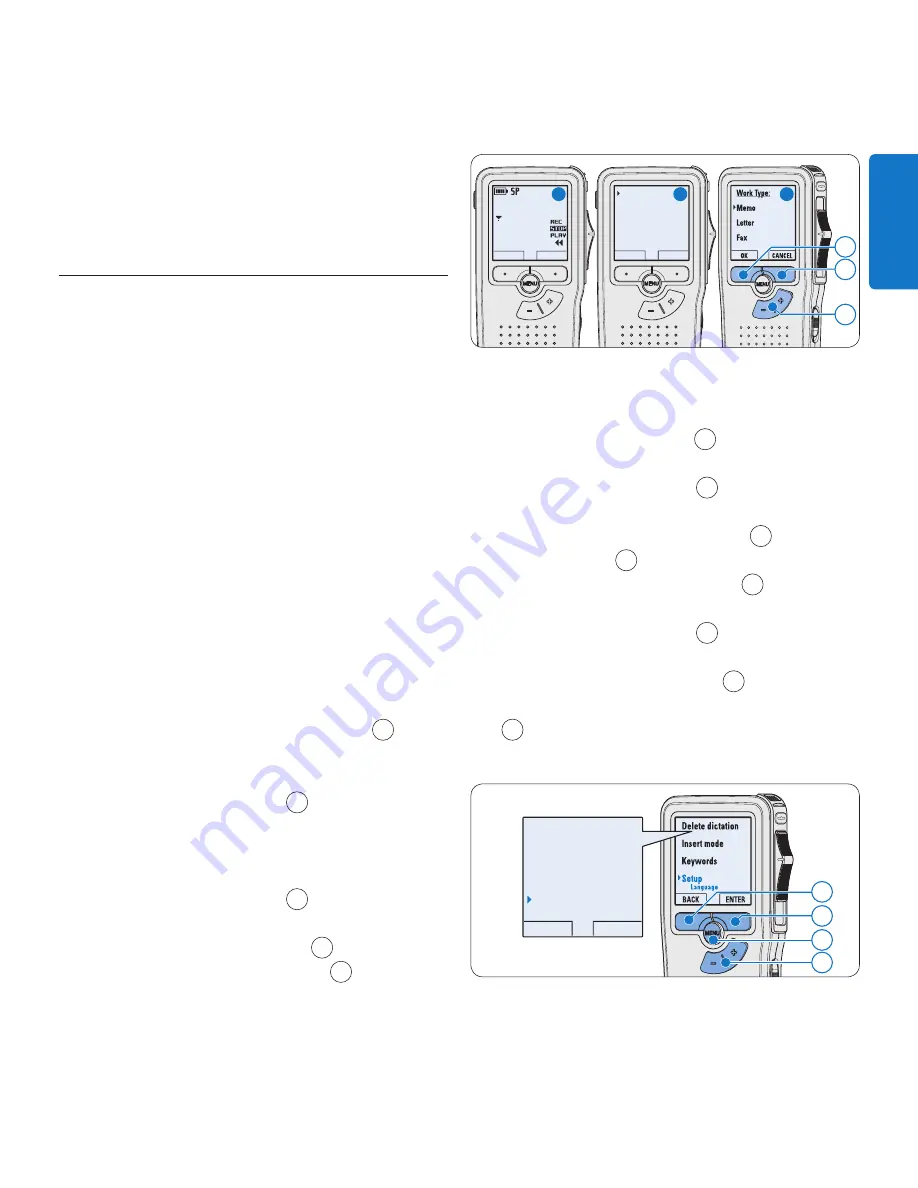
To assign a keyword to a recording:

Press the 

KEYWORD

 smart button 

1

 while 

in the stop position to display the list of 
keyword categories.
Press the 

+

 or 

 button 

2

 to select a 

category.
Press the 

ENTER

 smart button to display the 

list of keywords for the category.
Press the 

+

 or 

 button 

2

 to select a 

keyword.
Press the 

OK

 smart button 

4

 to confirm 

or the 

CANCEL

 smart button 

3

 to exit 

without assigning a keyword.

Work Type
Author

BACK

ENTER

DPM 9500

KEYWORD

NEW

0 : 0 0

# 2

1
3

2

A

B

C

Menu settings

4.5 

To access the Digital Pocket Memo menu:

Press the 

MENU

 button 

1

 while in the stop 

position to open the menu.
Press the 

+

 or 

– 

button 

2

 to select the 

next/previous menu item.
Press the 

ENTER

 smart button 

3

 or the 

MENU

 button 

1

 to enter a sub-menu. 

Press the 

BACK

 smart button 

4

 to exit the 

menu.
Press the 

+

 or 

– 

button 

2

 to select a 

function.
Press the 

OK

 smart button 

4

 to confirm 

a selection or the 

CANCEL

 smart button 

3

 to exit a sub-menu without changing a 

setting.

Delete dictation
Insert mode
Keywords

Setup

Language

BACK

ENTER

4
3
1
2

Summary of Contents for Digital Pocket Memo LFH 9500

Page 1: ...ort visit www philips com dictation POCKET MEMO IT Manuale di istruzioni 83 NL Gebruikershandleiding 103 PT Manual do utilizador 123 SV Användarhandbok 143 EN User manual 3 DE Benutzerhandbuch 23 FR Manuel de l utilisateur 43 ES Manual del usuario 63 ...

Page 2: ...ebsite www philips com dictation This device complies with Part 15 of the FCC Rules Operation is subject to the following two conditions 1 This device may not cause harmful interference 2 This device must accept any interference received including interference that may cause undesired operation The CE mark confirms that the device corresponds to the relevant guidelines of the European Union The ca...

Page 3: ... 3 Use your Digital Pocket Memo 11 3 1 Recording 11 3 1 1 Create a recording 11 3 1 2 Record a spoken instruction 12 3 1 3 Add to a recording insert overwrite 12 3 1 4 Finish lock a recording 13 3 1 5 Change the recording format 14 3 1 6 Adjust the microphone sensitivity 14 3 2 Playback 15 3 2 1 Overview playback functions 15 3 3 Delete 16 3 3 1 Delete a file 16 3 3 2 Delete part of a recording 16...

Page 4: ...emo to the USB Docking Station and transfer your dictation files to the PC in seconds At the same time the USB Docking Station can be used to recharge the batteries of the Digital Pocket Memo The Digital Pocket Memo is designed around standardized technologies From SD SecureDigital or MMC Multimedia cards mini USB cables batteries and sockets to the industry standard dss file format for speech pro...

Page 5: ...ation and volume control 10 Menu button 11 Smart buttons 12 Display 13 Memory card slot 14 LFH 9500 FWD forward button LFH 9520 EOL end of letter button 15 Battery compartment 16 USB connection slot 17 Docking station connection slot 18 Power supply socket USB Docking Station 19 Power supply socket 20 USB connection slot 21 Download indicator LED 22 Charge indicator LED 23 Docking slot for the Dig...

Page 6: ... LFH 9500 and LFH 9520 This user manual will describe functions for both models 11 Recording level meter 12 Sensitivity level for voice activated recording 13 Current position in the recording 14 Positions of the slide switch 15 Current function of the right smart button 16 Recording is marked finished EOL and locked 17 Recording is marked priority 18 Recording contains index mark 19 Recording con...

Page 7: ...tion in the menu of the Digital Pocket Memo and recharge the batteries using the optional power supply Recharge the batteries through the 2 2 2 docking station Make sure that the docking station is 1 connected to PC with the USB cable and that the PC is on Get started 2 Install the batteries 2 1 The Digital Pocket Memo can be operated with the two rechargeable AAA batteries delivered with the prod...

Page 8: ...cket Memo to the 2 Philips power supply D Note It is okay to continue using the Digital Pocket Memo during recharge The batteries will be recharged while you work and will continue recharging even when the Digital Pocket Memo is turned off Insert and eject the memory card 2 3 The Digital Pocket Memo operates with a SD SecureDigital memory card and supports SDHC cards with storage capacities of up ...

Page 9: ... no memory card inserted a warning screen is displayed Format a new memory card 2 4 When a new unformatted memory card or a memory card that was formatted with a non Digital Pocket Memo device is inserted the Digital Pocket Memo will display a prompt to format the memory card A To confirm and start the formatting process 1 press the OK smart button 1 To cancel the formatting process remove 2 the m...

Page 10: ...ess the 5 smart button 2 to confirm the date and time The Digital Pocket Memo is now ready to function 2 1 3 D Note If a mistake is made in setting the date time use the smart button 3 any time during the procedure to step back to make corrections It is also possible to change the date and time later using the menu See Menu settings on page 21 for more information Power save mode 2 6 After 60 minu...

Page 11: ...ket Memo 9500 move the slide switch 4 to the REC position and start speaking On the Digital Pocket Memo 9520 press the REC button 3 move the slide switch 4 to the REC position and start speaking The status LED 5 glows in red in overwrite mode or green in insert mode while recording The following information is displayed a Recording format b Recording time c Current position in the recording d File...

Page 12: ...as a solid line on the file position bar a DPM 9500 INDEX INSTR 9 23 2 1 a 3 1 3 Add to a recording insert overwrite Files are recorded in overwrite mode by default Follow these steps to switch to insert mode to make additions to a recording Press the 1 MENU button 1 while in the stop position to open the menu Press the 2 or button 2 to select the Insert mode menu and press the ENTER smart button ...

Page 13: ...t from step 1 to return to overwrite recording mode 3 1 4 Finish lock a recording When a recording is finished and no additional changes will be made follow these steps to mark it as finished and protect it from being accidentally deleted Press the 1 or button 1 while in the stop position to select the recording to be marked finished Press the end of letter 2 EOL button 2 to lock the file and mark...

Page 14: ...utton 3 to exit the sub menu without changing the setting Delete dictation Insert mode Keywords Setup Language BACK ENTER Language Record format Voice activation Backlight SP DSS BACK ENTER 4 3 1 2 A B C 3 1 6 Adjust the microphone sensitivity Set the microphone sensitivity for the environment and your recording preferences Press the 1 MENU button 1 while in the stop position to open the menu Pres...

Page 15: ...tton 1 once while in the stop position to skip to the end of a file Press the button again to skip to the beginning of the next file Press the button 1 once while in the stop position to skip to the beginning of a file Press the button again to skip to the end of the previous file Fast rewind Move the slide switch 2 to the position Move the slide switch to the STOP position to stop rewinding or th...

Page 16: ...ert mode Keywords Setup Delete BACK ENTER 4 3 2 A B 1 3 3 2 Delete part of a recording Follow these steps to delete a section from a recording Press the 1 MENU button 1 while in the stop position to open the menu Press the 2 or button 2 to select the Delete section menu item and press the OK smart button 3 Using the play forward or rewind functions 3 navigate to the beginning of the section to be ...

Page 17: ... the 2 or button 2 to select the Setup menu item and press the ENTER smart button 3 Press the 3 or button 2 to select the Delete dictations menu item and press the ENTER smart button 3 Delete dictation Insert mode Keywords Setup Language BACK ENTER 3 1 A B 2 Press the 4 ENTER smart button 4 and the OK smart button 5 to confirm the deletion or press the CANCEL smart button 4 to exit without deletin...

Page 18: ...are Click 3 Settings General settings on the menu bar of SpeechExec to open the settings menu and select DPM DT Configuration DPM Wizard from the list on the left side Click the 4 Start Wizard button to open the wizard Follow the on screen instructions to customize the Digital Pocket Memo Click the 5 Finish button to close the wizard and confirm the transfer of the new settings to the Digital Pock...

Page 19: ...tton 3 Press the 3 or button 2 to select the Voice activation menu item and press the ENTER smart button 3 Press the 4 or button 2 to choose Off or On Press the 5 OK smart button 4 to save the setting or press the CANCEL smart button 3 to exit the sub menu without changing the setting Delete dictation Insert mode Keywords Setup Language BACK ENTER Language Record format Voice activation Backlight ...

Page 20: ...fast forward or fast rewind to the index 1 mark to be deleted a Press the 2 MENU button 1 while in the stop position to open the menu Press the 3 or button 2 to select the Index clear menu and press the OK smart button 3 DPM 9500 KEYWORD NEW 6 32 2 3 1 A B 2 a 4 3 3 Delete all index marks Press the 1 MENU button 1 while in the stop position to open the menu Press the 2 or button 2 to select the De...

Page 21: ...ition to display the list of keyword categories Press the 2 or button 2 to select a category Press the 3 ENTER smart button to display the list of keywords for the category Press the 4 or button 2 to select a keyword Press the 5 OK smart button 4 to confirm or the CANCEL smart button 3 to exit without assigning a keyword Work Type Author BACK ENTER DPM 9500 KEYWORD NEW 0 00 2 1 3 2 A B C Menu sett...

Page 22: ...CLASSIC PLAYBACK VOLUME KEYWORDS see 4 4 page 21 RECORD FORMAT see 3 1 5 page 14 DATE TIME see 2 5 2 page 10 DELETE ALL DICTATIONS see 3 3 3 page 17 MAIN MENU SETUP MENU D Note Some settings such as defining keywords or switching to the simple display mode are available only through Philips SpeechExec Pro Dictate See Advanced configuration on page 18 for more information D Note Press and hold the ...

Page 23: ...lay mode QP 16 kHz Standard Play mode SP 12 kHz Technical data Compression rate Quality Play mode QP 26 kbit s Standard Play mode SP 13 5 kbit s Speaker Built in 30 mm round dynamic speaker Output power 200 mW Accesssories Philips Secure Digital SD memory card Two Philips AAA rechargeable batteries Travel pouch user manual quick start guide Installation CD Optional accesssories USB Docking Station...

Page 24: ...he property of Royal Philips Electronics or their respective owners 2010 Royal Philips Electronics All rights reserved Document Version 2 1 2010 01 22 5103 109 9663 2 Discover the comprehensive range of high end dictation products from Philips www philips com dictation ...

Reviews: