

Starlite
RF
Quick Start Guide
www.transvideo.eu
www.starliterf.com
Several patents pending
144TD0008 - Rev 00 May 2017
TRANSVIDEO S.A.
Zone Industrielle
F-27135 Verneuil sur Avre
FRANCE
Tel +33 2 3222
3000
Fax +33 2 3260 1479
www.transvideo.eu
u
Home view - Smart Corners
Starlite
RF
3
u
Main menu
Smart Corners
System
Adjust
Press down the ON/OFF switch
to display the main menu
Tools
Home view
4
Home view
Back to
main menu
Calendar & clock
Update
TX pairing
u
System menu
5
u
Tx pairing (Registration)
SDI Out
Horizontal Flip
Home view
Vertical Flip
Select input
Anamorphic Desqueeze 1.3x
Anamorphic Desqueeze 2x
Back to
main menu
6
u
Tx pairing (Registration)
Snapshot
Back to
main menu
No tools
To assign a tool to a smart corner: select a tool, then choose the corner
to which you want to assign it.
Waveform
Home view
u
Tools menu
8
u
Smart corners menu
9
u
Adjust menu
10
u
Recording / Playing
12
u
Warning & Caution
Slide to adjust Luminosity, Brightness or Contrast then validate by pushing
Push Reset to restore default values.
Histogram
Vectorscope
Record status
Record*
Tap to record
Tap again to stop
Playback gallery
Snapshots gallery
*
All supported standards
WARNING:
This product must be used in a correct grounded electrical environment; ground defects can create severe
problems to the equipment, the picture quality and even cause danger for the user.
This product must be powered only from 6 to 29V limited power source.
Copyright law and international treaties protect this product, its design and its software. One or several
international patents apply to the StarliteRF. Unauthorized reproduction or distribution of this product
or its design or its software or any portion of them, may result in severe civil and criminal penalties, and
will be prosecuted to the maximum extent possible under the law.
CAUTION:
Warranty is void as the product is opened. The unit contains electrostatic sensitive devices, which can be
damaged or destroyed if you touch them. Very high voltage is present in the product and there is some risk of
electric shock if opened by a non-accredited technician. Standard ESD procedures must be strictly followed
during disassembly/re-assembly of the unit.
The user and/or technician assume full responsibility or any risk of bodily injury, death or property damage
arising out of the use or disassembly or repair of this equipment. In no event shall Transvideo S.A. or its local
representatives be liable to a user, technician or third party for any loss of income or any damage of any kind
resulting from the use of or work on the said equipment.
This device should not be used within 20cm of a human body.
Starlite
RF
SD Card format
Select input
Wireless or BNC
Select TX
Home view
Back to
main menu
Peaking
Toggle TX A/B
Select TX A or B
Reset Pairing TX
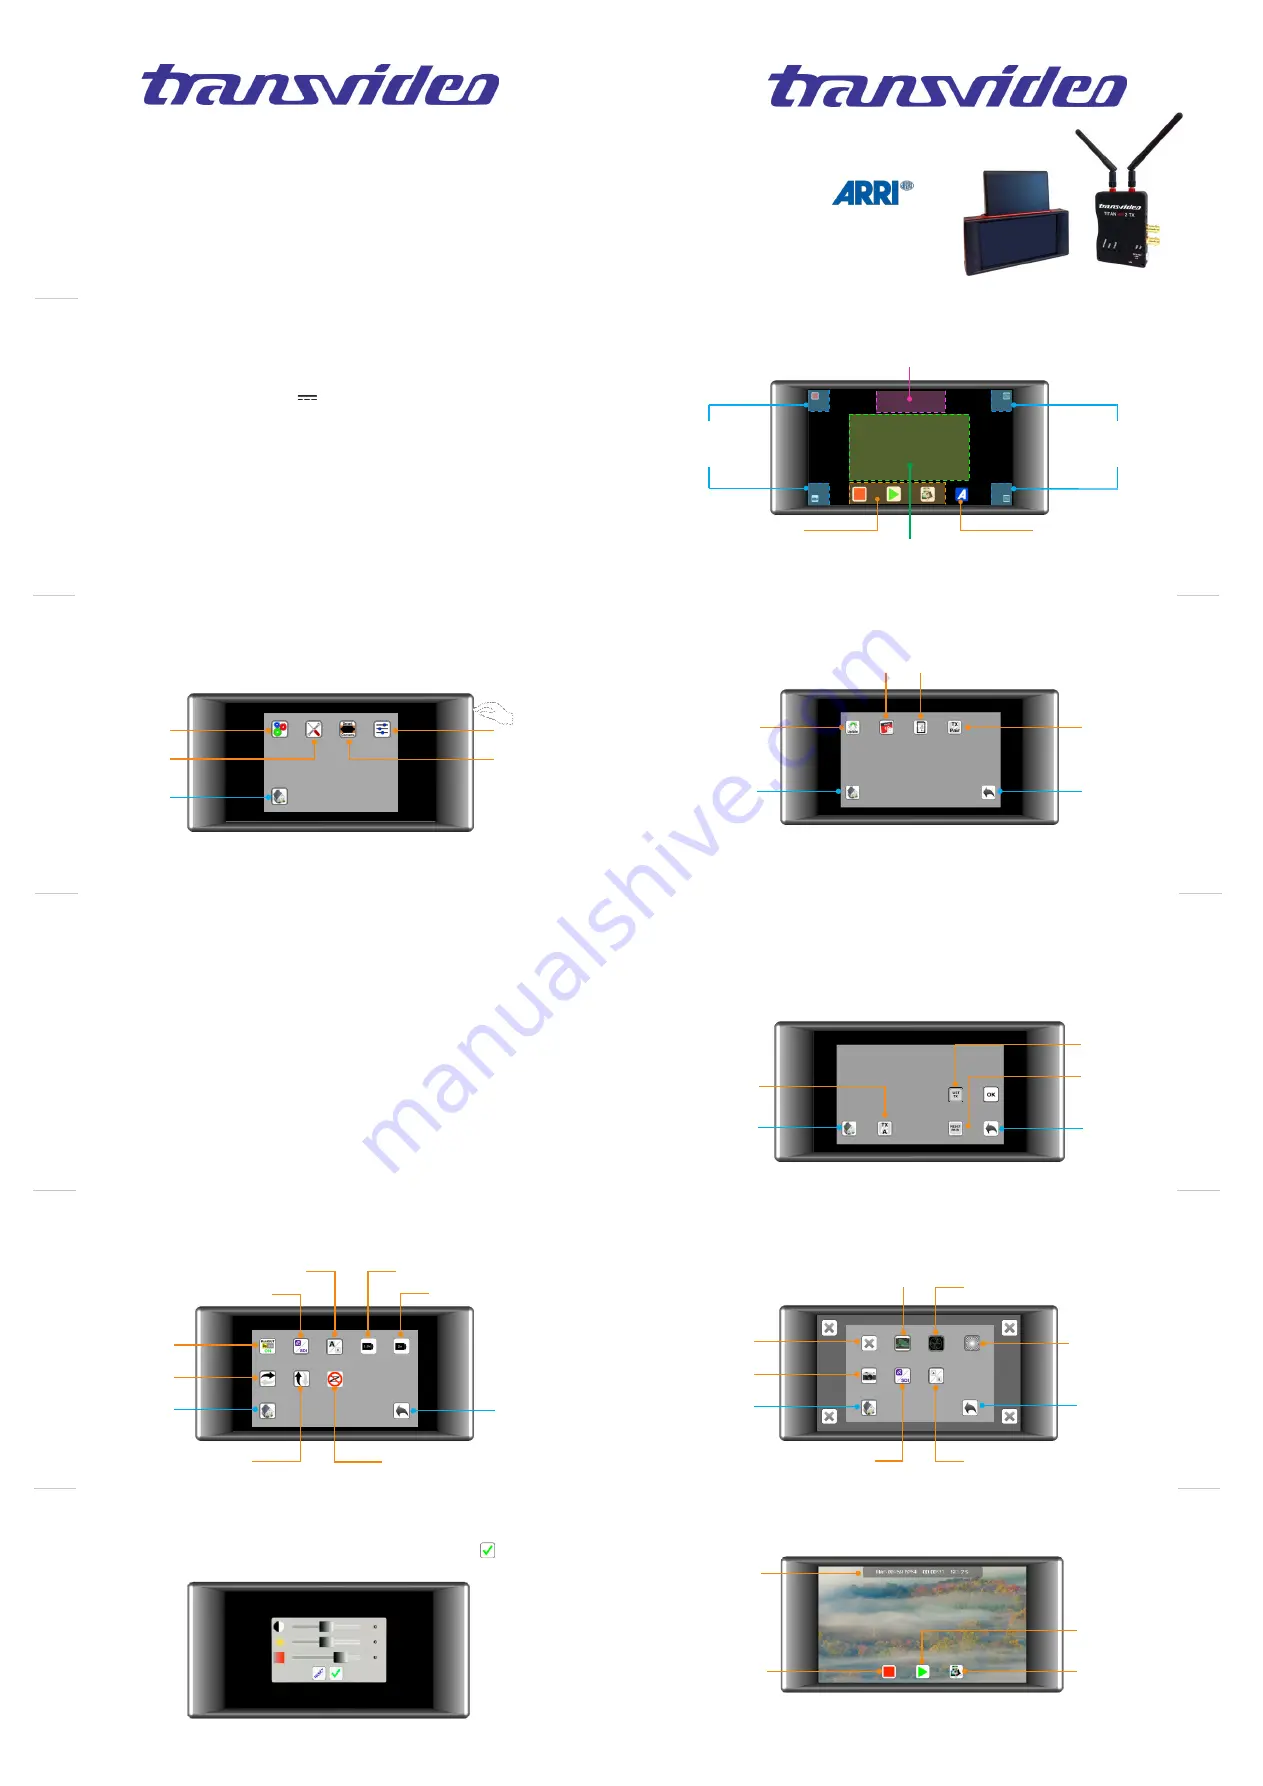
Tx pairing: one or more Starlite RF with one Titan Tx
Up to 4 Starlite RF can be paired (or registered) with a Titan Tx.
Pair Tx (properly) with Starlite RF n:
- Switch on Tx (we recommend a distance of 10 ft (3m) between Tx and Starlite RF)
- Do below as many times as Starlite RF you have:
- Switch on your Starlite RF n. In “Menu parameters / TX pair”, press icon “Reset Tx”
Press icon “Tx A”, press “REG” button on Tx unit A until blue led blinks fast (2s) and wait for
message “Press OK” appears on the monitor, and then press icon “OK”
The Tx has been registered with Starlite RF n.
- Switch off Starlite RF n
Tx pairing: one Starlite RF with 2 Titan TX
Up to 2 Tx can be paired (or registered) with a StarliteRF, in order to be swapped by use of smart
corner A/B (smart corners menu) or tool A/B (tools menu).
Pair Tx A (properly):
- Switch on your Starlite RF. In “Menu parameters / TX pair”, press icon “Reset Tx”
- Switch on Tx A (we recommend a distance of 10 ft (3m) between them)
Press icon “Tx A”, press “REG” button on Tx unit A until blue led blinks fast (2s) and wait for
message “Press OK” appears on the monitor, and then press icon “OK”
The first Tx has been registered. Icon “Tx A” is now marked “Tx B”
Starlite
RF
Starlite
RF
Starlite
RF
Starlite
RF
Starlite
RF
Starlite
RF
Starlite
RF
Starlite
RF
List TX
Pair Tx B:
- Switch off Tx A and switch on Tx B
Press icon “Tx B”, press “REG” button on Tx unit B until blue led blinks fast (2s) and wait for
message “Press OK” appears on the monitor, and then press icon “OK”
The secondth Tx has been registered, and you can swap them with A/B icons
Icon “List Tx” allows to display already paired Tx.
Zoom Switch
Displays Smart Corners
Rec zone
Rec - Play & Snap buttons
1:1 Zoom zone (pixel to pixel)
Tap to zoom in or zoom out
Slide to move the zoomed picture
Smart Corners
User assigned tools
Menu / Smart Corners
Smart Corners
User assigned tools
Menu / Smart Corners
ARRI Mode
Visible only when ARRI
Camera detected*
*ARRI MINI & AMIRA MODELS ONLY


