background image

8

EN

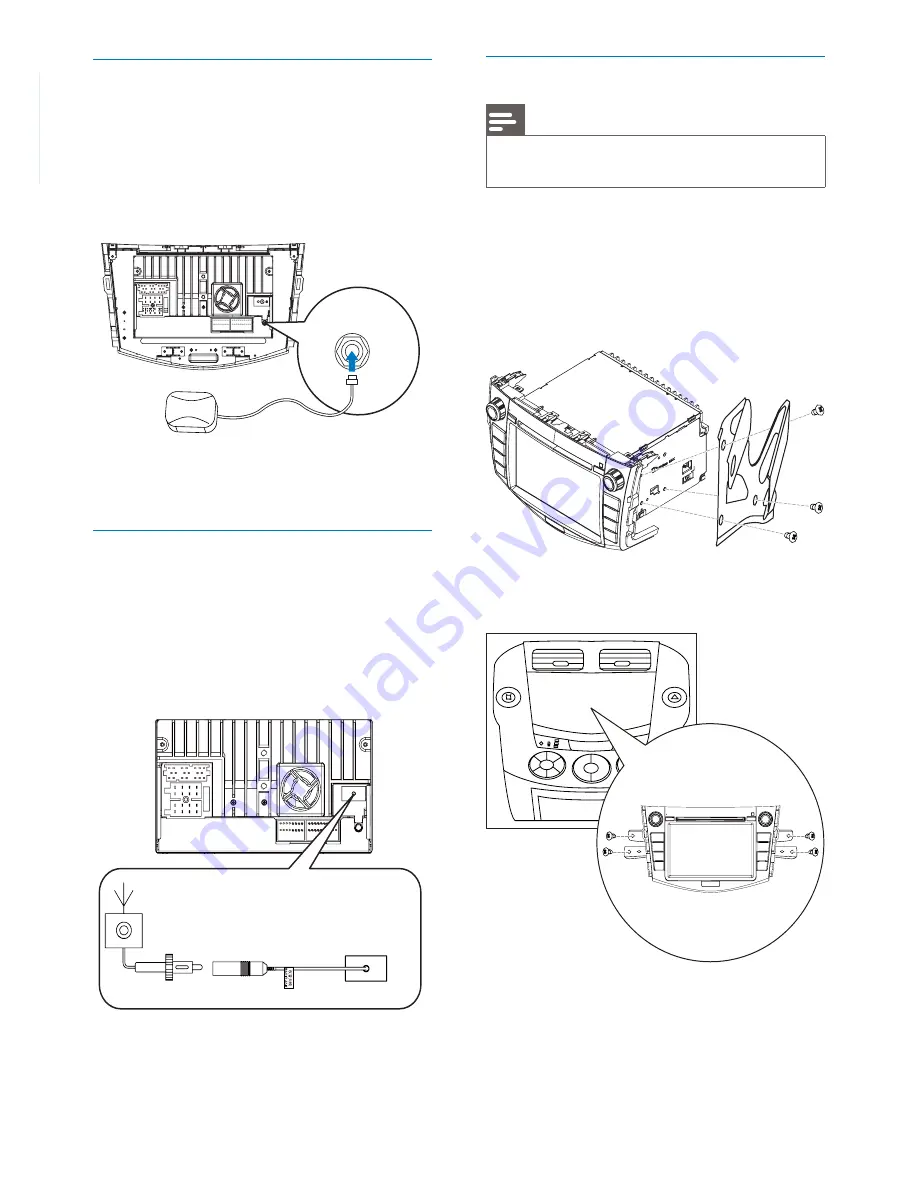
Connect GPS antenna

To receive signal from satellites, connect the 
supplied GPS antenna to your car and the 
system.

1

  Connect the supplied GPS antenna to the 

system fi rst.

2

  Stick the other end of the GPS antenna to 

a surface for signal reception.

Connect Radio antenna

If your car has built-in radio antenna, connect it 
to the radio antenna of the system for better 
radio signal.

1

  Connect the radio antenna to the car 

antenna.

Mount into the dashboard

Note

Check wire connection before you mount the unit into 

a car.

1

  Take off the trim plate of the car.

2

  Screw off the host car audio.

3

  Fix the mounting brackets to CID3685 

with screws (supplied by the car 
manufacturer). 

4

  Fix the unit to the dashboard with screws 

(supplied by the car manufacturer). 

5

  Attach the trim plate.

6

  Reconnect the negative terminal of the car 

battery.

Summary of Contents for CID3685

Page 1: ...Register your product and get support at CID3685 EN User manual ...

Page 2: ...Select audio mode 17 Select subtitle language 17 Rotate pictures 17 Zoom 18 Select slide show duration 18 6 Play with Bluetooth device 19 Pair the Bluetooth enabled devices 19 Make a call 19 Receive call 20 Listen to music from Bluetooth device 20 Adjust Bluetooth settings 20 7 Adjust sound 22 Adjust volume 22 Mute 22 Select preset equalizer 22 Adjust fader balance 23 Set Dynamic Bass Boost DBB 23...

Page 3: ...sh rub or strike the screen with any object Never use solvents such as benzene thinner cleaners available commercially or anti static sprays intended for discs Clean the apparatus with soft damp cloth Never use substances such as alcohol chemicals or household cleaners on the apparatus Notice The making of unauthorized copies of copy protected material including computer programs files broadcasts a...

Page 4: ...ange products at any time without being obliged to adjust earlier supplies accordingly Congratulations on your purchase and welcome to Philips To fully benefit from the support that Philips offers register your product at www philips com welcome Introduction With the car entertainment system you can Quickly found routine through the navigation system And you can also enjoy Audio video JPEG pictures...

Page 5: ... Disc slot e d c b a g h i p f j k l m n o i MAP Open the cover and insert remove the GPS map card j TUNE SELECT Skip to the previous or next title chapter or track Search backward forward at different speeds Confirm an entry or selection Start pause or resume play Display the equalizer setting interface k FM AM Switch to the FM AM source l DISP Adjust screen brightness contrast color Turn on off t...

Page 6: ...EN 5 E n glis h n USB socket o AV IN External equipment audio video in socket p SD SDHC MMC card slot ...

Page 7: ...ircuit before you connect ensure that the ignition is off Ensure that you connect the yellow and red power supply leads after all other leads are connected Ensure that all loose leads are insulated with electrical tape Ensure that the leads do not get caught under screws orin parts that will move e g seat rail Ensure that all ground earth leads are run to a common ground earth point Use only the s...

Page 8: ...se leads are insulated with electrical tape 1 Check the car s wiring carefully then do the other connections Red White Yellow Red Red White Yellow Black Black Yellow Green Blue White Black Touch controller Rear screen Amplifier Yellow White Brown Red Red 1 1 ...

Page 9: ...connect it to the radio antenna of the system for better radio signal 1 Connect the radio antenna to the car antenna Mount into the dashboard Note Check wire connection before you mount the unit into a car 1 Take off the trim plate of the car 2 Screw off the host car audio 3 Fix the mounting brackets to CID3685 with screws supplied by the car manufacturer 4 Fix the unit to the dashboard with screw...

Page 10: ...and hold MUTE VOL Adjust screen To adjust screen brightness contrast color 1 Press DISP to show the manual 2 Press or to select an item 3 Touch to adjust the value 4 Press DISP to confirm To turn on off the screen press and hold DISP Set date and time 1 Touch the upper left corner to display main menu 2 Touch in the middle right side of the screen The second main menu is displayed 3 Touch Settings ...

Page 11: ... mode 1 Touch Clock mode 2 Touch on 12Hr or 24Hr to select clock mode Set time 1 Touch Time 2 Touch on the displayed time A submenu is displayed 3 Touch or to set hour and minute Tip When date time is set touch first and then touch to return to main menu ...

Page 12: ...onds 3 Refer to the map manual in Chinese to operate the navigation tool Tip You can press NAVI to enter exit the navigation system Upgrade the map 1 Turn off the car audio system 2 Press the map card until you hear a click sound 3 Take out the card and bring it to the authorized service center for upgrade 4 Insert the upgraded map card back into the map card slot 5 Turn on the car audio The map u...

Page 13: ... automatically Tune by frequency 1 Touch 2 Touch Goto 3 Touch FM or AM to select band 4 Touch the numbers to enter frequency Touch to clear the last entered number Touch to clear all the entered numbers 5 Touch to confirm The radio station is broadcast Select radio range Before you start to search for radio stations you can select radio range 1 Touch 2 Touch Radio range to toggle tuner sensitivity ...

Page 14: ...d Store stations automatically You can search for a station with intro search which broadcasts a 10 second preview of each detected radio station 1 Select band 2 Touch 3 Touch Search Auto search starts The six strongest stations of the selected band are saved in preset channels 1 6 automatically Tune to a preset station 1 Touch Radio 2 Select band 3 Touch one of the preset channels 01 to 06 to sel...

Page 15: ...e facing up Play starts automatically To remove the disc press the button When the disc is ejected the unit switches to the previous source if connected Otherwise the unit switches to Radio mode automatically Connect USB device Note Ensure that the device contains playable content 1 Open the USB door 2 Insert your USB device to the USB socket Play starts automatically Remove the USB device 1 Selec...

Page 16: ... disc USB or SD MMC card is inserted play starts automatically For DVD movie if a menu appears press TUNE SELECT to start play 2 To pause touch To resume play touch again Tip You can also press TUNE SELECT repeatedly to pause resume play Search for a folder For video files 1 Touch to return to playlist menu 2 Touch to display all available video file folders 3 Touch a folder then touch or to select ...

Page 17: ...clear all input touch Repeat During play you can select different repeat play modes For DVD VCD movie disc 1 Touch anywhere except for the upper left corner to display menu on the screen if necessary 2 Touch to display the 2nd menu 3 Touch to select Repeat chapter play the current chapter repeatedly Repeat title play all chapters in the title repeatedly Repeat off cancel repeat play ForVCD karaoke...

Page 18: ...els 1 During play touch anywhere except for the upper left corner to display menu on the screen if necessary 2 Touch to display the 2nd menu 3 Touch repeatedly The audio channel information is displayed on the upper line of the screen Select audio mode When you playVCDs you can select an audio mode R L Stereo 1 During play touch anywhere except for the upper left corner to display menu on the scre...

Page 19: ...o display menu on the screen if necessary 2 Touch repeatedly to zoom in the picture 3 Touch or to pan through the enlarged picture Select slide show duration 1 Touch anywhere except for the upper left corner to display menu on the screen if necessary 2 Touch repeatedly to select Fast 3 seconds Normal 5 seconds Slow 8 seconds ...

Page 20: ... from any other electronic device that may cause interference Turn on the Bluetooth function on the device 1 Search for Bluetooth device with the device 2 Select CID3685 in the pairing list 3 Enter default password 0000 if pairing succeeds phone call record is displayed Disconnect Bluetooth devices 1 To disconnect one device touch red green is displayed Tip The device will also be disconnected whe...

Page 21: ... device If the connected Bluetooth device supports Advanced Audio Distribution Profile A2DP you can listen to the music stored on the device through the unit If the device also supports AudioVideo Remote Control Profile AVRCP profile you can use the control on the unit or its remote control to play music stored on the device 1 Pair the phone with the unit 2 Touch the upper left corner to return to ho...

Page 22: ...EN 21 E n glis h 2 Touch on the selected option to change the setting Tip You can also adjust Bluetooth settings in the Settings menu ...

Page 23: ... User Techno Rock Classic Jazz Optimal Flat Pop 1 Touch anywhere except for the upper left corner to display menu on the screen if necessary 2 Touch The current Equalizer setting is displayed 3 Touch or to select an EQ 4 Touch or to adjust below settings Bass bass range 14 to 14 Mid middle range 14 to 14 Treb treble range 14 to 14 LPH low pass filter range 60 80 100 200 MPF middle pass filter range ...

Page 24: ...necessary 1 Touch 2 Touch Below options are displayed 3 Touch or to select subwoofer volume Sub subwoofer volume 0 to 24 4 Touch F R L or R to adjust fader balance value Fade fader range 24 to 24 F front speaker R rear speaker Balance balance range 24 to 24 L left speaker R right speaker 5 Touch to exit Set Dynamic Bass Boost DBB 1 Touch to toggle between the settings DBB on The icon is illuminate...

Page 25: ...on Radio region USA S Amer 1 Arabia China S Amer 2 Europe Korea OIRT Select one that matches your location Radio range Local Only stations with strong signals can be broadcast Distance Stations with strong and weak signals can be broadcast Blackout off Never turn on the screen saver 10s Turn on the screen saver automatically 10 seconds after last operation 20s Turn on the screen saver automaticall...

Page 26: ...cription Sub woofer On Turn on the subwoofer Off Turn off the subwoofer Sub woofer filter 80Hz Select subwoofer filter criteria 120Hz 160Hz DBB On The Dynamic Bass Boost DBB function is on Off The DBB function is off DRC On Makes loud sound level softer and soft sound level louder so that you can watch the DVD movies at a low volume without disturbing others Off The DRC function is off 3 Press to ex...

Page 27: ...her countries PAL Used in China India Singapore the western European countries except France Australia and some other countries Secam Used in France Russia and other countries Rear camera Normal When you drive in reverse the rear view is displayed normally Mirror When you drive in reverse the rear view is displayed in mirror Parking On Disable video view during drive Off Enable video view during d...

Page 28: ...h Select DVD menu language Options available are depends on DVD disc ࣇບሱ ᐥᦥɻʼ 3 Press to exit 3 Press to exit Adjust Bluetooth settings 1 Touch Bluetooth 2 Touch an option repeatedly to select Bluetooth settings Options Description Bluetooth On Turn on the Bluetooth function Off Turn off the Bluetooth function Auto connect On If the pre paired device is within the effective range the unit re conne...

Page 29: ...7 to view R Restricted Recommend parent to guide children under 17 to view NC 17 Unsuitable for children under age 17 Adult Acceptable for adults only Load factory Restore to default settings 3 Press to exit Adjust volume settings You can set different volume for different modes 1 Touch Volume The volume setting sub menu is displayed 2 Touch on a source DVD USB SDHC Radio Bluetooth AV IN1 AV IN2 C...

Page 30: ... it has been replaced there may be an internal malfunction In such case consult your Philips dealer 9 Others Listen to other devices You can connect an external audio video device to the unit 1 Connect the car audio to the device with the supplied AV cable 2 Touch the upper left corner to display the main menu 3 Touch AV IN1 4 Operated the connected the device see the instructions manual of the de...

Page 31: ...size 7 inches 16 9 Display resolution 800 x 480 dots Contrast ratio 300 Brightness 350 cd m2 10 Product information Note Product information is subject to change without prior notice General Power supply 12V DC 11V 16V negative ground Fuse 15 A Suitable speaker impedance 4 8 Maximum power output 50 W x 4 channels Continuous power output 24 W x 4 channels 4 10 T H D Pre Amp output voltage 2 0V CD p...

Page 32: ...Maximum communication range Line of sight approx 8m Frequency band 2 4 GHz band 2 4000 GHz 2 4835 GHz Compatible Bluetooth profiles Hands Free Profile HFP Handset Profile HSP Advanced Audio Distribution Profile A2DP AudioVideo Remote Control Profile AVRCP Supported codecs Receive Transmit SBC Sub Band Codec SBC Sub Band Codec Compatible USB devices USB flash memory USB 2 0 or USB1 1 USB flash players USB...

Page 33: ...e user manual of the device for how to enable the function The system is not in the pairing mode The system is already connected with another Bluetooth enabled device 11 Troubleshooting Warning Never remove the casing of this apparatus To keep the warranty valid never try to repair the system yourself If you encounter problems when using this apparatus check the following points before requesting ...

Page 34: ...mobile phone closer to the system or remove any obstacle between the mobile phone and the system Some mobile phones may connect and disconnect constantly when you make or end calls This does not indicate any malfunction of the system For some mobile phones the Bluetooth connection may be deactivated automatically as a power saving feature This does not indicate any malfunction of the system ...

Page 35: ...ss protocol that is meant to allow mobile devices to share information and applications without the worry of cables or interface incompatibilities The name refers to aViking King who unified Denmark Operate at 2 4GHz For more information see www bluetooth com M MMC MultimediaCard A type of memory card with a flash memory MP3 A file format with a sound data compression system MP3 is the abbreviation o...

Page 36: ...12NC 2009 Koninklijke Philips Electronics N V All rights reserved CID3685_UM_93_V1 0G_V1 0 Document order number ...

Reviews: