background image

16

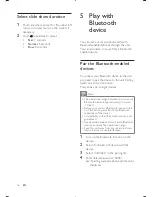
5 Play 

with 

Bluetooth 
device

You can make or receive phone calls with 
Bluetooth-enabled phones through the unit. 
You can also listen to music from a Bluetooth-
enabled device.

Pair the Bluetooth-enabled 
devices

To connect your Bluetooth device to the unit, 
you need to pair the device to the unit. Pairing 
needs only to be done once. 
You can pair up to eight devices.

Note

The operational range between this unit and a 


Bluetooth device is approximately 10 meters  
(30 feet).
Before you connect a Bluetooth device to this 


unit, familiarize yourself with the Bluetooth 
capabilities of the device. 
Compatibility with all Bluetooth devices is not 


guaranteed.
Any obstacle between this unit and a Bluetooth 


device can reduce the operational range.
Keep this unit away from any other electronic 


device that may cause interference.

1

  Turn on the Bluetooth function on the 

device.

2

  Search for Bluetooth device with the 

device.

3

  Select “CID3682” in the pairing list.

4

  Enter default password “0000”.

if pairing succeeds. phone call record is 


»

displayed.

Select slide show duration

1

  Touch anywhere except for the upper left 

corner to display menu on the screen, if 
necessary.

2

 Touch  repeatedly to select:

• 

Fast

: 3 seconds

• 

Normal

: 5 seconds

• 

Slow

: 8 seconds

EN

Summary of Contents for CID3682

Page 1: ...CID3682 Register your product and get support at www philips com welcome EN User manual ...

Page 2: ...tures 15 Zoom 15 Select slide show duration 16 5 Play with Bluetooth device 16 Pair the Bluetooth enabled devices 16 Make a call 17 Receive call 17 Listen to music from Bluetooth device 18 Adjust Bluetooth settings 18 6 Adjust sound 19 Adjust volume 19 Mute 19 Select preset equalizer 19 Set Dynamic Bass Boost DBB 19 7 Adjust settings 20 Display system setup menu 20 Adjust general settings 20 Adjus...

Page 3: ...apply Use of controls or adjustments or performance of procedures other than herein may result in hazardous radiation exposure or other unsafe operation This unit is designed for negative ground earth 12 V DC operation only To reduce the risk of traffic accident do no watch video during driving To ensure safe driving adjust the volume to a safe and comfortable level Improper fuses can cause damage ...

Page 4: ...ot expressly approved by Philips Consumer Lifestyle may void the user s authority to operate the equipment 2008 Koninklijke Philips Electronics N V All rights reserved Specifications are subject to change without notice Trademarks are the property of Koninklijke Philips Electronics N V or their respective owners Philips reserves the right to change products at any time without being obliged to adju...

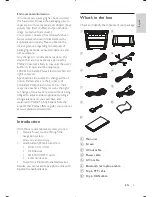
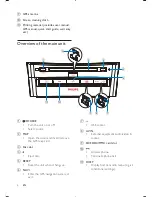
Page 5: ...s i GPS antenna j Screen cleaning cloth k Printing material includes user manual GPS manual quick start guide warranty etc Overview of the main unit a SOURCE Turn the unit on or off Select source b MAP Open the cover and insert remove the GPS map card c Disc slot d Eject disc e RESET Reset the unit when it hangs up f NAVI Enter the GPS navigation system or exit EN e f a b c d j k i h g ...

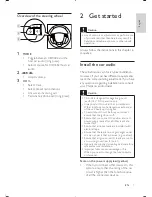
Page 6: ...ct the yellow and red power supply leads after all other leads are connected Ensure that all loose leads are insulated with electrical tape Ensure that the leads do not get caught under screws orin parts that will move e g seat rail Ensure that all ground earth leads are run to a common ground earth point Use only the supplied mounting hardware for a safe and secure installation Improper fuses can...

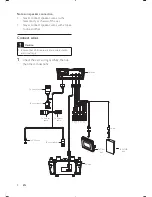
Page 7: ...ed with electrical tape 1 Check the car s wiring carefully then do the other connections EN To host car audio To host car audio To host car audio To host car audio To host car audio Screen To CAN box To CAN box To CMMB box MINI 8PIN Main unit REAR R OUT REAR L OUT CAMERA CVBS EXTERNAL MIC REAR VIDEO OUT1 REAR VIDEO OUT2 AUX IN VIDEO REAR TS REAR R IN REAR L IN Red White Yellow Yellow Yellow Yellow...

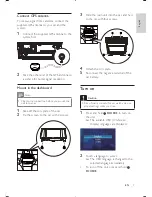
Page 8: ... language to select The OSD language is changed to the selected language immediately To turn off the unit press and hold SOURCE Connect GPS antenna To receive signal from satellites connect the supplied GPS antenna to your car and the system 1 Connect the supplied GPS antenna to the system first 2 Stick the other end of the GPS antenna to a surface for better signal reception Mount in the dashboard...

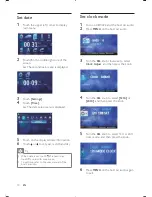
Page 9: ...e and then press the knob 6 Press MENU on the host car audio again to exit Set date 1 Touch the upper left corner to display main menu 2 Touch in the middle right side of the screen The second main menu is displayed 3 Touch Settings 4 Touch Time The date setup menu is displayed 5 Touch on the displayed date information 6 Touch or to set year month and day Tip When date is set touch first and then t...

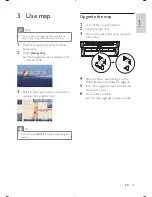
Page 10: ...ck into the map card slot 6 Turn on the car audio The map upgrades in a few minutes 3 Use map Note You may need to upgrade the map before using it see Upgrade the map section 1 Touch the upper left corner to display home menu 2 Touch Navigation The navigation menu is displayed in a few seconds 3 Refer to the map manual in Chinese to operate the navigation tool Tip You can press NAVI to enter exit ...

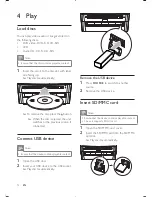
Page 11: ... play video audio or images stored on the following discs DVD video DVD R DVD RW VCD Audio CD CD R CD RW Note Ensure that the disc contains playable content 1 Insert the disc into the disc slot with label side facing up Play starts automatically To remove the disc press the button When the disc is ejected the unit switches to the previous source if connected Connect USB device Note Ensure that the...

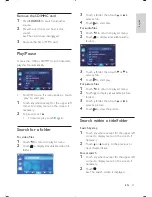
Page 12: ...to skip to the previous or next chapter track Direct search 1 Touch anywhere except for the upper left corner to display menu on the screen if necessary 2 Touch The search screen is displayed Remove the SD MMC card 1 Press SOURCE to switch to another source 2 Press the card until you hear a click sound The card is now disengaged 3 Remove the SD or MMC card Play Pause Once a disc USB or SD MMC card...

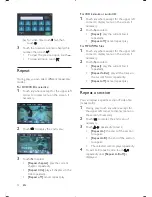
Page 13: ...enu on the screen if necessary 2 Touch to display the 2nd menu if necessary 3 Touch repeatedly to mark Repeat A the start of the section to repeat Repeat A B the end of the section to repeat The selected section plays repeatedly 4 To exit A B repeat mode touch repeatedly until Repeat A B off is displayed For video files touch first then touch 3 Touch the numbers to enter chapter file number then touc...

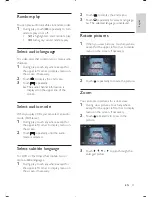
Page 14: ...urn random play on or off is highlighted start random play turns gray cancel random play Select audio language For video discs that contain two or more audio channels 1 During play touch anywhere except for the upper left corner to display menu on the screen if necessary 2 Touch to display the 2nd menu 3 Touch repeatedly The audio channel information is displayed on the upper line of the screen Se...

Page 15: ...is unit familiarize yourself with the Bluetooth capabilities of the device Compatibility with all Bluetooth devices is not guaranteed Any obstacle between this unit and a Bluetooth device can reduce the operational range Keep this unit away from any other electronic device that may cause interference 1 Turn on the Bluetooth function on the device 2 Search for Bluetooth device with the device 3 Sel...

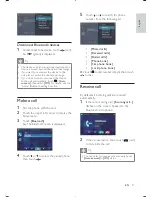
Page 16: ...ly by set Auto answer to Off status Disconnect Bluetooth devices 1 To disconnect one device touch red green is displayed Tip The device will also be disconnected when the device is moved beyond the operational range If you want to reconnect the device to the unit place it within the operational range If you do not want to reconnect the device to the unit automatically touch Auto connect then selec...

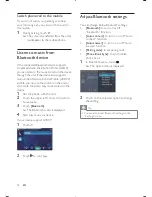
Page 17: ...hear your incoming call you can switch the call to the mobile 1 During talking touch The voice is transferred from the unit s loudspeaker to the mobile phone Listen to music from Bluetooth device If the connected Bluetooth device supports Advanced Audio Distribution Profile A2DP you can listen to the music stored on the device through the unit If the device also supports AudioVideo Remote Control P...

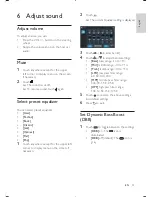
Page 18: ...Boost DBB 1 Touch to toggle between the settings DBB on The icon is illuminated DBB off default The icon is gray 6 Adjust sound Adjust volume To adjust volume you can Press the VOL button on the steering wheel Rotate the volume knob on the host car audio Mute 1 Touch anywhere except for the upper left corner to display menu on the screen if necessary 2 Touch The sound is cut off To resume sound to...

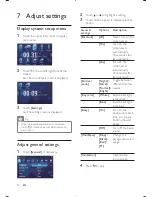
Page 19: ...s white Blue Button backlight turns blue Beep On Turn on the beep sound Each time you press a button the unit beeps Off Turn off the beep sound WallPaper Blue Black Red F1 Change the background color image Calibration Calibrate the touch screen 4 Press to exit 7 Adjust settings Display system setup menu 1 Touch the upper left corner to display main menu 2 Touch in the middle right side of the scre...

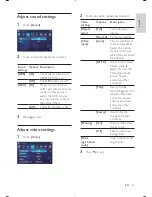
Page 20: ...ce Australia and some other countries Secam Used in France Russia and other countries Parking On Disable video view during drive Off Enable video view during drive DivX registration code View code for DivX registration 3 Press to exit Adjust sound settings 1 Touch Sound 2 Touch an option repeatedly to select Sound settings Options Description DBB On The Dynamic Bass Boost DBB function is on Off Th...

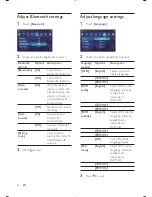
Page 21: ...h Select DVD menu language Options available are depends on DVD disc ࡩ ᇓ໗ ᐥᦥɻʼ 3 Press to exit Adjust Bluetooth settings 1 Touch Bluetooth 2 Touch an option repeatedly to select Bluetooth settings Options Description Bluetooth On Turn on the Bluetooth function Off Turn off the Bluetooth function Auto connect On If the pre paired device is within the effective range the unit re connects to pre pair...

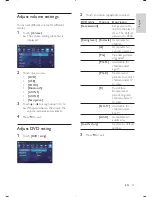
Page 22: ...o view R Restricted Recommend parent to guide children under 17 to view NC 17 Unsuitable for children under age 17 Adult Acceptable for adults only Load factory Restore to default settings 3 Press to exit Adjust volume settings You can set different volume for different modes 1 Touch Volume The volume setting sub menu is displayed 2 Touch on a source DVD USB SDHC Bluetooth AV IN1 AV IN2 Navigation...

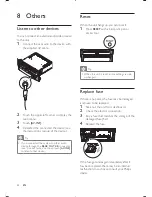
Page 23: ...use gets damaged immediately after it has been replaced there may be an internal malfunction In such case consult your Philips dealer 8 Others Listen to other devices You can connect an external audio video device to the unit 1 Connect the car audio to the device with the supplied AV cable 2 Touch the upper left corner to display the main menu 3 Touch AV IN1 4 Operated the connected the device see...

Page 24: ...ier Directory nesting up to a maximum of 8 levels Number of albums folders maximum 99 Number of tracks titles maximum 999 ID3 tag V2 0 to V2 4 File name in Unicode UTF8 maximum length 128 bytes 9 Product information Note Product information is subject to change without prior notice General Power supply 12 V DC 11 V 16 V negative ground Fuse 5 A Pre Amp output voltage 2 0 V CD play mode 1 kHz 0 dB ...

Page 25: ...he rating settings to lower one Disc region code is not compatible with the unit Use disc with proper region code No image Parking brake wire connection is incorrect Check the parking wiring Image flashes or distorted Video DVD settings do not match with the DVD Adjust video DVD settings Video connection is improper Check the connections Unsupported formats Empty albums an empty album is an album t...

Page 26: ...or power wire is grounded Check the connections Display show ERR 12 USB SD MMC data error Check the USB device or SD MMC card About Bluetooth device Music playback is unavailable on the system even after successful Bluetooth connection The device cannot be used with the system to play music The audio quality is poor after connection with a Bluetooth enabled device The Bluetooth reception is poor M...

Page 27: ...protocol that is meant to allow mobile devices to share information and applications without the worry of cables or interface incompatibilities The name refers to a Viking King who unified Denmark Operate at 2 4GHz For more information see www bluetooth com M MMC MultimediaCard A type of memory card with a flash memory MP3 A file format with a sound data compression system MP3 is the abbreviation of ...

Page 28: ...U WKLV SDUW LV EHORZ WKH OLPLW UHTXLUHPHQW LQ 6 7 Ҹභ ܠ ᄗٟᄗ འራሢ ᅿ ܠ Ө Ⴄঊራӭ ሱ ߅੪Գս 6 7 ҵቻ ىޡ ྭ੪ ႓ d QGLFDWHV WKDW WKLV WR LF RU KD DUGRXV VXEVWDQFH FRQWDLQHG LQ DW OHDVW RQH RI WKH KRPRJHQHRXV PDWHULDOV XVHG IRU WKLV SDUW LV DERYH WKH OLPLW UHTXLUHPHQW LQ 6 7 Ѯ ᄊ ྭ QYLURQPHQWDO 3URWHFWLRQ 8VH 3HULRG ت ኒ ཱԣసሱ߅ᄗ ᄗٟᄗ འራࡩᅏฯᅿሀԪ ᄊ ສ ྑӤࡘ ڡ ඕ ࡩ үĩ ت ኒ ཱԣసᄊࠞ ᄊ تܠ ኒ ཱԣసӤࡘ ॄ ٵ ᆑՐၚሹཌ ࡩ ٵ ഈඈcӯԣᆑՐၚሹ ྭd 7KLV ORJR ...

Page 29: ... 2010 Koninklijke Philips Electronics N V All rights reserved CID3682_93_UM_V2 0 ...

Reviews: