background image


- 10 - 


6.5.4


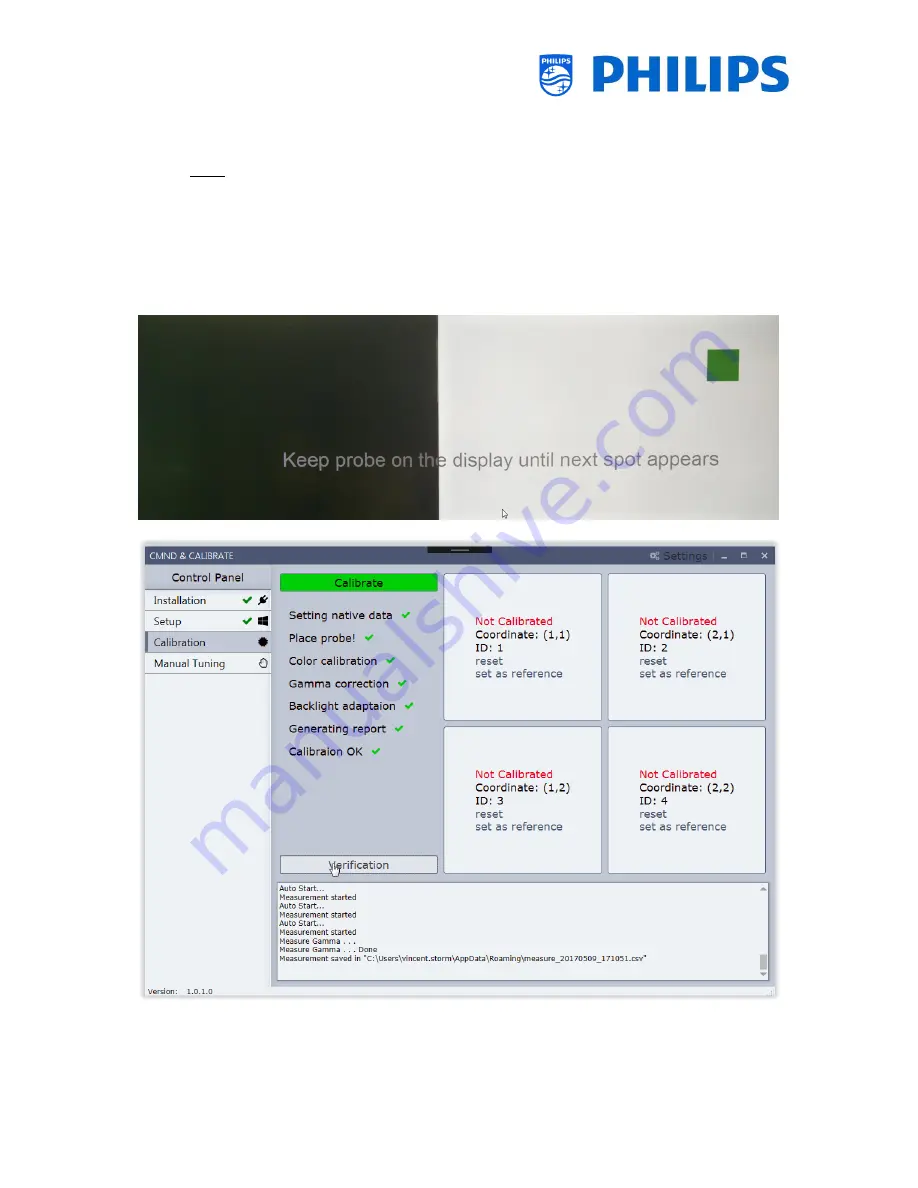
Calibration tab. 


In the “Calibrate” tab select “Calibrate”: this will launch the calibration 

Note: read first below before starting the actual calibration 


A green spot will appear on the first display 


Put the color sensor on this green spot and do not take it away 


The calibration will automatically start and the green spot will disappear 


Keep the color sensor on the same position until the next green spot appear 


If the green spot is in the middle than keep it there until “finished” appears on the monitor 


Summary of Contents for CCK4602

Page 1: ...Get support at http www philips com support http philips supportsystem com CMND Calibrate CCK4602 User Manual Version 1 0 6 Date 26 July 2017 Author Vincent Storm ...

Page 2: ...neral information 1 0 3 26 07 2017 Vincent Storm Add bold text in Connect COM port cable Connect the COM port from your PC via a null modem cross RS232 cable to the RS232 jack 2 5mm input of the first monitor with monitor ID 1 1 0 4 1 09 2017 Vincent Storm Add movie 1 0 5 6 10 2017 Vincent Storm Update supported monitors 1 0 6 2 11 2017 Vincent Storm Modified sw download link ...

Page 3: ...s 5 5 1 Calibrated parameters 5 5 2 Supported tiling matrix 5 6 Start the color calibration 6 6 1 Connect color sensor 6 6 2 Connect COM port cable 7 6 3 Video signal 7 6 4 Setup the monitors 7 6 5 Run the calibration software 8 6 5 1 Start the program 8 6 5 2 Installation tab 8 6 5 3 Setup tab 9 6 5 4 Calibration tab 10 6 5 5 Manual tuning 13 7 Supported monitors 13 8 Ini file 15 9 Trouble shooti...

Page 4: ...ps Electronics NV or their respective owners TP Vision Belgium NV reserves the right to change products at any time without being obliged to adjust earlier supplies accordingly TP Vision Belgium NV cannot be held responsible neither for any errors in the content of this document nor for any problems as a result of the content in this document Errors reported to Philips will be adapted and publishe...

Page 5: ...ith USB connection What else do you need o RS232 connection on your PC or USB to RS232 adaptor o Software package o a cross RS232 cable null model cable o an USB extender cable can be useful o SubD 9 to jack 2 5 mm always delivered with the monitor see picture below 4 Software installation Download the color calibration from http calibrate cmnd io Note if the link is not yet available in above web...

Page 6: ... 5 5 Specifications 5 1 Calibrated parameters Tint custom 10000K Gamma 2 2 Backlight automatic aligned to the maximum light output 5 2 Supported tiling matrix 1x1 to 15x15 monitors ...

Page 7: ...calibration warm up the monitor s for minimum 1 hour Movie of a 2x2 color calibration 6 1 Connect color sensor 1 Lift up the diffuser arm 2 Rotate the diffuser 3 Click the diffuser in the rear position 4 Connect the USB cable of the color sensor to your PC ...

Page 8: ...I or DP from your PC to the first monitor Use the same source inputs as your customer will use Set the screen options in your pc as extended Disable your PC s screensaver If your customer use display port and DVI than calibrate the videowall twice once via source selection display port and once via source selection DVI 6 4 Setup the monitors Set the monitor ID and tiling correct on all the monitor...

Page 9: ...COM port number The software will check automatically the communication to the monitors via RS232 make sure the setting is correct in all monitors the EDID information will be read via the video signal cable The probe color sensor connection is checked via USB All 3 parameters must be green o Display DVI HDMI D port read PHL from the EDID table o Display communication read model name via RS232 o P...

Page 10: ... monitor recommended value 5 Note On the bottom of the window of the program on PC you might see some error in red adapt where needed according to the errors Click on Identify it will read the model numbers via RS232 On the videowall you should see on each monitor a number this pattern is generated from the PC Example of a 2x2 1 2 3 4 ...

Page 11: ...ion A green spot will appear on the first display Put the color sensor on this green spot and do not take it away The calibration will automatically start and the green spot will disappear Keep the color sensor on the same position until the next green spot appear If the green spot is in the middle than keep it there until finished appears on the monitor ...

Page 12: ...ill appear on every calibrated monitor See below screenshot Note the monitors in the software calibration tool can be deselected means those monitors will not be calibrated See below screenshot in red marker as an example monitor ID 1 and ID 2 will not be calibrated ...

Page 13: ...he colors to a target value set in the PC Select in 1 monitor set as reference the light output of this monitor will be measured and used as target value to adjust the other monitor s In example below the light output on the first monitor will be measured and the second monitor will be aligned to the same light output ...

Page 14: ...tor and you can change the backlight the Red Green and Blue colors manually of the selected monitor see the red marker below 7 Supported monitors 65BDL3000Q BDL4280VL BDL4680VL BDL5580VL BDL4780VH BDL4988XL BDL4988XC BDL5588XL BDL5588XH BDL5588XC 55BDL1005X 55BDL1007X 65BDL3010T BDL6526QT ...

Page 15: ... 14 BDL6520QL BDL3260EL BDL4260EL BDL4660EL BDL5560EL BDL4765EL Firmware must be at least 1 94 for all above monitors ...

Page 16: ... 15 8 Ini file Normally you don t need to change any setting in this ini file 9 Trouble shooting ...

Reviews: