background image

8

EN

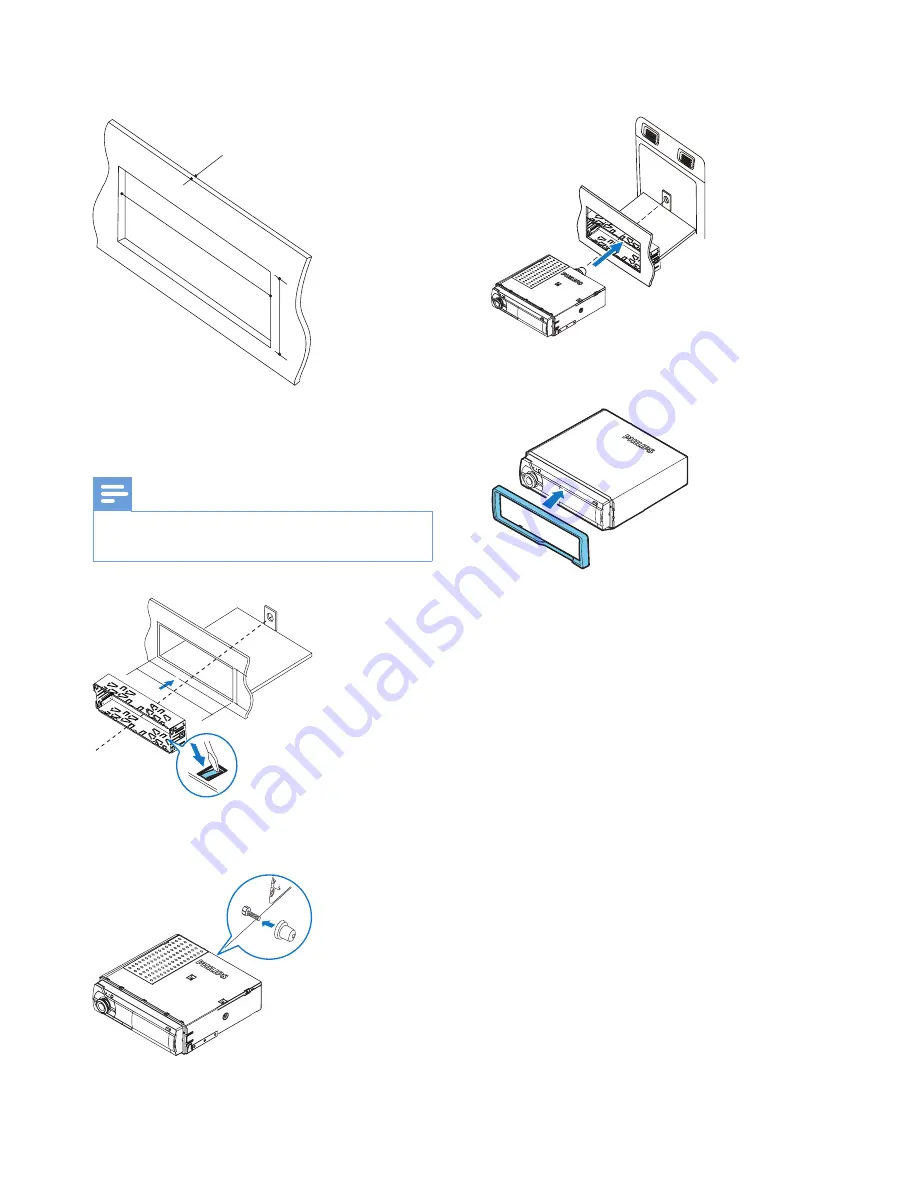
Make sure that the car dashboard opening 

is within these measurements.


Install the sleeve into the dashboard and 

bend the tabs outward to fix the sleeve.

Note


If the system is not fixed by sleeve but by the supplied 

screws, skip this step.


Place the supplied rubber cushion over the 

end of the mounting bolt.


183 mm

53mm

5mm

183 mm

53.5 mm

Slide the system into the dashboard until 

you hear a "click".


Attach the trim plate.


Reconnect the negative terminal of the car 

battery.

Summary of Contents for CarStudio CMD305A

Page 1: ...www philips com welcome CMD305A Always there to help you Question Contact Philips Register your product and get support at User manual ...

Page 2: ......

Page 3: ...17 8 Listen to an external device 18 9 Use the dock 18 Compatible with Android 18 Prepare for docking 18 Connect your phone 19 Adjust the dock bracket 20 Install the CarStudio application 21 Use the CarStudio application 22 Charge your phone 23 Undock your phone 23 Store the dock bracket 24 10 Adjust sound 24 Adjust the volume level 24 Mute sound 24 Use the DBB sound effect 24 Enable the max sound...

Page 4: ...or a safe and secure installation To avoid short circuits do not expose the device to rain or water The device shall not be exposed to dripping or splashing Do not place any sources of danger on the device e g liquid filled objects lighted candles Never insert objects into the ventilation slots or other openings on the device Clean the device with soft damp cloth Never use substances such as alcoh...

Page 5: ...es mp3 wmaV4 V7 V8 V9 L1 L2 Sampling frequencies MP3 32 kHz 44 1 kHz 48 kHz WMA 44 1 kHz 48 kHz Bitrates MP3 8 320 kbps and variable bitrates WMA 64 192 kbps and variable bitrates ID3 tag v2 0 or later Maximum number of albums folders 99 Maximum number of tracks files 999 Maximum level of directory 8 Unsupported formats AAC WAV PCM audio files DRM protected WMA files wav m4a m4p mp4 aac WMA files ...

Page 6: ...hannel No 1 For wma mp3 tracks press to select the next album folder q r t s u n o p e f g h j k l i a b c d m f In radio mode press to select the preset radio station of No 2 In radio mode press and hold to store the current radio station at channel No 2 For wma mp3 tracks press to select the previous album or folder g Press to enable or disable the maximum volume Press and hold to enable or disa...

Page 7: ...resume the play of tracks l Dock for Android powered phone m AUDIO IN Connect to the audio output socket usually the headphone socket of an external device n USB Connect to a USB storage device o RESET p Press to reset the system to factory default settings Press to eject the dock bracket q LCD screen r Press once to display the system clock Press and hold to access the system menu s Press to turn...

Page 8: ...ectrical tape Make sure that the leads do not get caught under screws iron parts that will move e g seat rail Make sure that all ground earth leads are run to a common ground earth point Use only the supplied mounting hardware for a safe and secure installation Improper fuses can cause damage or fire When you need to change the fuse consult a professional When you connect other devices to this sys...

Page 9: ...nnect to 1 ANTENNA Antenna for radio 2 External Mic An external microphone for phone call 3 SUBWOOFER Socket Subwoofer 4 REAR LINE OUT L Socket Rear left speaker 5 REAR LINE OUT R Socket Rear right speaker 6 OE REMOTE Brown OE remote 7 FRONT LINE OUT L Front left speaker 8 FRONT LINE OUT R Front right speaker Tip The pin arrangement for the ISO connectors depends on the type of vehicle you drive B...

Page 10: ...d to fix the sleeve Note If the system is not fixed by sleeve but by the supplied screws skip this step 3 Place the supplied rubber cushion over the end of the mounting bolt 183 mm 53m m 5mm 183 mm 53 5 mm 4 Slide the system into the dashboard until you hear a click 5 Attach the trim plate 6 Reconnect the negative terminal of the car battery ...

Page 11: ...the hour 4 Press to confirm 5 Rotate to set the minute 6 Press to confirm Set the clock format 1 Press and hold to access the system menu 2 Press repeatedly until CLOCK 12H or CLOCK 24H is displayed 3 Rotate to select a setting CLOCK 12H 12 hour time format CLOCK 24H 24 hour time format Display the clock Press to display the clock To exit press any button Select a source Note When all other source...

Page 12: ...r stations with strong and weak signals Tune to a radio station 1 Press repeatedly to switch the source to RADIO 2 Press repeatedly to select a band FM1 FM2 FM3 MW1 or MW2 3 Press and hold or until the frequency digits blink 4 Press or repeatedly to tune to a radio station manually The radio station is broadcast To search for a radio station automatically press or Store radio stations in memory No...

Page 13: ...ategory only 1 Press and hold to access the system menu 2 Press repeatedly until PTY is displayed 3 Press to confirm 4 Rotate to select a program type and then press to confirm Item Program type Description 1 NEWS News services 2 AFFAIRS Politics and current affairs 3 INFO Special information programs 4 SPORT Sports 5 EDUCATE Education and advanced training 6 DRAMA Radio plays and literature 7 CUL...

Page 14: ...ouncement is on air the system automatically switches to the tuner mode and begins to broadcast the traffic announcement When the traffic announcement is over the system returns to the previous mode TA OFF Traffic announcement does not cut in Tip When a traffic announcement cuts in you can press to switch the system to the previous mode Receive traffic programs only If you want to receive traffic ...

Page 15: ... 3 Enter the default password 0000 If the pairing is successful PAIR OK is displayed Disconnect a device 1 Press and hold until BT DISCO is displayed 2 Press to confirm DISCONNECTED scrolls Tip You can also disable the Bluetooth function on this connected device Reconnect a device 1 Press and hold until BT RECON is displayed 2 Press to confirm If the auto connection between CMD305A and this device...

Page 16: ...confirm CALL is displayed Pick up an incoming call When the system receives an incoming call the phone number or PHONE IN is displayed Press to answer the call Reject an incoming call Press and hold until END is displayed End a call To end an on going call press Transfer a phone call to mobile phone By default voice comes from the loudspeakers during a call 1 Press and hold until TRANSFER is displ...

Page 17: ...a folder 2 Press to select a file 3 Press to start play RESET Control play During play follow the instructions below to control play Buttons Functions Pause or resume play Skip to the previous or next track Press and hold to rewind a track or search forward fast within a track Skip to the previous or next folder when one or more folders exist Select a repeat mode REPEAT TRACK repeat the cur rent t...

Page 18: ... the dock An application Philips CarStudio is available on Google Play Store for this car audio system To enjoy full features download and install the application to your Android powered phone Compatible with Android Before using the dock check your Android powered phone and make sure that it meets the following requirements With Android operating systemV2 2 or later With a micro USB socket and Wi...

Page 19: ...cable Dock your phone Note Make sure that the width of your phone is between 52 mm and 73 mm Before docking your phone make sure that the dock bracket is in portrait position 1 Flip out the USB connector or hide it in the dock If the USB socket of your phone is on its bottom flip out the USB connector Otherwise flip the USB connector inwards to hide it in the dock 2 Switch the cushions to make sur...

Page 20: ...ts bottom or the width of your phone exceeds the range from 52 mm to 73 mm use the supplied USB cable for connection Connect the USB cable between the USB socket of your phone and the USB socket in the dock Adjust the dock bracket Caution When the dock bracket is in portrait position do not turn it clockwise When the dock bracket is in landscape position do not turn it anti clockwise Switch to lan...

Page 21: ... dock bracket clockwise by 90 degrees 2 Adjust the viewing angle Install the CarStudio application Note Make sure that the internet connection is active on your phone 1 Run the Google Play Store Play store application on your phone 2 Tap to display the search interface ...

Page 22: ... function or play audio through the dock connect your phone with the car audio system via Bluetooth first To enjoy the latest features update the application on your phone when an update message prompts After update the interface and features may be different from the description in this section Follow the actual operations If Bluetooth connection fails when you try to connect your phone and this ...

Page 23: ...device settings Change settings Return to the main interface Add a shortcut of an application onto the current interface Tap to display the dialog box tap Application on the dialog box to display all applications that are installed on your phone and then tap an application name to create a shortcut To remove an icon from the interface tap and hold it until a dialog box is displayed and then tap Ch...

Page 24: ... to all compatible media Adjust the volume level Rotate clockwise or anti clockwise Mute sound Press To restore sound press again Use the DBB sound effect Press and hold until one of the following settings is displayed DBB ON Dynamic bass boost DBB is enabled DBB OFF DBB is disabled Enable the max sound Press repeatedly to select one of the following settings MAX ON Use the maximum sound MAX OFF R...

Page 25: ... and rear speakers 12R to 12F BASS Bass level 7 to 7 TREBLE Treble level 7 to 7 SUBW Enable or mute the subwoofer 3 Rotate clockwise or anti clockwise to change the setting 11 Adjust system settings 1 Press and hold to access the system menu 2 Press repeatedly until one of the following settings is displayed BEEP BKO DIMMER or DEMO 3 Rotate to change the setting BEEP BEEP ON Enable the beep sound ...

Page 26: ...The system is reset Replace the fuse If there is no power check the fuse and replace it if it is damaged 1 Detach the system from dashboard 2 Check the electric connection 3 Remove the damaged fuse from the rear panel 4 Insert a new fuse with the same specifications 15 A Note If the fuse gets damaged immediately after it is replaced an internal malfunction may occur In this case consult your WOOX ...

Page 27: ...oltage 2 5V Aux in level 500 mV Dimensions W x H x D 188 x 58 x 199 5 mm Weight 1 32 kg Radio Frequency range FM ORIT 87 5 108 0 MHz 100 kHz per step in auto search and 50 kHz per step in manual search 65 0 74 0 MHz 30 kHz per step Frequency range AM MW 522 1620 kHz 9 kHz 530 1710 kHz 10 kHz Usable sensitivity FM 8 µV Usable sensitivity AM MW S N 20 dB 30 µV Bluetooth Output power 0 dBm Class 2 Fr...

Page 28: ...GPS signal reception of the phone is poor Remove the phone from the dock and place it in another location for better signal reception About Bluetooth device Cannot pair the Bluetooth enabled device with the car audio system The device does not support the profiles required for the system The Bluetooth function of the device is not enabled Refer to the user manual of the device for how to enable th...

Page 29: ...te into three materials cardboard box polystyrene foam buffer and polyethylene bags protective foam sheet Your system consists of materials which can be recycled and reused if disassembled by a specialized company Please observe the local regulations regarding the disposal of packaging materials exhausted batteries and old equipment Copyright 2013 WOOX Innovations Limited All rights reserved Speci...

Page 30: ...Innovations Limited or one of its affiliates further referred to in this document as WOOX Innovations and is the manufacturer of the product WOOX Innovations is the warrantor in relation to the product with which this booklet was packaged Philips and the Philips Shield Emblem are registered trademarks of Koninklijke Philips N V CMD305A_05_UM_V3 0_EN ...

Reviews: