background image

English

EN


 37

Ad

ju

st

 se

tt

in

g

s

[Factory Default] settings

[Settings] 

Option

Description

[Yes]

Reset all the settings to the 
factory default, except for 

[Parental]

 setting .

[No]

Does not perform the 
initialisation.

[Local Storage] 

Option

Description

[Yes]

Initialise (clean up) the area 
used for BD application.

[No]

Does not perform the 
initialisation.

Set-up

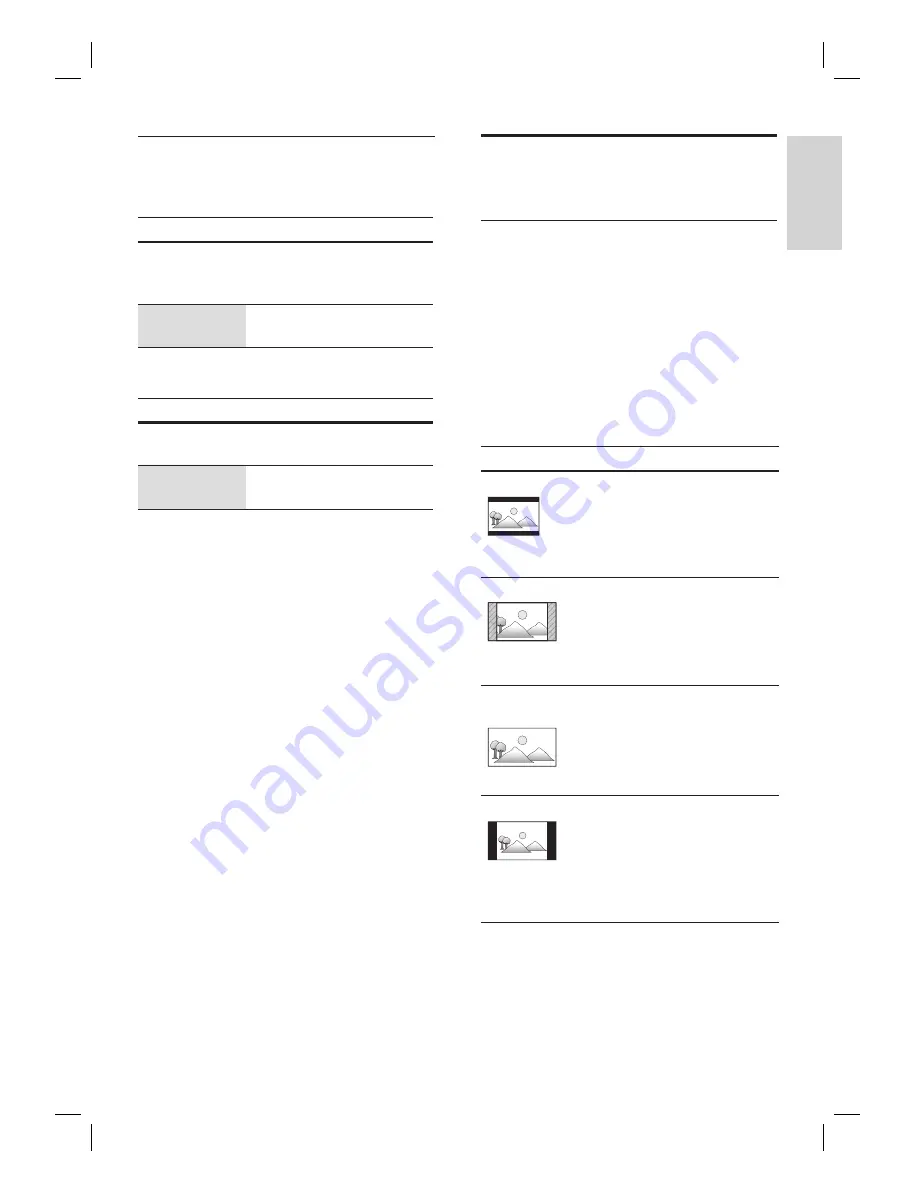
Set TV screen display format

Use this feature to adjust the aspect ratio of the 
video source which is different from your TV’s 
ratio to 

fi

 t your TV monitor without distorting 

the picture.  

Press 

HOME

.

Select 

[Settings]

 > 

[Advanced Set-up]

 > 

[Video Output]

 > 

[TV Shape].

Option

Description

[

4:3 Letter Box

]

To enjoy 16:9 picture on 4:3 
monitor. 16:9 picture is 
scaled down until the both 
sides of the picture 

fi

 ts the 

4:3 TV.

[4:3 Pan Scan]

To enjoy 16:9 picture on 4:3 
monitor.  Both sides of the 
picture are trimmed to 

fi

 t the 

4:3 TV without distorting the 
aspect ratio of the picture.

[16:9 Wide 
Screen]

To enjoy 16:9 picture on 
16:9 monitor. Select this 
setting when you want to 
enjoy 16:9 picture on the 
16:9 TV. 

[16:9 Squeeze]

To enjoy 4:3 picture on 16:9 
monitor.  Use this setting to 
display 4:3 picture on the 
16:9 TV without distorting 
the aspect ratio of the 
picture.

Summary of Contents for BDP7200

Page 1: ...BDP7200 EN Blu Ray Disc Player 4 Register your product and get support at www philips com welcome ...

Page 2: ...ured red Do not connect either wire to the earth terminal in the plug marked E or e or coloured green or green and yellow Before replacing the plug cover make certain that the cord grip is clamped over the sheath of the lead not simply over the two wires Copyright in the U K Recording and playback of material may require consent See Copyright Act 1956 and The Performer s Protection Acts 1958 to 19...

Page 3: ...uom Toiminnanvalitsin on kytketty toisiopuolelle eikä se kytke laitetta irti sähköverkosta Sisäänrakennettu verkko osa on kytkettynä sähköverkkoon aina silloin kun pistoke on pistorasiassa Manufactured under license from Dolby Laboratories Dolby and the double D symbol are trademarks of Dolby Laboratories HDMI and HDMI logo and High Definition Multimedia Interface are trademarks or registered trad...

Page 4: ...es 29 Switch audio soundtrack 30 Switch camera angles 30 Contents 1 Important 6 Safety and important notice 6 Recycle notice 6 Copyright notice 6 2 Your product 7 Features highlight 7 Symbols used in this user manual 8 Product overview 9 Front panel 9 Back panel 10 Remote control 11 Guide to on screen display 14 3 Connect 15 Connect video cables 15 Option 1 Connect to HDMI socket 15 Option 2 Conne...

Page 5: ... settings 36 Factory Default settings 37 Set up 37 SetTV screen display format 37 Set HDMI video resolution 38 Set HDMI audio output format 39 Set digital output format 40 Speaker Setup 41 Set parental lock 42 Activate EasyLink control 43 Reset to factory default 43 7 Additional information 44 Care 44 Specifications 45 8 Troubleshooting 46 9 Glossary 49 ...

Page 6: ...on Corporation and is intended for home and other limited viewing uses only unless otherwise authorised by Macrovision Corporation Reverse engineering or disassembly is prohibited 1 Important Safety and important notice Warning Risk of fire or electric shock Ensure that air can circulate freely through the ventilation holes on this unit Allow at least 5 10 cm clearance around the unit Never expose...

Page 7: ... over an HDMI connection The picture will be less jagged and more realistic for a near high definition experience Enjoy your content on different kinds of media Full backwards compatibility with DVD CD ensures that you can continue to enjoy your current audio video collection Additionally you can view JPEG digital pictures or listen to MP3 or Windows Media Audio music files Listen to the rich mult...

Page 8: ...terial with the frame rate of 24 frames per second with progressive Available only when the display device is connected by an HDMI cable Refer to chapter Adjust settings List of settings HDMI 1080p 24 HDMI 1080p 24 Output BD only This unit supports the high definition audio such as Dolby Digital Plus Dolby TrueHD and DTS HD These audio format can provide you with the higher audio quality than the ...

Page 9: ...t i Infrared sensor window j OUTPUT Press to change the resolution of HDMI output Not available during the playback of a BD video or while displaying the settings menu Front panel display Mode Loading a disc B Playback is in progress x Stop mode X Pause mode M Fast forward mode m Fast reverse mode Slow forward mode Repeat function is set Display the home menu Title is being played back Indicating ...

Page 10: ...th 5 1 channel audio cables e AUDIO OUT sockets Use to connect a TV monitor an AV receiver amplifier or other device with an RCA audio cable f DIGITAL OUT COAXIAL OPTICAL sockets Use to connect an AV receiver amplifier Dolby Digital DTS decoder or other device with a digital audio coaxial optical input socket with a digital audio coaxial optical cable g AC IN Terminal Use to connect to the AC outl...

Page 11: ...unction f HOME Press to display the home menu g OK Press to confirm or select menu items h Cursor buttons Press to select items or settings i BACK Press to return to the previously displayed menu or screen function j PREV í During playback press once to return to the beginning of the current title chapter or track During the JPEG playback press to return to the previous file During playback press ...

Page 12: ...tedly t AUDIO Press to select the audio channel such as audio languages on a disc u FFW M During playback press to fast forward the playback When playback is in pause press to slow forward the playback v TV CH Press to change the channel up and down only applicable to the PHILIPS brand TV w STOP x Press to stop playback x NEXT ë During playback press to skip to the next chapter track or file y DIS...

Page 13: ...t there are no obstacles between the remote control and the infrared sensor window on the unit Remote operation may become unreliable if strong sunlight or fluorescent light is shining on the infrared sensor window of the unit Remote control for different devices can interfere with each other Avoid using remote control for other device located close to the unit Replace the batteries when you notic...

Page 14: ...Product Info To access the product information Tip You can also download the latest firm ware from the web site which is displayed in the Product Info screen and update the firm ware by yourself Menu Screen Settings Quick Set up Advanced Set up Factory Default Player menu TV Shape HDMI Video Resolution BD Player 2 3 1 1 Directory Displays the current hierarchy 2 Menus 3 Sub menus Options Displays ...

Page 15: ...r a standard TV Option 1 Connect to HDMI socket HDMI OUT HDMI IN DVI IN HDMI OUT 1 Connect a HDMI cable supplied to HDMI OUT socket on this unit and the HDMI IN socket on your TV Use a HDMI DVI adaptor in case your TV has only a DVI connection Note To optimise the video output refer to chapter Adjust settings List of settings HDMI Video Resolution or press OUTPUT repeatedly to select the best reso...

Page 16: ...r to chapter Adjust settings List of settings Component Output for details The component video input socket on your TV may be labelled as Y Pb Cb Pr Cr or YUV This type of connections provide good picture quality Option 3 Connect to video socket VIDEO OUT VIDEO IN 1 Connect a RCA video cable supplied to the VIDEO OUT socket on this unit and the video input socket on your TV Tip The video input soc...

Page 17: ...io cable supplied to the AUDIO OUT sockets on this unit and the audio input sockets on the device Connect to digital amplifier receiver DIGITAL OUT PCM BITSTREAM COAXIAL OPTICAL COAXIAL OPTICAL DIGITAL AUDIO INPUT 1 Connect a coaxial cable not supplied to the DIGITAL OUT COAXIAL socket on this unit and the DIGITAL IN COAXIAL socket on the device or 1 Connect an optical cable not supplied to the DI...

Page 18: ...s unit and the audio input sockets on the device Tip To set up the speakers refer to chapter Adjust settings List of settings Analogue Audio for details Connect to power outlet Caution Insert the cords securely Incomplete connections will result in the generation of noise AC IN 1 After you made all the necessary connections connect the AC cord to the AC IN on this unit and to the AC power outlet ...

Page 19: ...n This is the correct viewing channel external input channel If a certain amount of time has passed since you turned on the unit you may see the home menu instead of the PHILIPS splash screen Disc Tray Settings Product info Blu ray Disc Player How to insert a disc 1 Press Z to open the disc tray 2 Place the disc on the disc tray with its label side facing up Make sure the disc is compatible with t...

Page 20: ... cannot play back the following discs Due to the intentional progression of the Blu ray disc format by its standard setting authority Philips cannot guarantee or warrant the playability of future extensions of the Blu ray disc format with this product BD R or BD RE recorded in BDAV mode or non compatible recording format Disc contents protected by Windows Media Digital Rights Management DRM DVD R ...

Page 21: ...ctions or folders groups of titles files as shown below BD video DVD video title 1 title 2 chapter 2 chapter 1 chapter 3 chapter 2 chapter 1 track 2 track 1 track 5 track 4 track 3 Audio CD MP3 Windows Media Audio JPEG folder group 1 folder group 2 file 3 file 2 file 1 file 2 file 1 Folders refers to the groups of files Tracks refers to the contents recorded on the audio CD Files refers to the con...

Page 22: ...3 0 00 13 MP3_2 mp3 MP3_3 mp3 MP3_4 mp3 MP3_5 mp3 MP3_6 mp3 MP3_7 mp3 3 MP3 File Page Up Page Down Media Filter 1 11 2 3 4 5 6 7 8 9 10 e g MP3 files 1 Number of contents in the current group folder 2 Repeat status music mode only 3 Image 4 Elapsed playing time of the current track 5 Current file name 6 Media type 7 Group folder file list 8 Playback status 9 Root folder q Group folder name qa Dire...

Page 23: ...ction To pause playback To return to the normal playback To stop playback Playback will be in Resume On Stop mode and the home menu appears When you press PLAY next time playback starts from the point where it has been stopped Note When you press HOME playback stops and the home menu appears For BD Java application the Resume On Stop is not available If you press OK instead of PLAY playback can be...

Page 24: ...turn to the normal playback To stop playback Playback will be in Resume On Stop mode For audio CD playback starts from the point where it is stopped next time you press PLAY For MP3 WMA playback starts from the file being played back last next time you press PLAY Red button To go back to the media filter screen Note When you press HOME playback stops and the home menu appears If you press OK inste...

Page 25: ...ccompanying the disc for details TOP MENU or DISC MENU POP UP MENU may not work with some discs Special playback Fast forward reverse play 1 During playback press FFW M or REW m repeatedly for fast forward or fast reverse Every time you press FFW M or REW m it changes the playback speed For BD and DVD speed changes in five different levels For audio CD MP3 Windows Media Audio speed changes in thre...

Page 26: ...med area not available for the JPEG playback Note For JPEG files slide show of the zoomed picture is not possible For JPEG files x4 zoom is not available For some DVD x4 zoom is not available Zoom does not work during the playback of the BD video Zoom does not work while DVD menu is displayed Repeat play Available repeat function vary depending the discs 1 During playback press REPEAT repeatedly t...

Page 27: ...between point A and point B starts to play repeatedly 3 To cancel A B repeat press REPEAT A B repeatedly until Off appears Note Point B should be set within the same title or track as point A Slide show 1 Insert a disc Home menu appears 2 With Disc Tray selected press OK Media filter screen appears 3 Select Picture then press OK 4 Open the folder which contains the desired JPEG files 24 BD Player ...

Page 28: ...ck on how to output the secondary audio Search Title Chapter search Use 1 During playback press NEXT ë to skip the current title or chapter and move to the next The title or chapter moves forward by one at a time If there is no chapter in one title the current title may be skipped 2 To go back to the beginning of the current title or chapter press PREV í Press PREV í repeatedly to go to the previo...

Page 29: ...ed time count 5 Press INFO to remove the information display Change audio and video format Switch subtitles Some BD video or DVD video may have subtitles in one or more languages For commercially available discs the supported languages can be found on the disc case Follow the steps below to switch the subtitle language during playback 1 During playback press SUBTITLE to bring up the subtitle infor...

Page 30: ... Press or AUDIO repeatedly to switch the audio soundtrack or audio channel Tip Refer to chapter Adjust settings Audio settings Blu ray Disc Audio on how to output the secondary audio 1 During playback press AUDIO to bring up the information bar 2 Press or AUDIO repeatedly to switch the audio soundtrack or audio channel Switch camera angles Some BD video or DVD video have scenes shot from 2 or more...

Page 31: ...stomise Settings with can be accessed from the Quick Set up also The item highlighted in grey is the default setting Language settings Audio Option Description Default Set the audio language for BD video or DVD video playback If you select Default the disc s original language will be in effect List of available languages Subtitle Option Description Off Set the subtitle language for BD video or DVD...

Page 32: ...ion setting is set to 1080p The display device supports the 1080p 24 output Off Output the picture in 50 Hz or 60 Hz HDMI Video Resolution This feature is available only when the display device is connected by an HDMI cable Refer to chapter Set up Set HDMI video resolution for more information Option Description Auto Set the resolution of the video signal being output from the HDMI OUT The selecte...

Page 33: ...l be available 480p 576p 720p 1080i Note With regard to the DVD Video with a copy protection the resolution will be set to 480p 576p regardless of the setting here If 480p 576p output is not available 480i 576i will be output De interlacing Mode Option Description Auto Automatically detects the film or the video content and appropriately converts it Video Select this setting when the picture is di...

Page 34: ... Select On to enjoy the stereophonic virtual space through your existing 2 channel stereo system during playback of BD video or DVD video Off Blu ray Disc Audio Option Description Mix Audio Output The audio for the secondary video and the interactive application will be output together with the audio for the primary video Primary Audio only Only the audio for the primary video will be output When ...

Page 35: ... number of your speakers Refer to chapter Set up Speaker setup for more information You can also output the test tone from each speaker by pressing Red button Speaker Distance Unit set the desired measure system default setting is Feet This measure system will be used for the speaker distance setting Select the distance from the listening point to the speaker to get the ideal delay time Speaker Le...

Page 36: ...f Slide Show Interval Option Description 5sec Set the amount of time for displaying one picture before switching to the next one For example select 5sec to switch the picture every 5 seconds 10sec Slide Show Transition Option Description Cut In Out The pictures cut in and out sharply as playback progresses Fade In Out The pictures fade in and out as playback progresses EasyLink HDMI CEC This featu...

Page 37: ...r without distorting the picture 1 Press HOME 2 Select Settings Advanced Set up Video Output TV Shape Option Description 4 3 Letter Box To enjoy 16 9 picture on 4 3 monitor 16 9 picture is scaled down until the both sides of the picture fits the 4 3 TV 4 3 Pan Scan To enjoy 16 9 picture on 4 3 monitor Both sides of the picture are trimmed to fit the 4 3 TV without distorting the aspect ratio of th...

Page 38: ...must support 24Hz output and HDMI 1080p 24 should be set to Auto Otherwise the image will be output in 60Hz Actual output resolution by DVD HDMI Video Resolution setting 480p 576p 720p 1080i 1080p Auto Source 480i 60Hz 480p 60Hz 720p 60Hz 1080i 60Hz 1080p 60Hz The highest resolution supported by your display device will be in effect automatically 576i 50Hz 576p 50Hz 720p 50Hz 1080i 50Hz 1080p 50Hz...

Page 39: ...ital PCM 2 1 Mute Dolby Digital PCM 2 2 Mute PCM 2 1 Mute PCM 2 2 Mute Mute DTS DTS PCM Mute Dolby Digital PCM Mute PCM Mute PCM Mute Mute DTS HD DTS HD DTS PCM 3 1 Mute Dolby Digital PCM 3 2 Mute PCM 3 1 Mute PCM 3 2 Mute Mute LPCM PCM Mute PCM Mute PCM Mute PCM Mute Mute DVD video Dolby Digital Dolby Digital PCM Mute PCM Mute Mute DTS DTS PCM Mute PCM Mute Mute LPCM PCM Mute PCM Mute Mute Audio ...

Page 40: ...set to Mix Audio Output Digital Out setting Bitstream PCM Blu ray Disc Audio setting Primary Audio Only Mix Audio Output Primary Audio Only Mix Audio Output Media Audio source BD video Dolby Digital Dolby Digital Dolby Digital DownMix PCM DownMix PCM Dolby Digital Plus Dolby Digital Dolby Digital DownMix PCM 1 1 DownMix PCM 1 2 Dolby TrueHD Dolby Digital Dolby Digital DownMix PCM 2 1 DownMix PCM 2...

Page 41: ...und R Surround L Subwoofer Center 4 Press OK repeatedly to change the setting Option Suitable for Large Large speakers with the capacity for powerful low frequency sound Small Small speakers which do not bare the powerful low frequency sound On When subwoofer speaker is connected Off No speakers With regards to the low frequency sound which is less than 100Hz the sound will be output from the subw...

Page 42: ...OK again Current PIN code and the Parental settings are now cleared Follow the above steps to create a new PIN code 4 After entering the PIN code Rating Level appears Select desired rating level then press OK Rating Level All New PIN 8 Adult 7 6 5 4 3 2 All Parental lock is inactive 8 Adult DVD software of any grades can be played 7 NC 17 No one under 17 admitted 6 R Restricted under 17 requires a...

Page 43: ...andby On for 2 seconds it turns off the power of the TV first and then turns off the power of this unit also When the connected EasyLink HDMI CEC compatible display device is turned off this unit may also turns off together System Information Get Set Menu Language The unit recognises the OSD language set for theTV and automatically sets the same language as the player menu language OSD menu langua...

Page 44: ...n this user manual the laser optical pickup unit may be dirty Consult your dealer or an Authorised Service Centre for inspection and cleaning of the laser optical pickup unit Clean the cabinet Wipe the front panel and other exterior surfaces of the unit with a soft slightly damp cloth Disc handling Handle the discs so that fingerprints and dust do not adhere to the surfaces of the discs Always sto...

Page 45: ...dio Front L R 2 Vrms 1 kohm Audio Surround L R 2 Vrms 1 kohm Audio Centre 2 Vrms 1 kohm Audio Subwoofer 1 15 Vrms 1 kohm Digital output 0 5 Vp p 75 ohm Optical Coaxial HDMI output Sampling frequency MP3 32 kHz 44 1 kHz 48 kHz WMA 44 1 kHz 48 kHz Constant bit rate MP3 112 kbps 320 kbps WMA 48 kbps 192 kbps Main Unit Dimensions w x h x d 435 x 70 x 348 mm Net Weight 4 1 kg Remote Control Operating d...

Page 46: ...HDMI cable If the unit is connected to the unauthorised display device with an HDMI cable the audio video signal may not be output No high definition video signal on the TV Does the disc contain high definition video High definition video is not available when the disc does not contain it Does the TV support high definition video High definition video is not available when the TV does not support ...

Page 47: ...annot play back a disc Make sure that the product supports the disc Make sure that the Blu ray Disc player supports the region code of the DVD or BD For DVD RW or DVD R make sure that the disc is finalised Clean the disc Cannot play back JPEG files from a disc Make sure that the disc was recorded in the UDF ISO9660 or JOLIET format Cannot play MP3 files and Windows Media Audio from a disc Make sur...

Page 48: ...is mp3 or MP3 and wma or WMA for Windows Media Audio X appears in the upper right hand corner of the screen The operation is not possible Error message appears when select Auto in the Player Menu Make sure that the unit is connected to the Philips brand EasyLink TV and the EasyLink HDMI CEC is set to On This error message may appear when your TV s OSD language is not supported by this unit ...

Page 49: ...stream of numbers On playback a digital to analogue converter generates an analogue signal based on these numbers DTS Digital Theatre System DTS is a multi channel surround sound system You can enjoy movie dynamic and realistic sound like movie theatre DTS surround sound technologies were developed by DTS Inc Dolby Digital The system to compress digital sound developed by Dolby Laboratories It off...

Page 50: ...ecified interval to turn into digital audio data The numbers of sampling in one second defines as sampling frequency The higher the rate the better the sound quality Title A collection of chapters on BD video or DVD video Track Audio CD use tracks to divide up the content of a disc The BD video or DVD video equivalent is called a chapter Windows Media Audio Windows Media Audio is the audio compres...

Page 51: ... 2008 Philips Consumer Lifestyle All right reserved 1VMN26153 sgpjp 0829 en1 ...

Reviews: