background image

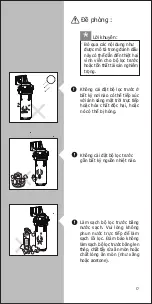
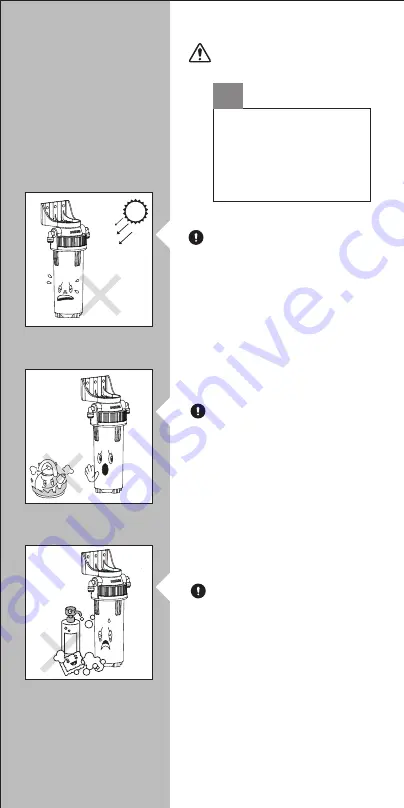
Clean the pre-filter with the 
clean water. Please don't 
spray the water directly to 
clean the filter. Be sure not 
to clean the pre-filter with 
steel wool, abrasive cleaner 
or corrosive liquid (such as 
gasoline or acetone).

Don't install the pre-filter in 
any place where it may be 
exposed to direct sunlight 
or hazardous chemicals, or 
it may be damaged.

Precautions:

· Ignoring the contents as 
  described in this marking 


may result in permanent 

  damage to the pre-filter 
  or serious property losses.

Tips:

*

Don't install the pre-filter 
near any heat source.

6

Summary of Contents for AWP1811

Page 1: ...Hướng dẫn sử dụng User manual 1 11 12 21 Sediment prefilter AWP1811 Water solutions ...

Page 2: ......

Page 3: ...4 Usage instruction First use 4 2 3 Preparation before installation Installation steps Installation 4 2 6 5 5 Precautions Warning Precautions 6 8 Fault diagnosis 9 9 Guarantee Service 10 10 Packing list 11 7 7 7 Maintenance and servicing Routine maintenance Replacement of filter cartridge 8 ...

Page 4: ... introduction 2 Main technical specifications AWP1811 3L min Product model Filter cartridge Purified water flow 4500L Total rated water purification amount 0 1 0 4MPa Inlet water pressure Municipal tap water Inlet water quality AWP111 3 Product overview 1 Filter shell Polypropylene filter cartridge O shape seal ring Clip Filter cover Water inlet Screw Screw Plastic pipe Connector Water outlet Fixe...

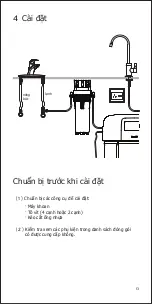
Page 5: ...热 2 4 Installation Hot Cold 1 Prepare tools for installation 2 Check if the accessories in packaging list are all provided Preparation before installation Percussion drill Cross screwdriver Pipe scissors ...

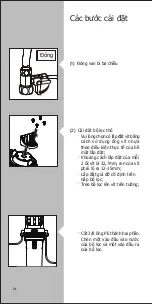
Page 6: ...to the actual conditions of the mounting surface The installation distance of every 2 screws is 32 7mm the thread of the screw shall expose 12 15mm Install the fixed holder on the filter cover Hang the filter on the screw on wall Cut 3 8 PE pipe into two sections Insert one into the water inlet of filter and one into the water outlet of filter Close 冷 热 冷 热 3 ...

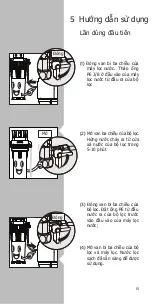
Page 7: ...er purifier 2 Open the three wayvalve Keep the water flowing out from water outlet of filter for 5 10 minutes 3 Close the three way ball valve Insert the PE pipe on water outlet of the pre filter into the water inlet of the water purifier 4 Open the three way ball valve The purified water is ready to be used Open Close ...

Page 8: ...ter pressure exceeds 0 4 MPa the pressure reducing valve must be added to be purchased separately The inlet water temperature of the pre filter should be 5 38 C as required If the inlet water temperature exceeds 38 C the seal may be damaged causing water leakage If the inlet water temperature is lower than 5 C the freezing conditions mayoccur causing pipeline rupture and water leakage Do not insta...

Page 9: ...corrosive liquid such as gasoline or acetone 洗 剂 Don t install the pre filter in any place where it may be exposed to direct sunlight or hazardous chemicals or it may be damaged Precautions Ignoring the contents as described in this marking may result in permanent damage to the pre filter or serious property losses Tips Don t install the pre filter near any heat source 6 ...

Page 10: ...y seal the filter cartridge store the filter cartridge in the refrigerator fresh keeping room don t put the filter element in the refrigerating chamber allow the water purifier to pass the water for 3 minutes before use 7 Maintenance and servicing Routine maintenance If the pre filter has not been used for a long time please close the three way connector and disconnect it from the water source Clo...

Page 11: ...h the original Philips filter cartridge Recommended replacement period Model code Recommended replacement period About 3 6 months The actual service life of filter cartridge depends on local water quality and daily usage 8 Steps for replacement of the filter cartridge Close Rotate the filter shell with the wrench in the box and install the new filter 2 Close the three way ball valve 1 ...

Page 12: ...y of tap water is poor The pipeline or filter cartridge is not installed properly The parts and components are damaged Replace the filter element Take the pressurization measures orwait for the water pressure to return to normal before use Replace the filter element Rinse it for 5 10 minutes Confirm whether the water quality of municipal tap water is good Re install the pipeline or filter cartridg...

Page 13: ...se show the proof of purchase to the service personnel during maintenance You cannot receive free warranty service under the following conditions 1 Damage by improper operation such as improper components connection improperinstallation deprived of manual use mis operation 2 Negligence and damage because of transportation or other accident 3 Maintenance and modification without approval 4 Otherdam...

Page 14: ...ease keep this user manual for future reference 10 Packing list Main machine 3 8 adapters 3 division clip Wrench Wall mounted bracket Plastic pipe Screw Wall mounted Screw User manual 1 2 2 1 1 3 4 3 1 11 ...

Page 15: ...5 Hướng dẫn sử dụng Lần dùng đầu tiên 15 13 14 Chuẩn bị trước khi cài đặt Các bước cài đặt Cài đặt 4 13 Nội dung 6 16 16 Đề phòng Cảnh báo Đề phòng 17 8 Chẩn đoán lỗi 20 9 Bảo hành và dịch vụ 21 10 Danh sách đóng gói 22 7 18 18 Bảo trì và bảo dưỡng Bảo dưỡng định kỳ Thay bộ lõi lọc 19 ...

Page 16: ... sản phẩm 2 Thông số kỹ thuật chính AWP1811 3L phút Dòng sản phẩm Lõi lọc Lưu lượng nước sạch 4500L Tổng lượng nước lọc định mức 0 1 0 4MPa Áp lực nước đầu vào Nước máy thủy cục thành phố Chất lượng nước đầu vào AWP111 3 Tổng quan về sản phẩm Hộp bộ lọc Lõi lọc bằng polypropylen Vòng đệm hình chữ O ron cao su Kẹp Nắp bộ lọc Nước đầu vào Đinh ốc Đinh ốc Tíc kê Kết nối Nước đầu ra Giá đỡ cố định Dụn...

Page 17: ...Cài đặt 1 Chuẩn bị các công cụ để cài đặt 2 Kiểm tra xem các phụ kiện trong danh sách đóng gói có được cung cấp không Chuẩn bị trước khi cài đặt Máy khoan Tô vít 4 cạnh hoặc 2 cạnh Kéo cắt ống nhựa nóng bức lạnh ...

Page 18: ... ống vít nhựa theo điều kiện thực tế của bề mặt lắp đặt Khoảng cách lắp đặt của mỗi 2 ốc vít là 32 7mm ren của vít phải lộ ra 12 15mm Lắp đặt giá đỡ cố định trên nắp bộ lọc Treo bộ lọc lên vít trên tường Cắt 3 8 ống PE thành hai phần Chèn một vào đầu vào nước của bộ lọc và một vào đầu ra của bộ lọc Đóng 冷 热 冷 热 ...

Page 19: ... nước từ đầu ra của bộ lọc 2 Mở van ba chiều của bộ lọc Hứng nước chảy ra từ cửa xả nước của bộ lọc trong 5 10 phút 3 Đóng van bi ba chiều của bộ lọc Đặt ống PE từ đầu nước ra của bộ lọc trước vào đầu vào của máy lọc nước 4 Mở van bi ba chiều của bộ lọc và máy lọc Nước lọc sạch đã sẵn sàng để được sử dụng Mở Đóng Đóng ...

Page 20: ...MPa Nếu áp lực nước đầu vào vượt quá 0 4 MPa phải thêm van giảm áp phải mua riêng Nhiệt độ nước đầu vào của bộ lọc trước phải ở mức 5 38 theo yêu cầu Nếu nhiệt độ nước đầu vào vượt quá 38 vòng đệm nhựa có thể bị hỏng gây rò rỉ nước Nếu nhiệt độ nước đầu vào thấp hơn 5 điều kiện đóng băng có thể xảy ra gây vỡ vỡ đường ống và rò rỉ nước Không lắp đặt bộ lọc trước một cách đảo ngược và không kết nối ...

Page 21: ...òn như xăng hoặc acetone 洗 剂 Không cài đặt bộ lọc trước ở bất kỳ nơi nào có thể tiếp xúc với ánh sáng mặt trời trực tiếp hoặc hóa chất độc hại hoặc nó có thể bị hỏng Đề phòng Bỏ qua các nội dung như được mô tả trong đánh dấu này có thể dẫn đến thiệt hại vĩnh viễn cho bộ lọc trước hoặc tổn thất tài sản nghiêm trọng Lời khuyên Không cài đặt bộ lọc trước gần bất kỳ nguồn nhiệt nào 17 ...

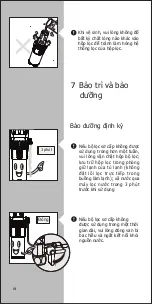
Page 22: ...t tuần vui lòng vặn chặt hộp bộ lọc lưu trữ hộp lọc trong phòng giữ lạnh của tủ lạnh không đặt lõi lọc trực tiếp trong buồng làm lạnh xã nước qua máy lọc nước trong 3 phút trước khi sử dụng 7 Bảo trì và bảo dưỡng Bảo dưỡng định kỳ Nếu bộ lọc sơ cấp không được sử dụng trong một thời gian dài vui lòng đóng van bi ba chiều và ngắt kết nối khỏi nguồn nước Đóng 3 phút ...

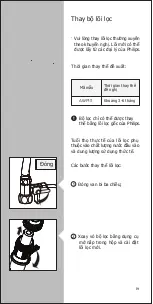
Page 23: ... được thay thế bằng lõi lọc gốc của Philips Thời gian thay thế đề nghị Mã mẫu Thời gian thay thế đề xuất Khoảng 3 6 tháng Tuổi thọ thực tế của lõi lọc phụ thuộc vào chất lượng nước đầu vào và dung lượng sử dụng thức tế 19 Các bước thay thế lõi lọc Đóng Xoay vỏ bộ lọc bằng dụng cụ mở nắp trong hộp và cài đặt lõi lọc mới 2 Đóng van bi ba chiều 1 ...

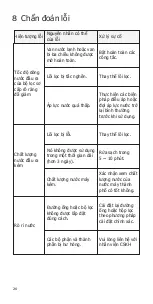
Page 24: ...ày Chất lượng nước máy kém Các bộ phận và thành phần bị hư hỏng Đường ống hoặc bộ lọc không được lắp đặt đúng cách Thay thế lõi lọc Thực hiện các biện pháp điều áp hoặc đợi áp lực nước trở lại bình thường trước khi sử dụng Thay thế lõi lọc Rửa sạch trong 5 10 phút Xác nhận xem chất lượng nước của nước máy thành phố có tốt không Cài đặt lại đường ống hoặc hộp lọc theo phương pháp cài đặt chính xác ...

Page 25: ...đơn mua hàng cho nhân viên dịch vụ trong quá trình bảo trì Bạn không thể nhận dịch vụ bảo hành miễn phí trong các điều kiện sau 1 Hư hỏng do vận hành không đúng cách chẳng hạn như kết nối linh kiện không đúng cách cài đặt không đúng cách sử dụng thủ công vận hành sai 2 Thiệt hại vì vận chuyển hoặc tai nạn khác 3 Bảo trì và sửa đổi mà không được phê duyệt 4 Các thiệt hại khác do bất khả kháng như t...

Page 26: ...ng gói Vui lòng giữ hướng dẫn sử dụng này để tham khảo trong tương lai Máy chính Bộ điều hợp 3 8 Clip 3 phân Dụng cụ mở nắp bộ lọc Giá treo tường Ống nhựa Đinh ốc Vít treo tường Hướng dẫn sử dụng 1 2 2 1 1 3 4 3 1 22 ...

Page 27: ......
Page 28: ...has been manufactured by and is sold under the responsibility of Hong Kong AquaShield Health Technology Company Limited and Hong Kong AquaShield Health Technology Company Limited is the warrantor in relation to this product Rev A FEB 20 Specifications are subject to change without notice www philips com welcome Register your product and learn more in the website link below ...

Reviews: