6
the button is pressed. You can set the desired hour by briefly pressing the button again.
The minutes will start blinking 5 seconds after you have released the button, and you
can then set the minutes. The settings will be saved, and the current time will be
displayed after 5 seconds.
‘SEt’:
The ‘SEt’ indication will appear if you press the button four times in the rest
position. This means: Set clock. The real time clock is hereby set. The clock can be set
by pressing and holding the button for 3 seconds when the ‘SEt’ indication is visible on
the display. You can set the hours when the digits for the hours start blinking. The
hours will start counting upwards as soon as the button is pressed. You can set the
desired hour by briefly pressing the button again. The minutes will start blinking 5
seconds after you have released the button, and you can then set the minutes. The
settings will be saved, and the current time will be displayed after 5 seconds.
‘rSt’:
The ‘rSt’ indication will appear if you press the button five times in the rest
position. This means: Reset. This option is used to reset the timer. After you have
replaced the lamp and the filter, you can reset the timer to 8,000 hours. The timer can
be reset to 8,000 hours by pressing and holding the button for 3 seconds while the ‘rSt’
indication is visible on the display. The settings will be saved, and the current time will
be displayed after 5 seconds.
‘0000.’:
The display will indicate 0000 when the 8,000 operating hours of the lamp
have expired. The actual time will blink in the display, alternating with four blinking
zeros. The filter and the UV-C lamp must now be replaced. See item ‘rSt’ for resetting
the timer.
‘FAIL’:
The software stops if there is a problem with the real time clock or with the
ventilator connection. As soon as the device is switched on, the program will carry out
a self-test to check the proper operation of the product. The units that are checked are
the real time clock and the ventilator connection. Any problems with these items will
be indicated on the display.
‘FAIL002‘:
This is a warning shown in the display of the unit if the unit has been
switched off. The AIR160 Classic needs to be switched on 24/7, this to make sure
that it can offer the most reliable disinfection of your room. If the unit is switched
off (for whatever reason) the warning message FAIL002 will appear in the display.
This warning message indicates that the room is not disinfected and may hold some
unwanted micro-organisms. This warning will also show on the first time you turn it
on.
Pressing the button on the display of the AIR160 classic once will simply
remove this warning message.
Switching off the display illumination
The display illumination can be switched off by pressing and holding down the display
button for 10 seconds. This will not switch the device off, and the settings will be
retained. The display illumination is switched on again by briefly pressing the display
button once.
Switching off the device
It is not necessary to switch off the device during the day because it has been designed
to operate 24 hours a day to avoid the formation of new micro-organisms. You can
switch the device off by removing the plug from the socket.
Dismantling / Maintenance
During maintenance work, or when dismantling the device, always switch off the
power supply by removing the plug from the socket. The device must be cleaned at
least once a year. If dust deposits on the filter more quickly, the filter should be replaced
more than once a year. The special lamp must be replaced after 8,000 operating hours
at the latest. Clean the aluminium interior with a soft cloth.
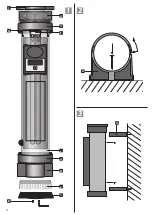
1. Click the pipe clips
(A)
open and remove the AIR160 Classic from the pipe clips
(A)
.
2. Using a screwdriver, unscrew the 2 screws
(B)
from the filter grid
(C)
on the underside
of the device.
3. Loosen the filter grid
(C)
and remove the filter
(E)
from the filter holder
(D)
.
4. Carefully pull the UV-C lamp
(F)
from the lamp fitting
(H)
, then turn it by a quarter-
turn to enable you to easily remove the UV-C lamp
(F)
from the lamp clip
(G)
of the
device.
5. Clean the interior of the aluminium housing
(L)
with a soft cloth.
6. Carefully insert the (new) UV-C lamp
(F)
into the lamp clip
(G)
in a vertical position,
pushing the UV-C lamp
(F)
through until it almost reaches the lamp fitting
(H)
. Turn
the lamp by a quarter-turn to fix it more tightly into the lamp clip
(G)
, and then
carefully push the lamp into the lamp fitting
(H)
(see Drawing 4).
ATTENTION: The lamp
(F)
will only fit into the lamp fitting
(H)
in one way (see
Drawing 4B).
7. Place the (new) Aetaire High Air Flow (HAF) filter
(E)
into the filter holder
(D)
.
8. You can now reinsert the filter grid
(C)
into the filter holder
(D)
and tighten it with
the 2 screws
(B)
.
9. Insert the plug into the socket and check the operation of the UV-C lamp
(H)
- only
do this through the air vents at the top of the unit! Blue light can be seen through
the air vents of the lid
(I)
if the lamp is on (see Drawing 1).
10. Check the operation of the ventilator
(K)
by holding your hand underneath the filter
grid
(C)
. If you feel an air flow, the ventilator
(K)
is working (see Drawing 1).
Technical specifications
• AIR160 Classic
65 Watt
• Philips PL-L 60W/4P HO lamp
60 Watt
• UV-C Dose
4.23 mJ/cm
2
(air flow 50 m
3
/hr)
• UV-C (W) output
19.0 Watt
• UV-C (%) after 8,000 hours
85 %
• Filter
Aetaire High Air Flow (HAF) Air Filter
• Ventilator
12 Volt
• Max. area capacity
100 m
3
• Max. throughput
50 m
3
of air per hour
• Dimensions of the device
60x17x15 cm
Replacement articles
The replacement parts (both filters and UV-C Signify Philips lamp) are supplied in a ‘1
year replacement kit (containing 4x HAF-filter, 4x dust-filter and 1x UV-C lamp). You
can purchase this kit from your distributor.
Type of UV-C system
Article number: AIR160 Classic 100 m³ / 60 Watt (230V/120V; 50/60 Hz)
Replacement articles
Article number: Signify/Philips PL-L 60/4P HO (60 Watt)
Article number: Aetaire HAF filter
Terms of guarantee
The guarantee for this product covers manufacturing faults for a period of 24 months
following the date of purchase. The lamp is not included in this guarantee.
Claims under the guarantee can only be considered if the product is returned post-paid
together with a guarantee registration form and a valid purchase receipt.
Repairs under the guarantee may only be carried out by the supplier. Guarantee claims
that are caused by errors in the installation or in the operation of the device will not be
considered.
Defects originating from poor maintenance are also excluded from the guarantee. The
supplier will not be held responsible in any way whatsoever for any damage caused by
the incorrect operation of the product.
The supplier will not be liable for any consequential damage caused by the breakdown
of the device. Complaints regarding transport damage will only be considered if the
damage was established or confirmed on delivery by the carrier or the postal
authorities. A claim can only be made against the carrier or the postal authorities if this
has been done.
En
gl
is
h


