T
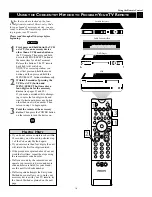
he following instructions explain how to
connect a DVD player with progressive-scan
capability to the HD INPUT-AV 4 jacks on
your TV.
To make the connections, you will need:
• three cables for video connections (standard
RCA connectors)
• two cables for audio connections (standard
RCA connectors).
NOTE: The cables are not supplied with your TV.
You should be able to buy them at most stores
that sell electronics. Or you can call our
Customer Care Center at 1-800-531-0039.
1
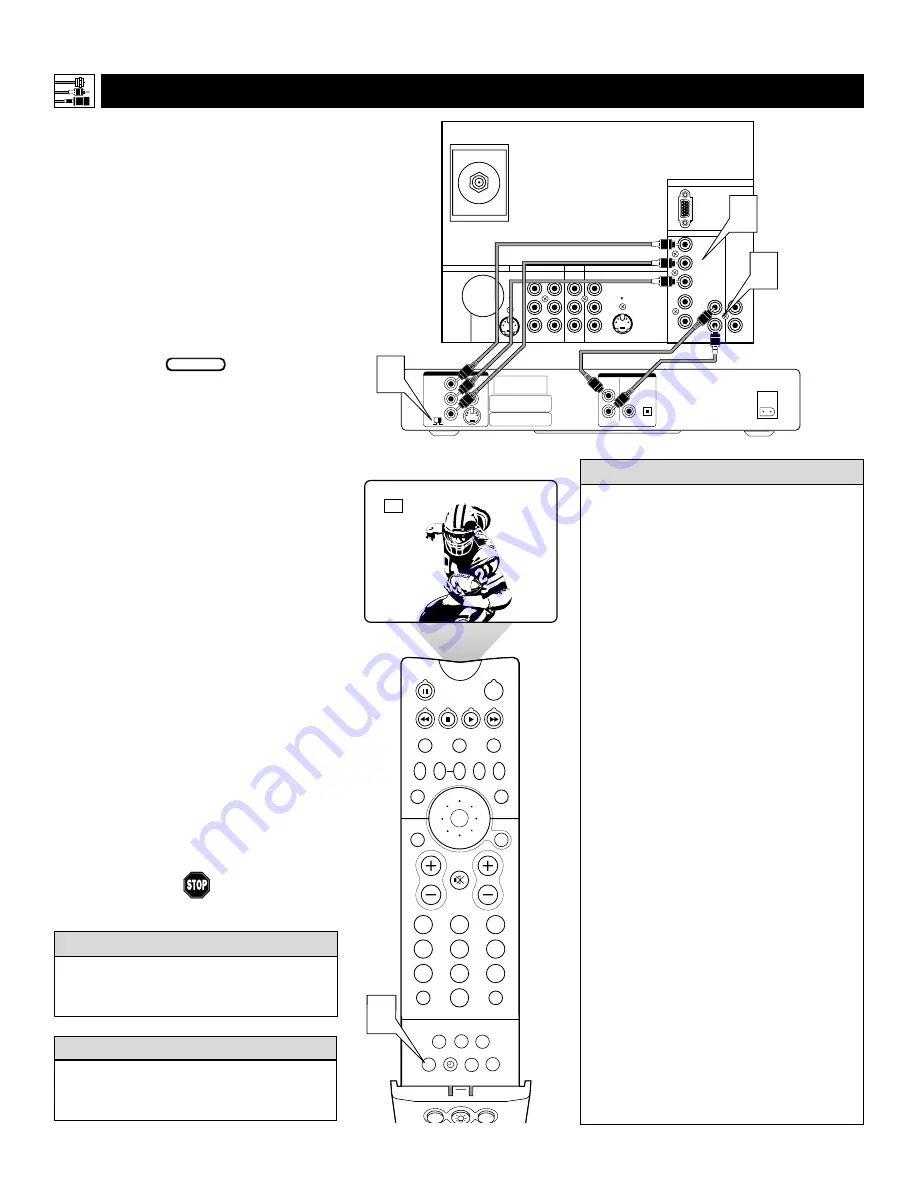
Connect from the YPrPb jacks on
the rear of the DVD player to the
HD INPUT-AV 4 G/Y, R/Pr, B/Pb jacks
on the rear of the TV.
2
Connect from the L(eft) and R(ight)
AUDIO OUT jacks on the rear of the
DVD player to the HD INPUT-AV 4
AUDIO L(eft) and R(ight) jacks on the rear
of the TV.
3
Make sure the DVD player is in pro-
gressive-scan mode. You will not get a
viewable picture through the HD
INPUT-AV 4 jacks if the DVD player is
in interlaced mode.
For more information on placing your
DVD player in progressive-scan mode,
see the DVD player’s directions-for-use
manual. Also, see the Helpful Hints to
the right. The way in which progres-
sive-scan mode is selected varies among
DVD players.
4
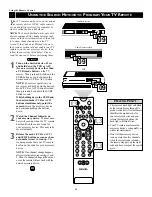
Press the AV button on your TV remote
control as many times as necessary to
select the AV4 signal source.
5
Turn the DVD on, insert a disc, and
press play to view a DVD on the TV.
If you experience difficulties receiving
sound with a DVD disc, check the sound
settings through the DVD disc’s menu.
H
ELPFUL
H
INT
To prevent uneven picture-tube aging, do not
leave nonmoving images or picture borders on
the screen for an extended period. See page 60.
W
ARNING
12
C
ONNECTING A
DVD P
LAYER WITH
P
ROGRESSIVE
-
SCAN
C
APABILITY
Rear of TV
ANTENNA IN 75
Ω
INPUT-AV 1
OUTPUT
INPUT-AV 2
HD INPUT-AV 4
HD INPUT-AV 5
VIDEO
AUDIO
S-VIDEO
L
R
Y
Pb
Pr
VIDEO
AUDIO
L
R
S-VIDEO
B/Pb
V
H
SYNC
AUDIO
L
R
AUDIO
L
R
R/Pr
G/Y
Rear of DVD Player with Progressive Scan Capability
OPTICAL
COAXIAL
DIGITAL
BITSTREAM
/PCM
AUDIO OUT
2CH
L
R
AC IN ~
VIDEO OUT
SELECT
I
P
Y
P
B
P
R
VIDEO
S
3
1
2
Connecting Accessory Devices to Your TV
BEGIN
PIP ON/OFF
2
1
3
5
4
6
8
7
9
0
TV
SWAP
PIP CH
DN
UP
ACTIVE
CONTROL FREEZE
SOUND
MUTE
SURF
A/CH
POWER
PICTURE
STATUS/
EXIT
SURF
ITR/
RECORD
HOME
VIDEO
HOME
MOVIES
PERSONAL
SLEEP
REC •
PIP
POSITION
VCR
ACC
MENU/
SELECT
VOL
CH
TV/VCR
FORMAT
SAP
PROG.LIST
DOLBY V
AV
4
AV4
• If after connecting your DVD player your
display is filled with wavy lines, it may be
that your DVD player is not set to progres-
sive-scan mode. Some DVD players have an
I/P (interlaced/progressive scan) switch
located on the back or front of the players for
changing from interlaced to progressive-scan
mode. Other DVD players may allow the
mode to be changed by pressing a button on
the DVD player’s remote control or by using
the DVD player’s onscreen menu. If the
interlaced/progressive-scan selection
option is provided only through the DVD
onscreen menu, you will need to connect
the DVD player to another AV input
source in addition to HD INPUT-AV 4 to
see the DVD menu. Select this additional
AV source on screen to see the DVD menu
and choose progressive-scan mode. You
will then be able to see the DVD picture
through the AV4 source.
• Some DVD players have dedicated progres-
sive-scan output jacks that are labeled as
such and require no switching to provide a
picture through the HD INPUT-AV 4 jacks.
See your DVD player’s directions-for-use
manual for information.
• The default color-space setting for the
HD INPUT-AV 4 jacks is YPbPr. RGB is
also an option. If the picture’s color looks
grossly incorrect, try changing either the
DVD player’s or TV’s color-space setting.
See the DVD player’s directions-for-use
manual for information on setting its color
space. Or see page 59 in this manual to set
the TV’s color space.
• The Picture-in-Picture (PIP) feature does
not function with AV4 or AV5.
H
ELPFUL
H
INTS
Summary of Contents for 55PP9352
Page 67: ...67 ...


