24
Logo
Choose to enable or disable the picture of Logo when turn on your
display.
The options are:
• {Off} (Default)
• {On}
Monitor ID
Set the ID number for controlling the display via the RS232C
connection. Each display must have a unique ID number when multiple
sets of this display are connected. Monitor ID number range is between
1 to 255.
The option are: {
Monitor group
} / {
Tiling matrix
} / {
Auto ID
}
Monitor Id
Monitor Id
Monitor group
Tiling matrix
Auto ID
1
1
1
End
• {
Monitor group
}
The options are: {
Off
} / {
1-254
}
• {Off} – {Monitor group} are not supported.
• {1-254} – {Monitor group} are supported. The default setting is
1.
• {
Tiling matrix
}
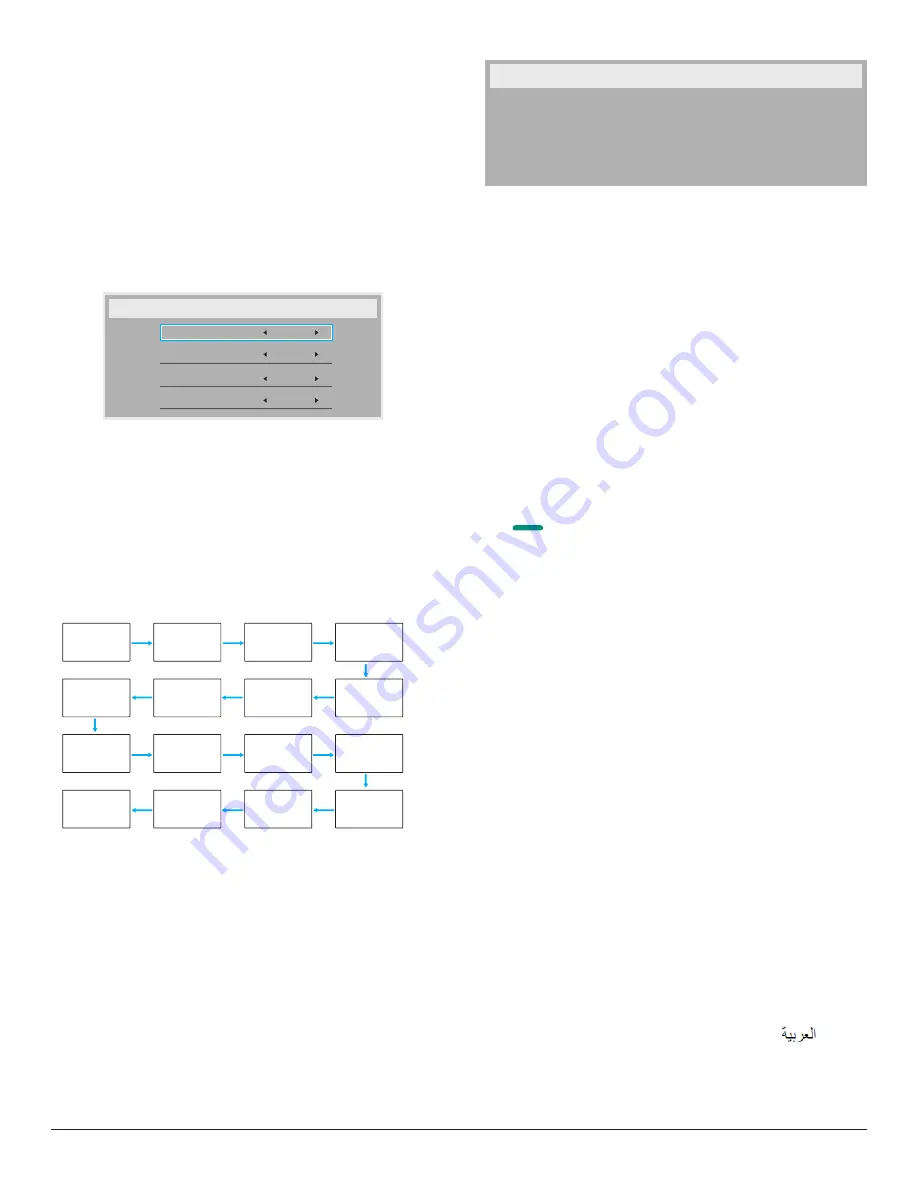
Tiling matrix number range is between 1 to 15. 1 is default setting.
The {
Auto ID
} setup function enables setting up {
Monitor ID
} of
connected machine according to {
Tiling matrix
} settings.
Example: Tiling matrix sets as 4
1
2
5
6
3
4
7
8
9
10
11
12
13
14
15
16
• {
Auto ID
}
The option are: {
Start
} / {
End
}. The default is {
End
}.
• Switch to Start option to set up IDs of machines backward
from current one.
• Once the setup is completed, the option exits to End
automatically.
• To use this function, serial connect all machines with RS-232
cable and set their Control ports to RS-232 too.
Heat status
This function allows you to check the thermal status at any time.
Monitor information
Shows information about your display, including model number, serial
number, operating hours and software version.
Monitor information
Model name
Serial no
Operation hours
SW Version
XXXXXXXX
XXXXX
XXXXX
XXXXX
DP version
DisplayPort support mode.
The options are:
• {
DP 1.1
} (
Default
) : DP 1.1 single stream(clone mode)
• {
DP 1.2 SST
}: DP 1.2 Single stream(clone mode)
• {
DP 1.2 MST
}: DP 1.2 Multi-Stream
*NOTE:
1. The DP version must be set the same for all daisy chain displays.
2. For 3840x2160, the dot clock timing should be 533MHz.
3. DP 1.1 not support 4K/60Hz timing.
Window selection
Select the window for adjusting setting. The selected window will be
highlight green border.
Window selection will set to Main after power on.
The options are:
• {
Main
}(
Default
), {
PIP
}
• [
]
Hot key for Window selection function.
Rotation
Set the rotation of Main/Sub/OSD
Auto Rotate :
Off/On
Default : Off
OSD Rotate :
Landscape/Portrait
Default : Landscape
Image Rotate:
All :
Off/On
Default : Off
Main :
Off/On
Default : Off
Sub :
Off/On
Default : Off
Auto Rotate: {Off}, {On} when value is On,automatically detect whether
the PD rotation, Off is set by OSD.
OSD Rotate: {Off}, {On} when value is on, OSD rotate 90 °, Off is
restored.
All: {Off}, {On} when value is on, all Window screen rotate 90 °, Off the
reference set individual window.
Main: {Off}, {On} when value is onn, Main window screen rotate 90 °,
Off is restored.
Sub: {Off}, {On} when value is on, Sub1 Window screen rotate 90 °, Off
is restored.
* When the Main / Sub source is the same, rotation is given priority to
with Sub.
* Not suupored De-Interlacing function in rotation mode.
Language
Select the language used in the OSD menu.
The options are: English/Deutsch/
简
体中文
/Français/Italiano/Español/
Pyccкий/Polski/Türkçe/
繁體中文
/
日本語
/Português/
/Danish/
Svenska/Suomi/Norsk/Nederlands.
Configuration2 reset
Reset all settings in
Configuration2
menu to the factory preset values.


