background image

EN            17   

Eng

lis

From the Internet 

Make sure that your TV is connected to the 
Internet through a high-speed broadband 
connection. See 

Connect your TV > 

Connect to a network and the Internet

(Page 58). 

Select Internet program guide

Before you use the program guide, check 
these settings: 
1. Press  .
2. Select 

[Setup]

 > 

[TV settings]

 > 

[General 

settings]

 > 

[TV guide]

.

3. Select 

[From the Internet]

, then press 

OK

.

Access Internet program guide

1. Press  .
2. Select 

[TV guide]

, then press 

OK

.

Note:

 If you are viewing the program guide 

for the first time, follow the onscreen 
instructions to update the guide.  

Customize Internet program guide

You can use the program guide to: 

Schedule recordings of programs. See 

Use more of your TV > Record TV 
shows > Schedule recordings

 (Page 

27). 

Identify channels. 

Select day of display. 

Reload and zoom into the program 
guide information. 

View security information. 

Note:

 Options may vary according to the 

program information available from the 
broadcaster. 

1. In the program guide, press  

OPTIONS

.

2. Select an option, then press 

OK

:

[Record]

: Set a scheduled recording. 

[Identify channel]

: Manually update 

channel information. 

[Select day]

: Select the day to display. 

[Manual record]

: Set a manual 

recording. 

[Reload page]

: Refresh the page display. 

[Zoom]

: Change zoom level of page 

display. 

[Security info]

: Display program 

security information.    

Watch 3D 

What you need 

Your TV is a 3D TV. Before you watch 3D, 
read the health warning information in 

Important > Safety > 3D health warning

(Page 4). 

To watch 3D on this TV, use the Philips Easy 
3D passive glasses supplied with your TV. 

Note:

If you need additional glasses, purchase 
the Philips Easy 3D glasses, PTA417. 3D 
glasses from other brands may reduce 
or lose the 3D effect. 

Some 3D formats are not supported. 

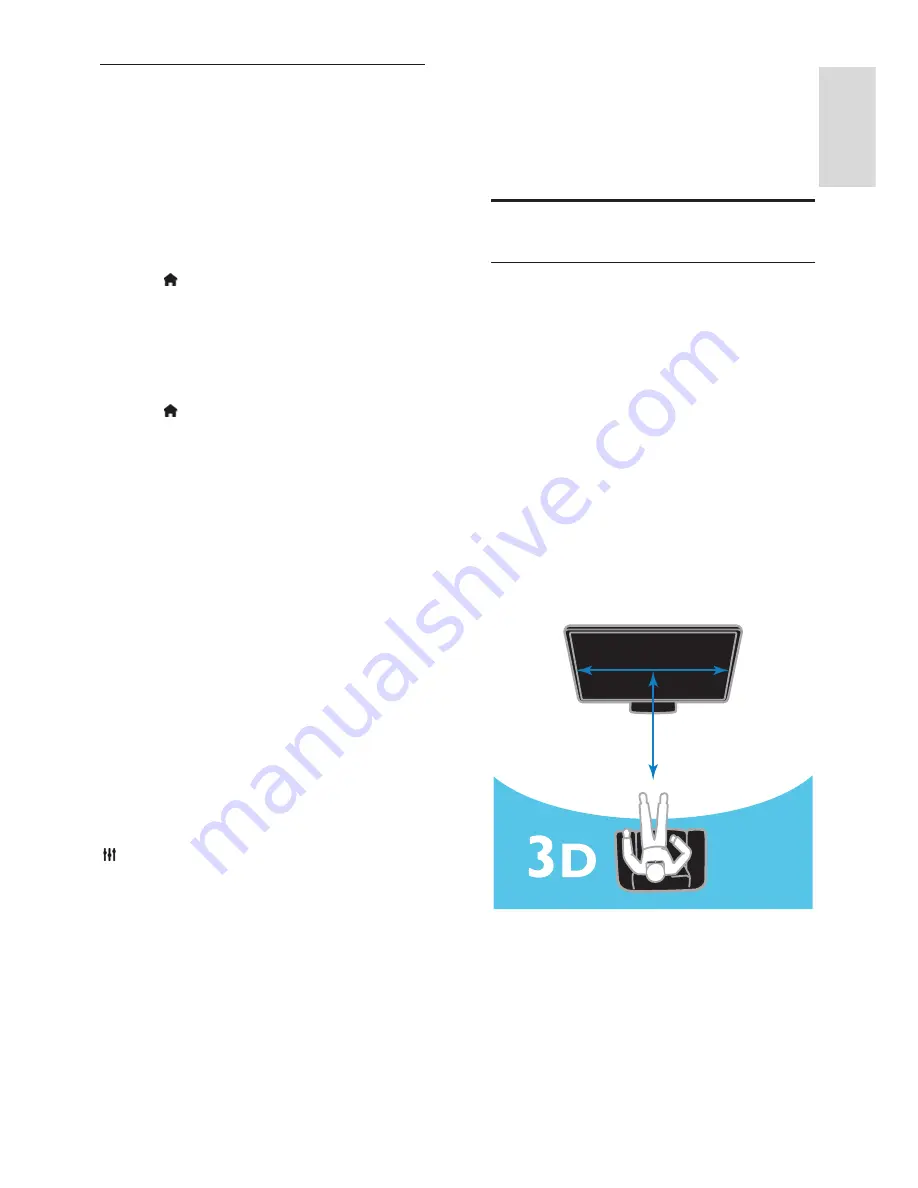
w

3x w

To experience the best 3D effect while you 
watch 3D programs:  

Sit at a distance that is at least three 
times the width (w) of the TV screen. 

Summary of Contents for 42PFL5008G

Page 1: ...EN User Manual Register your product and get support at www philips com welcome 42PFL5008G 46PFL5008G 42PFL5508G 46PFL5508G ...

Page 2: ...Channels 38 Language settings 39 Universal access settings 40 Other settings 40 Update software 40 Reset all 42 5 Connect your TV 43 About cables 43 Connect antenna 44 Connect devices 44 Connect more devices 52 Watch connected devices 55 Set up EasyLink devices 56 Connect to a network and the Internet 58 6 Troubleshooting 61 General issues 61 Channel issues 61 Picture issues 62 Sound issues 62 Con...

Page 3: ...ower cord can loosen connections and cause arcing To disconnect the TV from the mains power the power plug of the TV must be disconnected When disconnecting the power always pull the power plug never the cord Ensure that you have full access to the power plug power cord and outlet socket at all times Risk of damage to the TV Two people are required to lift and carry a TV that weighs more than 25kg...

Page 4: ... any part of the TV power cord or aerial cable Risk of hearing damage Avoid using earphones or headphones at high volumes or for prolonged periods of time Low temperatures If the TV is transported in temperatures below 5 C or 41 F unpack the TV and wait until the TV temperature matches room temperature before connecting the TV to the power outlet 3D health warning For 3D TVs only If you or your fa...

Page 5: ... the 3D glasses to direct sunlight heat fire or water This may result in a product malfunction or fire Do not drop bend or apply force to the lenses of the 3D glasses Do not use cleaning chemicals containing alcohol solvent surfactant or wax benzene thinner mosquito repellent or lubricant Using these chemicals can cause discoloration or cracks CHOKING HAZARD Keep the product out of reach of childr...

Page 6: ...ed by the manufacturer The caution sign printed on the back of the TV indicates risk of electric shock Never remove the TV cover Always contact Philips Customer Care for service or repairs Any operation expressly prohibited in this manual or any adjustments and assembly procedures not recommended or authorized in this manual shall void the warranty Pixel characteristics This LED product has a high...

Page 7: ...LLC a subsidiary of Rovi Corporation This is an official DivX Certified device that plays DivX video Visit divx com for more information and software tools to convert your files into DivX videos ABOUT DIVX VIDEO ON DEMAND This DivX Certified device must be registered in order to play purchased DivX Video on Demand VOD movies To obtain your registration code locate the DivX VOD section in your devi...

Page 8: ... energy efficient features To access these features press the Green button on the remote control Energy saving picture settings You can apply a combination of energy saving picture settings While you watch TV press the Green button and select Energy saving Then select the Energy saving picture setting Screen off If you only want to listen to audio from the TV you can switch off the TV display Othe...

Page 9: ...ropean Directive 2002 96 EC Please inform yourself about the local separate collection system for electrical and electronic products Please act according to your local rules and do not dispose of your old products with your normal household waste Correct disposal of your old product helps to prevent potential negative consequences for the environment and human health Your product contains batterie...

Page 10: ...e in certain countries only Use the Philips connectivity guide An easy to use connectivity guide gives you guidance on how to connect your TV to other devices Visit http www connectivityguide philips com Search the TV forum Your question may have already been answered by the Philips TV community of users Visit www supportforum philips com Contact Philips You can contact Philips Consumer Care in yo...

Page 11: ...s when your TV is in standby Point the remote control at the sensor Make sure that the line of sight between the remote control and the TV is not blocked Remote control 4 3 2 1 5 1 Standby Switch the TV on or to standby 2 Play buttons Control playback of media files 3 SOURCE Watch a connected device 4 TV Watch TV 5 AMBILIGHT Switch Ambilight on or off 9 7 6 8 6 Home Access the Home menu 7 OK Confi...

Page 12: ...k devices Control devices Page 57 Onscreen remote control You can also control connected HDMI CEC enabled devices through other buttons that are available through the onscreen remote control Make sure that Easylink is switched on after connection Read more about Easylink in Connect your TV Set up Easylink devices Control devices Page 57 To access the onscreen remote control 1 While you watch a con...

Page 13: ...u are not going to use the TV for an extended period of time disconnect the TV from the mains plug Automatic switch off You can save energy with this TV s energy efficiency settings which are enabled by default If there is no user interaction such as pressing a remote control button or a control on the TV for four hours the TV will automatically switch to standby To disable automatic switch off 1 ...

Page 14: ...nnels Lock a channel Display channel logos Filter channels 1 Press LIST 2 Press OPTIONS then select Digital Analog 3 Select an option then press OK Tips To select the menu tabs in the channel list press Digital Analog Display all channels in the channel list Digital TV channels Display only digital channels Analog channels Display only analog channels Switch between antenna and cable channels You ...

Page 15: ...then press OK 3 Select the device then press OK To add or manage your connected devices see Connect your TV Watch connected devices Change device settings Page 55 Use picture and sound presets Your TV comes with predefined picture and sound settings You can apply these settings or customize them Select your preferred picture presets 1 While you watch TV press OPTIONS 2 Select Picture and sound in ...

Page 16: ...roadcaster You can view program guides through one of two methods From the broadcaster From the Internet You cannot view a channel s program guide information if the age rating of the channel is equal or higher than the age rating set on your TV the channel is locked From the broadcaster Select broadcaster program guide Before you use the program guide check these settings 1 Press 2 Select Setup T...

Page 17: ...View security information Note Options may vary according to the program information available from the broadcaster 1 In the program guide press OPTIONS 2 Select an option then press OK Record Set a scheduled recording Identify channel Manually update channel information Select day Select the day to display Manual record Set a manual recording Reload page Refresh the page display Zoom Change zoom ...

Page 18: ...at overlap To switch the overlapping images to 3D change the 3D format 1 Press 3D 2 Select a setting then press OK 3D Side by side Select if the TV displays pictures that overlap vertically 3D Top bottom Select if the TV displays pictures that overlap horizontally 3D Top bottom inverted or 3D Side by side inverted Select if the TV displays distorted images such as the background appearing nearer t...

Page 19: ...ed Ambilight color mode is Custom Advanced Select for more Ambilight settings Wall color Select the color of your wall to apply suitable Ambilight settings TV switch off Select how Ambilight switches off when the TV is switched to standby Lounge light mood Select a predefined Ambilight color for a lounge light effect when the TV is switched to standby Play multimedia files What you can do You can ...

Page 20: ...trol play 5 Optional To select a different USB device select USB device at the bottom of the TV screen Tips Select the top bar to filter your files by type Select Sort to arrange the files by name date or other fields Play options Watch video 1 Select in the top bar 2 Select a video then press OK 3 Optional To play all the videos in a folder select a video then select Play all To skip to the next ...

Page 21: ...ess OPTIONS then press OK to select an option Shuffle off Shuffle on Enable or disable random display of pictures in the slideshow Repeat Select Repeat to watch a slideshow repeatedly or Play once to watch once Slideshow time Select the display time for each photo in the slideshow Slideshow transitions Select the transition from one photo to the next Media server When you play content from a media...

Page 22: ...Smart TV displays one page at a time in full screen view Certain websites may not display completely Functions that require plug ins may be unavailable TP Vision Netherlands B V bears no responsibility regarding the content and the quality of the content provided by the content service providers What you need 1 On your home network connect the TV to the Internet 2 On your TV configure Smart TV 3 O...

Page 23: ...ress the Navigation buttons and to scroll up and down on a web page Reload page If a page does not load correctly press OPTIONS then select Reload page View security info To view security information about a page press OPTIONS then select Security info Smart TV options Clear Smart TV memory You can clear the Smart TV memory completely including your favorites parental control code passwords cookie...

Page 24: ...ograms Join a quiz or contest Play games Shop online Pay for a video on demand VOD program Vote Chat What you need To enjoy this service you need Digital channels with interactive services A wired or wireless home network connected through a Universal Plug and Play router uPnP For network connection see Connect your TV Connect to a network and the Internet Page 58 Access interactive TV You can ide...

Page 25: ... connected USB hard drive The USB hard drive is formatted exclusively for this TV Keep it permanently connected to the TV You cannot access the contents of the USB hard drive from another TV or PC Do not overload the USB port If you connect a USB hard drive device that consumes more than 500mA power make sure that it is connected to its own external power supply Note Make sure that the TV and the ...

Page 26: ...cord both current TV programs as well as future TV programs Note Recording is only supported in countries with Internet program guides What you need Tune your TV to receive digital TV channels such as DVB broadcasts See Change your TV settings Channels Automatic installation Page 38 Connect a USB 2 0 compatible hard drive with a minimum capacity of 32 GB and a minimum transfer speed of 30 megabits...

Page 27: ...lete Start recording One touch recording You can record the program you are currently watching with a single button 1 While you watch TV press Recording starts immediately A pop up window is displayed indicating the end time of the program 2 Optional Use the Navigation buttons to mark the end time of the recording 3 Select Confirm then press OK 4 To stop recording press Note While recording you ca...

Page 28: ...rdings is displayed 3 Select the recording then select Remove The schedule recording is canceled Watch recordings 1 Press 2 Select Recordings then press OK A list of recordings is displayed 3 Select a recording from the list then press OK The recording starts to play Sort recordings 1 Press 2 Select Recordings then press OK A list of recordings is displayed 3 Press OPTIONS 4 Select an option to so...

Page 29: ...etwork settings Wi Fi Miracast 3 Select Off then press OK Share a screen on TV 1 On your device enable Wi Fi Miracast Wi Fi Direct or similar for example screen mirroring The device starts scanning for other Miracast devices 2 In the list of found devices select your TV to connect to it 3 A prompt appears on the TV asking for permission to connect to the device Press OK to connect When pairing is ...

Page 30: ...s not a replacement for your telephone and cannot be used for emergency calls This TV comes with Skype pre installed on it and ready to use You do not need to install or download any files for using Skype Simply connect a Philips TV video camera to use Skype What you need A Philips TV video camera PTA317 00 sold separately with built in microphone See Connect your TV Connect more devices Video cal...

Page 31: ...e on their contact list You will be notified of their request which you can accept or decline Rename a contact 1 In the Skype menu select Contacts then press OK 2 Select a contact then press OPTIONS 3 Select Rename then press OK 4 Follow the onscreen instructions to edit the information Block a contact 1 In the Skype menu select Contacts then press OK 2 Select the contact then press OPTIONS 3 Sele...

Page 32: ...control to pan or tilt the camera Video call options During a video call press OPTIONS to access these options Full view See your contact in full screen view Dial pad Access dial pad Hold Put the call on hold Full view will be stopped Mute Mute the microphone Stop My Video Stop the video feed to your contact s screen Call a phone With Skype you can call land line phones and mobile phones Note No e...

Page 33: ...u can call land lines or mobile phones on your TV To purchase Skype Credit you need to log in to your Skype account on your computer The amount of Skype Credit you purchase will appear when you log in to your Skype account on your TV Automatic sign in 1 In the Skype menu select Settings and then press OK 2 Select General settings Sign me in when Skype starts then press OK Change your profile pictu...

Page 34: ...t picture lag 1 Press 2 Select Setup TV settings Picture then press OK 3 Select Game or computer Game Sound preset for games You can optimize sound effects for gaming 1 Press OPTIONS 2 Select Picture and sound Sound style Game then press OK The TV is ready for gaming Note When your gaming session ends switch back to your usual sound setting Set locks and timers Clock You can display a clock on the...

Page 35: ...elect Set code or Change code 4 Enter the code with the Numeric buttons Tip If you access the channels from the channel list you are prompted to enter your lock code If you forget your code enter 8888 to override any existing codes Age rating You can set your TV to display only programs with age ratings lower than your child s age This restriction only applies to digital channels from broadcasters...

Page 36: ...uce a brilliant high definition image HD Natural Motion Remove motion judders Advance sharpness Enable superior sharpness especially on lines and contours in the picture Dynamic contrast Dynamically enhance the details in the dark medium and light areas of the picture Dynamic backlight Select a backlight level to optimize dynamic power consumption and picture contrast Color enhancement Dynamically...

Page 37: ...ker output Page 57 Clear sound Enhance sound quality Audio Out format Select the type of audio output through the digital audio output connector Choose between Multichannel and Stereo Audio Out levelling Set the output level for stereo audio Select More for higher output level Medium for medium output level and Less for lesser output level HDMI 1 ARC Enable audio output from the ARC compliant devi...

Page 38: ... channel frequency of the channels you want to install you can search and store digital channels one by one For best results contact the service provider 1 Press 2 Select Setup Channel settings Channel installation 3 Select Digital Reception test Search channel then press OK 4 Press the Numeric buttons to enter the channel frequency 5 Select Search then press OK 6 When the channel is found select ...

Page 39: ...nels to a TV with pre installed channels 1 Switch on the second TV on which you want to copy the channel list 2 Press 3 Select Setup Search for channels Reinstall channels then press OK The country menu is displayed 4 Make sure that the country setting is the same as the first TV 5 Press 6 Press Cancel to exit 7 If the country setting is different reinstall the second TV to match the country setti...

Page 40: ...ings General settings 3 Select Universal access On or Off then press OK Set audio feedback When you press a button on the remote control or TV you can set the TV to play a beep 1 While you watch TV press OPTIONS 2 Select Universal access key beep On then press OK Other settings TV demo You can watch a demo to find out more about the features on this TV 1 While you watch TV press 2 Select Setup Wat...

Page 41: ...e file into a folder 7 Eject and disconnect the USB flash drive from the computer Upgrade the TV software Caution Do not switch off the TV or remove the USB flash drive during the software upgrade If a power failure occurs during the upgrade do not remove the USB flash drive from the TV The TV continues the upgrade as soon as power is restored If an error occurs during the upgrade retry the upgrad...

Page 42: ...tches to standby and on again automatically Wait for the TV to switch back on Do not switch on the TV yourself Note If the TV is connected to the Internet the TV displays the availability of new software at startup Philips may occasionally push a software upgrade to your TV over the Internet Follow the onscreen instructions to upgrade the TV software Reset all You can reset all picture and sound s...

Page 43: ...signals Connect HDMI for high definition HD TV signals and to switch on EasyLink An HDMI Audio Return Channel ARC connector allows output of TV audio to an HDMI ARC compliant device Connect HDMI cables shorter than 5 meters 16 4 feet HDMI Y Pb Pr Component video Y Pb Pr only transmits video For sound also connect to Audio Left Right The Y Pb Pr connection can handle high definition HD TV signals M...

Page 44: ...ntenna to the TV TVANTENNA Connect devices Blu ray or DVD disc player Connect the disc player with an HDMI cable to the TV HDMI Connect the disc player with a component video cable Y Pb Pr and an audio L R cable to the TV AUDIO L R YPbPr ...

Page 45: ...player with a composite cable CVBS and an audio L R cable to the TV CVBS AUDIO IN TV receiver Connect the digital TV receiver with an antenna cable to the TV TVANTENNA Connect the digital TV receiver with an HDMI cable to the TV HDMI ...

Page 46: ...video cable Y Pb Pr and an audio L R cable to the TV AUDIO L R YPbPr Connect the digital TV receiver with a composite cable CVBS and an audio L R cable to the TV CVBS AUDIO IN Video recorder Connect the recorder with an antenna cable to the TV REC TVANTENNA ...

Page 47: ...HDMI cable to the TV HDMI ARC REC Connect the recorder with a component video cable Y Pb Pr and an audio L R cable to the TV REC AUDIO L R YPbPr Connect the recorder with a composite cable CVBS and an audio L R cable to the TV REC CVBS AUDIO IN ...

Page 48: ... with an HDMI cable to the TV HDMI Connect the game console with a component video cable Y Pb Pr and an audio L R cable to the TV AUDIO L R YPbPr Connect the game console with a composite cable CVBS and an audio L R cable to the TV CVBS AUDIO IN ...

Page 49: ...e theater with an HDMI cable to the TV HDMI ARC Connect the home theater with an HDMI cable and a coaxial audio cable to the TV HDMI Digital Audio Out Connect the home theater with a component video cable Y Pb Pr and an audio L R cable to the TV AUDIO L R YPbPr ...

Page 50: ...r with a composite cable CVBS and an audio L R cable to the TV CVBS AUDIO IN Digital camera Connect the digital camera with a USB cable to the TV USB Digital camcorder Connect the digital camcorder with an HDMI cable to the TV HDMI ...

Page 51: ...nnect the digital camcorder with a component video cable Y Pb Pr and an audio L R cable to the TV AUDIO L R YPbPr Connect the digital camcorder with a composite cable CVBS and an audio L R cable to the TV CVBS AUDIO IN ...

Page 52: ...EN 52 Connect more devices USB storage device USB Connect the USB hard drive with a USB cable to the TV USB Connect the USB flash drive with a USB cable to the TV ...

Page 53: ...t the computer with an HDMI cable to the TV HDMI Connect the computer with a DVI HDMI cable and an audio cable to the TV AUDIO IN DVI VGA HDMI Connect the computer with a VGA cable and an audio cable to the TV AUDIO IN DVI VGA VGA ...

Page 54: ...Make sure that you connect the USB hub to the USB 1 connector on the back of the TV You can also connect the USB mouse to a connected USB keyboard Connect the keyboard and mouse with a USB cable to the TV USB USB When the TV detects the keyboard you can select the keyboard layout and test your selection 1 Press 2 Select Setup TV settings General settings USB keyboard settings 3 Change the keyboard...

Page 55: ...ce to the TV See Connect your TV Connect device Page 44 Automatically detect a device When you connect a new HDMI device to the TV the device is detected automatically and added to the Source menu Select a device with SOURCE 1 Press SOURCE 2 Select a device then press OK Select a device from Home menu 1 Press 2 Select Source then press OK 3 Select a device then press OK Update the source list If y...

Page 56: ... mode Auto switch off inactive devices If a HDMI CEC compliant device has been inactive for some time it switches to standby mode EasyLink remote control You can control multiple HDMI CEC compliant devices with your TV remote control System audio control If you connect an HDMI CEC compliant device that includes speakers through the HDMI ARC connector you can choose to hear the TV audio from those ...

Page 57: ...itches the connecting device to standby after 10 minutes of inactivity 1 Press 2 Select Setup TV settings General settings EasyLink 3 Select Auto switch off devices On then press OK Select speaker output If a connected device is HDMI Audio Return Channel HDMI ARC compliant you can output TV audio through an HDMI cable Additional audio cables are not required Make sure you connect the device to the...

Page 58: ...o maximize the video display area you can switch on auto subtitle shift The subtitles then display over the video image Switch on auto subtitle shift 1 Press 2 Select Setup TV settings General settings EasyLink 3 Select Auto subtitle shift On then press OK Connect to a network and the Internet What you can do View Media If you connect the TV to a home network you can play photos music and videos f...

Page 59: ...ctrum as common household devices such as Dect phones microwave ovens or Bluetooth devices which can cause Wi Fi interference Move these devices away from the TV For optimum Wi Fi performance place the TV at a distance of less than 10 m from the wireless router Avoid obstructions such as concrete walls between the router and the TV Reception quality depends on the location of the wireless router a...

Page 60: ... control 1 To enter the encryption key manually select Standard and press OK 2 To access the onscreen keyboard select the text entry field then press OK Set secured connection with WEP encryption If your router has WEP security the TV asks for the WEP encryption key in hexadecimal numbers 1 Locate the hexadecimal key in the router software on your PC and make a note of the first key in the WEP key...

Page 61: ...ess on the remote control or press any key on the TV The standby light on the TV blinks red Disconnect the power cable from the power outlet Wait until the TV cools down before you reconnect the power cable If the blinking reoccurs contact Philips Consumer Care The TV audio is in the wrong language Change your audio language by pressing OPTIONS then select Audio language or Alternate audio The TV ...

Page 62: ...ure signals from some devices may not fit the screen correctly Check the signal output of the device An e sticker banner displaying information appears on the TV display The TV is in Shop mode To remove the e sticker set the TV to Home mode then restart the TV See Change your TV settings Other settings Home mode Page 40 The computer display on the TV is not stable Make sure that your PC uses the s...

Page 63: ...files on your USB storage device do not play or display smoothly The transfer performance of the USB storage device may limit the data transfer rate to the TV which causes poor playback Network issues You want to establish a wireless connection between your TV and home network Refer to Connect your TV Connect to a network and the Internet Wi Fi integrated Page 59 for instructions on how to connect...

Page 64: ...ips com support You can also consult and contribute to the Philips TV community at www supportforum philips com If you wish to speak with or email a Philips representative contact the Philips Consumer Care in your country You can find the contact details in the leaflet accompanying this TV or at www philips com support Take note of your TV model and serial number before you contact Philips These n...

Page 65: ...0 Hz Ambilight Ambilight Spectra 2 3D 3D TV Sound Output power RMS 20 W 10 THD Incredible Surround Clear Sound Mono Smart Stereo 3D Display resolutions Computer formats HDMI Resolution refresh rate 640 x 480 60 Hz 800 x 600 60 Hz 1024 x 768 60 Hz 1280 x 1024 60 Hz 1360 x 768 60 Hz 1920 x 1080 60 Hz Computer formats VGA Resolution refresh rate 640 x 480 60 Hz 800 x 600 60 Hz 1024 x 768 60 Hz 1280 x...

Page 66: ...Dolby Pulse Yes Yes No No No 1920x1088 30 Yes Yes No No No MPEG 2 MPEG 4 ASP H 264 MVC MPEG 2 MPEG 4 ASP H 264 1920x1088 25p 30p 50i 60i 25p 30p 50i 60i 25p 30p 50p 60p 60i 25p 30p 50i 60i 25p 30p 50i 60i 25p 30p 50p 60p 60i 30 Yes Yes No No No Supported audio video formats File Extensions Container Maximum resolution Audio codec USB CE HTML HTML5 YouTube Max Bit Rate Mbps Video codec Max Frame Ra...

Page 67: ...2 3GP AAC HE AAC v1 v2 AMR Yes Yes No No No MPEG 4 ASP H 264 1920x1088 1920x1088 25p 30p 50i 60i 25p 30p 50p 60p 60i 30 30 Yes Yes No No No Supported audio formats File Extensions Container Maximum resolution Audio codec USB CE HTML HTML5 YouTube Max Bit Rate Mbps Video codec Frequency kHz Media server mp3 MP3 48 384 MPEG 1 2 2 5 L3 Yes Yes Yes Yes No wma asf WMA V2 up toV9 2 WMA Pro 48 192 WMA Ye...

Page 68: ...t Windows Twonky Media Microsoft Windows Mac OS X Sony Vaio Media Server Microsoft Windows TVersity Microsoft Windows Nero MediaHome DiXiM Microsoft Windows XP Macrovision Network Media Server Microsoft Windows Fuppes Linux uShare Linux Connectivity Rear NETWORK Ethernet LAN RJ 45 AUDIO IN DVI VGA stereo 3 5mm mini jack VGA PC input SERV U Service port CVBS Y Pb Pr Component Composite video L R Co...

Page 69: ...rt 14 channels switch 14 channels update 38 child lock 35 clock 34 closed captions 40 codecs supported 65 computer play files 19 connect computer 53 connect digital camcorder 50 connect digital camera 50 connect disc player 44 connect external hard disk 52 connect game console 48 connect home network 59 connect home theater 49 connect Internet 58 connect keyboard 54 connect mouse 54 connect record...

Page 70: ... 43 HDMI ARC 43 help onscreen 10 Help version 68 home mode 40 home network 58 home theater connect 49 I install channels automatic 38 Interactive TV 24 Internet connect 58 K Kensington lock 5 key beep 40 L language menu 39 lock TV 5 lounge light 19 M media server program 19 Miracast 29 mode home or shop 40 Multimedia Home Platform MHP 24 multimedia play files 19 multimedia play options 20 multimed...

Page 71: ...e video 23 S safety 3 schedule recordings 27 screen care 5 sensors 11 settings assistant 36 settings audio format 37 settings game 34 settings network 60 settings picture 36 settings sound 37 shop mode 40 Skype 30 Skype block contact 31 Skype contacts 31 Skype receive call 32 Skype settings 33 Skype setup 30 Skype sign in 30 Skype video call 32 Skype voice call 32 Skype voicemails 33 sleep timer 3...

Page 72: ...guide Internet 17 TV receiver connect 45 TV speakers mute 13 U universal access enable 40 update source list 55 USB keyboard 54 USB mouse 54 USB play files 20 V VGA 43 video call camera 54 video store 23 volume 13 W Wi Fi integrated setup 59 Y YouTube 22 YPbPr component video 43 ...

Page 73: ... 0 1 2 3 Lista de Postos Autorizados Envision Brasil ...

Page 74: ...tos ou de força maior bem como aqueles causados por DJHQWHV GD QDWXUH D H DFLGHQWHV FOXHP VH LJXDOPHQWH GHVWD JDUDQWLD GHIHLWRV GHFRUUHQWHV do uso dos produtos em serviços não domésticos residendais regulares ou em desacordo com o uso recomendado ESTÃO EXCLUÍDAS DA GARANTIA ADICIONAL AS PILHAS OU 7 5 6 251 6 8172 20 2 21752 5 0272 1RV PXQLFtSLRV RQGH QmR H LVWD DVVLVWrQFLD WpFQLFD DXWRUL DGD QYLVL...

Page 75: ...All registered and unregistered trademarks are the property of their respective owners www philips com ...

Reviews: