


Directions for use
GB 6
FTV1.9DE
3.
2
V
GA
640x480
31.468
kHz
60
Hz
V
GA
640x400
31.468
kHz
70
Hz
V
GA
640x350
31.468
kHz
70
Hz
MA
C
II
640x480
35.000
kHz
67
Hz
SV
GA
800x600
35.156
kHz
56
Hz
X
G
A
1
0
2
4
x768
45.000
kHz
56
Hz
When
a
V
GA
computer
is
connected,
the
selection
is
made
automaticall
y.
A
message
is
displa
yed
when
the
monitor
does
not
suppor
t
one
of
the
abo
ve
mentioned
V
GA
modes.
Switch
your
computer
to
a
cor
rect
displa
y
mode
.
&
Inser
t
the
mains
plug
5
(see
pr
e
vious
page
for
the
illustration)
supplied
into
the
mains
inlet
at
the
back
of
the
monitor
and
in
the
wall
sock
et.
Please
,onl
y
use
the
supplied
rim-ear
thed
mains
cor
d
with
its
built-in
filter
.
é
Remote
contr
ol:
remov
e
the
cov
er
o
f
the
batter
y
co
mpar
tment.
Inser
t
the
2
batteries
supplied
(T
ype
LR6AA-1.5V).
The
batter
ies
supplied
do
not
contain
the
heavy
metals
mercur
y
and
cadmium.
Ne
ver
theless
in
many
countr
ies
batter
ies
may
not
be
disposed
of
with
your
household
w
aste
.Please
check
on
ho
w
to
dispose
of
batter
ies
according
to
local
re
gulations
.
“
Switch
the
monitor
on
:
Pr
ess
the
pow
er
butto
n
B
at
the
right
side
of
the
monitor
.
A
gr
een
indicator
lights
up
and
the
scr
een
comes
on.
When
the
monitor
does
not
receiv
e
a
cer
tain
V
GA
signal
the
scr
een
remains
black.
Mak
e
sur
e
that
your
PC
is
switched
on
and
is
in
the
cor
rect
displa
y
mode
.
Use
of
the
remote
contr
ol
Computer
Displa
y
modes
Operation
1
English
Unpacking
and
wall
mounting
instructions
For
the
unpacking
instructions
follo
w
the
illustrated
steps
printed
on
the
packaging
(outside
and
inside).
For
the
wall
mounting
instructions
follo
w
the
illustrated
steps
‘
to
§
printed
on
the
first
pages
of
this
instruction
booklet.
Mak
e
sur
e
that
the
wall
mount
is
being
fix
ed
secur
el
y
enough
so
that
it
meets
saf
ety
standar
ds.
The
w
eight
of
the
monitor
(excl.
packaging)
is
about
43
kg.
Connect
y
our
computer
&
Connect
one
end
of
the
V
GA
cable
1
supplied
to
the
video
car
d
of
the
computer
and
the
other
end
to
the
V
GA
IN
connector
at
the
rear
side
of
the
monitor
.Fix
the
connectors
firml
y
with
the
scr
e
ws
on
the
plug.
é
In
case
of
a
Multimedia
computer
,connect
the
audio
cable
2
to
the
audio
outputs
of
your
Multimedia
computer
and
to
the
A
UDIO
IN
R
(right)
and
L
(left)
inputs
of
the
monitor
.
Daisy
chaining
The
Activ
e
Loop
Thr
ough
facility
mak
es
it
possible
to
mak
e
a
daisy
chain
with
a
second
V
GA
monitor
.
“
Connect
one
end
of
another
V
GA
cable
3
to
the
V
GA
OUT
connector
at
the
rear
side
of
the
monitor
and
the
other
end
to
the
VG
A
IN
connector
of
a
second
V
GA
monitor
.
‘
In
case
of
a
Multimedia
computer
,also
connect
the
audio
cables
4
to
the
A
UDIO
L
and
R
outputs
of
the
monitor
and
to
the
A
UDIO
IN
L
and
R
inputs
of
the
second
V
GA
monitor
.
Note:
only
use
the
VGA
cab
les
supplied
or
use
cab
les
that
are
specially
delivered
with
the
monitor
.
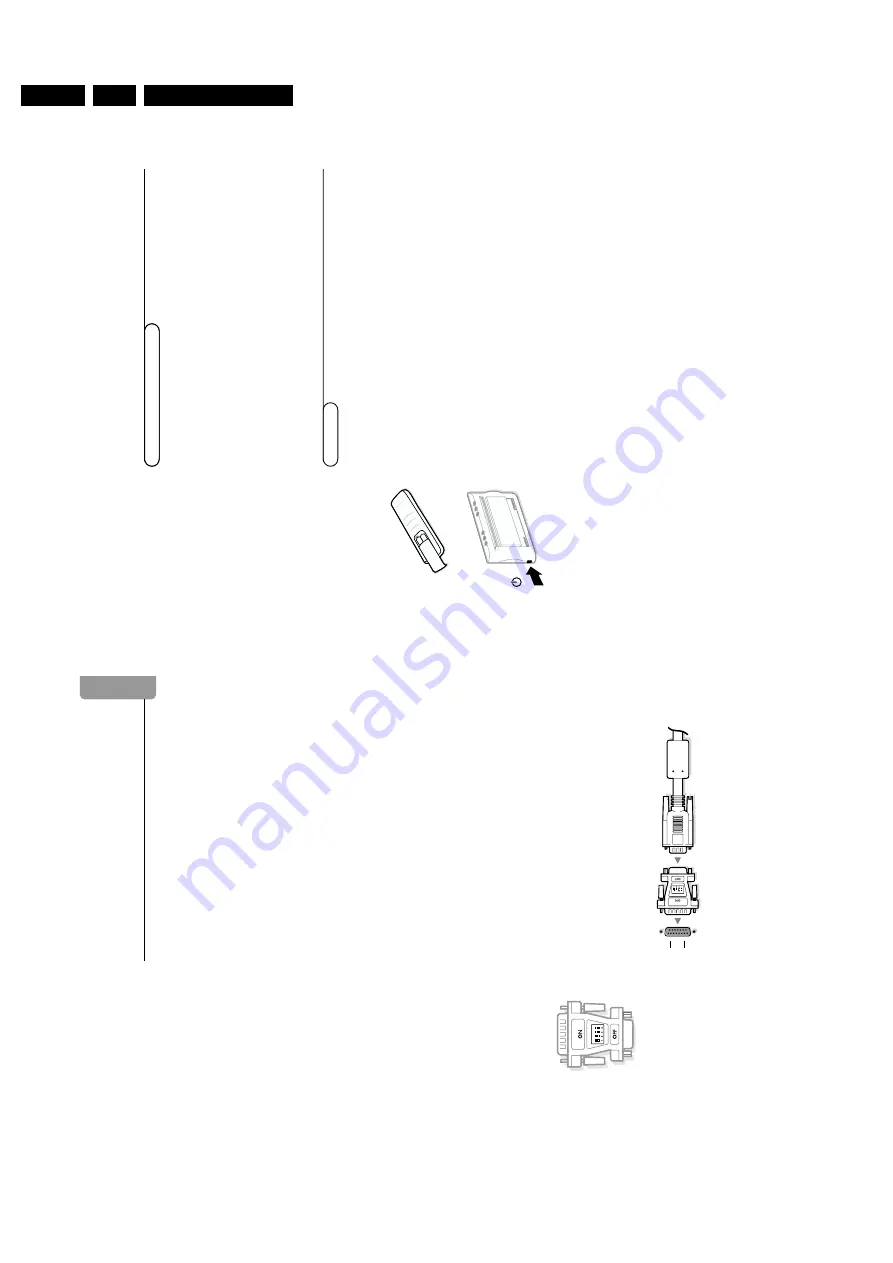
Connect
y
our
Apple
Macintosh*
computer
Attention:
Macintosh
computer
s
with
separ
ate
H
and
V
synchronisation
signals
can
be
used
together
with
the
supplied
adaptor
.Macintosh
computer
s
with
Composite
Sync
and
Sync
on
Green
signals
may
need
a
special
(not
supplied)
adaptor
or
cab
le
.Contact
your
dealer
.
Connect
the
supplied
switchable
ada
ptor
for
Apple
video
connectors
to
one
end
of
a
V
GA
cable
.
Put
the
DIP
switches
on
the
ada
ptor
in
the
follo
wing
positions
:
1234
off
off
on
on
Connect
the
end
of
the
V
GA
cable
with
the
ada
ptor
to
the
video
car
d
of
the
computer
and
the
other
end
to
the
V
GA
IN
connector
on
the
back
of
the
monitor
.
Scr
e
w
the
connectors
do
wn
firml
y.
*
Apple
Macintosh
is
a
register
ed
trademark
of
Apple
Computer
,Inc
.
15-pin D sub
(2-row)
15-pin mini D sub
(3-row)
a
www.freeservicemanuals.info
3/2/2013
www.nostatatech.nl
World of free manuals


