background image

English

18

 Timer  

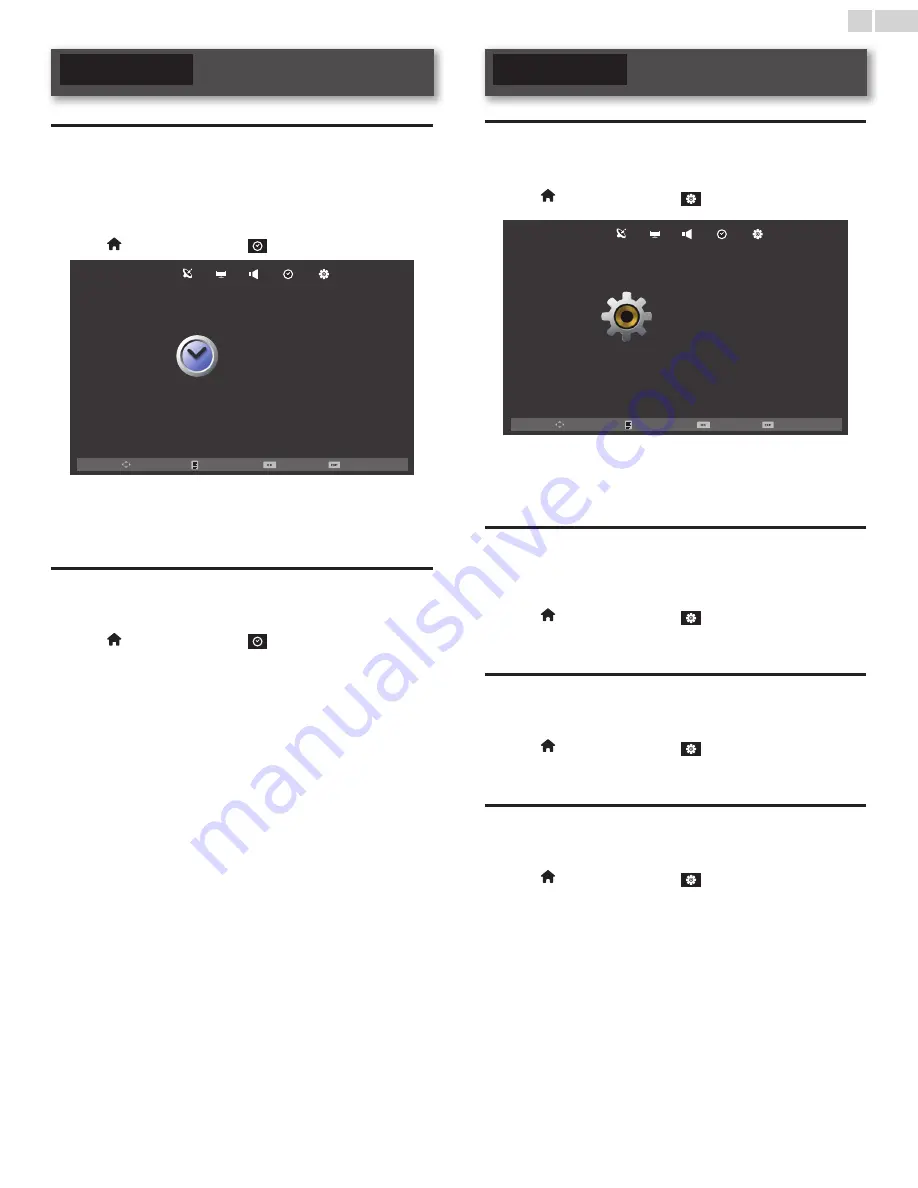
Auto Standby

You can set the time to turn off the display power automatically. In spite 
of this setting, the unit goes into standby mode automatically if there is 
no signal input from the antenna terminal and no user operation for 15 
minutes.

1

 Press   and use 

◄►

 to select 


(

TIMER)

.

Move

Enter

Menu

Exit

TIMER

Sleep Timer

Auto Standby

OSD Timer

Off

4 H

15s

2

 Use 

▲▼

 to select 

Auto Standby

, then press 

OK

.

3

 Use 

▲▼

 to select the time you want, then press 

OK

.

OSD Timer

You can set the time to turn off the OSD display.

1

 Press   and use 

◄►

 to select 


(

TIMER)

.

2

 Use 

▲▼

 to select 

OSD Timer

, then press 

OK

.

3

 Use 

▲▼

 to select the time you want, then press 

OK

.

 Option

Aspect Ratio

Display modes can be selected when your TV receives a 16:9 or 4:3 
video signal.
1 Press  and use 

◄►

 to select 


(

OPTION)

.

Move

Enter

Menu

Exit

OPTION

OSD Language

Aspect Ratio

Blue Screen

Key Lock

Reset

Software Update(USB)

English

16:9

Off

Off

2

 Use 

▲▼

 to select 

Aspect Ratio

, then press 

OK

.

3

 Use 

▲▼

 to select the display mode you want, then press 

OK

.

•  Available options are: 

4:3

16:9

Zoom1

Zoom2

 and 

Just Scan

.

Blue Screen

If you set to 

On

, the background screen displays blue, during no input 

signal.

1

 Press   and use 

◄►

 to select 


(

OPTION)

.

2

 Use 

▲▼

 to select 

Blue Screen

, then select 

On

 or 

Off

 using 

◄►

.

Key Lock

If you set to 

On

, you cannot use the buttons on the unit.

1

 Press   and use 

◄►

 to select 


(

OPTION)

.

2

 Use 

▲▼

 to select 

Key Lock

, then select 

On

 or 

Off

 using 

◄►

.

Reset

You can restore the all settings.

1

 Press   and use 

◄►

 to select 


(

OPTION)

.

2

 Use 

▲▼

 to select 

Reset

, then press 

OK

.

3

 Press 

 to select 

Yes

 to reset the current settings.

•  Channel setting has no change before and after reset.

Summary of Contents for 39PFL1707

Page 1: ...service in your country To obtain assistance contact Philips Customer Care Center at Lima Peru 225 99 77 annex 21 Chile 800 05630 203 ES Para obtener más información llame al servicio de soporte al cliente de su país Para obtener asistencia póngase en contacto con CENTRO DE INFORMACION AL CLIENTE Lima Perú 225 99 77 anexo 21 Chile 800 05630 203 39PFL1707 ...

Page 2: ... 13 Watching channels from an external device 13 Favorite 13 Sleep timer 14 Switching audio mode 14 Changing picture format 14 5 Use more of your TV 15 Displaying the main menu 15 Channel 16 AutoTuning 16 ATV ManualTuning 16 Programme Edit 16 Screen 16 Picture 17 Sound 17 Timer 18 Auto Standby 18 OSDTimer 18 Option 18 Aspect Ratio 18 Blue Screen 18 Key Lock 18 Reset 18 6 Playback Mode 19 View Phot...

Page 3: ...k do not expose this apparatus to rain or moisture Apparatus shall not be exposed to dripping or splashing and no objects filled with liquids such as vases shall be placed on the apparatus CAUTION To prevent electric shock match wide blade of plug to wide slot fully insert ATTENTION Pour éviter les choc électriques introduire la lame la plus large de la fiche dans la borne correspondante de la pri...

Page 4: ...er grounding and in particular specifies that the cable ground shall be connected to the grounding system of the building as close to the point of cable entry as practical Example of Antenna Grounding as per NEC National Electric Code ANTENNA DISCHARGE UNIT NEC SECTION 810 20 GROUNDING CONDUCTORS NEC SECTION 810 21 POWER SERVICE GROUNDING ELECTRODE SYSTEM NEC ART 250 PART H ANTENNA LEAD IN WIRE GR...

Page 5: ...tion against harmful interference in a residential installation This equipment generates uses and can radiate radio frequency energy and if not installed and used in accordance with the instructions may cause harmful interference to radio communications However there is no guarantee that interference will not occur in a particular installation If this equipment does cause harmful interference to r...

Page 6: ...pace of 4 inches 10cm or more around this apparatus Press to turn the unit on and go into standby mode To completely turn Off the unit you must unplug the AC power cord Disconnect the AC plug to shut the unit off when trouble is found or not in use The AC plug shall remain readily available Never use a gas duster on this TV The gas trapped inside of this unit may cause ignition and explosion CAUTI...

Page 7: ...ity suitable for your room and sets your sound preference HDMI Input HDMI DVI Input If your video device has DVI Output jack use an HDMI DVI conversion cable to connect the unit ComponentVideo Input PC Input AV Input USB terminal The picture video music and text files stored on a USB Memory Stick can be played back on this unit Digital Audio Output Headphone Audio Output Supplied accessories User ...

Page 8: ...ard the 2 hooks don t fit into the base When attaching the base ensure that all screws are tightly fastened If the base is not properly attached it could cause the unit to fall resulting in injuries as well as damage to the unit To remove the base from this unit unscrew the Phillips head screws in step 2 Be careful not to drop the base when you remove it Installing the remote control batteries 1 S...

Page 9: ...menu e INFO Displays information about theTV channel or accessory device f OK Press to decide the command of setting when the main menu is displayed NAVIGATION buttons Press to move left right up down through the items g SLEEP Press to activate the sleep timer h SOURCE Toggle and select connected devices i CH Press to select channels j COLOR RED GREEN YELLOW BLUE buttons Functionally useful for pr...

Page 10: ... control a d b c e f g Terminals h HDMI Input jack Digital audio and video Input from high definition Digital devices such as Blu ray disc players cable boxes and satellite set top boxes i VGA Audio cable connection for PC and HDMI DVI j VGA cable connection for PC k ComponentVideo Y Pb Pr Input jacks forVIDEO l USB terminal Data Input from USB Memory Stick only Do not connect any device to this t...

Page 11: ...t the correct Component Video Source by using SOURCE IN OUT OUT OUT OUT IN IN IN IN set top box set top box RF cable RF cable Audio L R cables Audio L R cables Component Y Pb Pr video cables Component Y Pb Pr video cables Connecting a set top box Blu ray disc DVD recorder via composite connectors and Analog Audio Do not place your recorder too close to the screen because some recorders can be susc...

Page 12: ...Air When Air is selected the TV detects antenna signals It searches for NTSC channels available in your area When Cable is selected the TV detects signals supplied by cable It searches for NTSC and Cable channels available in your area When the scanning and memorizing are completed the lowest memorized channel will be displayed If you press during the scanning this operation will be stopped and a ...

Page 13: ... a set top box or the connected device The picture from your set top box or the connected device might appear automatically on theTV screen If the picture does not appear Press SOURCE repeatedly or use to select the input mode you want then press OK Media PC HDMI ATV AV YPbPr Input Source OK Enter Favorite You can easily locate a favorite channel 1 Press FAV while watching a program to show the fa...

Page 14: ...de Analog CableTV operation 1 Press SAP to display the currently selected audio mode 2 While receiving an MTS broadcast press SAP repeatedly to cycle through the available audio channels Changing picture format Display modes can be selected when yourTV receives a 16 9 or 4 3 video signal Two types of display modes can be selected for a PC Input signal Press FORMAT repeatedly to switch theTV aspect...

Page 15: ...ne Type Air 2 Use to select the desired menu and an item then press OK or use to determine the setting Channel p 16 Adjusting the channel settings Screen p 16 Adjusting the screen settings in PC mode Picture p 17 Adjusting the picture mode or customize the picture quality as your preference Sound p 17 Adjusting the sound mode equalizer and some other sound functions Timer p 18 Adjusting the timer ...

Page 16: ...nel you want 5 Use to select Sound System then use to select the channel you want 6 Use to select FineTune then use to adjust the setting 7 Use to select AFC then use to select On or Off If you set to On this unit searches a near channel automatically 8 Use to select Search then use to search a current selected channel Program Edit You can edit the program settings 1 Press and use to select CHANNE...

Page 17: ...re mode individually to each input mode You can adjust Contrast Brightness Color Tint and Sharpness if you set Personal in Picture Mode While adjusting each setting of Picture Mode Contrast Brightness Color Tint and Sharpness you can change the setting item using Sound You can adjust the sound settings according to your personal preferences 1 Press and use to select SOUND Move Enter Menu Exit Soun...

Page 18: ...rTV receives a 16 9 or 4 3 video signal 1 Press and use to select OPTION Move Enter Menu Exit OPTION OSD Language Aspect Ratio Blue Screen Key Lock Reset Software Update USB English 16 9 Off Off 2 Use to select Aspect Ratio then press OK 3 Use to select the display mode you want then press OK Available options are 4 3 16 9 Zoom1 Zoom2 and Just Scan Blue Screen If you set to On the background scree...

Page 19: ...y the menu BF Press to play or pause the slideshow Press to skip the file backward or forward C Press to stop the slideshow Repeat Use and press OK to select the repeat mode Repeat None Repeat 1 or Repeat All in order Music Use to select Music and press OK to play then the music file in the same folder play automatically Playlist Use and press OK to select Playlist to show the playlist Info Use an...

Page 20: ...e the music playback E D Press to rewind or fast forward the music playback Press to skip backward or forward a music file C Press to stop the music playback Repeat Use and press OK to select the repeat mode Repeat None Repeat 1 or Repeat All in order MUTE Use and press OK to select MUTE to mute Playlist Use and press OK to select Playlist to show the playlist Info Use and press OK to select Info ...

Page 21: ...epeat None Repeat 1 or Repeat All in order A B Repeat Use and press OK to select the limited repeat mode Set A Set B or None in order Playlist Use and press OK to select Playlist to show the playlist Info Use and press OK to select Info to show the details Slow Forward Use and press OK to select Slow F to play slow Step Forward Use and press OK to select Step Fo to play frame by frame playback Got...

Page 22: ... cord between the USB Memory Stick and the unit Always connect the USB Memory Stick to this unit directly A USB Memory Stick that required its own driver or the device with a special system such as fingerprint recognition are not supported Be sure to keep a backup copy of the original files on your device before you play them back on this unit We have no responsibilities for damage or loss of your...

Page 23: ... software update If an error occurs during the update retry the procedure or for further assistance please contact Call Center Downloading the software Find information and software related to yourTV and download the latest software update file to your PC 1 On your PC open a web browser and go to www philips com support 2 Enter the model number in the Type the Model Number field 3 Click the desire...

Page 24: ...les Connecting your devices HDMI Digital connection HDMI connection offers the highest picture quality HDMI High Definition Multimedia Interface transports high definition Digital video and multi channel Digital Audio through a single cable IN IN OUT OUT set top box set top box or or Blu ray disc player Blu ray disc player or or HD game console HD game console HDMI cable HDMI cable HDMI DVI connec...

Page 25: ...IDEO Input jack connect audio cables to the Audio L R Input jacks OUT OUT IN IN DVD player DVD player Audio L R Video cables Audio L R Video cables Digital Audio Output Connection Use a Digital Audio coaxial cable to connect the unit to external Digital Audio devices IN IN OUT OUT Digital home theater Digital home theater amplifier amplifier Digital Audio coaxial cable Digital Audio coaxial cable ...

Page 26: ...ction requires separate audio connections as well and the audio signals are output as Analog L R Audio USB Memory Stick This unit offers easy playback of picture JPEG and video Motion JPEG files Insert the USB Memory Stick into the USB terminal shown below Playback Mode p 19 Note The unit recognizes only a USB Memory Stick Do not use a USB hub or an extension cable to connect an external hard disk...

Page 27: ...RF coaxial cable from your wall cable satellite box needs to be plugged into the unit How come there is no image from the connected external devices Check if the correct Input mode is selected by pressing SOURCE or using CH Refer to Watching channels from an external device p 13 Check the antenna cable or other Input connection to the unit When using the ComponentVideo connection check that the Gr...

Page 28: ...ture quality watch High Definition wide screen programs If the HD content is not available watch Standard Definition programs instead Picture OK sound poor View otherTV channels The problem might be limited to the broadcasting station or weak signal strength Check if the audio cable is connected into the unit correctly You see a distorted picture or hear an unusual sound You may be getting interfe...

Page 29: ...annel This audio channel is used as an alternate in bilingual broadcasting SDTV Standard Definition TV Standard Digital format that is similar to the AnalogTV picture quality Maintenance Cabinet Cleaning Wipe the front panel and other exterior surfaces of the unit with a soft cloth Never use a solvent or alcohol Do not spray insecticide liquid near the unit Such chemicals may cause damage and disc...

Page 30: ...MPEG 1 MPEG 2 dat MPEG 1 MP2 Max Resolution and Frame Rate 352 x 288 Max Data Rate 20Mbps vob MPEG 2 Max Resolution and Frame Rate 720 x 576 Max Data Rate 20Mbps Music playback MP3 files only Connectivity ComponentVideo Input Y Pb Pr 1 supporting video signals 480i p 576i p 720p 1080i p 60Hz CompositeVideo Input 1 HDMI Input 1 supporting video signals 480i p 576i p 720p 1080i p 24 30 50 60Hz PC In...

Page 31: ...2UTZZH Philips and Philips Shield are used under license of Koninklijke Philips Electronics N V P F Mexicana S A de C V Av La Palma No 6 Col San Fernando La Herradura Huixquilucan Edo de México C P 52787 ...

Reviews: