background image

31

demo

 20

devices

 23

devices


add to home menu 

10, 24

remove 10
 

digital services


teletext 9, 

13

disconnect USB

 17

display


resolution 27
 

dispose


4

E

EasyLink


disable 26
enable 26
system audio control 

26

end of life


4

environmental care


4

e-sticker

 19

F

factory settings

 20

H

HDMI


30, 23, 23

home mode

 19

I

install channels


automatic 21
manual 21

K

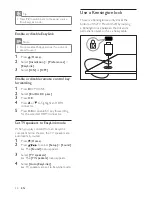
Kensington lock

 26

L

language


menu 29
troubleshoot 29

location


10 Index

A

antenna

 23

B

back connectors

 23

batteries


27, 4, 29

bracket for wall mount

 27

C

care


4

channels


install 

automatic 21
manual 21

lock 16
rename 21
reorder/rearrange 22
 

troubleshooting 29
tune 21

child lock


lock channels 

16

lock connected devices 

15

PIN code 

29, 15

computer


connect 30
display resolution 

27

connect


antenna 23
PC 30
power cord 

23

connectors


back connectors 

23

HDMI 30, 

23

overview 23
side connectors 

23

USB 16

controls


5

D

default settings

 20

English

EN

Summary of Contents for 32PFL5605

Page 1: ...Register your product and get support at www philips com welcome 32PFL5605 98 40PFL5605 98 46PFL5605 98 32PFL5605S 98 40PFL5605S 98 46PFL5605S 98 EN User manual ...

Page 2: ...idéo MP4 utilisant le codec H 264 ou AVC n est pas prise en charge TH ภาคผนวก คุณไม สามารถเล นไฟล วิดีโอ MP4 ที เข ารหัสแบบ H 264 หรือ AVC ได VI Phụ lục Bạn không thể phát các tập tin video MP4 sử dụng bộ giải mã AVC hoặc H 264 ZH CN 附录 您无法播放使用 H 264 或 AVC 编解码器的 MP4 视频文 件 ZH HK 附錄 您無法播放使用 H 264 或 AVC 編碼的 MP4 影像檔 ...

Page 3: ...1 Contents 1 Notice 2 2 Important 3 3 Your TV 5 Side controls and indicators 5 Remote control 5 4 Use your TV AdjustTV volume 9 Use teletext 9 5 Use more of your TV 10 AccessTV menus 10 Change picture and sound settings 10 Use advanced teletext features 13 Create and use lists of favourite channels 14 Use timers 15 Use child control 15 Use theTV clock 16 View photos play music and watch video from...

Page 4: ...nklijke Philips Electronics N V All rights reserved notice Trademarks are the property of Koninklijke Philips Electronics N V or their respective owners Philips reserves the right to change products at any time without being obliged to adjust earlier supplies accordingly The material in this manual is believed adequate for the intended use of the system If the product or its individual modules or ...

Page 5: ...nches or 10 cm around the TV for ventilation Ensure curtains or other objects never cover the ventilation slots on the TV Risk of damage to the TV Before you connect the TV to the power outlet ensure that the power voltage matches the value printed on the back of the TV Never connect the TV to the power outlet if the voltage is different 2 Important Read and understand all instructions before you ...

Page 6: ... cord from the power outlet ensure that you have full access to the power cord at all times When you disconnect the power cord always pull the plug never the cable Disconnect the TV from the power outlet and antenna before lightning storms During lightning storms never touch any part of the TV power cord or antenna cable Risk of hearing damage Avoid using earphones or headphones at high volumes or...

Page 7: ...egister yourTV at www philips com welcome This section gives you an overview of commonly usedTV controls and functions Side controls and indicators a Increases or decreases volume b Selects connected devices c P CH Switches to the next or previous channel d Power switch Switches the TV on or off e Ambient sensor Standby indicator Remote control sensor 5 2 1 3 4 Eng lish EN ...

Page 8: ...bles Incredible Surround for stereo sources Enables spatial mode for mono sources a Standby On Switches the TV to standby if it is on Switches on the TV if it is in standby b TELETEXT Toggles teletext on or off c SOURCE Selects connected devices d Colour buttons Select tasks options or teletext pages Available in selected models only e SLEEP Sets a delay after which the TV switches to standby f DU...

Page 9: ...n using the remote control hold it close to the TV and point it at the remote control sensor Make sure that the line of sight between the remote control and TV is not blocked by furniture walls or other objects 5m 30 Eng lish EN ...

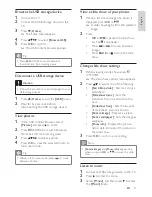
Page 10: ...evice 4 Use your TV This section helps you perform basicTV operations see Use more of yourTV on page 10 Switch your TV on off or to standby To switch on If the standby indicator is off press Power switch at the bottom of the TV If the standby indicator is red press Standby On on the remote control To switch to standby Press Standby On on the remote control The standby indicator switches to red To ...

Page 11: ...turn to the previously viewed page 3 Press TELETEXT to exit teletext Use the home menu Note You can add new devices to the home menu for easy access 1 Press Home The home menu appears 2 Press to select the device 3 Press OK to watch the connected device on your TV Adjust TV volume To increase or decrease volume Press on the remote control or at the side of the TV To mute or unmute sound Press to m...

Page 12: ...h the picture and sound settings 1 Press Home 2 Press to select Setup Picture Settings assistant 3 Press OK The Settings assistant menu appears Follow the on screen instructions to choose your preferred picture settings 5 Use more of your TV Access TV menus Menus help you to install channels change picture and sound settings and access other features Access the home menu The home menu gives you ea...

Page 13: ...tal shift Adjusts the picture horizontally for PC VGA or HD input Vertical shift Adjusts the picture vertically for PC VGA or HD input Use smart picture picture settings 1 Press PICTURE The Smart picture menu appears 2 Press to select one of the following smart picture settings Personal Lists customised picture settings Vivid Applies rich and dynamic settings Standard Adjusts picture settings to s...

Page 14: ...aster s systems Set your PC resolution to wide screen mode for best results Use smart sound settings 1 Press SOUND The Smart sound menu appears 2 Press to select one of the following smart sound settings Standard Adjusts sound settings to suit most environments and types of audio Change picture format 1 Press FORMAT A picture format bar appears 2 Press to select a picture format The selected pictu...

Page 15: ... subpage The subpage appears 4 Press to switch between subpages News Applies settings for spoken audio such as news Movie Applies settings for movies Personal Applies the settings that were customised in the sound menu 3 Press OK The selected smart sound setting is applied Manually adjust sound settings 1 Press Home 2 Press to select Setup Sound The Sound menu appears 3 Press to select and adjust ...

Page 16: ...ss to select Unmark as fav 4 Press OK The channel is removed from the favourite list 5 Press BACK to exit Select T O P teletext broadcasts Table Of Pages T O P teletext broadcasts allow you to jump from one subject to another without using page numbers T O P teletext is not broadcast on all TV channels 1 Press TELETEXT The teletext screen appears 2 Press INFO TheT O P overview appears 3 Press to s...

Page 17: ...rompting you to enter a code 3 Enter your code using Numeric buttons Use timers You can set timers to switch theTV to standby Automatically switch the TV to standby sleep timer Sleep timer switches the TV to standby after a Tip You can always switch off your TV earlier or reset the sleeptimer during the countdown 1 Press Home 2 Press to select Setup Features Sleep timer The Sleep timer menu appear...

Page 18: ...ted USB storage devices are supported File names must not 4 Press to select Lock or Unlock 5 Press OK All channels and connected devices are locked or unlocked Note If you select Lock you have to enter your code every time you turn on your TV Lock or unlock one or more channels 1 When watching TV press OK to display the channel grid 2 Press to select a channel to lock or unlock 3 Press OPTIONS 4 P...

Page 19: ...in the slide show 3 Press OK Note Rotate image and Show info appear only when you press OK or to pause the slide show Listen to music 1 Connect a USB storage device to the TV 2 Press to enter the menu 3 Select Music and then press to enter the Music folder Browse the USB storage device 1 Turn on the TV 2 Connect the USB storage device to the TV 3 Press Home The home menu appears 4 Press to select ...

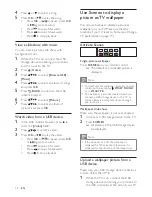
Page 20: ...allpaper picture from a USB device Make sure your USB storage device contains a picture of less than 1MB 1 While the TV is on connect the USB storage device containing your pictures to the USB connector at the side of your TV 4 Press or to select a song 5 Press OK or to play the song Press OK or to pause press OK or again to resume Press to search forward Press to search backward Press to stop pla...

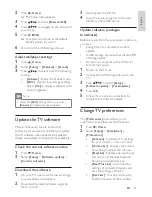
Page 21: ...onnected devices and uses the settings of the TV E sticker For shop mode only Sets the location of the e sticker 2 Press Home The home menu appears 3 Press to select Browse USB 4 Press to navigate to the picture of your choice 5 Press SCENEA Your picture is stored as the default Scenea picture in yourTV 6 Disconnect the USB storage device Adjust wallpaper settings 1 Press Home 2 Select Setup Featu...

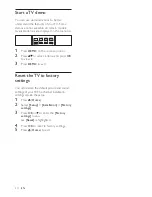
Page 22: ...ntrol 2 Press to select a demo and press OK to view it 3 Press DEMO to exit Reset the TV to factory settings You can restore the default picture and sound settings of yourTV The channel installation settings remain the same 1 Press Home 2 Select Setup Installation Factory settings 3 Press OK or to enter the Factory settings menu Reset is highlighted 4 Press OK to reset to factory settings 5 Press ...

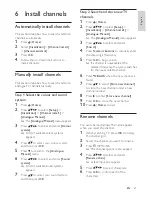
Page 23: ... OPTIONS The channel options menu appears 4 Press to select and enter Rename chan A text input box appears 5 Press to select characters 6 Press OK characters 6 Install channels Automatically install channels This section describes how to search and store channels automatically 1 Press Home 2 Select Installation Channel install Channel assistant 3 Press OK 4 Follow the on screen instructions to ins...

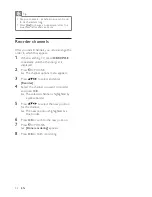
Page 24: ...r 1 When watching TV press BROWSE repeatedly until the channel grid is displayed 2 Press OPTIONS The channel options menu appears 3 Press to select and enter Reorder 4 Select the channel you want to reorder and press OK The selected channel is highlighted by a yellow border 5 Press to select the new position for the channel The new position is highlighted by a blue border 6 Press OK 7 Press OPTION...

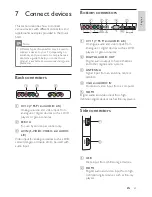
Page 25: ...onnect devices This section describes how to connect various devices with different connectors and supplements examples provided in the Quick Start Note Different types of connectors may be used to connect a device to your TV depending on availability and your needs A comprehensive interactive guide to help you connect your product is available at www connectivityguide philips com Back connectors ...

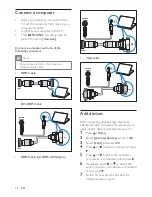
Page 26: ...select the audio connector your device is connected to and press 7 Switch on your device and check for video and audio output DVI DVI VGA AUDIO IN VGA DVI VGA AUDIO IN VGA Connect a computer Before you connect a computer to the TV set the monitor refresh rate on your computer to 60Hz Connect your computer to the TV Press FORMAT and change the TV picture format to Unscaled Connect a computer with o...

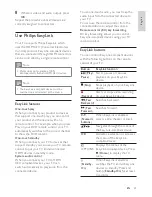
Page 27: ... TV and all EasyLink devices to standby Press and hold Standby On for at least 3 seconds 8 If there is video and audio output press OK Repeat the procedure until all devices are correctly assigned to connectors Use Philips EasyLink Your TV supports Philips EasyLink which uses the HDMI CEC Consumer Electronics Control protocol EasyLink compliant devices that are connected through HDMI connectors ca...

Page 28: ...stallation Preferences EasyLink 3 Select ON or OFF Enable or disable remote control key forwarding 1 Press OPTIONS 2 Select En Dis RC pass 3 Press OK 4 Press or to highlight an HDMI connector 5 Press OK to enable RC key forwarding for the selected HDMI connector Set TV speakers to EasyLink mode When you play content from an EasyLink compliant home theater the TV speakers are automatically muted 1 ...

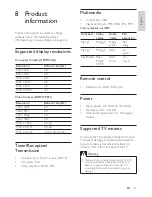
Page 29: ...of at least 2 2 inches or 5 5cm from the back of theTV Warning Follow all instructions provided with the TV mount Koninklijke Philips Electronics N V bears no responsibility for improper TV mounting that results in accident injury or damage 8 Product information Product information is subject to change without notice For detailed product information go to www philips com support Supported display ...

Page 30: ...0 x 501 x 92 mm Weight 10 kg With TV stand Dimension WxHxD 790 x 542 x 221 mm Weight 11 5 kg 40PFL5605 Without TV stand Dimension WxHxD 977 x 605 x Weight 13 7 kg With TV stand Dimension WxHxD 977 x 649x 236 mm Weight 16 1 kg 46PFL5605 Without TV stand Weight 17 9 kg With TV stand Dimension WxHxD 1122 x 731 x Weight 21 3 kg Note without notice EN ...

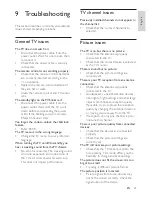
Page 31: ...sing a different picture format The picture position is incorrect Picture signals from some devices may X signal output of the device 9 Troubleshooting This section describes commonly encountered issues and accompanying solutions General TV issues The TV does not switch on Disconnect the power cable from the power outlet Wait for one minute then reconnect it Check that the power cable is securely ...

Page 32: ...tically switches the audio output off this does not indicate malfunction Check that all cables are properly connected Check that the volume is not set to 0 Check that the sound is not muted There is a picture but the sound quality is poor Check that the sound settings are correctly set There is a picture but sound comes from one speaker only Verify that sound balance is set to the centre HDMI conn...

Page 33: ... K Kensington lock 26 L language menu 29 troubleshoot 29 location 10 Index A antenna 23 B back connectors 23 batteries 27 4 29 bracket for wall mount 27 C care 4 channels install automatic 21 manual 21 lock 16 rename 21 reorder rearrange 22 troubleshooting 29 tune 21 child lock lock channels 16 lock connected devices 15 PIN code 29 15 computer connect 30 display resolution 27 connect antenna 23 PC...

Page 34: ...dby subpages in teletext 13 switch T Table of Pages 14 27 teletext features 13 menu 13 subpages 13 home or shop 19 lock Kensington lock 26 lock channels 16 lock connected devices 15 PIN code 29 15 M menu language 29 main menu 10 10 teletext 13 troubleshooting 29 MHEG teletext 9 MPEG artifact reduction 11 multimedia 27 music USB 17 mute TV speakers 26 O on timer 15 15 P PC connect 30 resolution 27 ...

Page 35: ...Contact information 52737691 local 67228896 local 40 6661 5644 Ortsgespräch Appel local 0680018189 Ingyenes hívás 0800 0230076 Gratis nummer 22 70 81 11 Lokalsamtale 0800 180 016 00800 311 13 18 Pozosta e produkty RTV oraz AGD 800780903 Chamada Grátis 495 961 1111 8 800 200 0880 ª 0800 894910 Apel gratuit 0318107125 Apel local 381 114 440 841 Lokalni poziv 0800 004537 Bezplatný hovor 00386 12 80 9...

Page 36: ... 2010 Koninklijke Philips Electronics N V All rights reserved Document order number 3139 125 41581 ...

Reviews: