Service Modes, Error Codes, and Fault Finding
5.
5.4
Service Tools
5.4.1
ComPair
Introduction
ComPair (Computer Aided Repair) is a Service tool for Philips
Consumer Electronics products. and offers the following:
1.
ComPair helps to quickly get an understanding on how to
repair the chassis in a short and effective way.
2.
ComPair allows very detailed diagnostics and is therefore
capable of accurately indicating problem areas. No
knowledge on I
2
C or UART commands is necessary,
because ComPair takes care of this.
3.
ComPair speeds up the repair time since it can
automatically communicate with the chassis (when the
micro processor is working) and all repair information is
directly available.
4.
ComPair features TV software up possibilities.
Specifications
ComPair consists of a Windows based fault finding program
and an interface box between PC and the (defective) product.
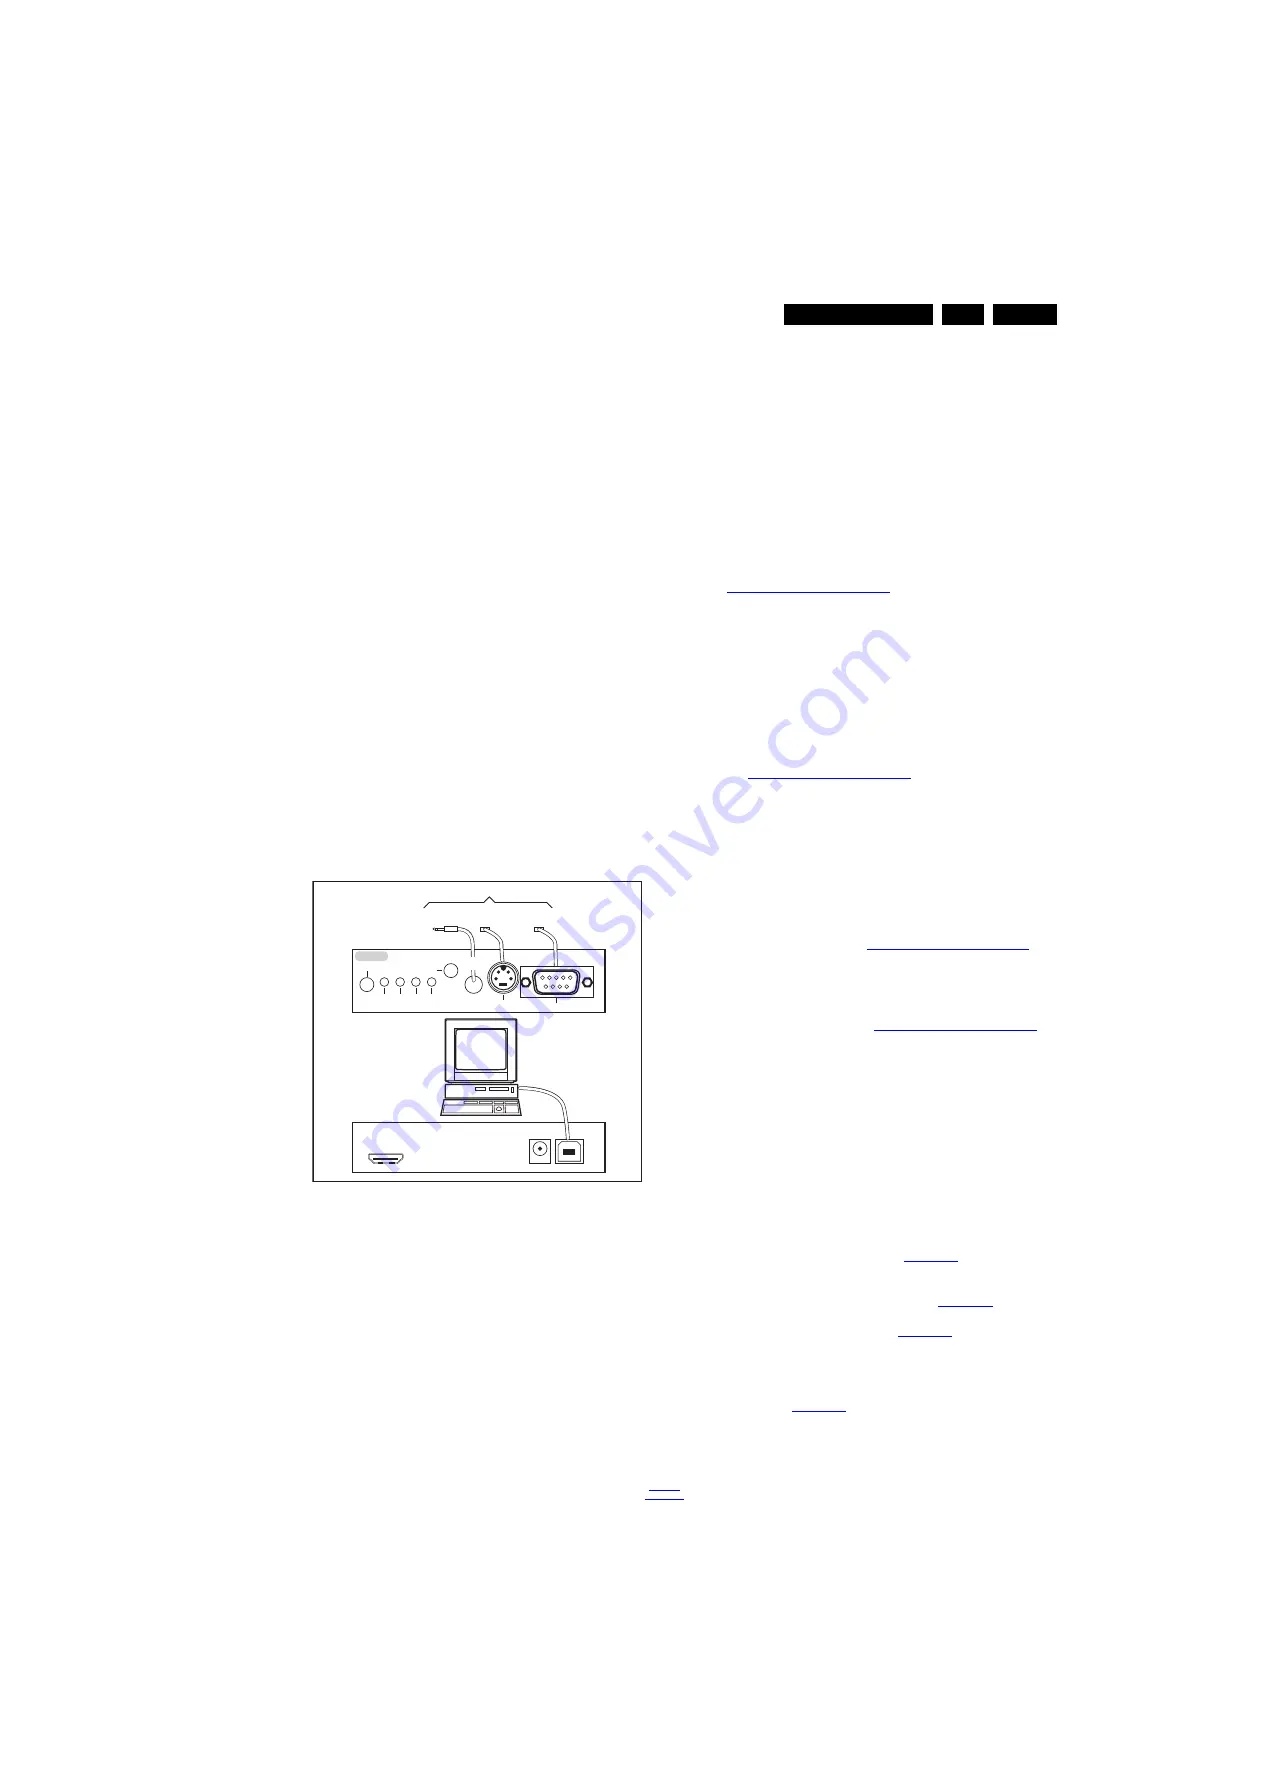
The ComPair II interface box is connected to the PC via an
USB cable. For the TV chassis, the ComPair interface box and
the TV communicate via a bi-directional cable via the service
connector(s).
The ComPair fault finding program is able to determine the
problem of the defective television, by a combination of
automatic diagnostics and an interactive question/answer
procedure.
How to Connect
This is described in the chassis fault finding database in
ComPair.
Figure 5-2 ComPair II interface connection
Caution: It is compulsory to connect the TV to the PC as
shown in the picture above (with the ComPair interface in
between), as the ComPair interface acts as a level shifter. If
one connects the TV directly to the PC (via UART), ICs can be
blown!
How to Order
ComPair II order codes:
•
ComPair II interface: 3122 785 91020.
•
Software is available via the Philips Service web portal.
•
ComPair UART interface cable for TPM10.1x xx.
(using DB9 to 2mm pitch JST connector): 3122 785 90630.
Note: When you encounter problems, contact your local
support desk.
5.5
Software Upgrading
5.5.1
Description
It is possible for the user to upgrade the main software via the
USB port. This allows replacement of a software image in a
stand alone set. A description on how to upgrade the main
software can be found in the DFU or on the Philips website.
5.5.2
Introduction
Philips continuously tries to improve its products, and it’s
recommend that the TV software is updated when updates are
available. Software update files can be obtained from the
dealer or can be downloaded from the following websites:
http://www.philips.com/support
Preparing a portable memory for software upgrade
The following requirements have to be met:
1.
A personal computer connected to the internet.
2.
An archive utility that supports the ZIP-format (e.g. WinZip
for Windows or Stufflt for Mac OS).
3.
A FAT formatted USB memory stick (preferably empty).
Note:
1.
Only FAT/DOS-formatted memory sticks are supported.
2.
Only use software update files that can be found on the
http://www.philips.com/support
5.5.3
Check the current TV software version
Before starting the software upgrade procedure, it is advised to
check that what the current TV software:
1.
Press the “1 2 3 6 5 4” button on the remote control to enter
the CSM mode.
2.
Use the up/down cursor keys to select “Current Main
Software”.
If the current software version of the TV is the same as the
latest update file found on
http://www.philips.com/support
, it is
not necessary to update the TV software.
5.5.4
Download the latest software
1.
Open the internet page
http://www.philips.com/support
2.
Find information and software related to the TV.
3.
Select the latest software update file and download it to the
PC.
4.
Insert the USB memory stick into one of the USB ports of
the PC.
5.
Decompress the downloaded ZIP file and copy it to the root
directory of the USB flash drive.
5.5.5
Update the TV software
1.
Turn the TV on and wait for it to boot completely.
2.
Insert the USB memory stick that contains the software
update files in one of the TV’s USB ports.
3.
The TV will detect the USB memory stick automatically.
Then a window jumps out as
.
Note: If the USB flash drive is not detected after power up,
disconnect it and re-insert it.
4.
Select [Update] and press OK. See
5.
To proceed, In next menu select [Start] and press OK to
start software updates. See
.
6.
Upgrading will now begins and the status of the updating
progress will be displayed.
7.
When the TV software is updated. Remove your USB flash
drive, then select [Restart] and press OK to restart the
TV.See
.
10000_036_090121.eps
091118
TO
UART SERV CE
CONNECTOR
TO
UART SERVICE
CONNECTOR
TO
I2C SERVICE
CONNECTOR
TO TV
PC
HDMI
I
2
C only
Optional power
5V DC
ComPa r II Developed by Ph lips Brugge
RC out
RC in
Optional
Switch
Power
Mode
Link/
Activity
I
2
C
ComPair II
Multi
function
RS232 /UART


