background image

4

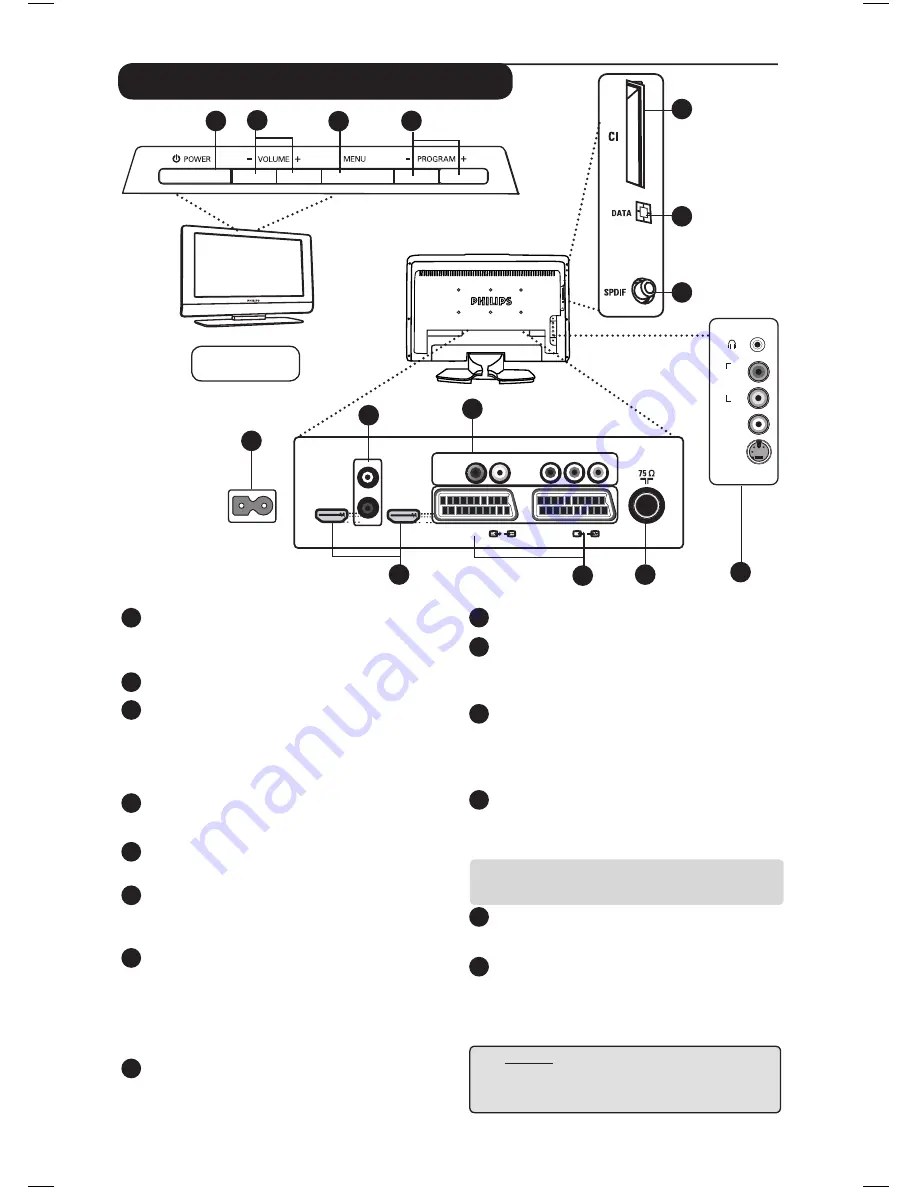
Television keys and connectors

6

12

5

EXT 4

EXT 2 /SVHS2

EXT 1

DVI

(AUDIO IN)

HDMI 2

HDMI 1

AUDIO  R     L

IN

Pr      Pb       Y

L

R

11

7

AC in ~

8

 10

9

AUDIO
    IN

R

L

VIDEO
    IN

S-VIDEO

14

13


1

3

4

2

26” TV


1

 POWER 

.


: to switch the TV on and off.

    The power remains on even when the Power  

    switch is turned off.

2

   VOLUME –/+

: to adjust sound level.


3

  MENU 

: to access or close menus. 

       The PROGRAM –/+ keys can be used to  

       select a menu item and the VOLUME – / +  

       key to enter into the selected menu item 

       and make adjustments.


4

  PROGRAM / CHANNEL –/+ 

: to select  

        programmes.

5

  POWER

 socket : Insert the mains plug  

        into a wall socket.

6

  DVI


Audio Input 

: for connecting a HD  

       (high definition) equipment or computer with  

        DVI output.

7

 Component Video Inputs / Audio Inputs : 

       to connect to equipment like DVD, Set-top  

       box which have the same sockets. Connect the  

       audio inputs of the TV to the outputs of the  

       device together with the Component Video 

       Inputs.


CI 

(Common Interface) slot : to connect   

        a CAM (Conditional Access Module) and a  

        smartcard.

NOTE
For more details on connections, 
see CONNECTION GUIDE.

9

  DATA 

socket : for Service use only.

10

  SPDIF

 socket : to connect to an amplifier  

      with coaxial digital input (only available in  
      Digital Mode).

11

  HDMI 1 /HDMI 2

 sockets : to connect to  

      set-top boxes, DVD player/recorder, High  

      Definition receiver/equipment or Personal  
      Computer.

12

   EXT1

 and 

EXT2

 socket : connect to equipment  

       like DVD player/recorder, VCR, Decoder box  

      which have scart connections.


Important

 : In order to connect your  

       decoder box , please use 

EXT1

 scart only.

13

   TV Aerial

 socket : Insert the aerial plug into  

      the 75 

Ω 

(TV antenna)


socket .

14


Side

 connections : for connecting to devices 

       like video camera or camcorder. Also allows  

      you to connect your headphone for your  

      personal listening pleasure. 

Summary of Contents for 26PF7521D

Page 1: ...Português English Français Deutsch Česky Polski Svenska Suomi Español ...

Page 2: ...0005 0 23 min Germany 0180 5 356 767 0 12 min Greece 0 0800 3122 1280 free Ireland 01 601 1777 local Italy 199 404 041 0 25 min Luxemburg 40 6661 5644 local Netherlands 0900 8407 0 20 min Norway 2270 8111 local Portugal 2 1359 1442 local Spain 902 888 784 0 15 min Sweden 08 5792 9100 local Switzerland 0844 800 544 local UK 0906 1010 016 0 15 min ...

Page 3: ......

Page 4: ......

Page 5: ...g the Sleeptimer feature 22 Using the Contrast and NR Noise Reduction features 22 Timer function 22 Picture and Sound settings 23 Using the PIP Picture in Picture feature 24 Screen Formats 25 Using the Active Control feature 26 Using the Smart Picture and Sound features 26 Teletext 27 Using the TV as PC monitor 29 Using the TV in HD High Definition Mode 30 Troubleshooting Tips 31 Glossary 33 Centr...

Page 6: ...dripping with water Do not use acetone toulene or alcohol to clean the TV As a safety precaution unplug the power cord from the mains As a safety precaution do not touch any part of the TV power lead or aerial lead during lightning storms Installation of the TV set on the wall should be carried out by qualified serviceman Improper and incorrect installation may render the set unsafe X Avoid placin...

Page 7: ... 14 8 10 9 32 TV 14 42 50 Plasma TV 37 LCD TV 5 5 MAINS AC in 6 7 8 9 10 12 13 11 CAUTION This a Class 1 apparatus It must be connected to a MAINS socket out with a protective earthing connection ï 37 42 50 TV 3 PROGRAM MENU VOLUME POWER 4 2 1 1 3 2 4 PROGRAM MENU VOLUME POWER HDMI 2 HDMI 1 EXT 4 Pr Pb Y AUDIO R L IN DVI AUDIO IN EXT 2 SVHS2 EXT 1 ANTENNA R L ...

Page 8: ...ve the same sockets Connect the audio inputs of the TV to the outputs of the device together with the Component Video Inputs 8 CI Common Interface slot to connect a CAM Conditional Access Module and a smartcard NOTE For more details on connections see CONNECTION GUIDE 9 DATA socket for Service use only 10 SPDIF socket to connect to an amplifier with coaxial digital input only available in Digital ...

Page 9: ... the dash disappears The number the name and the sound mode in analogue mode are displayed for a few seconds Screen information In digital mode press the key once to display the information banner and the second time to exit information banner see page 11 In analogue mode display remove the programme number the sound mode the remaining time of the sleeptimer and the signal strength indicator Telet...

Page 10: ... as a teletext key see page 27 28 In TV mode it is used to display the Source list to select TV or peripheral equipment connected to EXT1 EXT2 SVHS2 EXT3 SVHS3 EXT 4 HDMI 1 HDMI 2 or switch to Digital TV Digital TV Radio In digital mode it is used to access digital radio stations Press the OK key to access radio list Note To return to digital video mode press the Dgital TV Radio key again Smart Pi...

Page 11: ...al TV By using your remote control you can access all kinds of information like the digital text which is much clearer than the old teletext system It gives you the added enjoyment of related information running alongside the programme you are watching You can also access an Electronic Programme Guide that provides you with a quick and easy way to view a complete list of digital programmes as you ...

Page 12: ...eutsch English Español Français Italiano Magyar Norski Polski Portugués Suomi Svenska Location Country Australia Austria Belgium Czech Denmark Finland France Germany Hungary Italy Netherlands Norway Poland Portugal Spain Sweden Switzerland United Kingdom Time zone Digital Audio Output PCM MPEG AC3 PCM MPEG Information System software Current software version Always accept new software Yes No Acces...

Page 13: ...tup Add new services Search TV channels found Radio station found Other services found Store Discard Reinstall all services Search TV channels found Radio station found Other services found Store Discard Test reception Frequency Network name Signal quality Signal strength Overview of Digital main menu and sub menus ...

Page 14: ...ong country the channel numbering will not be according to the standard for your country and you may not receive all services or nothing at all Note that the Language can be selected independently from the Country Select Service Scan from the menu and press key to start the installation The service scan menu is displayed All the digital and analogue programmes are searched for and stored automatic...

Page 15: ...n one or more of the favourite list which is currently not activated Rearrange services This menu allows you to change the order of the stored digital channels and radio stations From the digital mode press the key to display the setup menu é Use the ï key to select Installation and press Æ twice to select the Service lists menu Use the Î ï keys to select Rearrange services and press Æ key Use the...

Page 16: ...s will be stored and added to the channel list menu The percentage of the installation that has been completed and the number of channels found is displayed When the search is completed press the key to accept the new services To return to previous menu press the Í key Press the key to exit the menu Add new services Reinstall all services Service lists Service setup Test reception Setup 11 46 Inst...

Page 17: ...e press the key to display the setup menu é Use the ï key to select Preferences and press Æ key Select Language Location or Digital Audio Output ï and press Æ key Use the Î ï keys to select a setting and press Æ key to enter into the sub menu Make your adjustment and press key or Í key to exit Language default settings Audio to select the audio sound language Subtitle Teletext to select the subtit...

Page 18: ... or strange behaviour you must call your CI service provider Setup 11 46 On Off Set pin code protection Maturity rating TV channels Radio stations Change pin code Switch pin code protection on or of Access restrictions Close Setting up your favourite list This menu enables you to create a favourite list with your prefered TV channels and radio stations For example each member of your family can cr...

Page 19: ...ll contain both radio stations and TV channels Banner duration to select the duration for which the banner is visible Press the white OPTIONS key to exit the menu System software Favourites Preferences Information Access restrictions Installation Setup 11 46 Provide information on problem reports and installing new software Close The software download menu will give a description of the software t...

Page 20: ...top box and a VCR to switch the recorder into record mode The pin 8 signal effectively acts as a record on off switch whilst additionally signalling thes aspect ratio of the video signal carried on the cable IMPORTANT In digital mode if you change the channel when recording starts a message will appear on the screen to confirm whether you want to stop recording Select Yes if you want to stop recor...

Page 21: ...ge keys Press key to exit Start time enter the start time End time enter the end time Audio language select your language and confirm with key Subtitle language make your selection and confirm with key Subtitles for hearing impaired select Yes or No and confirm with key Occurrence select Once Daily or Weekly and confirm with key Press the RED key to store your recording The TV guide reappears You ...

Page 22: ...de use the key on the remote control to exit teletext mode When you have finished watching teletext select a different channel with P keys or follow the on screen instructions to return to picture When you switch to a digital channel with links to a telext service software is downloaded in the background to enable the teletext function You should wait for a while before you press the key to allow ...

Page 23: ... of the card should be facing you If you are inserting the module from the front of the TV screen 26 32 the reverse side of the module without the arrow should be facing you For 37 42 50 TV if you inserting the module from behind of the TV the reverse side of the module without the arrow should be facing you Switch on the TV Press the key to switch the TV to Digital mode move to the Access Restric...

Page 24: ...elect the new programme number and confirm with the Í OK key The arrow points to the right and sorting is completed Repeat steps and for each programme number you wish to re number è To return to previous menu press the key 8 To exit the menu press the key TV Menu Picture Sound Features Install Install Language Country Auto Store Manual Store Sort Name Æ 0 Æ 1 Æ 2 Æ 3 Æ 4 Æ 5 Important To exit or ...

Page 25: ... adjust or activate System Use the Í Æ keys to select Europe automatic detection or France LL standard or UK I standard West Europe BG standard East Europe DK standard or Except for France LL standard you must select France This menu is used to store the programmes one at a time Manual tuning of analogue programmes 12 TV Menu Picture Sound Features Install Manual Store System Search Program No Fin...

Page 26: ...e settings Contrast optimise the total contrast of the picture for improved picture visibility select On option to activate feature NR Noise Reduction improves noisy picture little dots on picture due to weak signal transmission select On option to activate feature 1 3 4 2 5 Start Time enter the start time Stop Time enter the standby time è Program No enter the number of the programme for the wake...

Page 27: ...he light and dark tones Sharpness this increases or decreases the sharpness level to improve details in the picture Colour Temp this changes the colour rendering Cool bluer Normal balanced or Warm redder Store to store the picture adjustments and settings Description of the Sound settings Equalizer to adjust the sound tone from bass 120 Hz to treble 10 KHz Balance this balances the sound on the le...

Page 28: ...time exit PIP screen The PIP Picture in Picture feature allows you to call up a PIP screen of the PC Personal Computer or HD High Defintion device while watching a TV programme IMPORTANT To call up a PIP screen of the PC equipment the following step must be taken HDMI 1 or HDMI 2 input MUST be connected to the DVI output of the PC equipment Use a HDMI to DVI adaptor cable to do the connection To c...

Page 29: ... in 4 3 format and a black band is displayed on either side of the picture Movie Expand 14 9 The picture is enlarged to 14 9 format a thin black band remains on both sides of the picture Movie Expand 16 9 The picture is enlarged to 16 9 format This mode is recommended when displaying pictures which have black bands at the top and bottom letterbox format Subtitle Zoom This mode is used to display 4...

Page 30: ...the Active Control feature Select the Active Control Off option to deactivate the Active Control feature Active Control Off Definition of Picture Settings Rich Brilliant and sharp picture settings suitable for bright environment and for use in demonstrations to show off the quality of the TV on good sources Natural Reference mode for living room conditions and average signals Soft Intended for bad...

Page 31: ...n blank Proceed to exit teletext and select another channel Enter the number of the page required using the 0 to 9 keys or P keys Example page 120 enter 120 The number is displayed at the top left corner of the screen When the page is located the counter stops searching Repeat this operation to view another page If the counter continues to search this means that the page is not transmitted Select ...

Page 32: ...ch can then be accessed using the coloured keys red green yellow blue Once set these favourite pages will become the default every time teletext is selected Press the MENU TV key to change to favourite pages mode Use the keys to enter the teletext page that you want to store as a favourite page Press and hold the colour key of your choice for about 5 seconds The page is now stored Repeat steps 2 t...

Page 33: ... SVHS2 AV SVHS3 EXT 4 HDMI 1 Æ HDMI 2 DIGITAL TV NOTE For more details on connection to the PC equipment see CONNECTION GUIDE NOTE PC connection is only available via HDMI DVI connector VGA connection is not supported Description of Features Format Chooses between full screen or native format of the PC screen PIP Picture in Picture Displays a PIP screen to watch TV programmes at the same time Mode...

Page 34: ...age 22 PIP Display a PIP screen to watch TV programmes at the same time The PIP menu items PIP Size Horizontal and Vertical work in exactly the same way as when calling a PIP screen in TV mode For description of PIP menu items and how it works refer to the section on Using the PIP Picture in Picture Feature page 24 Horizontal Shift Adjust the horizontal position of the image Mode Selection When yo...

Page 35: ...to deactivate mute mode Aim remote control directly at sensor on front of TV Headphone is connected Disconnect headphone connection only for 26 32 Sound interference Electrical appliances Try switching off any electrical appliances for interference example hairdryer vacuum cleaner that are in use TV not responding Wrong polarity of batteries Check polarity of the batteries to remote control Flat b...

Page 36: ...ected Press button to enter Source list and select the correct source Wrong display resolution Check whether you have configured the computer on a compatible display resolution see Using your TV as PC Monitor on page 29 Wrong setting of PC Check graphic card setting of PC graphic card S Video colour Wrong detection of Check whether power cord is properly connected becomes faint signal Press the P ...

Page 37: ...HDMI equipped audio video component such as set top box DVD player and A V receiver HDMI supports enhanced or high definition video plus two channel digital audio System Television pictures are not broadcast in the same way in all countries There are different standards BG DK I and LL The System setting page 24 is used to select these different standards This is not to be confused with PAL or SECAM...

Page 38: ...00 35 586 000 36 594 000 37 602 000 38 610 000 39 618 000 40 626 000 41 634 000 42 642 000 43 650 000 44 658 000 45 666 000 Digital Frequency Nominal Centre Channel Frequency KHz 46 674 000 47 682 000 48 690 000 49 698 000 50 706 000 51 714 000 52 722 000 53 730 000 54 738 000 55 746 000 56 754 000 57 762 000 58 770 000 59 778 000 60 786 000 61 794 000 62 802 000 63 810 000 64 818 000 65 826 000 6...

Page 39: ... In 75 Ω Scart 1 Scart 2 HDMI 1 HDMI 2 Component Video Input SPDIF socket 37 42 50 TV Common Interface slot 37 42 50 TV Side Audio In Video In S Video In Headphone SPDIF socket 26 32 TV Common Interface slot 26 32 TV Power consumption 50 W 65 W 75 W 230 W 290 W Standby power consumption 1 W 1 W 2 W 2 W 2 W Set dimensions with stand Width 697 5 mm 935 mm 1114 mm 1249 mm 1425 mm Depth 246 8 mm 233 m...

Page 40: ... subject to change without notice Trademarks are the property of Koninklijke Philips Electronics N V or their respective owners 2005 Koninklijke Philips Electronics N V All rights reserved www philips com 3139 125 35764 ...

Reviews: