


24
1
2
3
4
5
6
7
8
9
0
A/CH
POWER
CC
STATUS
EXIT
SLEEP
MUTE
MENU
CLOCK
SURF
SMART
PICTURE SOUND
CH+
CH–
VOL+
VOL–
1
2
7
5
PICTURE
SMARTLOCK
SETUP
CC
STEREO
BLOCK
CHANGE CODE
MOVIE RATINGS
TV RATINGS
MASTER DISABLE
ON
OR OFF
BLOCK UNRATED
BLOCK NO RATING
MOVIE RATINGS
TV RATINGS
MASTER DISABLE
BLOCK UNRATED
ON
OR OFF
BLOCK NO RATING
MOVIE RATINGS
TV RATINGS
MASTER DISABLE
BLOCK UNRATED
BLOCK NO RATING
ON
OR OFF
ACCESS CODE
_ _ _ _
ACCESS CODE
X X X X
SMARTLOCK
MOVIE RATINGS
-- -- -- -- -- --
TV RATINGS
-- -- -- -- -- --
BLOCK UNRATED
OFF
BLOCK NO RATING OFF
3
4
6
8
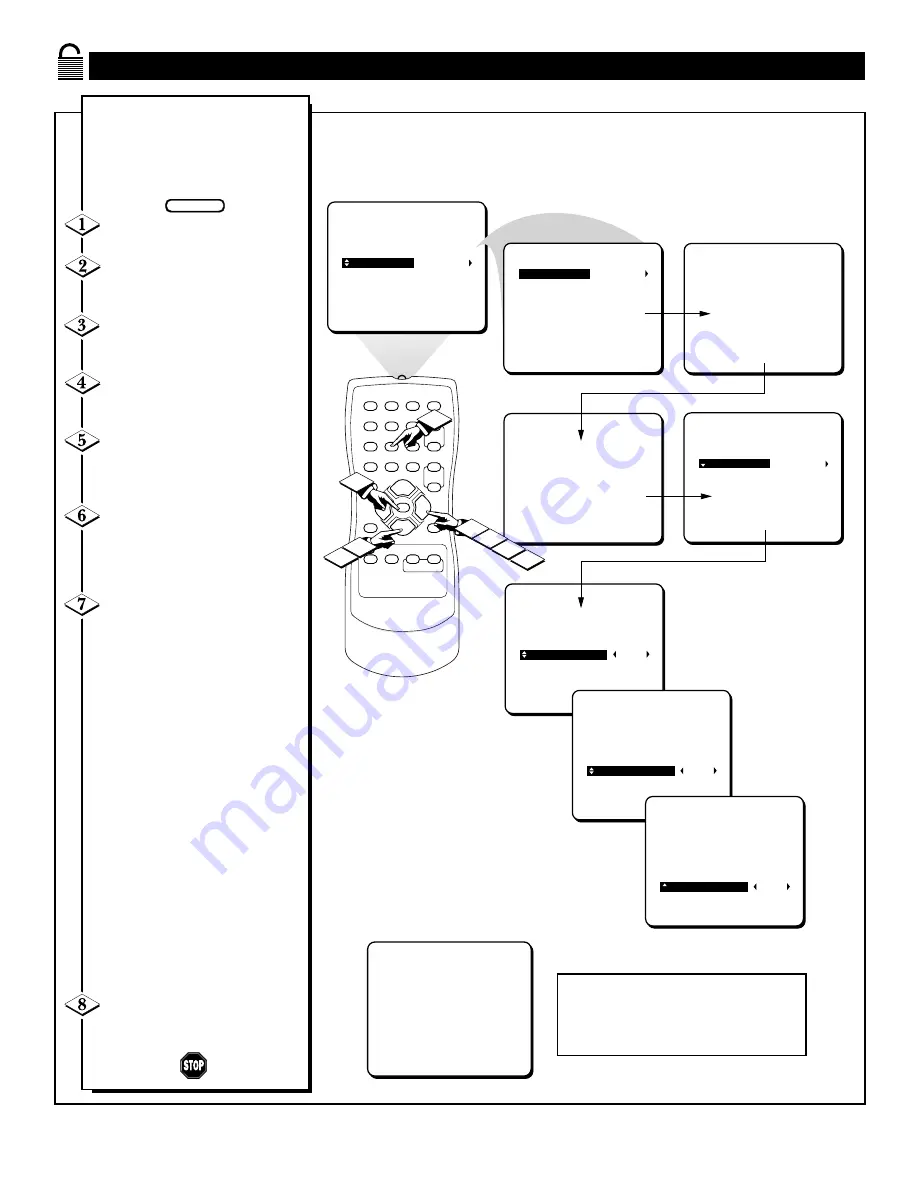
S
ETTING THE
S
MART
L
OCK
™ B
LOCKING
O
PTIONS
A
fter your personal access code
has been set (see previous
page), SmartLock offers the viewer
special blocking options. With these
Blocking Options, the censoring
controls can be turned ON or OFF.
Press the MENU button on the
remote to show the onscreen menu.
Press the CURSOR UP
▲
or
DOWN
▼
button until the words
SMARTLOCK are highlighted.
Press the CURSOR RIGHT
©
button to display the SMART-
LOCK REVIEW screen.
Press the CURSOR RIGHT
©
button. The onscreen display
will read “ACCESS CODE ----.”
Enter the correct access code
number. “XXXX” shows on the
Access Code display as you press
the NUMBERED buttons.
The onscreen menu will change
with the word BLOCK highlighted.
Press the CURSOR RIGHT
©
button to display the blocking
options.
Press the CURSOR DOWN
▼
button to highlight MASTER DIS-
ABLE, BLOCK UNRATED, or
BLOCK NO RATING.
MASTER DISABLE: This is what
might be called the "master switch"
for SmartLock. When in the ON
position, ALL blocking/censoring
is turned off (or disabled). When in
the OFF position, ALL blocking
based on specifically blocked set-
tings will take place.
BLOCK UNRATED: ALL unrated
programs based on the Movie
Ratings or Parental (TV)
Guidelines can be blocked if this
feature is set to ON and the MAS-
TER DISABLE feature is set to
OFF.
BLOCK NO RATINGS: ALL pro-
gramming with NO content adviso-
ry data can be blocked if this fea-
ture is set to ON and the MASTER
DISABLE feature is set to OFF.
Press the CURSOR RIGHT
©
button to select ON (block) or
OFF (do not block).
BEGIN
BLOCKED BY NO RATING
ENTER ACCESS CODE
— — — —
If the BLOCK UNRATED or BLOCK NO RATINGS
controls are turned ON, all unrated programs and pro-
grams containing NO content advisory data will display
the screen shown to the left. To watch the channel enter
your access code, or change the BLOCK UNRATED
and BLOCK NO RATINGS back to off.


