17” LCD Color Monitor
8
3.3 Adjusting the Picture
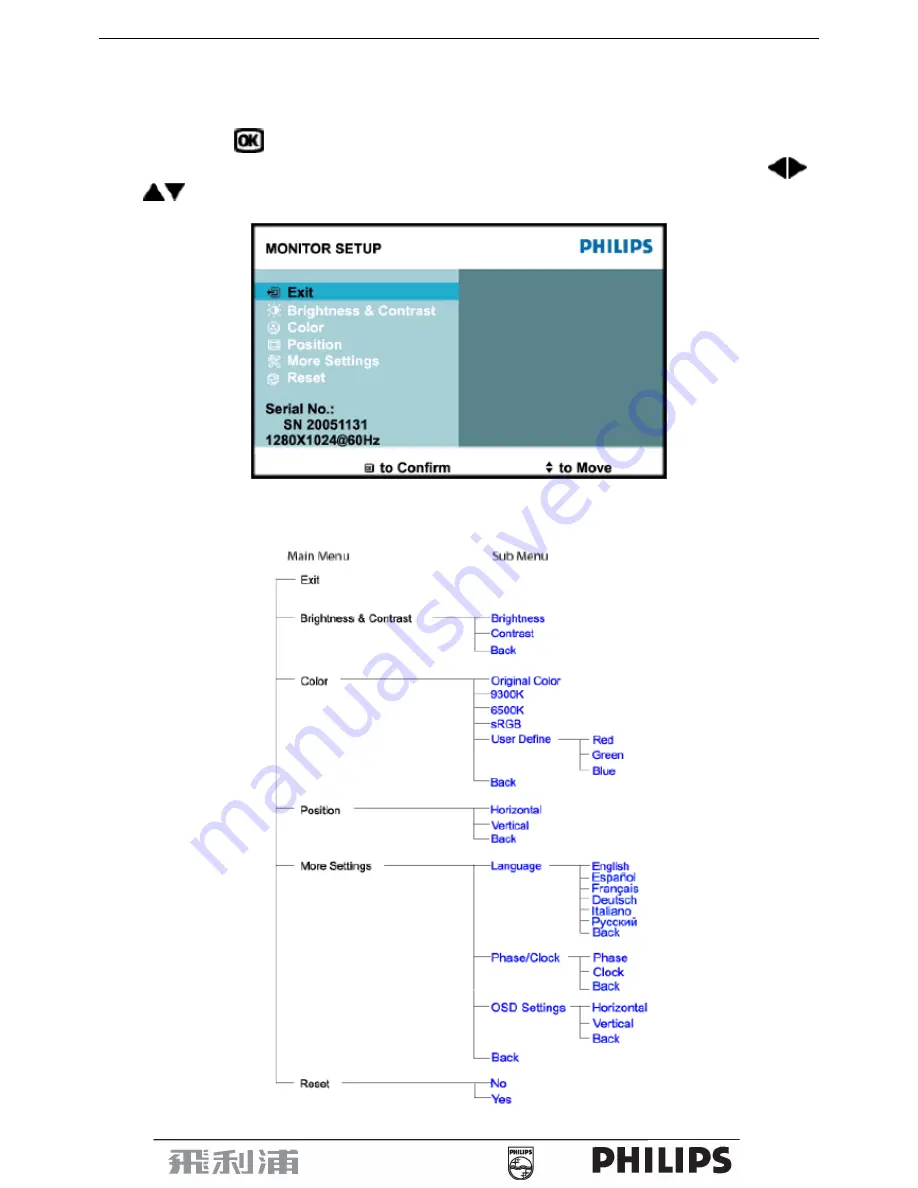
This is a feather in all Philips LCD monitors. It allows an end user to adjust screen performance of the monitors
directly through an on-screen instruction window. The user interface provides user-friendliness and ease-of-use
when operating the monitor.
When you press the
button on the front control of your monitor, the On-Screen Display (OSD) main controls
window will pop up and you can then start making adjustments to your monitor’s various features. Use the
or the
keys to make your adjustments.
The OSD tree
Below is an overall view of the structure of the On-Screen Display. You can use this as a reference when you want to
work your way around the different adjustments later on.
For Europe Model only:
Summary of Contents for 170S7FS/00
Page 7: ...17 LCD Color Monitor 7 Back View ...
Page 12: ...17 LCD Color Monitor 12 4 3 2 Optical Characteristics LM170E01 TLBB Panel ...
Page 13: ...17 LCD Color Monitor 13 QD17EL07 Panel ...
Page 14: ...17 LCD Color Monitor 14 4 3 3 Electrical Characteristics LM170E01 TLBB Panel QD17EL07 Panel ...
Page 15: ...17 LCD Color Monitor 15 5 Block Diagram 5 1 Monitor Exploded View ...
Page 19: ...17 LCD Color Monitor 19 5 3 2 Inverter Power Board ...
Page 26: ...17 LCD Color Monitor 26 7 PCB Layout 7 1 Main Board 715G1712 F ...
Page 27: ...17 LCD Color Monitor 27 ...
Page 28: ...17 LCD Color Monitor 28 ...
Page 29: ...17 LCD Color Monitor 29 7 2 Pwpc Board 715G1813 1 ...
Page 30: ...17 LCD Color Monitor 30 ...
Page 31: ...17 LCD Color Monitor 31 7 3 Key Board 715G1755 1 ...
Page 36: ...17 LCD Color Monitor 36 Fig 13 Fig 14 ...
Page 38: ...17 LCD Color Monitor 38 ...
Page 45: ...17 LCD Color Monitor 45 ...
Page 48: ...17 LCD Color Monitor 48 c After click OPEN there would be a dialog box select ...
Page 51: ...17 LCD Color Monitor 51 ...
Page 54: ...17 LCD Color Monitor 54 d Unit appears the following Fig writer completed ...


