background image

Reproduction or translation, even partial, is forbidden without the written consent of Peugeot Scooters

13/21

FR

GB

DE

IT

ES

NL

GR

SE

PT

FI

DK

ADVICE FOR STARTING UP AND DRIVING

WARNING

Before using the vehicle for the first time, make sure you are 

familiar with all the controls and their respective uses. If you 
are not sure about the functions of any of the controls, your 
registered dealer can answer your questions and give you any 
help you may require. 

As exhaust fumes are toxic, the engine must be started in a 

well-ventilated area. It must never be allowed to run in a closed 
space, even for a short time. 

STARTING THE ENGINE

For greater safety, place the vehicle on its central stand before 

starting the engine. 

Ensure that the emergency stop button on the 
handlebar is in the start position 

.

Ensure that the switch under the saddle is in 
position UNLOCK. 

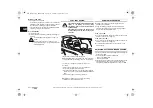
• Turn the ignition key to "ON".
• Ensure that the throttle is in the OFF position.
• Press one of the brake levers while pressing the starter 

button. Do not press the starter for more than 10 seconds. 

• Release the starter button as soon as the engine starts. 

If the engine does not start, release the starter 
button and the brake lever, wait a few seconds and 
try again. 

To kick start, place the vehicle on its central stand.

1

• Turn the ignition key to "ON".
• Ensure that the throttle is in the OFF position.
• Grip the grab handle with your right hand. 
• Operate the kick-start until the engine starts.

DRIVING

Starting off

The vehicle is on its stand with the engine running. 
• Squeeze the brake lever with your left hand, grip the grab 

handle with your right hand and push the vehicle forwards to 
fold up the central stand. 

• Sit on the vehicle.
• Release the left brake and turn the throttle slowly with your

right hand to start moving. 

Accelerating and decelerating

To accelerate, turn the throttle towards (A). To slow down, turn 

the throttle towards (B). 

BRAKING

TWEET 50 cc
Conventional braking

The right lever controls the front brake and the left lever 

controls the rear brake

Use of the brakes

For good braking, it is very important to coordinate the 

following actions: 

• Close the throttle. 
• Operate the left and right brake levers simultaneously 

and slowly increase the pressure.

Using only one brake reduces braking 
efficiency and can lock the wheel, causing a 
fall

Avoid braking suddenly on wet roads or in 
bends. 

Reduce speed on steep slopes to avoid prolonged 

braking, as overheating will reduce braking efficiency. 

TWEET 125/151 cc

This vehicle is equipped, depending on the model, with 

one of the 2 following systems: 

Braking system SBC

This is an integrated braking system. 

- This system makes the vehicle easier to use: the right 

hand operates the throttle and the left hand controls 
the brake. When braking with the left hand, the system 
acts simultaneously on the front and rear brake. 

- The right brake is a secondary service brake which 

only acts on the front brake and supplements the
combined system on the left lever in case of 
emergency. 

1.

Depending on equipment. 

B

A

NOT_804135_TWT_EURO4-04A.mif  Page 13  Vendredi, 16. juin 2017  1:11 13

Summary of Contents for TWEET 125 ABS

Page 1: ......

Page 2: ...Libretto d istruzioni Manual de utilización Gebruikershandleiding ΕΓΧΕΙΡΙ ΙΟΧΡΗΣΤΗ Instruktionsbok Manual de proprietàrio Käyttöohjekirja Instruktionsbog FR GB DE GR IT ES NL DK PT FI SE COUV_NOTICE_TWEET_EURO4_V3 01A mif Page 1 Vendredi 16 juin 2017 8 53 08 ...

Page 3: ...ng off 12 Advice for starting up and driving 13 Warning 13 Starting the engine 13 Driving 13 Fuel Fuel saving 14 Running in the engine 14 Service operations 15 Maintenance advice 15 Spark plug inspection or replacement 15 Checking the engine oil level 16 Changing the engine oil 16 Draining the relay box 17 Replacing the air filter 17 Throttle cable play 18 Tyres 18 Brake inspection 18 Brake fluid ...

Page 4: ... with a professional depending on the applicable legislation and based on engine capacity Wearing an approved helmet and gloves is obligatory for the user and passenger You are also advised to wear goggles and light coloured or reflective clothing adapted to motorcycling In some countries the applicable legislation may not authorise transportation of a passenger and elsewhere it may oblige motorcy...

Page 5: ...WEET 125 ABS TWEET 151 ABS TWEET 125 ABS Official type approval code LW1AJA LW4CJA LW3DJB LW2CAA Dimensions in mm Weight in kg Unladen weight 96 116 119a a Version PRO In working order 100 120 126a Authorised maximum Total weight of the vehicle the user the passenger the accessories and luggage 250 270 236a 690 1330 1125 2000 NOT_804135_TWT_EURO4 04A mif Page 3 Vendredi 16 juin 2017 1 11 13 LW5BJA...

Page 6: ...t 6500 rpm 3 4 Nm at 6500 rpm 9 2 Nm at 7000 rpm 11 2 Nm at 6000 rpm 9 2 Nm at 6000 rpm Cooling Air cooling Fuel supply ECU controlled carburetion system Indirect electronic injection EFI Carburettor Spark plug NGK CR6HSA NGK CR7HSA Lubrication Pressurised wet sump lubrication Exhaust Catalysed and lambda sensor Anti pollution standard Euro4 Euro3 Consumption a a These consumption values are estab...

Page 7: ...d index and speed rating Minimum load index and speed rating 51N 51B 52P 39J Rear 90 80 16 110 70 16 Standard load index and speed rating Minimum load index and speed rating 51N 51B 52P 49J Pressure in bars Front Solo 1 75 Pillion 1 75 Rear Solo 2 25 Pillion 2 4 Suspension Front Travel 100 mm Rear 1 adjustable shock absorber Travel 80 mm 2 adjustable shock absorbers Travel 75 mm Brakes Front 1 dis...

Page 8: ...SBC TWEET 125 ABS TWEET 151 ABS TWEET 125 ABS Official type approval code LW1AJA LW4CJA LW3DJB LW2CAA Electrical equipment Headlights 12V 35 35W HS1 Side light bulbs 12V 5W 12V 5W ou LED 12V 5W Indicator bulbs 12V 10W Rear light 12V 21 5W Number plate light 12V 5W Battery 12V 6Ah Maintenance free batteries YUASA YTX7A BS NOT_804135_TWT_EURO4 04A mif Page 6 Vendredi 16 juin 2017 1 11 13 LW5BJA LW4C...

Page 9: ...the product Toxic or fatal The product can rapidly be fatal It poisons rapidly even at low doses Wear protective equipment Avoid any contact oral skin inhalation with the product and wash all exposed areas carefully after use Harmful for the environment The product pollutes It has a harmful effect in the short and or long term on organisms in aquatic environments Do not dispose of it in the enviro...

Page 10: ...urer s plate 6 Fuel tank 7 Grab handle 8 Kick starter1 9 Central stand 10 Engine number 11 Passenger footrests 12 Lateral stand 13 Left brake lever 14 Brake fluid level 15 Circuit breaker1 16 Helmet compartment 17 Ignition switch 18 Throttle 19 Right brake lever 20 Battery Fuses 21 Oil level gauge 1 Depending on model 17 18 15 11 21 1 16 4 3 2 14 13 6 5 7 9 10 12 11 20 19 14 8 NOT_804135_TWT_EURO4...

Page 11: ... beam control 3 Direction indicator warning light When a flasher bulb has failed the repeater light and the other flasher light flash more quickly to alert the rider of a failure 4 Emissions control system failure warning light MIL Malfunction Indicator Lamp 1 If the indicator light turns on when riding you are advised to have the vehicle checked by an authorised dealer 5 Multi function display se...

Page 12: ...k Press the control button several times briefly until the figures of the clock flash SET Set the time by successive pushes on the control button MODE A short press on the control button makes the first minutes figure flash SET Change the minutes by successive pushes on the control button MODE A short press on the control button makes the second minutes figure flash SET Change the minutes by succe...

Page 13: ...e started Adjustment of damper settings Each damper has an adjuster ring that can be used to stiffen or soften the suspension depending on the vehicle load Use the on board tool to make this adjustment To guarantee your comfort and safety always adjust the damper preload in line with the vehicle load Perform the same setting for the 2 dampers 125 151 cc LATERAL STAND The lateral kickstand is fitte...

Page 14: ...efore using the vehicle INSPECTION BEFORE SETTING OFF Component Checks Fuel Check the fuel level in the tank Top up with fuel if necessary Check that there is no fuel leak Engine oil Check the level of the engine oil If necessary top up with the recommended oil Disk brakes Check brake operation Have an approved dealer check them if they feel soft Check brake pad wear Check the level of brake fluid...

Page 15: ...starts DRIVING Starting off The vehicle is on its stand with the engine running Squeeze the brake lever with your left hand grip the grab handle with your right hand and push the vehicle forwards to fold up the central stand Sit on the vehicle Release the left brake and turn the throttle slowly with your right hand to start moving Accelerating and decelerating To accelerate turn the throttle towar...

Page 16: ...icle s mechanics Avoid using very high revs over very short distances Do not race the engine when declutched Ensure that the weight of the user the passenger luggage and accessories does not exceed the maximum authorised load Switch off the engine even during a short halt Managing fuel consumption is also a way of personally contributing to environmental protection RUNNING IN THE ENGINE Running in...

Page 17: ...nical training specific tools and spare parts SPARK PLUG INSPECTION OR REPLACEMENT It is essential to use a resistive spark suppressor and a resistive spark plug in accordance with the manufacturer s recommendations The engine must be cold Remove the spark plug access hatch Remove the saddle storage compartment Disconnect the suppressor Remove the spark plug Measure the distance between the electr...

Page 18: ...ent standards When the ambient temperature is below 5 C C use an oil of viscosity 5W40 The engine must be drained when it is warm to allow the oil to run easier Place the vehicle on its central stand on flat ground Put on protective gloves Remove the drainage cap and its seal 1 and allow the oil to drip into a recipient Remove the strainer cap 2 and clean the strainer 3 Put back the drainage cap a...

Page 19: ... oil corresponding to the manufacturer s standards into the filler hole Fit the filler cap REPLACING THE AIR FILTER Remove the air filter cover Remove the air filter Clean inside the air filter box Fit a new air filter Re fit the cover Remove the oil vapour return drain plug to let humidity and oil drip out 3 SETTING THE IDLE SPEED1 The engine must be at its operating temperature Switch off the en...

Page 20: ...replacing tyres you are advised to mount tyres of the same brand and equivalent quality In case of puncture it is forbidden to mount an inner tube in a tubeless tyre Tyres contain substances that are harmful to the environment Your dealer is equipped to dispose of used tyres without endangering the environment in compliance with current standards BRAKE INSPECTION We advise you to visit a registere...

Page 21: ...the minimum mark we advise you to go to a registered dealer to have the braking system checked and topped up if necessary FUSES Find the faulty fuse by looking at the condition of its filament If a fuse often blows this is usually a sign of a short circuit in the electrical circuit You are advised to have the system checked by a registered dealer Before changing a fuse you must find the reason for...

Page 22: ...rally or due to its electronics or certain accessories and must thus be regularly charged If the vehicle is not used for a period of 1 month or longer the battery charge must be preserved Using a maintenance charger if the vehicle is not used for a long period If not by disconnecting it from the vehicle if the vehicle is not used for a period of less than 2 months If these recommendations are not ...

Page 23: ... Disconnect and remove the battery Charge the battery to 100 beforehand Use a maintenance charger or charge monthly Before restarting the battery must be charged to 100 Installing the battery Connect the batter in the following order 1 The positive terminal 2 The negative terminal BULB REPLACEMENT Headlight bulb Remove the rearview mirrors Remove the headlight fairing 1 You are advised to contact ...

Page 24: ...peugeotscooters fr www peugeotscooters com ISO 9001 Édition 2008 N SQ 1956 Dans un souci constant d amélioration Peugeot Scooters se réserve le droit de supprimer modifier ou ajouter toutes références citées DQ APV du 6 2017 photos non contractuelles 0 800 007 216 COUV_NOTICE_TWEET_EURO4_V3 01A mif Page 2 Vendredi 16 juin 2017 8 53 08 ...

Page 25: ...11 804135 00 peugeotscooters com PMTC DTEF 05 17 V1 ISO 9001 Édition 2008 N SQ 1956 RECOMMENDS PEUGEOT SCOOTERS 0 800 007 216 ...

Reviews: