


DE
NL
IT
FR
ES
EN
www.petsafe.net 7
6 www.petsafe.net
•
Outer Frame Size
– Overall Dog Door dimensions.
•
Passport
™
Key
– A Passport
™
Key is a passive transmitter that sends a unique identification code to the Dog Door.
•
Passport
™
Intelligent Dog Door
– The Passport
™
Intelligent Dog Door is an intelligent receiver using an internal Antenna to pick up unique
Passport
™
Key codes for selective pet access.
•
Passport
™
Rechargeable Battery
– Optional, rechargeable lithium-ion battery specially designed to work with the Dog Door to allow full
operation in place of the Power Adaptor or as a power back-up option in case of mains power loss (sold separately).
•
Radio-Frequency Interference
– Radio-Frequency Interference is due to radio-frequency signals from other household appliances or
common electronic products that negatively affect the ability of the Dog Door to receive a signal from a Passport
™
Key. Radio-Frequency
Interference or “noise” can come from a variety of sources. Interference can be minimal, constant or ever changing based on usage and
closeness of other electronic household items during operation of the Dog Door. It is recommended that household appliances and common
electronic products be placed at least 61 cm away from the location of the Dog Door.
•
Radio-Frequency Technology
– The use of a radio-frequency signal that can be transmitted without wires.
•
Re-latch Time
– Amount of time it takes the Dog Door to re-lock after Passport
™
Key is no longer in Read Range or detected. Default factory
setting is 2 seconds but can be adjusted from 1 second to 60 seconds.
•
Read Range
– Distance between Passport
™
Key and the Passport
™
Intelligent Dog Door when it first detects the key and triggers the flap to
unlock or operate as programmed for dog.
•
Reset Button
– Pin-sized button located in the Control Panel which reboots the Dog Door.
•
Smart Mode
– Dog Door operational mode where flaps are electronically locked and will function as specifically programmed for dogs with
programmed Passport
™
Key accessories . The default factory setting for door operational mode.
•
Speaker
– Produces sound and used to alert when In-Tone or Out-Tone has been set, or when battery alert or error has been detected.
•
Serial Number
– Unique identification number assigned to each Dog Door during manufacturing. The Serial Number is located on a label
inside Battery Compartment or on Passport
™
Intelligent Dog Door About screen.
•
Timer Mode
– Allows the different dog access settings to be set at specific times of day for all dogs with programmed Passport
™
Key
accessories through Master Access or can be programmed by dog. Four time slots available with a minimum of 2 programmed times required.
Door operational mode must be set to Smart Mode for Timer Mode to work.
•
USB Port
– Connection for a mini-USB cable to connect Dog Door to a computer for programming or to download door firmware updates
(USB cable included).
•
Volume
– Turns Speaker on or off. Default factory setting is on.
•
Wireless Card Port
– Connection for Passport
™
Wireless Card (sold separately) which is used to connect to your existing wireless
router to remotely program and operate the Dog Door from a computer, smartphone or other smart device. Contact Customer Care Centre
for availability.
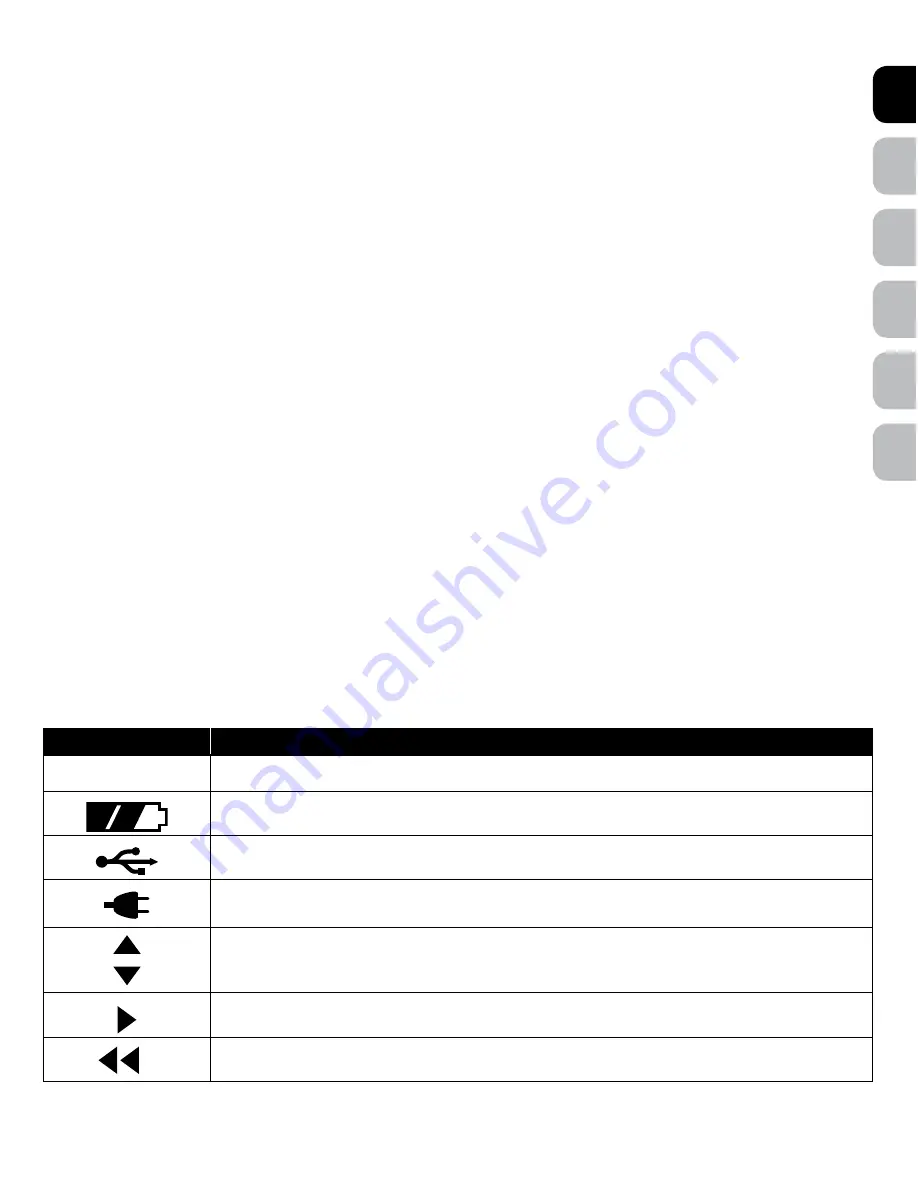
Icon Definitions
ICON
FUNCTION
05:30
TIME INDICATOR
— Displays the current set time. Can be set to 12-hour or 24-hour format.
BATTERY INDICATOR
— Displays when the optional Passport
™
Rechargeable Battery is in use with its
charge status.
USB CONNECTION
— Indicates a mini-USB cable is connected to the Dog Door.
POWER ADAPTOR
— Indicates the Power Adaptor is connected to the Dog Door.
UP / DOWN INDICATORS
— Indicates menu choices available above or below. Use the up and down
arrow keys on 5-Button Navigation to view additional menu items not shown on screen.
MORE / SELECT INDICATOR
— Indicates more information or options available. Use right arrow key on
5-Button Navigation to view additional information or options. Can sometimes be used to select an option.
BACK INDICATOR
— Indicates lower menu level. Press the back or left arrow key on 5-Button Navigation
to return to previous screen.


