background image

TTR-08A Electromechanical Tripod Turnstile 

8  INSTALLATION INSTRUCTIONS 

Follow the safety requirements during the installation (see Clause 7.1)  

8.1  Installation details 

Correct turnstile installation provides its functionality and lifetime. Please carefully study 
and follow the installation instructions. 

It is recommended: 

  to mount the turnstile on steady and level concrete (grade 400 or higher), stone or 

similar foundations at least 150mm thick; 

  to level the foundation so that the anchoring points of the turnstile lie in the same 

plane; 

  to apply reinforcing elements (400×400×300mm) for installation on less steady 

foundation (frame foundation, for example). 

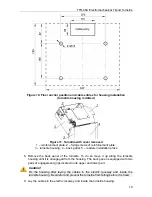
To ensure accurate passage tracking, when the turnstile is operated from an ACS, it is 
recommended to create the passage area in such a way that the barrier arms should turn 
in the direction of movement at the angle no less than 70° (Fig. 9). 


Figure 9. Site preparation. Recommendations 

The turnstile is equipped with the resetting device that operates as follows:  

o

  at the barrier arm turning at the angle of more than 60°±5° the reset is effected in 

the direction of movement and the turn of barrier arm to counter direction is not 
possible (blocking of return passage) ; 

o

  at the barrier arm turning at the angle less than 60°±5° the reset is effected  

in the counter to the movement direction (reset to home position).  

When planning the passage area, it is necessary to arrange additional emergency exit. For 
example, it can be the automatic rotary section BH-02 (Clause 9.4).  

8.2  Installation tools 

  1.2÷1.5 kW hammer drill; 

  Ø16 mm hard-alloyed drill bits; 

  Floor chaser for electric raceway; 

  Flat slot screwdriver No.2; 

 Cross-head 

screwdriver; 

17 

Summary of Contents for TTR-08A

Page 1: ...ASSEMBLY AND OPERATION MANUAL TTR 08A Electromechanical Tripod Turnstile with Automatic Anti Panic Arms...

Page 2: ...Electromechanical Tripod Turnstile with Automatic Anti Panic Arms TTR 08A Assembly and Operation Manual...

Page 3: ...rgency unblocking of the turnstile 15 5 11 Operation contingencies and response 15 6 MARKING AND PACKAGING 16 7 SAFETY REQUIREMENTS 16 7 1 Installation safety requirements 16 7 2 Operation safety requ...

Page 4: ...is designed for managing pedestrian flows at entrance points of industrial facilities banks administrative buildings retail outlets railway terminals airports providing free passageway in emergency s...

Page 5: ...assage mode 30 persons min Passage width 500 mm Arm rotation force max 3 kgf RC panel cable length 6 6 m1 Ingress Protection Rating IP54 EN 60529 Electric shock protection class III IEC 61140 Mean tim...

Page 6: ...ive cable tie mount 3 Nylon cable tie 100 mm 5 Technical documentation Certificate 1 Assembly and operation manual 1 Package Box 1 4 2 Optional equipment supplied on request Turnstile power supply1 1...

Page 7: ...reset and quiet operation are ensured by a damper The optical arm rotation sensors are built into the turnstile housing to ensure accurate count of inputs to an ACS The turnstile is supplied with saf...

Page 8: ...6 hub fastening bolts 7 LED indication side 8 AC power cable1 9 turnstile power supply1 10 emergency unblocking device Fire Alarm 1 11 turnstile power cable1 12 emergency unblocking device cable1 13 R...

Page 9: ...hown in Fig 3 There are three control buttons on the RC front panel intended for setting the turnstile operating modes The LED indicators are located above the buttons The middle button on the RC pane...

Page 10: ...e power supply XT4 Light A and XT5 Light B connector blocks to connect open closed remote indicators one indicator per each direction XT6 AntiPanic connector block to connect the electromagnet of auto...

Page 11: ...cal arm rotation sensors and from the intrusion detector contact Detector and basing on those signals generates commands to the control mechanism and to the external devices indication on the RC PANEL...

Page 12: ...ial inactive state when the power is on the relay contacts PASS A PASS B Ready and Detector are closed voltage is supplied to the relay coil and the Alarm relay contacts are broken voltage is not supp...

Page 13: ...and it does not depend on the input signal duration See Clause 5 10 for the turnstile operation at special Fire Alarm control input The potential control mode is intended for the turnstile operation f...

Page 14: ...reset to home position barrier arms turning at 112 the microcontroller removes the signal PASS A B contacting the PASS A B and Common takes place The Always free operating mode particularity in this m...

Page 15: ...e signal from the intrusion detector comes it is also ignored The intrusion detector status signal is constantly transmitted to the Det Out and Common contacts of the CLB XT1 H connector block Fig 4 T...

Page 16: ...sage delay for more than 30 sec one or both optical arm rotation sensors are out of order A special signal Ready is generated in each of the above cases In case of unauthorized access the Ready signal...

Page 17: ...age Transportation box dimensions L H W 1190 450 420 mm Transportation box weight gross no more than 53 kg 7 SAFETY REQUIREMENTS 7 1 Installation safety requirements The installation should be carried...

Page 18: ...recommended to create the passage area in such a way that the barrier arms should turn in the direction of movement at the angle no less than 70 Fig 9 Figure 9 Site preparation Recommendations The tu...

Page 19: ...ing from the turnstile incorrect installation and no claims from the Customer are accepted if the installation is made without following the instructions of the given Manual The turnstile connection l...

Page 20: ...tallation place 8 Remove the back panel of the turnstile To do so move it up along the turnstile housing until it is unengaged from the housing The back panel is equipped with two pairs of engagement...

Page 21: ...cables in two points to the hole in the turnstile housing horizontal plane using hook and loop cable ties 17 Install the back panel in reversed order 18 Install the reinforcement plate on the turnsti...

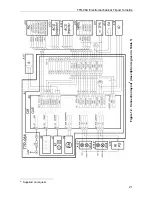
Page 22: ...TTR 08A Electromechanical Tripod Turnstile Figure 12 Connection layout 6 description is given in Table 1 6 Supplied on request 21...

Page 23: ...pply 1 12V 6A A121 WRC kit 1 A131 Access control system 1 A141 Emergency unblocking device Fire Alarm 1 A15 11 A15 21 Remote indicators 2 RI A RI B A161 Remote indicator power supply 1 A171 Siren 1 12...

Page 24: ...dingly After the power up wait until the moment of the test indicator inside the intrusion detector going off from 10 to 50 sec Put your hand before the intrusion detector The continuous signal will s...

Page 25: ...direction of completed passage Free passage in the set direction open for free passage in the chosen direction Press the STOP button and the button corresponding to the chosen passage direction LEFT R...

Page 26: ...d indicator above the STOP button is on The Red cross for each passage direction and Red line pictograms are on The turnstile is locked One of the passage directions is open the turnstile is open for...

Page 27: ...AC mains open the turnstile housing cover Check the power cable serviceability and reliability of its connection to the CLB XT3 connector block The turnstile is not controlled in one of the direction...

Page 28: ...and roller the arm rotation sensors and the damper Fig 14 Caution Avoid the ingress of lubricant on the arm rotation sensor disc and the roller surfaces 8 Remove dust from the arm rotation sensor dis...

Page 29: ...l Support Department the PERCo TSD Figure 14 Location of the interior components of the turnstile mechanism 11 TRANSPORTATION AND STORAGE The turnstile in the original package should be transported in...

Page 30: ...direction B open for passage of one person in the direction B Active front is at the contact Unlock B while there is a high level at the contacts Stop and Unlock A At this command the passage directi...

Page 31: ...age direction B opens until the command Always locked is received the status of the passage direction A does not change at that Free passage open for free passage in both directions Active front is at...

Page 32: ...At this command the direction A opens up to the low level signal removal from the contact A or until the command Both directions locked is received The status of the direction B does not change at tha...

Page 33: ...PERCo Polytechnicheskaya str 4 block 2 194021 Saint Petersburg Russia Tel 7 812 247 04 64 E mail export perco com support perco com www perco com...

Page 34: ...www perco com...
Reviews:

Related manuals for TTR-08A