background image

VisuNet GXP

Mechanical Installation

 2

01

9-

10

3

6

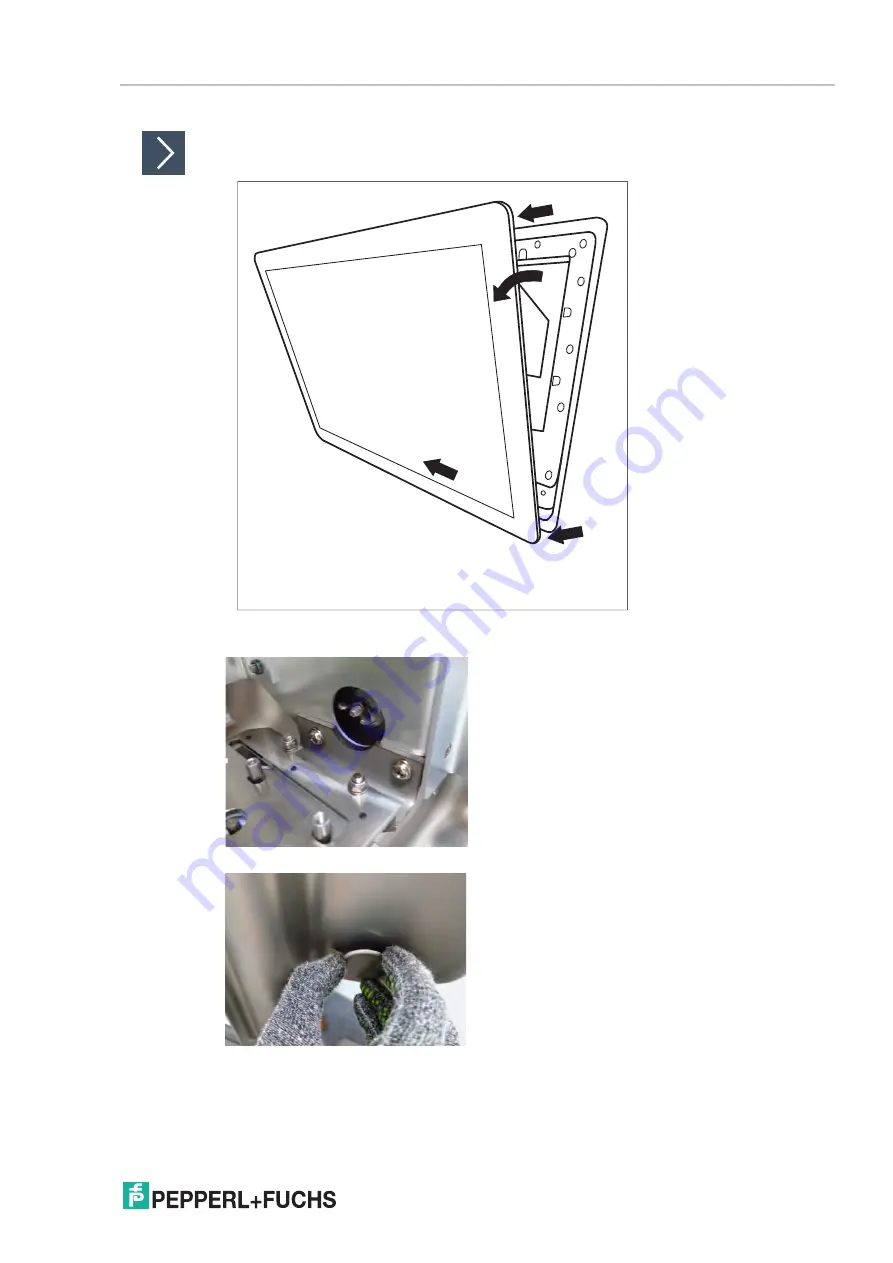
Mounting HOLDER-BRACKET-XX00-IDMx61-B-N to AG-XX00 Housing

1. Open the housing. See chapter 3.3.3

2. Remove the cover plate on the outside right side of the AG-XX00 housing by opening the

wing screw that is located on the inside of the housing.

3. Connect the adapter (included with the holder bracket in delivery) to the bracket with the

enclosed screws.

4. From the inside-right of the AG-XX00 housing, use a hex key to put the first screw (with lock

washer and sealing washer) through one of the drilled holes on the bracket.

1.

1.

2.

3.

VisuNet GXP 

System Installation

Summary of Contents for VisuNet GXP PC-GXP1100-22F

Page 1: ...SYSTEM MANUAL VisuNet GXP RM GXP1100 22F RM GXP1200 22F PC GXP1100 22F PC GXP1200 22F ...

Page 2: ...Industry published by the Central Association of the Electrical Industry Zentralverband Elektrotechnik und Elektroindustrie ZVEI e V in its most recent version as well as the supplementary clause Expanded reservation of proprietorship Worldwide Pepperl Fuchs Group Lilienthalstr 200 68307 Mannheim Germany Telephone 49 621 776 0 Email info de pepperl fuchs com VisuNet GXP ...

Page 3: ...7 3 3 2 Preparing for Pedestal Installation 18 3 3 3 Mounting the Housing onto the Pedestal 22 3 3 4 Installing Cables in the Pedestal 27 3 3 5 Grounding the Housing to the Pedestal 29 3 3 6 Wall Mount Installation 32 3 3 7 Mounting the Keyboard 34 3 3 8 Mounting the IDM Barcode Reader Holder Bracket 35 3 3 9 Cable Installation for IDM Readers and Base Stations 38 3 3 10 Cable Installation for PSC...

Page 4: ...aration of conformity Attestation of conformity Certificates Control drawings Additional documents 1 2 Target Group Personnel Responsibility for planning assembly commissioning operation maintenance and dismounting lies with the plant operator Only appropriately trained and qualified personnel may carry out mounting installation commissioning operation maintenance and dismounting of the product Th...

Page 5: ...follows Informative Symbols Action This symbol indicates a paragraph with instructions You are prompted to perform an action or a sequence of actions Danger This symbol indicates an imminent danger Non observance will result in personal injury or death Warning This symbol indicates a possible fault or danger Non observance may cause personal injury or serious property damage Caution This symbol in...

Page 6: ...t technology they allow connection to host systems in the non Ex area PCU1100 and PCU1200 PC units run an open Microsoft Windows operating system that allows installation of any software including SCADA packages PSU1100 and PSU1200 power supply units provide the above devices with 24 V DC power They are available as DC or wide range AC versions VisuNet GXP components come preassembled in a panel A...

Page 7: ...on a PEDESTAL XX00 pedestal with optional EXTA2 keyboard mouse ordered separately VisuNet GXP Pedestal Mounted with Keyboard Mouse Note For a description of the product model nomenclature see the VisuNet GXP PC or VisuNet GXP RM product datasheets at www pepperl fuchs com For more mounting options and information see the VisuNet Mounting Options datasheet VisuNet GXP Product Description ...

Page 8: ...s 10 IoT Enterprise x64 Supply Power consumption AC 115 230 V AC 0 4 0 7 A 50 60 Hz DC 18 36 V DC 1 5 3 A Indicators operating means Display Type Liquid Crystal Display LCD with LED backlight Screen diagonal 54 61 cm 21 5 inch Resolution 1920 x 1080 pixels Full HD Aspect ratio 16 9 Color depth 24 bit 16 7 M color Contrast 5000 1 typically Brightness 300 cd m2 Reading angle 175 in all directions Li...

Page 9: ...on frequency 2 402 2 48 GHz Directive conformity Electromagnetic compatibility Directive 2014 30 EU EN 61326 1 2013 industrial locations non Bluetooth products only Radio and telecommunication terminal equipment Directive 2014 53 EU EN 301 328 V2 1 1 EN 301 489 1 V2 1 1 EN 301 489 17 V3 1 1 Bluetooth products only RoHS Directive 2011 65 EU RoHS EN 50581 2012 09 Ambient conditions Operating tempera...

Page 10: ... PSU AC appx 18 kg Dimensions Panel with DC 625 mm x 459 mm x 120 mm Panel with AC 625 mm x 459 mm x 137 mm Panel with system housing 625 mm x 459 mm x 173 mm Panel cut out 583 mm x 417 mm installation surface Data for application in connection with hazardous areas EU type examination certificate BVS 17 ATEX E 036 X Directive conformity Directive 2014 34 EU EN 60079 0 2012 A11 2013 EN 60079 5 2015...

Page 11: ...1200 J2 Personal Computer Units PCU1100 and PCU1200 Peripherals such as keyboards or barcode readers ATEX RM GXP1100 J1 PC GXP1100 J1 II 2G Ex eb q ib ib IIC T4 IP66 Gb II 2D Ex tb ib IIIC T85 C IP66 Db RM GXP1200 J2 PC GXP1200 J2 II 3G Ex ec ib q IIC T4 IP66 Gc II 3D Ex tc ib IIIC T85 C IP66 Dc IECEx RM GXP1100 J1 PC GXP1100 J1 Ex eb q ib ib IIC T4 IP66 Gb Ex tb ib IIIC T85 C IP66 Db RM GXP1200 J...

Page 12: ...G mounting version 1 Arm for mounting to AG XX00 housing Note For more options and information refer to the VisuNet GXP Mounting Options datasheet 1 Shown with PEDESTAL XX00 124 3 304 TRN N0 2 Shown with PEDESTAL XX00 124 4 304 TRN N0 625 451 1687 400 173 1236 ø 165 104 154 214 45 400 104 154 204 45 1 2 263 4 5 9 173 4 5 9 Note EXTA2 keyboard and PEDESTAL XX00 pedestal must be ordered separately V...

Page 13: ...ing with additional WALL BRACKET XX00 3 304 N0 and EXTA2 keyboard inside an F housing with G mounting version 1 Arm for mounting to AG XX00 housing 256 450 635 582 8 625 451 VisuNet GXP Dimensions 175 260 310 46 130 284 300 8 218 8 6 12 11 8 2 3 22 8 23 9 ø 14 ø 14 104 4 113 8 150 260 19 Wall Mount Hole Pattern ...

Page 14: ...3 3 1 Mechanical Installation Unpacking The VisuNet GXP comes with its core components preassembled These components consist of a display unit DPU power supply unit PSU and thin client unit TCU or PC unit PCU If the housing option is chosen the components come pre mounted into the housing Warning Risk of injury Handling the VisuNet GXP components without gloves may cut fingers hands or wrists Wear...

Page 15: ... GXP components may become scratched or damaged if they are placed onto or slid across hard surfaces Warning Danger resulting from scratched DPU screen Scratches in the DPU screen weaken the glass structure This may result in glass breakage in the event of an explosion Explosion protection is no longer ensured if a DPU with a scratched screen is used NEVER use a DPU with a scratched screen in a ha...

Page 16: ...gnition Only use cables and connection lines which are suitable to be used within a temperature rating of 80 C if the system components are used within an ambient operating temperature of Ta 40 C Note Refer to the manuals of the individual VisuNet GXP components for more information on electrical installation and wiring Danger Explosion hazard from wrong or missing grounding Wrong or missing groun...

Page 17: ... system Included with Delivery Pre assembled VisuNet PC or RM GXP panel pre mounted into AG XX00 housing when H1 option is selected 2 x protective tubes Screws for housing Items Ordered Separately Pedestal that is compatible with AG XX00 housing StandardLine or BasicLine pedestal Optional EXTA2 keyboard Warning Risk of injury Lifting the device on your own may lead to injury Do not attempt to lift...

Page 18: ...destal is shipped with a pre installed rotating coupling with four bolts and a PE wire which is attached to the pedestal tube Figure 3 4 Pedestal with optional 3 or 4 cable glands Figure 3 5 Pedestal with PE wire 1 PEDESTAL XX00 124 3 304 TRN N0 with 3 cable glands 2 PEDESTAL XX00 124 4 304 TRN N0 with 4 cable glands 1 PE wire 104 154 214 45 104 154 204 45 1 2 263 1 VisuNet GXP System Installation...

Page 19: ...nection to the Housing 1 Align the pedestal so that the cable glands point away from you 2 The pedestal must be firmly screwed to the floor 3 Bend the PE wire with a max radius of 20 mm and place it within the pedestal tube 4 Place the O ring and sealant into the channel of the coupling VisuNet GXP System Installation ...

Page 20: ...VisuNet GXP Mechanical Installation 2019 10 20 VisuNet GXP System Installation Adjusting the Rotation of the Coupling 1 Loosen the worm screws in the inner ring with a hexagon socket wrench ...

Page 21: ...hanical Installation 2 Use an appropriate tool to open the locking ring 3 Adjust the ease of rotation for your application 4 Tighten the worm screws in the inner ring with a hexagon socket wrench VisuNet GXP System Installation ...

Page 22: ...ves Loctite Threadlocker Blue 243 Warning Risk of injury Lifting the device on your own may lead to injury Do not attempt to lift the device on your own Use a crane or get another person to help you Warning Risk of injury While the device is resting on the pedestal and the nuts have not yet been fixed to the screws the device may tip over and fall off the pedestal become damaged and cause injury M...

Page 23: ...isplay bezel until the display extends away from the housing 6 Slide the display panel about 8 mm to the left to lock the panel mechanism that secures the display This will allow you to open the housing quickly and safely after it has been secured to the top of the pedestal and will prevent the outer seal from being clamped Figure 3 7 Housing prepared for mounting onto pedestal 7 Using a crane or ...

Page 24: ...come damaged if it gets stuck between the pedestal and the housing Bend the PE wire in such a way that it does not get stuck between the pedestal and the housing Opening the AG XX00 Housing 1 Holding the edges of the DPU slowly and evenly pull the DPU away from the housing 2 Slide the DPU about 8 mm to the left 3 Slowly lower the DPU 1 1 2 3 VisuNet GXP System Installation ...

Page 25: ...est at its fully opened position hanging down at an angle from taut cables Make sure to follow the steps as describe otherwise there is a high risk of damaging the gasket 10 Tigthen the M6 U washers onto the pedestal bolts using a torque of 7 5 Nm Note Optional Secure the nuts with a medium strength bolt adhesive such as Loctite Threadlocker Blue 243 VisuNet GXP System Installation ...

Page 26: ...s should be torque controlled if a torque is specified Cable Gland and Opening Overview Warning Pinched cables Ensure that cables do not get pinched or damaged during installation Note Refer to the manuals of the individual components for information on electrical installation and wiring Pedestal with Four Cable Glands 1 M20 2 M16 3 M16 4 M16 1 2 3 4 VisuNet GXP System Installation ...

Page 27: ...bles and openings are required i e power and Ethernet remove the appropriate number of cable glands at the bottom of the pedestal Pedestal with Three Cable Glands 1 M20 2 M16 3 M16 Opening Size Wrench Size Cable Diameter Torque M20 24 mm 7 12 mm 10 Nm M16 20 mm 3 7 mm 5 Nm M16 20 mm 6 10 mm 5 Nm 1 2 3 VisuNet GXP System Installation ...

Page 28: ... They will be tightened in a later installation step 3 Route the cables through the cable glands up through the pedestal tube and out through the top of the pedestal 4 Pull the cable through the pedestal so that 50 cm of the cable is hanging out of the top of the pedestal 5 Repeat the preceding steps for each cable that must be routed through the pedestal The pedestal is now ready for connection V...

Page 29: ... the same configuration Tighten the PE hardware to 7 5 Nm Figure 3 8 Factory assembled ground connections to the housing Warning Connection to the PE studs Connection to the PE studs is mandatory Warning Operator responsibility to verify grounding path Check the grounding path after completing system installation Warning Risk of personal injury and equipment damage Pinched PE wire Ensure that the ...

Page 30: ...erty damage from inadequate grounding If you do not ground the device correctly this could result in potential equalization currents These currents could hurt operating personnel or cause property damage Ground the device via the grounding bolt Optionally ground the device additionally via the terminal X1 1 When both are used ensure that a correct potential equalization is guaranteed at all times ...

Page 31: ...ncept Housing PE stud hexagon socket Contact washer Nut Cable lug Flat washer Spring washer Nut 1 2 3 4 5 6 7 8 Note For more information on installing the input power and output power cables refer to the VisuNet GXP PSU manuals VisuNet GXP System Installation ...

Page 32: ...sing H1 housing Wall bracket adapter for wall mounting installation compatible with AG XX00 housing Optional EXTA2 keyboard mouse Required Installation Tools 8 mm socket wrench for attaching PE hardware and housing screws Safety gloves Loctite Threadlocker Blue 243 Warning Proper installation on the wall It is the installer s responsibility to select a suitable location with sufficient strength to...

Page 33: ...te cables through the cable glands in the wall bracket A cable tie socket could be used to attach the cables Cables can be routed from the top through the cutout in the wall bracket or from the bottom 6 Close the housing See chapter 3 3 11 Figure 3 10 Bottom view of wall bracket Note Always consider the allowed bending radii See the VisuNet GXP TCU PCU manual for information about wiring the TCU P...

Page 34: ... 4 mm hex wrench for keyboard arm Loctite Threadlocker Blue 243 All tools should be torque controlled if a torque is specified Mounting the EXTA2 G Keyboard to Housing AG XX00 1 Open and remove the four cover plate screws on the bottom left side of the AG XX00 hous ing 2 Route the keyboard cable with the protective tube through the hole of the AG XX00 housing 3 Using the screws and lock washers de...

Page 35: ...ing Barcode reader holder bracket screws included Required Installation Tools Size 8 socket wrench for housing screws 3 mm hex wrench for scanner holder screws All tools should be torque controlled if a torque is specified Figure 3 11 HOLDER BRACKET XX00 IDMx61 B N 548267 screws and adapter included Note Secure the screws with a medium strength bolt adhesive such as Loctite Threadlocker Blue 243 R...

Page 36: ... AG XX00 housing by opening the wing screw that is located on the inside of the housing 3 Connect the adapter included with the holder bracket in delivery to the bracket with the enclosed screws 4 From the inside right of the AG XX00 housing use a hex key to put the first screw with lock washer and sealing washer through one of the drilled holes on the bracket 1 1 2 3 VisuNet GXP System Installati...

Page 37: ...ey to put the second screw with lock washer and sealing washer through the other drilled hole on the bracket Fasten the screw using a torque of 6 Nm The holder bracket is now attached to the housing VisuNet GXP System Installation Follow the same steps to mount HOLDER BRACKET XX00 IDMx61 B N 548396 This bracket holds the IDM base station Figure 3 12 HOLDER BRACKET XX00 IDMx61 B N screws and adapte...

Page 38: ... XX00 housing Required Components CBL IDMx60 D cable Required Installation Tools Flat head screwdriver 19 mm socket wrench for counter nut and connector Cable tie All tools should be torque controlled if a torque is specified Installing CBL IDMx60 D 1 Open the housing See chapter 3 3 3 2 Remove the plug at the bottom right side of the housing by holding the screw steady from below with a screwdriv...

Page 39: ...e end of the cable 5 Pull the socket into the housing and tighten it with the M16 counter nut Tighten the nut with a torque of 5 Nm 6 Protect the cable from mechanical damage by fastening it with a cable tie 7 Route the cable through the cable gland on the TCU PCU Install the wire ends per the tables below VisuNet GXP System Installation ...

Page 40: ...e Terminal Signal Name Direction Assignment Color coding Pin M12 connector Xx 1 Vcc Supply Vcc green 1 Xx 2 GND Supply GND brown 3 Xx 3 Xx 4 Xx 5 Xx 6 RxD I TxD white 4 Xx 7 Xx 8 TCU Cable Terminal Signal Name Direction Assignment Color coding Pin M12 connector Xx 1 Us Supply Vcc green 1 Xx 2 RxD I TxD white 4 Xx 3 Xx 4 Xx 5 GND Supply GND brown 3 Xx 6 Xx 7 Xx 8 Note For detailed information on el...

Page 41: ...d Components DATL PSCAN D XX00 N0 cable Required Installation Tools Flat head screwdriver 19 mm socket wrench for counter nut and connector Cable tie All tools should be torque controlled if a torque is specified Installing DATL PSCAN D XX00 N0 1 Open the housing See chapter 3 3 3 2 Remove the plug at the bottom right side of the housing by holding the screw steady from below with a screwdriver wh...

Page 42: ...he end of the cable 5 Pull the socket into the housing and tighten it with the M16 counter nut Tighten the nut with a torque of 5 Nm 6 Protect the cable from mechanical damage by fastening it with a cable tie 7 Route the cable through the cable gland on the TCU PCU Install the wire ends per the table below VisuNet GXP System Installation ...

Page 43: ...oded Match the coding on the plug and socket before tightening TCU Cable Terminal Signal Assignment Color coding Pin M12 connector Name Direction Xx 1 Us Supply Us yellow 4 Xx 2 GND Supply GND brown gray 1 5 Xx 3 Xx 4 TxD O RxD green 3 Xx 5 Xx 6 RxD I TxD white 2 Xx 7 Xx 8 Note For detailed information on electrical installation refer to the TCU PCU and PSCAN D barcode reader manuals Coded Plug an...

Page 44: ...r frame of the housing 3 Slowly and evenly push both lower corners of the DPU into the housing Warning Risk of injury Fingers can be inured when the display is moved backed into the housing Wear protective gloves and hold the display panel by the frame when moving it Warning Risk of cable damage The cables may become damaged during the closing process Properly fasten all cables place them in a pro...

Page 45: ...housing together at the top end of the system From the back of the housing place one screw in the hole at the upper left corner and one screw in the hole at the upper right corner of the housing 5 Tighten the two screws with a torque of 6 Nm 6 Repeat the previous step with all other screws following a diagonal pattern VisuNet GXP System Installation ...

Page 46: ...emove all 10 screws from the back of the TCU PCU and take it off of the DPU 2 Warning Danger of Explosion An ignition may be triggered if the TCU PCU is still energized when its terminal compartment is opened Turn off the TCU PCU and wait 3 minutes after de energizing before opening the terminal compartment 1 2 VisuNet GXP System Installation Warning Risk of Injury Lifting the device on your own m...

Page 47: ...sing take the cables out of the carabiners and remove the 4 screws that hold the angle brackets to the DPU 1 Remove the DPU from the housing 2 1 Use a torque of 4 Nm for tightening the PE hardware during the DPU reassembly process when these steps are performed in reverse order 2 1 VisuNet GXP System Installation 2 To simplify replacement of the DPU temporarily hold the TCU PCU in place using cabl...

Page 48: ...ity to select a suitable location with sufficient strength to hold the equipment It is the installer s responsibility to select the proper screws based on the installation conditions VisuNet GXP System Installation 5 Remove the two brackets 1 and the 10 bolts at the top sides and bottom of the DPU 2 Remove the carabiners 3 from their brackets take out the 6 bracket screws 4 and remove the carabine...

Page 49: ...r panel mount brackets Loctite Threadlocker Blue 243 All tools should be torque controlled if a torque is specified If the Panel Mount Option S1 is chosen you will receive a pre assembled package consisting of a DPU a TCU PCU and a PSU The kit for panel mounting can be ordered separately For ordering details see chapter 4 1 Panel Mounting the GXP 1 Mount the first L shaped bracket to the back of t...

Page 50: ...el in the cabinet cutout hole 1 and move it to an upright vertical position 2 3 From inside the cabinet add the stiffener frame position it 1 3 and press it against the back of the cabinet wall 1 Cabinet wall back 2 Stiffener frame 1 2 3 2 1 1 2 1 VisuNet GXP System Installation ...

Page 51: ...ket to the display unit housing 1 then affix both L shaped brackets with all screws to the stiffener frame 2 6 Tighten all screws in a criss cross pattern using 1 8 Nm torque for the 14 x M5 x 25 socket head cap screws and 4 Nm for the 10 x M5 lock nuts 1 2 VisuNet GXP System Installation Ground the device as shown below Panel Mount Grounding ...

Page 52: ...ecessed into the installation surface This mounting must be done from the back of the housing and the fitting is kept inside the surface of the wall The cutout dimensions and stud location must match those on the GXP exactly Figure 3 16 VisuNet GXP flush mounted Note For more options and accessories contact your local Pepperl Fuchs sales representative VisuNet GXP System Installation ...

Page 53: ...onfiguration EXTA2 product family Keyboard and mouse system Mounting options for Zone 1 21 hazardous locations Contact sales for model selection IDM160 D 1D J1 Corded 1 D and 2 D handheld reader for Zone 1 21 Contact sales for model selection IDMx61 M Bluetooth 1 D and 2 D handheld reader for Zone 1 21 548333 CBL IDMx60 D J1 S S18 N0 Cable for connecting IDMx60 D barcode readers to the VisuNet GXP...

Page 54: ...www pepperl fuchs com Pepperl Fuchs Subject to modifications Printed in Germany 2019 10 TDOCT 5482AENG Pepperl Fuchs Quality Download our latest policy here www pepperl fuchs com quality ...

Reviews: